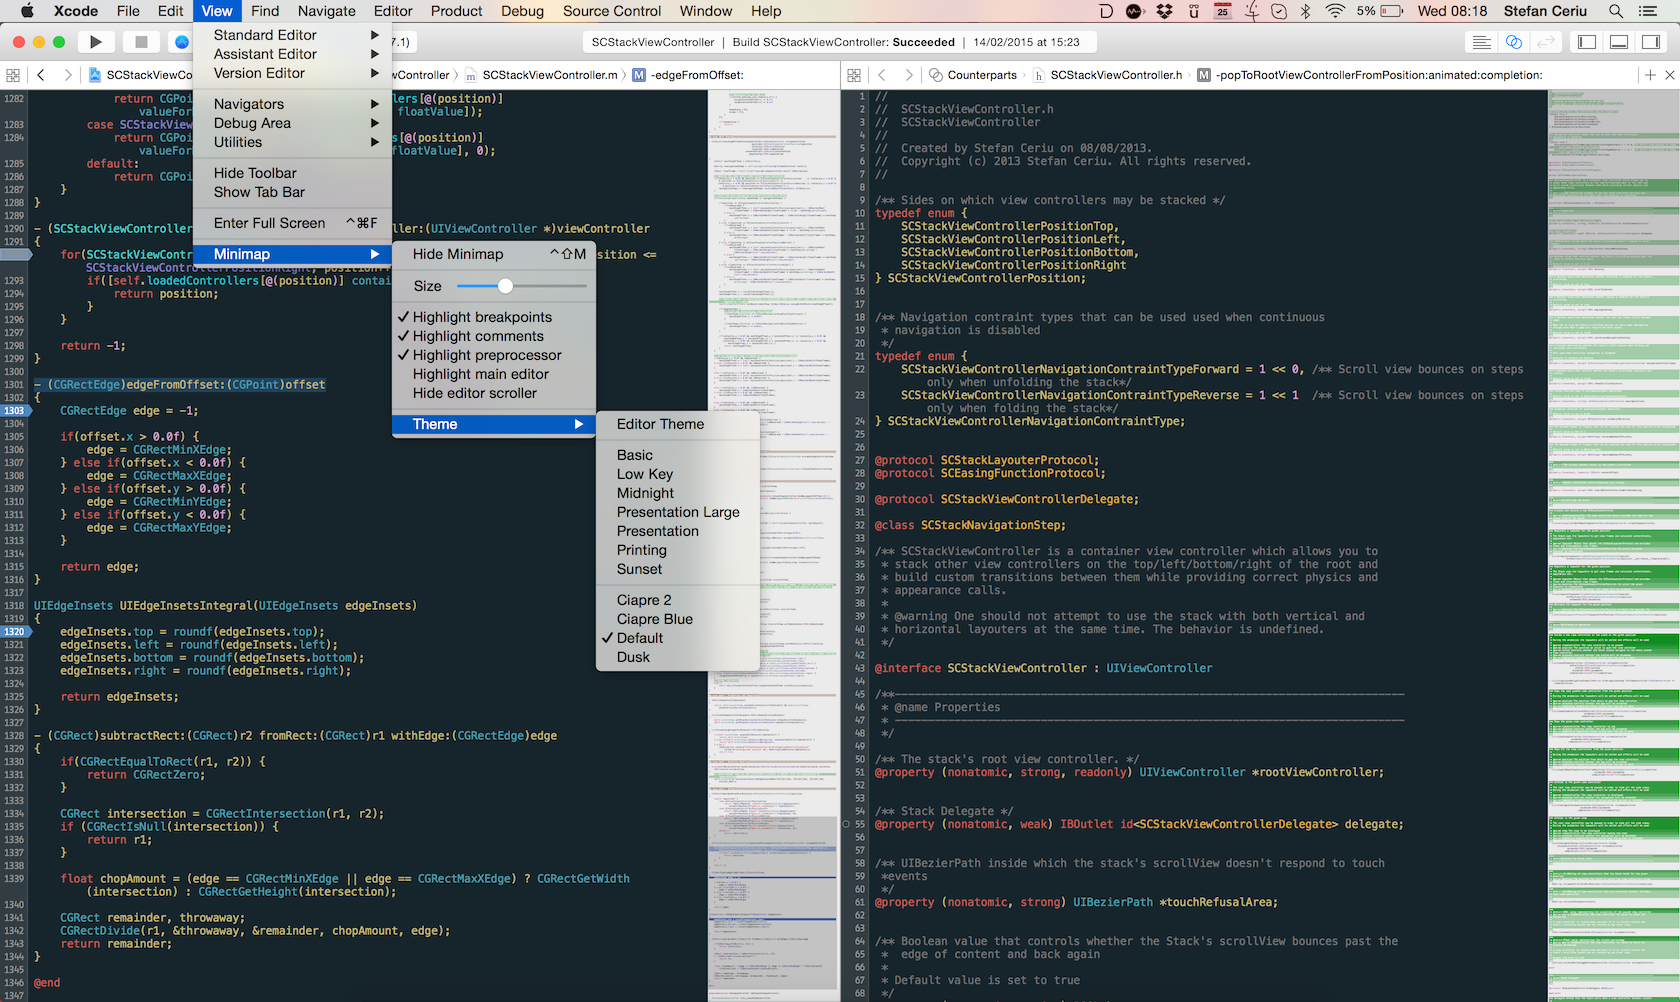
How to convert your Xcode plugins to Xcode extensions
Issue #267
Original post https://medium.freecodecamp.org/how-to-convert-your-xcode-plugins-to-xcode-extensions-ac90f32ae0e3
Xcode is an indispensable IDE for iOS and macOS developers. From the early days, the ability to build and install custom plugins had given us a huge boost in productivity. It was not long before Apple introduced Xcode extension due to privacy concerns.
I have built a few Xcode plugins and extensions like XcodeWay, XcodeColorSense, XcodeColorSense2, and Xmas. It was a rewarding experience. I learned a lot, and the productivity I gained was considerable. In this post I walkthrough how I converted my Xcode plugins to extensions, and the experience I had in doing so.
My first Xcode plugin: XcodeWay
I choose a lazy person to do a hard job. Because a lazy person will find an easy way to do it
I really like the above quote from Bill Gates. I try to avoid repetitive and boring tasks. Whenever I find myself doing the same tasks again, I write scripts and tools to automate that. Doing this takes some time, but I will be a bit lazier in the near future.
Besides the interest in building open source frameworks and tools, I like to extend the IDE I’m using — mostly Xcode.
I first started iOS development in 2014. I wanted a quick way to navigate to many places right from Xcode with the context of the current project. There are many times we want to:
open the current project folder in “Finder” to change some files
open Terminal to run some commands
open the current file in GitHub to quickly give the link to a workmate
or to open other folders like themes, plugins, code snippets, device logs.
Every little bit of time we save each day counts.
I thought it would be cool idea to write an Xcode plugin that we can do all above things right inside Xcode. Instead of waiting for other people to do it, I pulled up my sleeve and wrote my first Xcode plugin — XcodeWay— and shared it as open source.
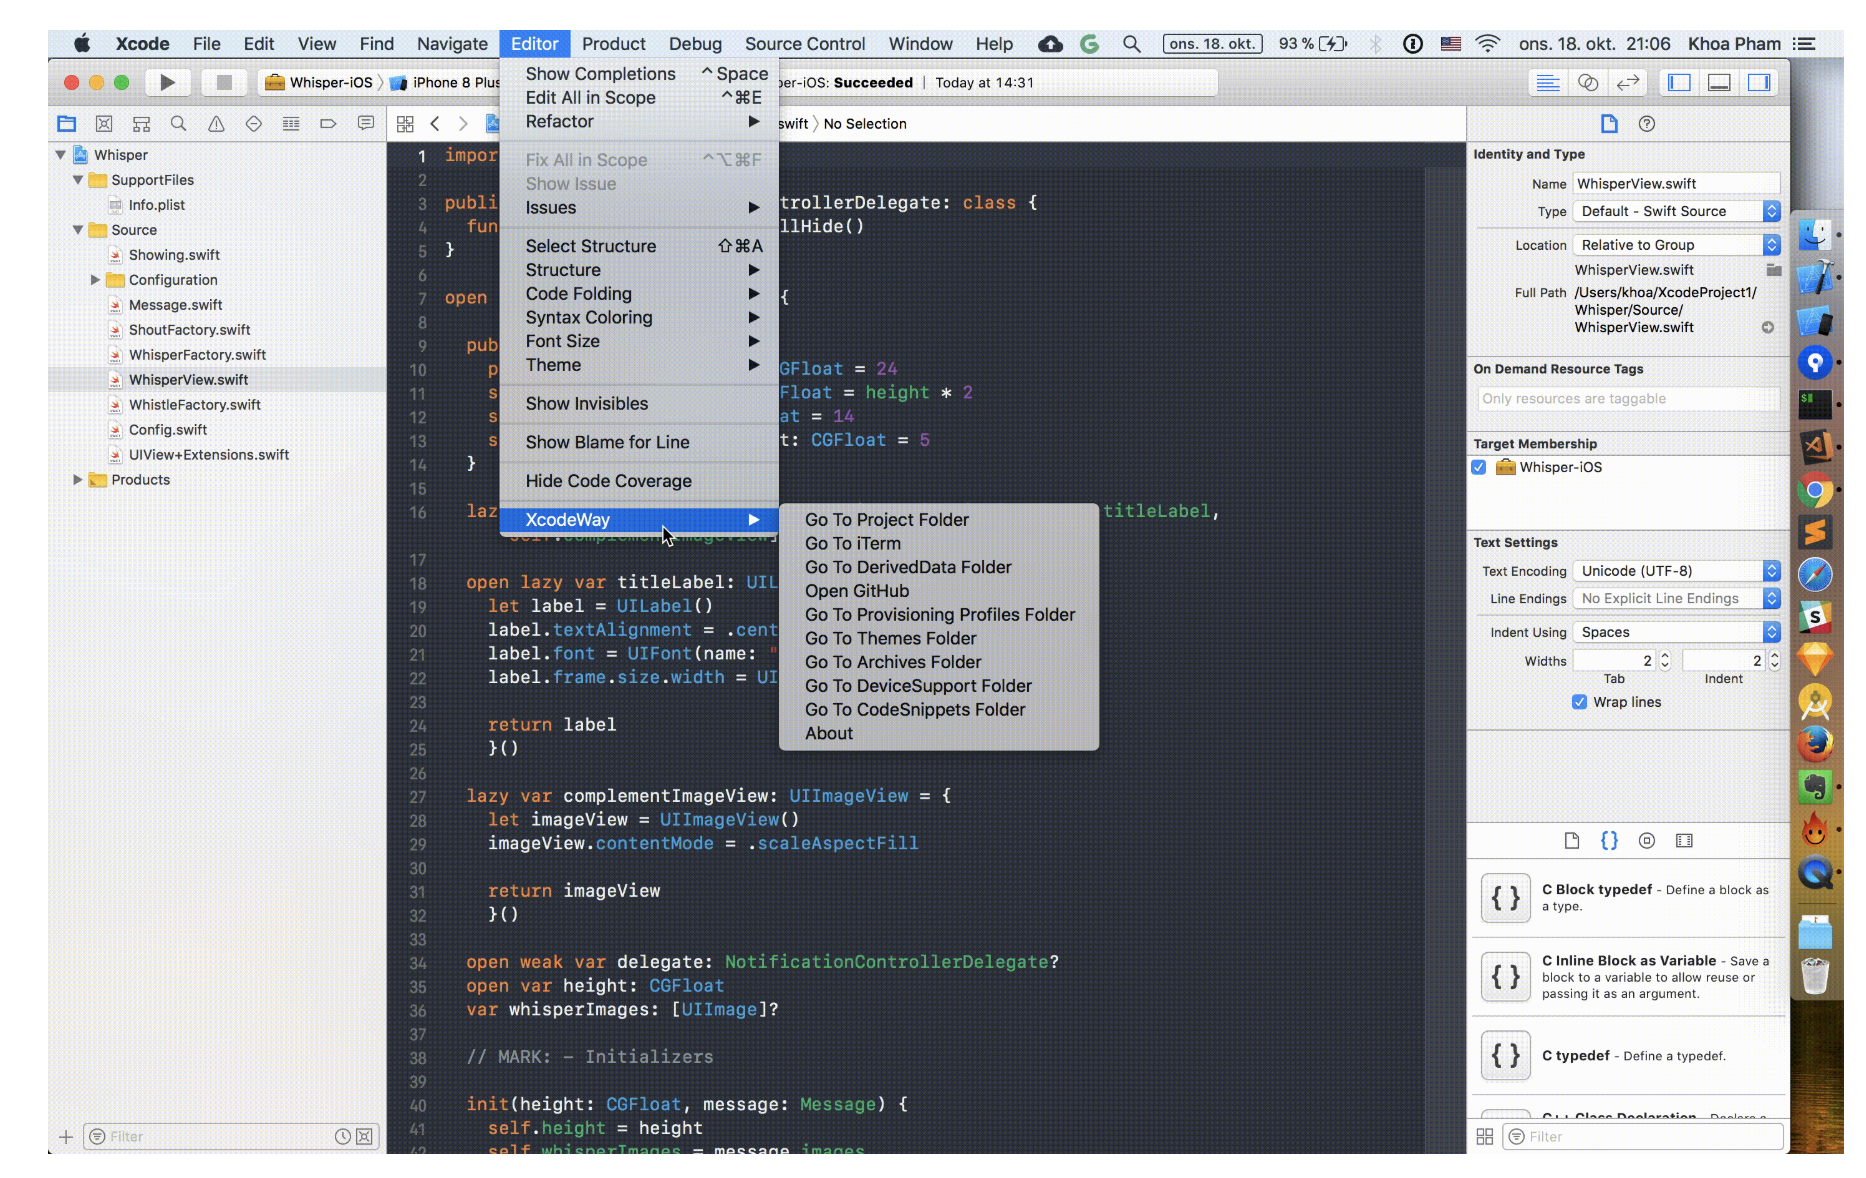 XcodeWay works by creating a menu under Editor with lots of options to navigate to other places right from Xcode. It looks simple but there was some hard work required.
What are Xcode plugins?
Xcode plugins are not officially supported by Xcode or recommended by Apple. There are no documents about them. The best places we can learn about them are via existing plugins’ source code and a few tutorials.
An Xcode plugin is just a bundle of type xcplugin and is placed at ~/Library/Application Support/Developer/Shared/Xcode/Plug-ins . Xcode, when starting, will load any Xcode plugins present in this folder. Plugins are run in the same process as Xcode, so could do anything as Xcode. A bug in any plugin can cause Xcode to crash.
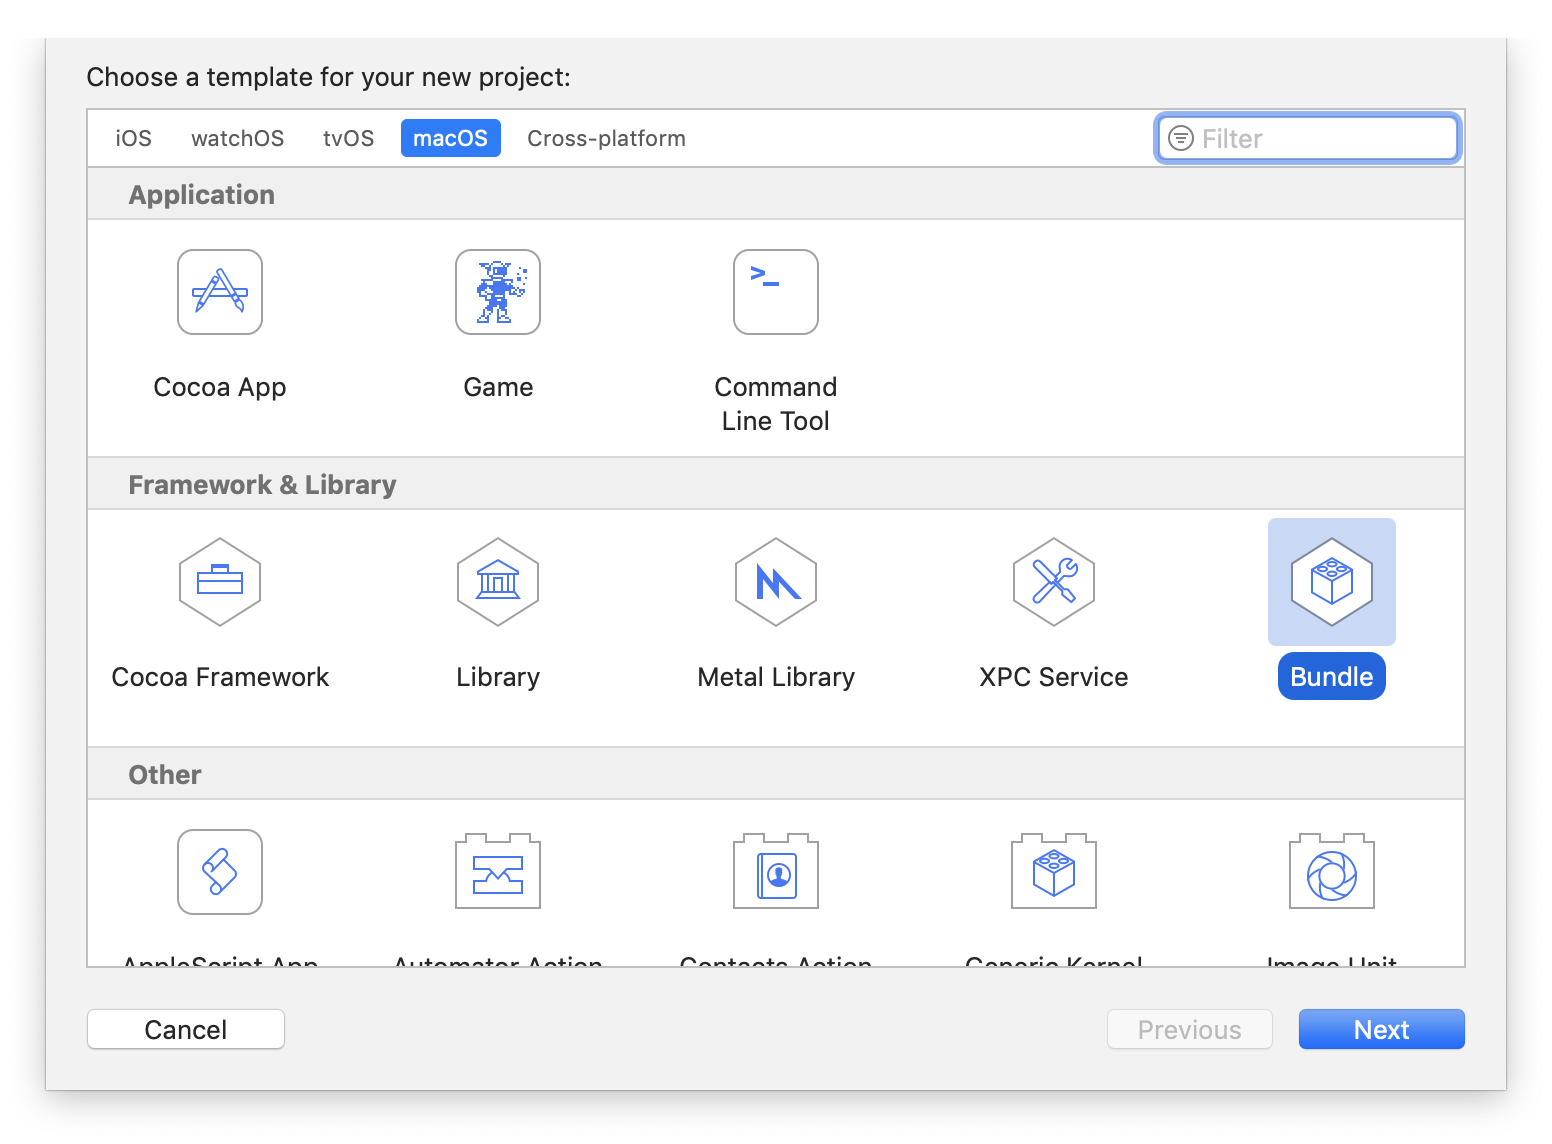
To make an Xcode plugin, create a macOS Bundle with one class that extends from NSObject , and have an initialiser that accepts NSBundle , for example in Xmas:
class Xmas: NSObject {

  var bundle: NSBundle

  init(bundle: NSBundle) {
    self.bundle = bundle
    super.init()
  }
}
Inside Info.plist, we need to:
declare this class as the main entry class for the plugin, and
that this bundle has no UI, because we create UI controls and add to the Xcode interface during runtime
NSPrincipalClass
Xmas
XCPluginHasUI
Another problem with Xcode plugins is that we have to continuously update DVTPluginCompatibilityUUIDs . This changes every time a new version of Xcode comes out. Without updating, Xcode will refuse to load the plugin.
What Xcode plugins can do
Many developers build Xcode plugins because they miss specific features found in other IDEs like Sublime Text, AppCode, or Atom.
Since Xcode plugins are loaded in the same process as Xcode, they can do everything that Xcode can. The only limit is our imagination. We can leverage Objective C Runtime to discover private frameworks and functions. Then LLDB and Symbolic breakpoint can be used further to inspect running code and alter their behaviors. We can also use swizzling to change implementation of any running code. Writing Xcode plugins is hard — lots of guessing, and sometimes a good knowledge of assembly is required.
In the golden age of plugins, there was a popular plugin manager, which itself was a plugin, called Alcatraz. It could install other plugins, which basically just downloads the xcplugin file and moves this to the Plug Ins folder.
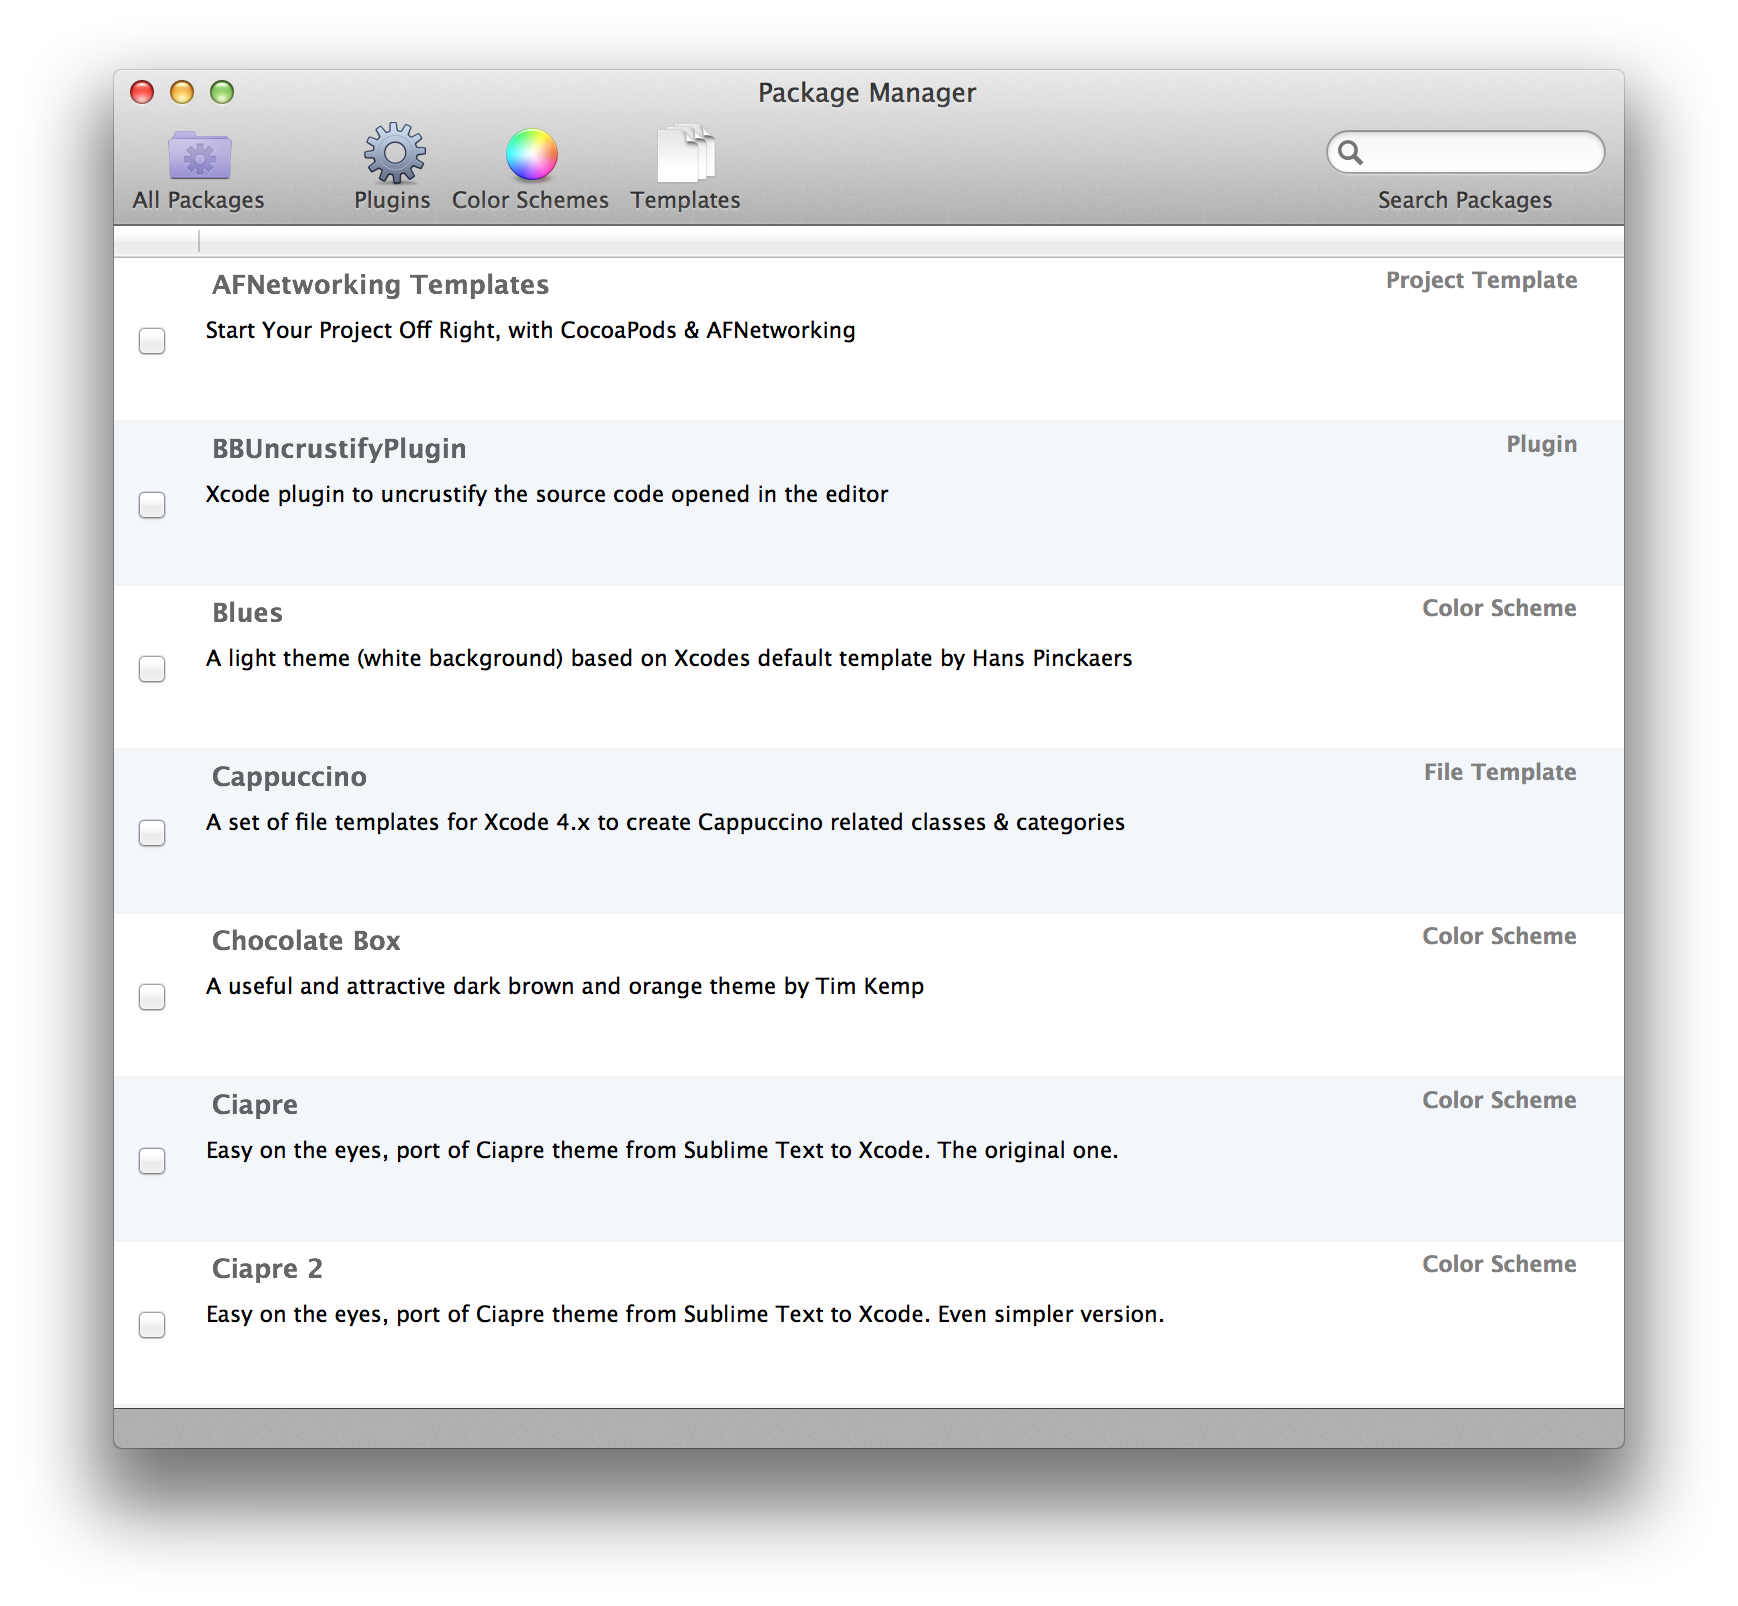
To get a sense of what plugins can do, let’s take a look at some popular plugins.
Xvim
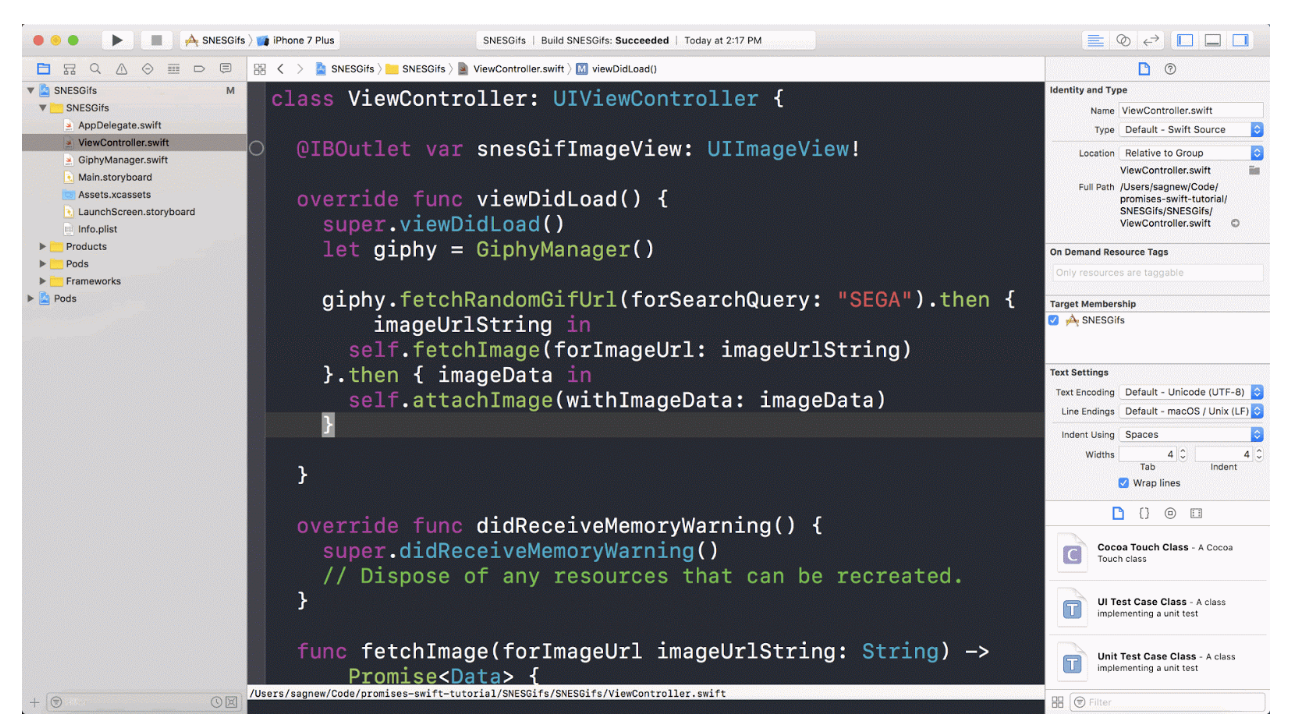
First in the list is Xvim, which adds Vim keybindings right inside Xcode. It supports mostly all of the keybindings that we used to have in Terminal.
SCXcodeMiniMap
If you miss MiniMap mode in Sublime Text, you can use SCXcodeMiniMap to add a right map panel inside Xcode editor.
FuzzyAutocompletePlugin
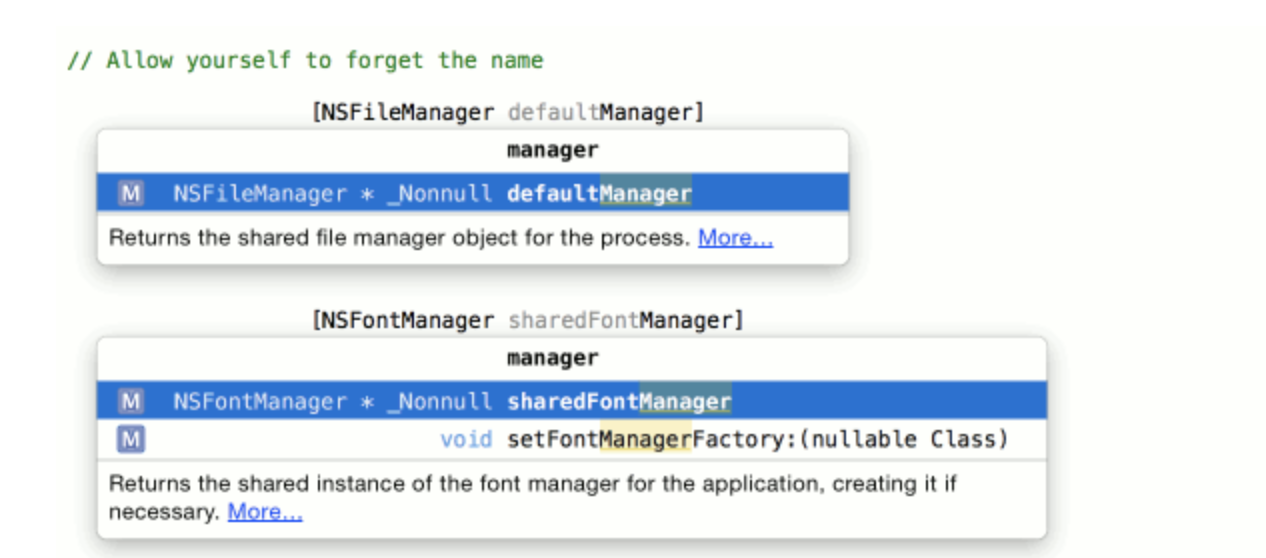
Before version 9, Xcode didn’t have proper auto completion — it was just based on prefix. That was where FuzzyAutocompletePlugin shone. It performs fuzzy auto completion based on the hidden IDEOpenQuicklyPattern feature in Xcode.
KSImageNamed-Xcode
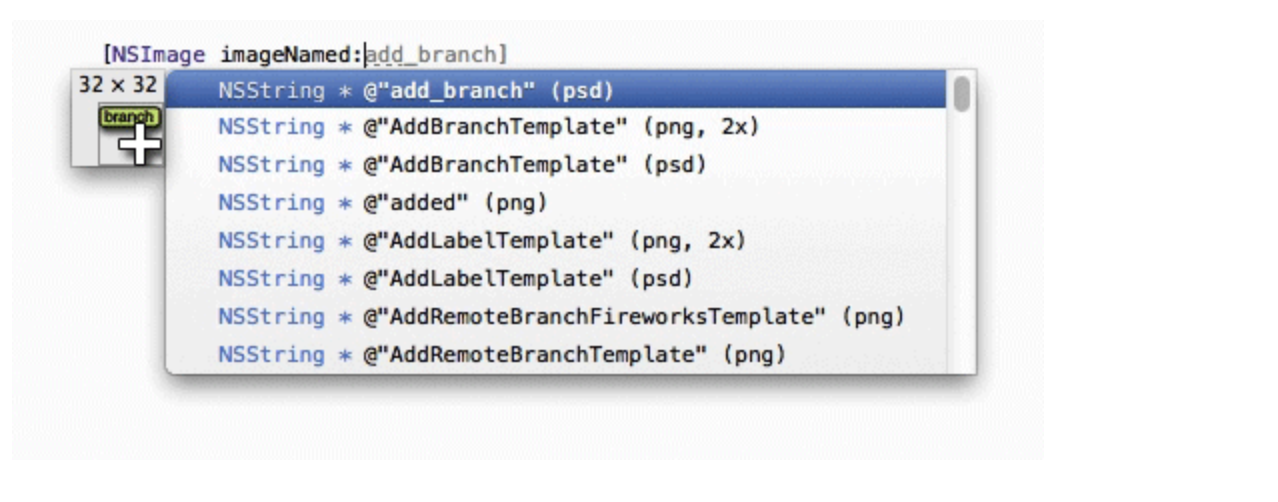
To display a bundle image inside UIImageView, we often use the imageNamed method. But remembering exactly the name of the image file is hard. KSImageNamed-Xcode is here to help. You will get a list of auto-suggested image names when you begin to type.
ColorSense-for-Xcode
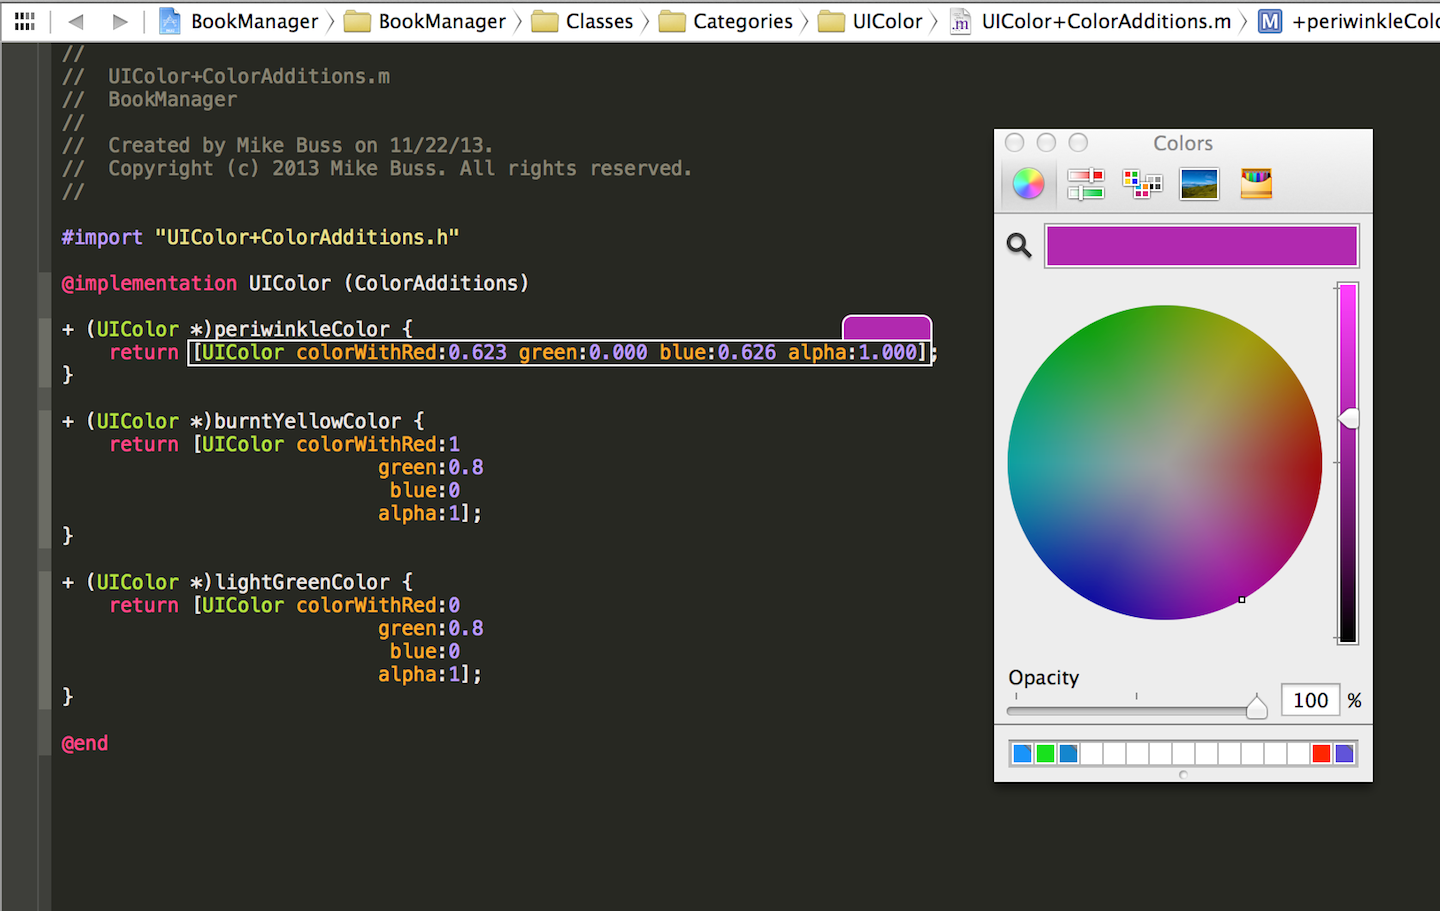
Another itch during development is to work with UIColor , which uses RGBA color space. We don’t get a visual indicator of the color that we specify, and manually performing checking can be time consuming. Luckily there is ColorSense-for-Xcode which shows the color being used and the color picker panel to easily select the right color.
LinkedConsole
In AppCode, we can jump to a specific line in the file that is logged inside the console. If you miss this feature in Xcode, you can use LinkedConsole. This enables clickable links inside Xcode console so we can jump to that file instantly.
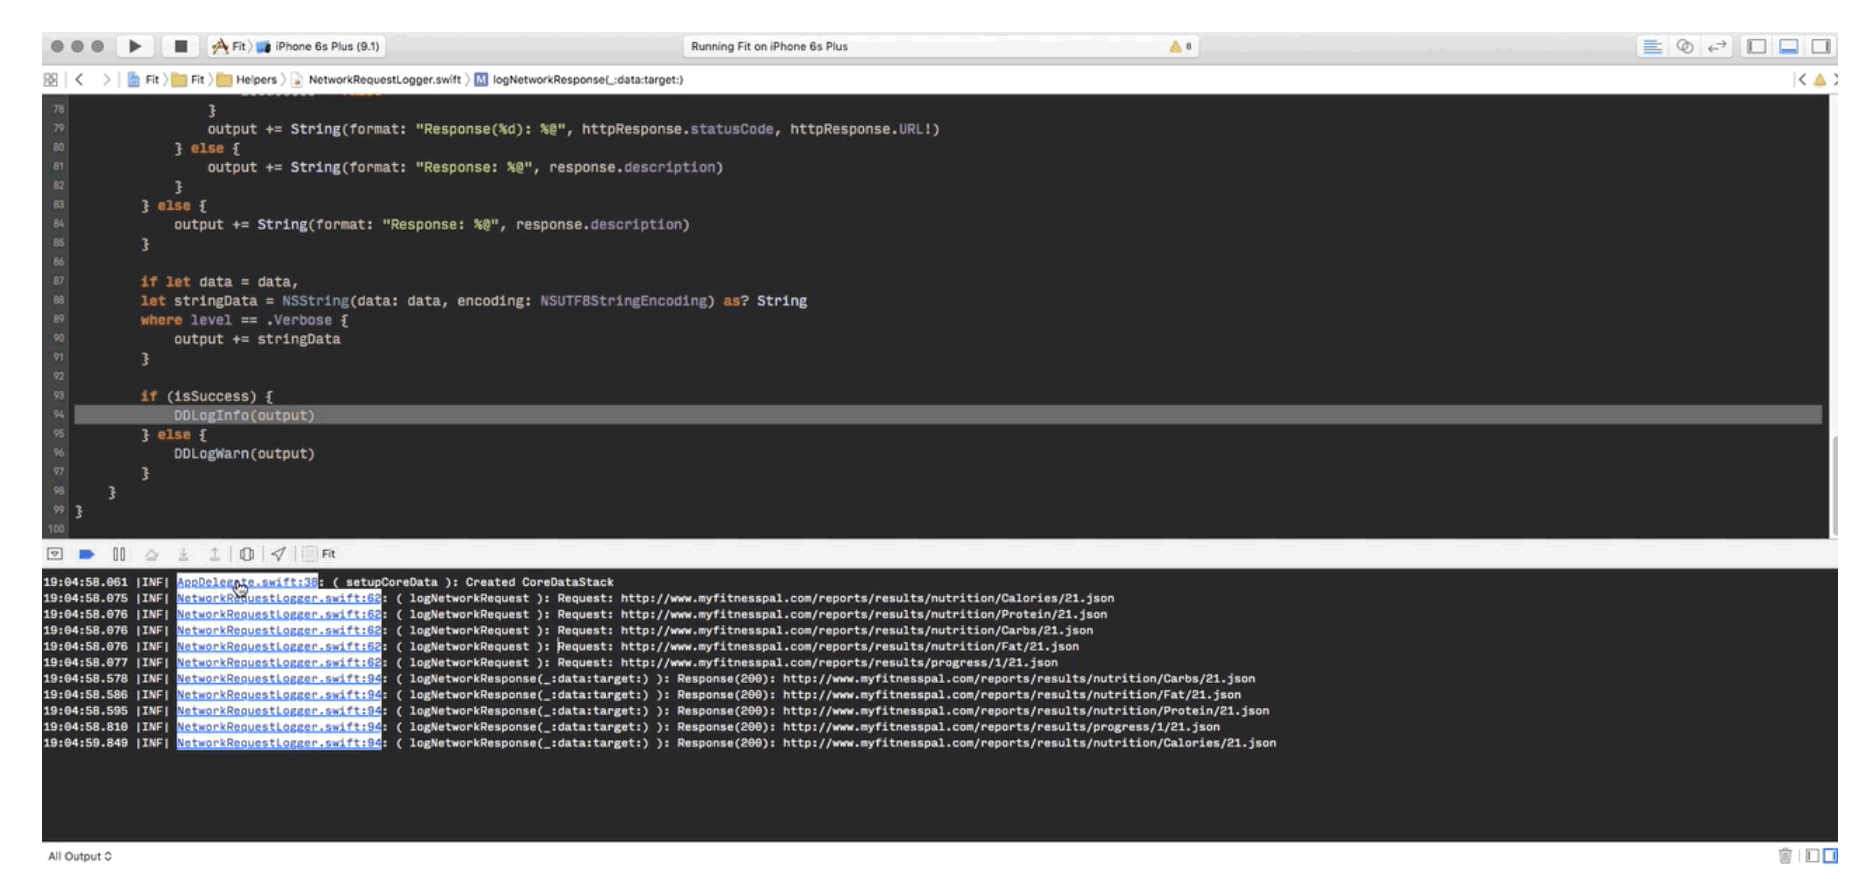
The hard work behind Xcode plugins
Making an Xcode plugin is not easy. Not only do we need to know macOS programming, but we also need to dive deep into Xcode view hierarchy. We need to explore private frameworks and APIs in order to inject the feature we want.
There are very few tutorials on how to make plugins but, luckily, most plugins are open source so we can understand how they work. Since I have made a few plugins, I can give some technical details about them.
Xcode plugins are done usually with two private frameworks: DVTKit and IDEKit . System frameworks are at /System/Library/PrivateFrameworks but the frameworks that Xcode uses exclusively are under /Applications/Xcode.app/Contents/ , there you can find Frameworks , OtherFrameworks and SharedFrameworks.
There is a tool class-dump that can generate headers from the Xcode app bundle. With the class names and methods, you can call NSClassFromString to get the class from the name.
Swizzling DVTBezelAlertPanel framework in Xmas
Christmas has always given me a special feeling, so I decided to make Xmas, which shows a random Christmas picture instead of the default alert view. The class used to render that view is DVTBezelAlertPanel inside the DVTKit framework. My article on building that plugin is here.
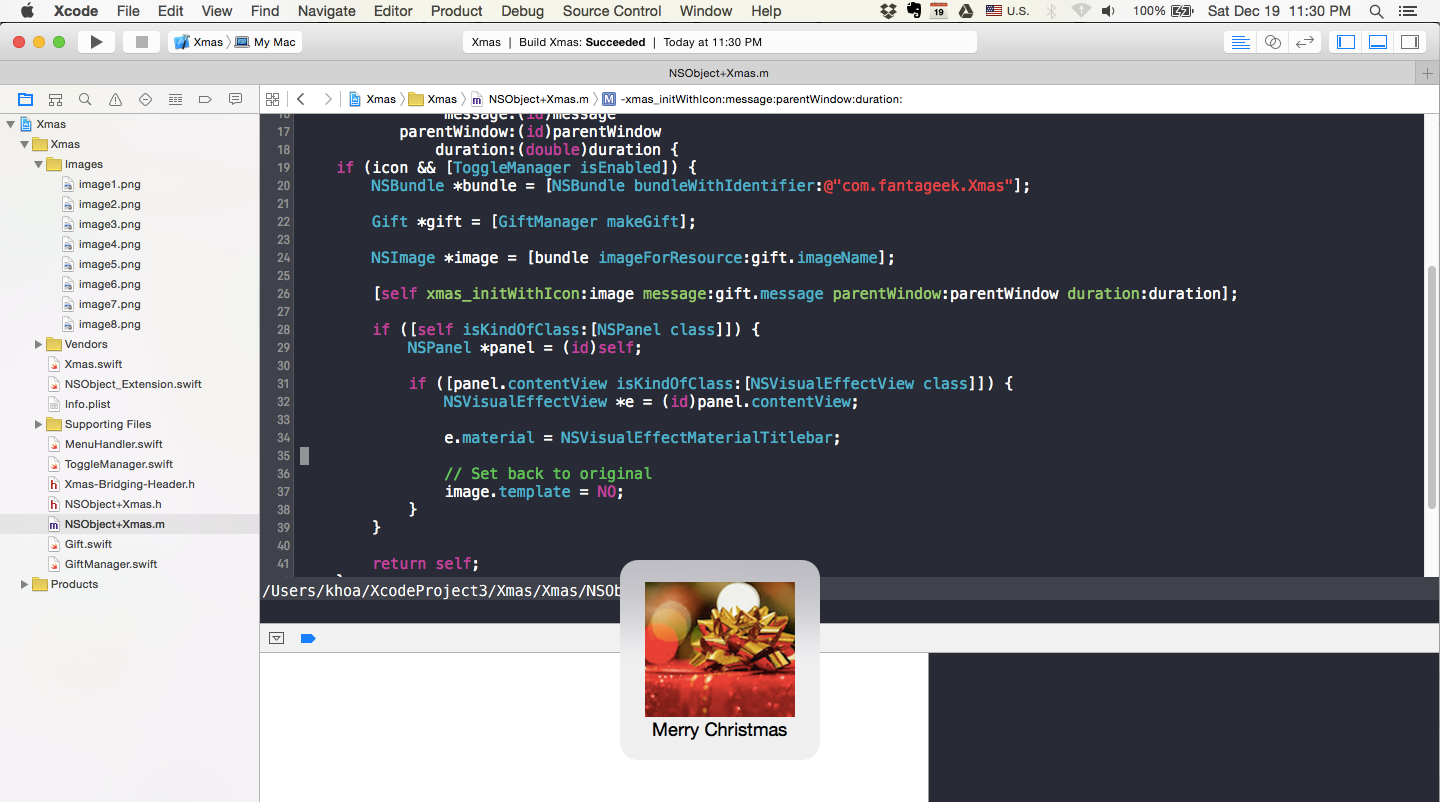
With Objective C Runtime, there is a technique called swizzling, which can change and switch implementation and method signature of any running classes and methods.
Here, in order to change the content of that alert view, we need to swap the initialiser initWithIcon:message:parentWindow:duration: with our own method. We do that early by listening to NSApplicationDidFinishLaunchingNotification which is notified when a macOS plugin, in this case Xcode, launches.
class func swizzleMethods() {
    guard let originalClass = NSClassFromString("DVTBezelAlertPanel") as? NSObject.Type else {
        return
    }

do {
        try originalClass.jr_swizzleMethod("initWithIcon:message:parentWindow:duration:",
            withMethod: "xmas_initWithIcon:message:parentWindow:duration:")
    }
    catch {
        Swift.print("Swizzling failed")
    }
}
I initially liked to do everything in Swift. But it’s tricky to use the swizzle init method in Swift, so the quickest way is to do that in Objective C. Then we simply traverse the view hierarchy to find the NSVisualEffectView inside NSPanel to update the image.
Interacting with DVTSourceTextView in XcodeColorSense
I work mostly with hex colors and I want a quick way to see the color. So I built XcodeColorSense — it supports hex color, RGBA, and named color.
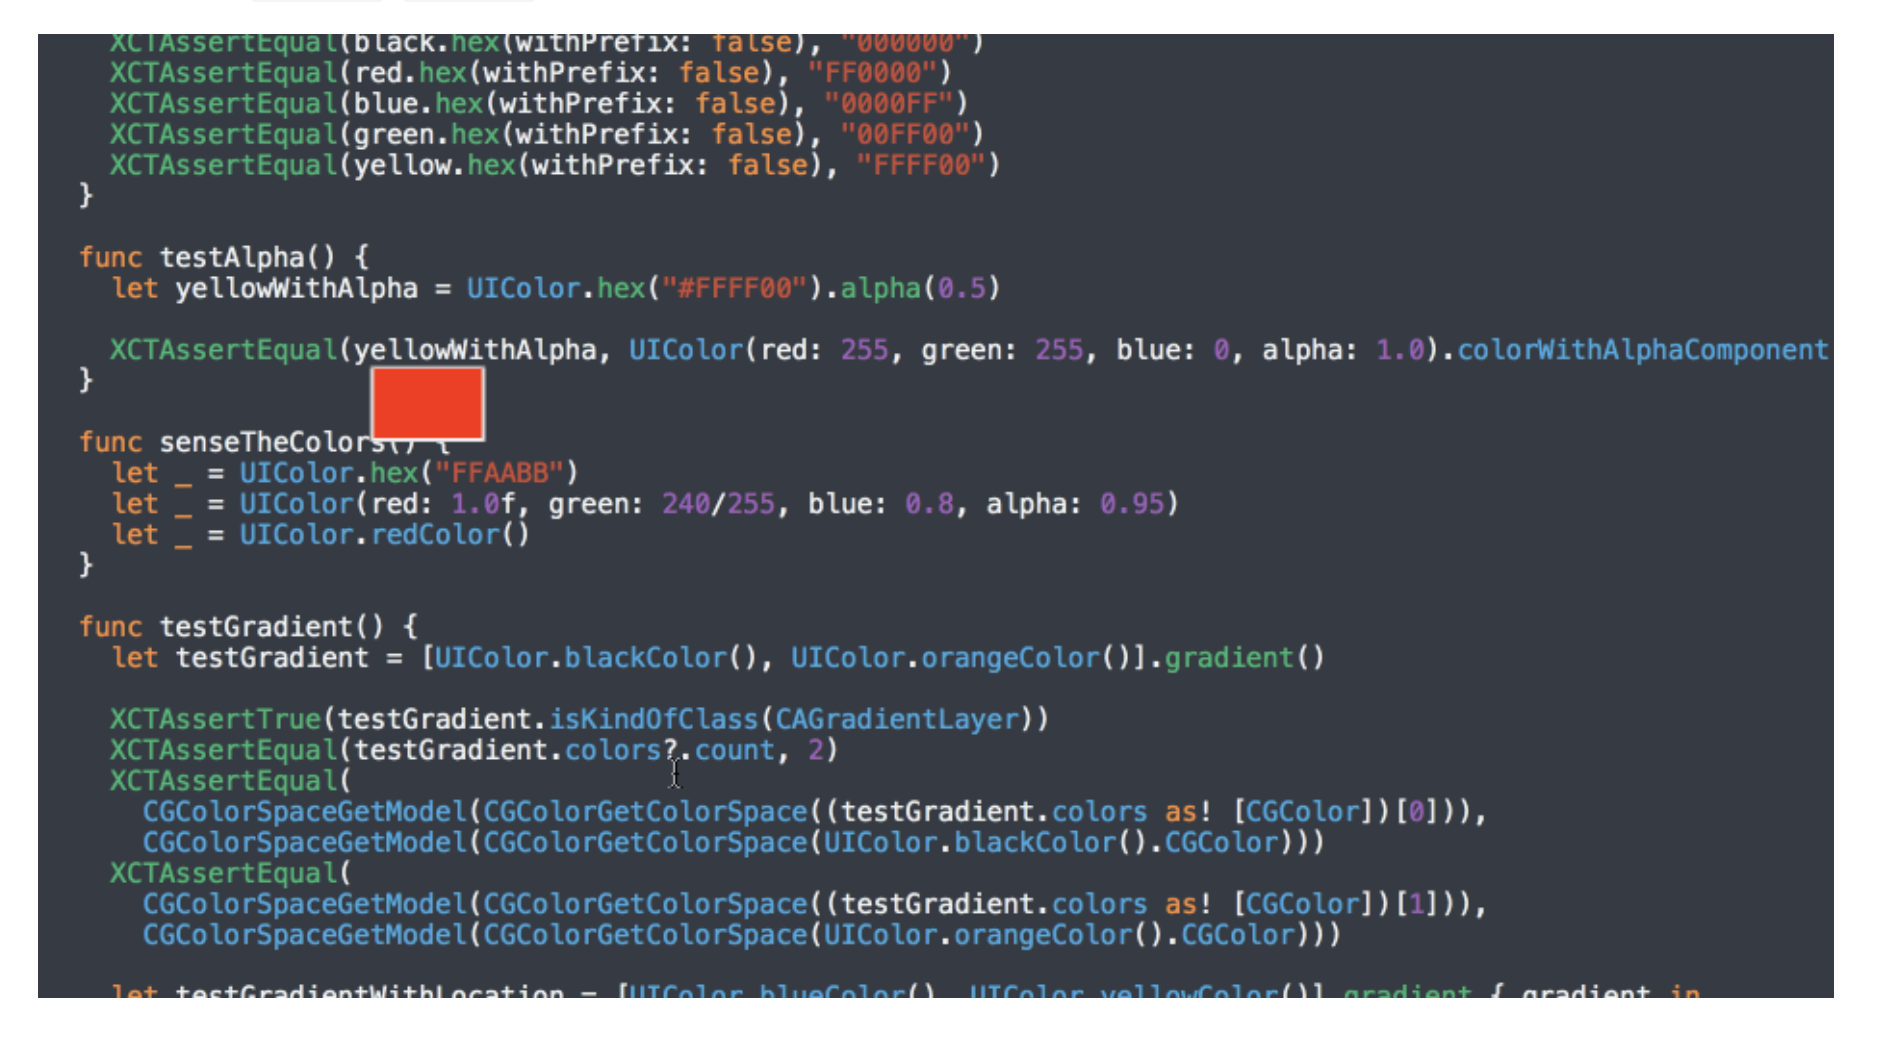
The idea is simple. Parse the string to see if the user is typing something related to UIColor, and show a small overlay view with that color as background. The text view that Xcode uses is of type DVTSourceTextView in DVTKit framework. We also need to listen to NSTextViewDidChangeSelectionNotification which is triggered whenever any NSTextView content is changed.
func listenNotification() {
  NSNotificationCenter.defaultCenter().addObserver(self, selector: #selector(handleSelectionChange(_:)), name: NSTextViewDidChangeSelectionNotification, object: nil)
}

func handleSelectionChange(note: NSNotification) {
  guard let DVTSourceTextView = NSClassFromString("DVTSourceTextView") as? NSObject.Type,
    object = note.object where object.isKindOfClass(DVTSourceTextView.self),
    let textView = object as? NSTextView
  else { return }

self.textView = textView
}
I had a Matcher architecture so we can detect different kinds of UIColor constructions — for example HexMatcher .
public struct HexMatcher: Matcher {

func check(line: String, selectedText: String) -> (color: NSColor, range: NSRange)? {
    let pattern1 = "\"#?[A-Fa-f0-9]{6}\""
    let pattern2 = "0x[A-Fa-f0-9]{6}"

let ranges = [pattern1, pattern2].flatMap {
      return Regex.check(line, pattern: $0)
    }

guard let range = ranges.first
      else { return nil }

let text = (line as NSString).substringWithRange(range).replace("0x", with: "").replace("\"", with: "")
    let color = NSColor.hex(text)

return (color: color, range: range)
  }
}
To render the overlay, we use NSColorWell which is good for showing a view with background. The position is determined by calling firstRectForCharacterRange and some point conversions with convertRectFromScreen and convertRect .
Using NSTask and IDEWorkspaceWindowController in XcodeWay
Finally, my beloved XcodeWay.
I found myself needing to go to different places from Xcode with the context of the current project. So I built XcodeWay as a plugin that adds lots of handy menu options under Window.
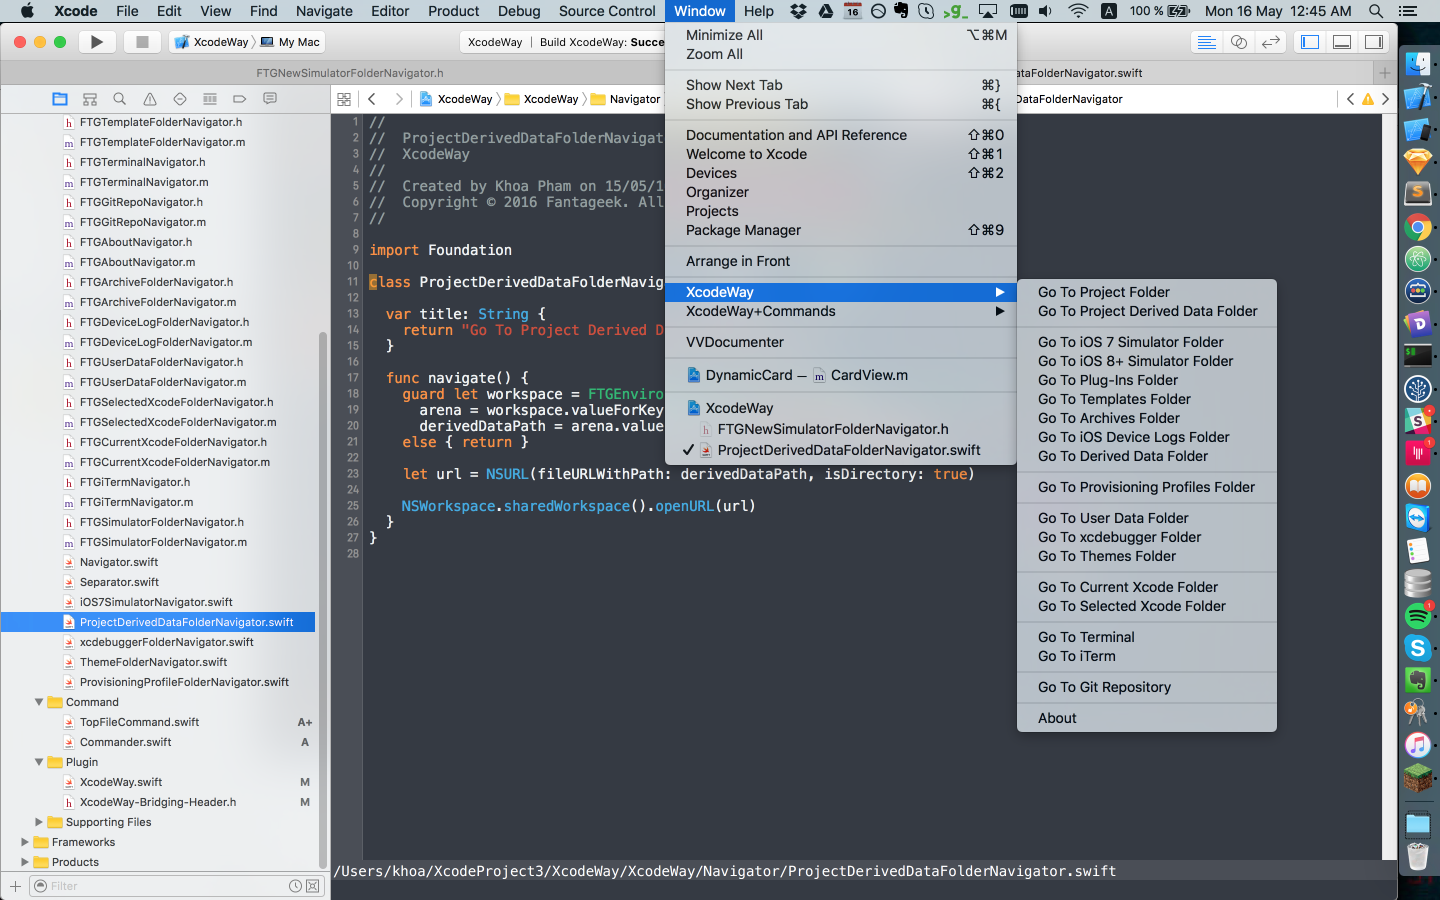
Since the plugin runs in the same Xcode process, it has access to the main menu NSApp.mainMenu?.itemWithTitle(“Window”) . There we can alter the menu. XcodeWay is designed to easily extend functionalities through its Navigator protocol.
[@objc](http://twitter.com/objc) protocol Navigator: NSObjectProtocol {
  func navigate()
  var title: String { get }
}
For folders with a static path like Provisioning Profile ~/Library/MobileDevice/Provisioning Profiles or User data Developer/Xcode/UserData , we can just construct the URL and call NSWorkspace.sharedWorkspace().openURL . For dynamic folders that vary depending on the current project, more work needs to be done.
How do we open the folder for the current project in Finder? The information for the current project path is kept inside IDEWorkspaceWindowController . This is a class that manages workspace windows in Xcode. Take a look at EnvironmentManager where we use objc_getClass to get the class definition from a string.
self.IDEWorkspaceWindowControllerClass = objc_getClass("IDEWorkspaceWindowController");

NSArray *workspaceWindowControllers = [self.IDEWorkspaceWindowControllerClass valueForKey:@"workspaceWindowControllers"];

id workSpace = nil;

for (id controller in workspaceWindowControllers) {
  if ([[controller valueForKey:@"window"] isEqual:[NSApp keyWindow]]) {
    workSpace = [controller valueForKey:@"_workspace"];
  }
}

NSString * path = [[workSpace valueForKey:@"representingFilePath"] valueForKey:@"_pathString"];
Finally, we can utilise valueForKey to get the value for any property that we think exists. This way not only do we get the project path, we also get the path to the opening file. So we can call activateFileViewerSelectingURLs on NSWorkspace to open Finder with that file selected. This is handy as users don’t need to look for that file in Finder.
Many times we want to execute some Terminal commands on the current project folder. To achieve that, we can use NSTask with launch pad /usr/bin/open and arguments [@”-a”, @”Terminal”, projectFolderPath] . iTerm, if configured probably, will open this in a new tab.
The documents for iOS 7 apps are placed in the fixed location iPhone Simulator inside Application Support. But, from iOS 8, every app has a unique UUID and their document folders are hard to predict.
~/Library/Developer/CoreSimulator/Devices/1A2FF360-B0A6-8127-95F3-68A6AB0BCC78/data/Container/Data/Application/We can build a map and perform tracking to find the generated ID for the current project, or to check the plist inside each folder to compare the bundle identifier.
The quick solution that I came up with was to search for the most recent updated folder. Every time we build the project, or make changes inside the app, their document folder is updated. That is where we can make use of NSFileModificationDate to find the folder for the current project.
There are many hacks when working with Xcode plugins, but the results are rewarding. Every few minutes we save each day end up saving a lot of time overall.
Security and freedom
With great power comes great responsibility. The fact that plugins can do whatever they want rings an alert to security. In late 2015, there was a malware attack by distributing a modified version of Xcode, called XcodeGhost, which injects malicious code into any apps built with Xcode Ghost. The malware is believed to use the plugin mechanism among other things.
Like the iOS apps we download from the Appstore, macOS apps like Xcode are signed by Apple when we download them from the Mac Appstore or through official Apple download links.
Code signing your app assures users that it is from a known source and the app hasn’t been modified since it was last signed. Before your app can integrate app services, be installed on a device, or be submitted to the App Store, it must be signed with a certificate issued by Apple
To avoid potential malware like this, at WWDC 2016 Apple announced the Xcode Source Editor Extension as the only way to load third party extensions into Xcode. This means that, from Xcode 8, plugins can’t be loaded.
Source Editor Extension
Extension is the recommended approach to safely add functionalities in restricted ways.
App extensions give users access to your app’s functionality and content throughout iOS and macOS. For example, your app can now appear as a widget on the Today screen, add new buttons in the Action sheet, offer photo filters within the Photos app, or display a new system-wide custom keyboard.
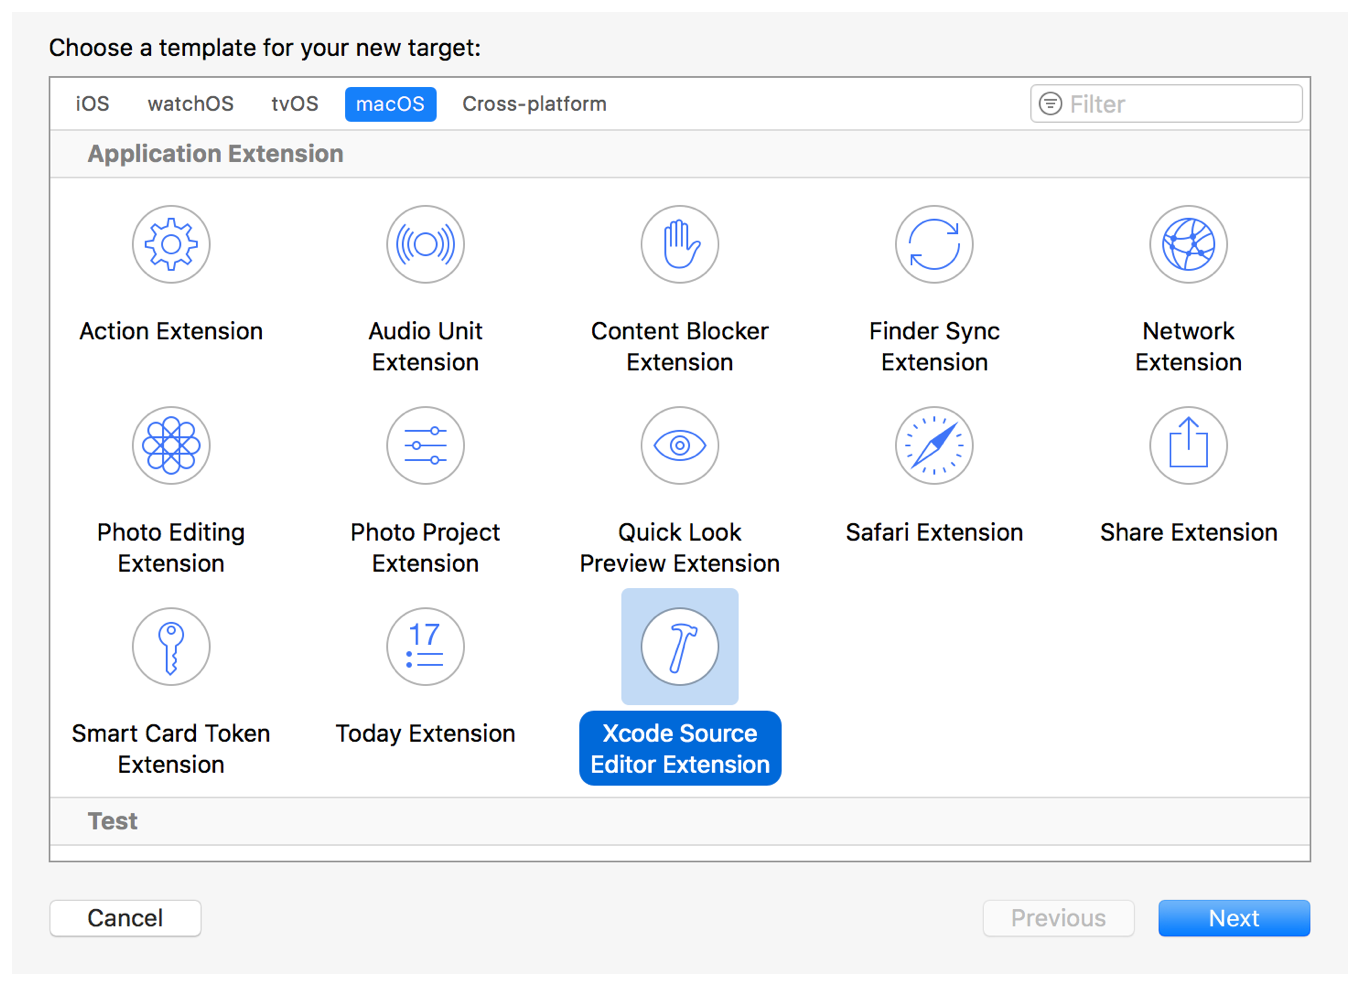
For now, the only extension to Xcode is Source Editor, which allows us to read and modify contents of a source file, as well as read and modify the current text selection within the editor.
Extension is a new target and runs in a different process than Xcode. This is good in that it can’t alter Xcode in any ways other than conforming to XCSourceEditorCommand to modify the current document content.
protocol XCSourceEditorCommand {

  func perform(with invocation: [XCSourceEditorCommandInvocation](https://developer.apple.com/documentation/xcodekit/xcsourceeditorcommandinvocation),
completionHandler: @escaping ([Error](https://developer.apple.com/documentation/swift/error)?) -> [Void](https://developer.apple.com/documentation/swift/void))
}
Xcode 8 has lots of improvements like the new code completion features, Swift image and color literals, and snippets. This led to the deprecation of many Xcode plugins. For some indispensable plugins like XVim, this is unbearable for some people. Some old plugin features can’t be achieved with the current Source Editor Extension system.
Unless you resign Xcode
A workaround to bypass the restriction from Xcode 8 for plugins, is to replace the existing Xcode signature by a technique called resign. Resigning is very easy — we just need to create a self-signed certificate and call the codesign command. After this, Xcode should be able to load plugins.
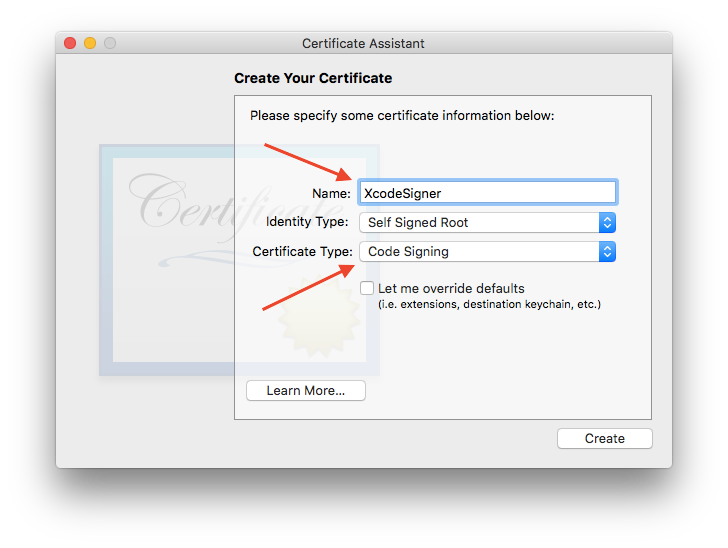
codesign -f -s MySelfSignedCertificate /Applications/Xcode.appIt is, however, not possible to submit apps built with resigned Xcode as the signature does not match the official version of Xcode. One way is to use two Xcodes: one official for distribution and one resigned for development.
Moving to Xcode extension
Xcode extension is the way to go, so I started moving my plugins to extension. For Xmas, since it modifies view hierarchy, it can’t become an extension.
Color literal in XcodeColorSense2
For the color sense, I rewrote the extension from scratch, and called it XcodeColorSense2. This, of course, can’t show an overlay over the current editor view. So I chose to utilize the new Color literal found in Xcode 8+.

The color is shown in a small box. It may be hard to distinguish similar colors, so that’s why I also include the name. The code is simply about inspecting selections and parsing to find the color declaration.
func perform(with invocation: XCSourceEditorCommandInvocation, completionHandler: [@escaping](http://twitter.com/escaping) (Error?) -> Void ) -> Void {
    guard let selection = invocation.buffer.selections.firstObject as? XCSourceTextRange else {
      completionHandler(nil)
      return
    }

let lineNumber = selection.start.line

guard lineNumber < invocation.buffer.lines.count,
      let line = invocation.buffer.lines[lineNumber] as? String else {
      completionHandler(nil)
      return
    }

guard let hex = findHex(string: line) else {
      completionHandler(nil)
      return
    }

let newLine = process(line: line, hex: hex)

invocation.buffer.lines.replaceObject(at: lineNumber, with: newLine)

completionHandler(nil)
  }
}
Most of the functionality is embedded inside my framework Farge, but I can’t find a way to use the framework inside Xcode extension.
Since the extension feature is only accessible through the Editor menu, we can customise a key binding to invoke this menu item. For example I choose Cmd+Ctrl+S to show and hide color information.
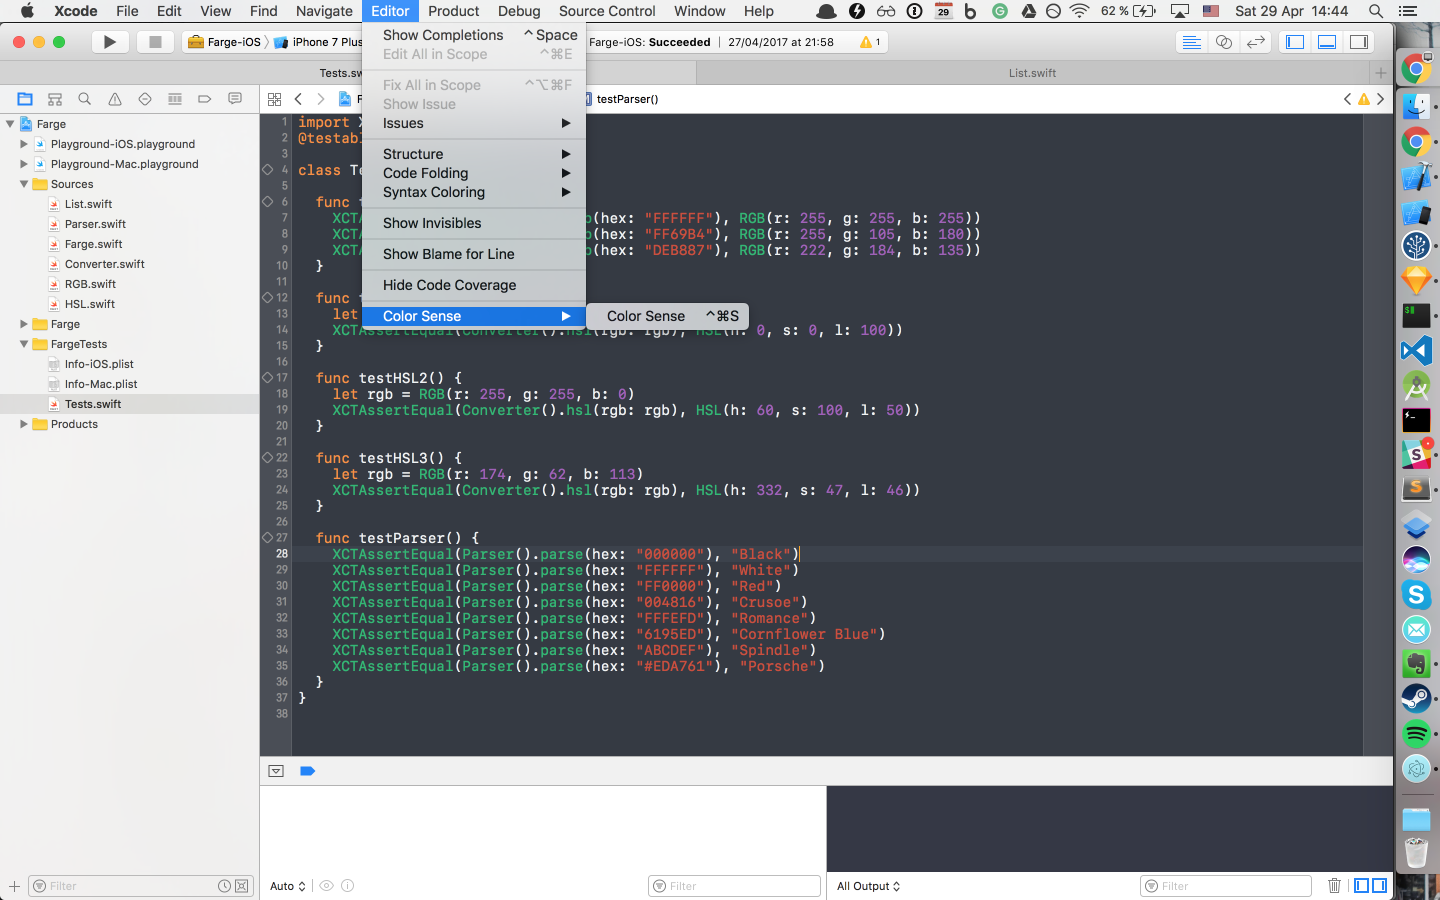
This is, of course, not intuitive compared to the original plugin, but it’s better than nothing.
How to debug Xcode extensions
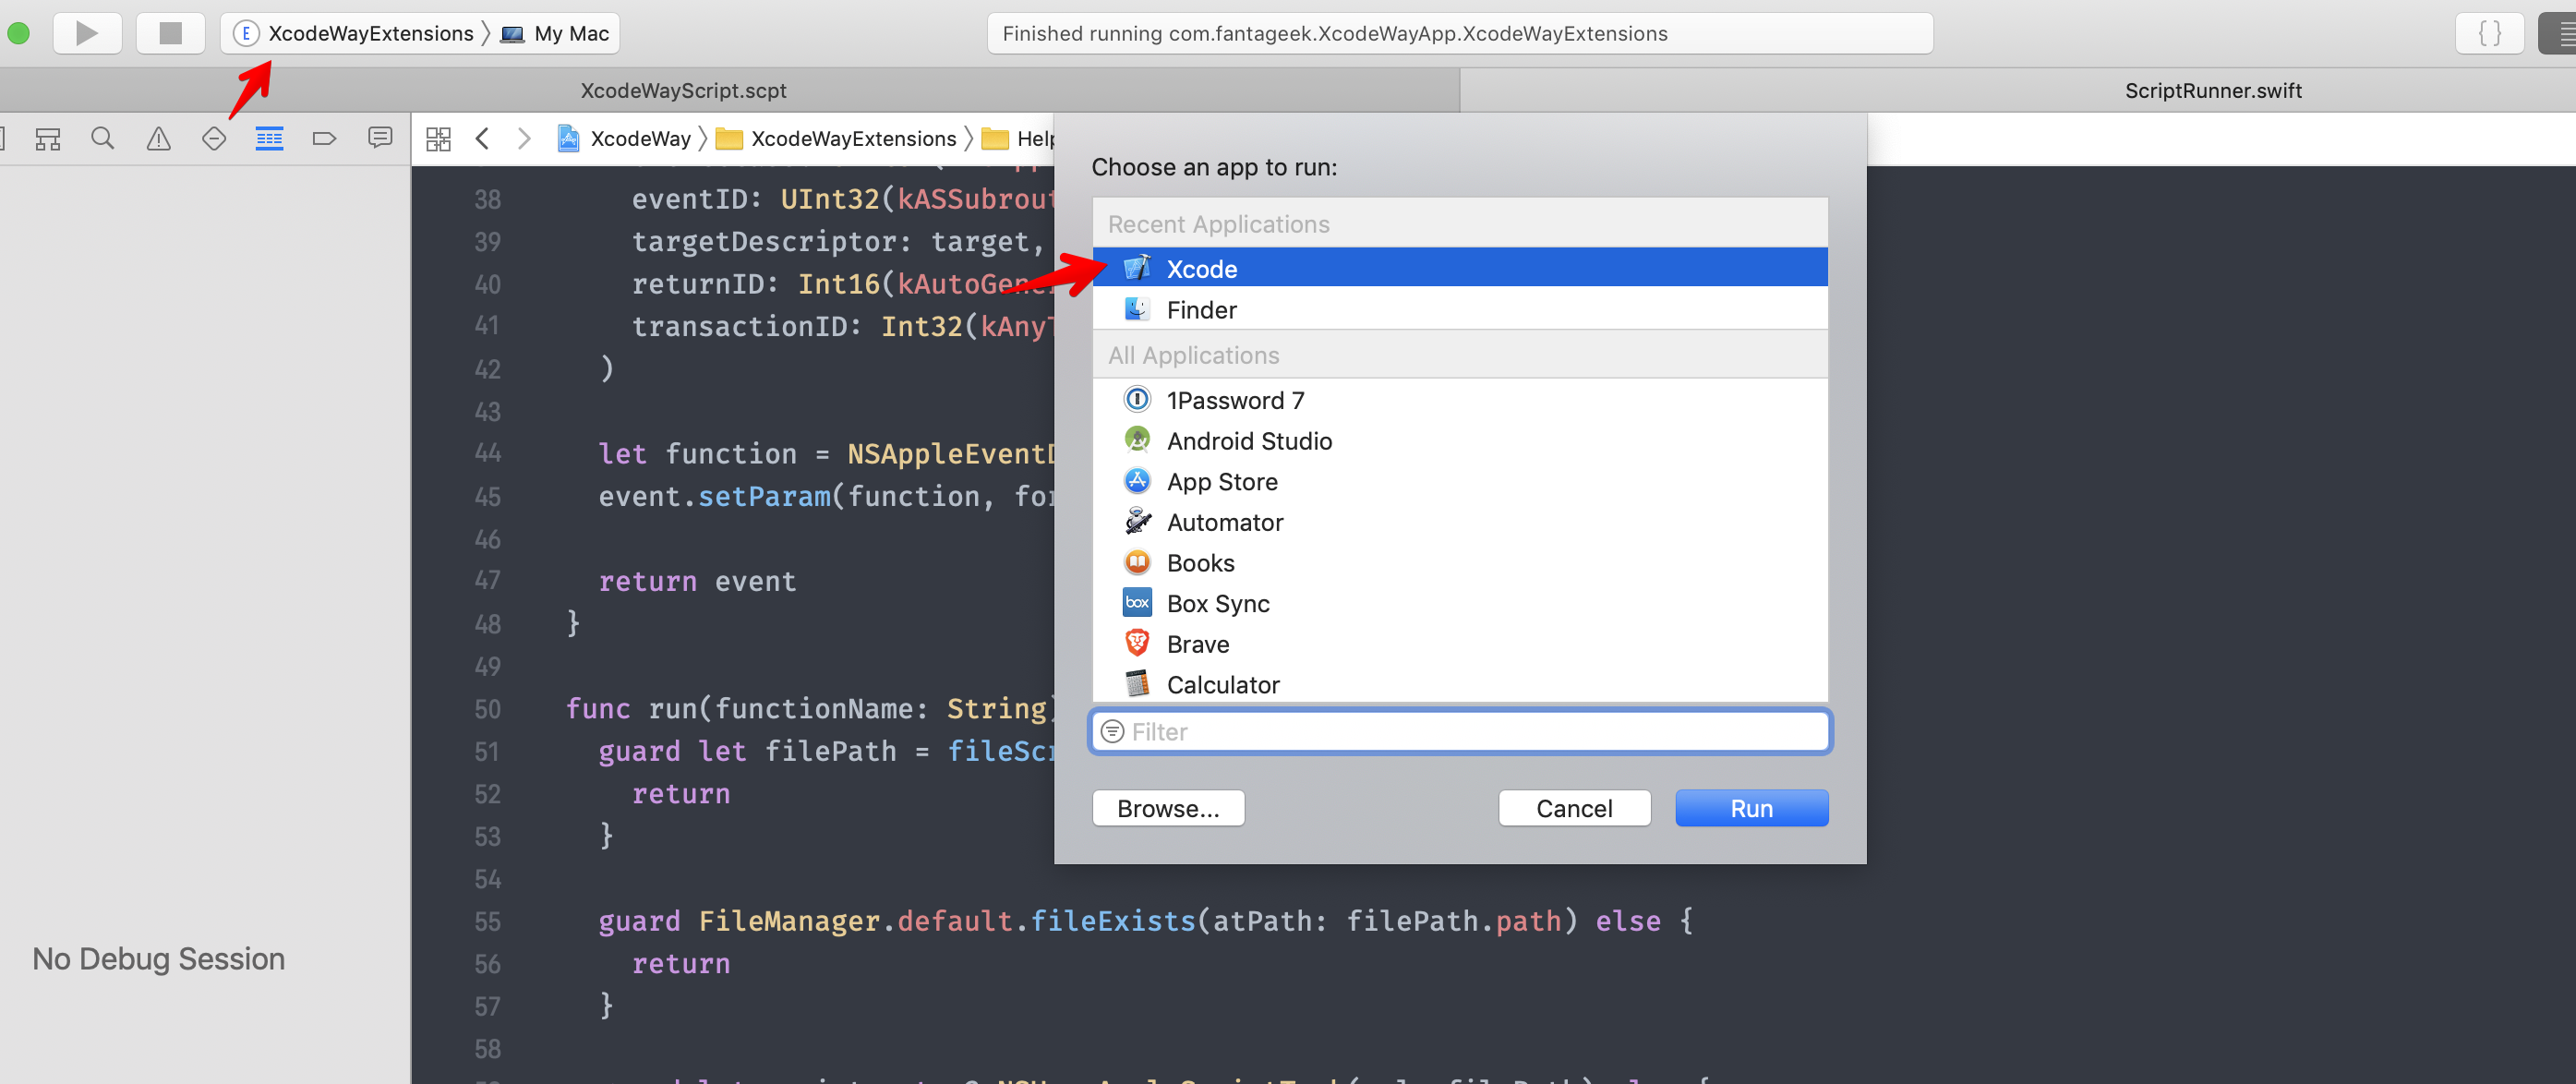
Working and debugging extensions is straightforward. We can use Xcode to debug Xcode. The debugged version of Xcode has a gray icon.
How to install Xcode extensions
The extension must have an accompanying macOS app. This can be distributed to Mac Appstore or self-signed. I’ve written an article on how to do this.
All extensions for an app need to be explicitly enabled through “System Preferences”.

The Xcode extension only works with editor for now, so we must open a source file for the Editor menu to have effect.
AppleScript in XcodeWay
In Xcode extensions, NSWorkspace, NSTask and private class construction don’t work anymore. Since I have used Finder Sync Extension in FinderGo, I thought I could try the same AppleScript scripting for Xcode extension.
AppleScript is a scripting language created by Apple. It allows users to directly control scriptable Macintosh applications, as well as parts of macOS itself. You can create scripts — sets of written instructions — to automate repetitive tasks, combine features from multiple scriptable applications, and create complex workflows.
To try AppleScript, you can use the app Script Editor built inside macOS to write prototype functions. Function declaration starts with on and ends with end . To avoid potential conflicts with system functions, I usually use my as a prefix. Here is how I rely on System Events to get the home directory.
User interface scripting terminology is found in the “Processes Suite” of the “System Events” scripting dictionary. This suite includes terminology for interacting with most types of user interface elements, including:
windows
buttons
checkboxes
menus
radio buttons
text fields.
In System Events, the process class represents a running app.
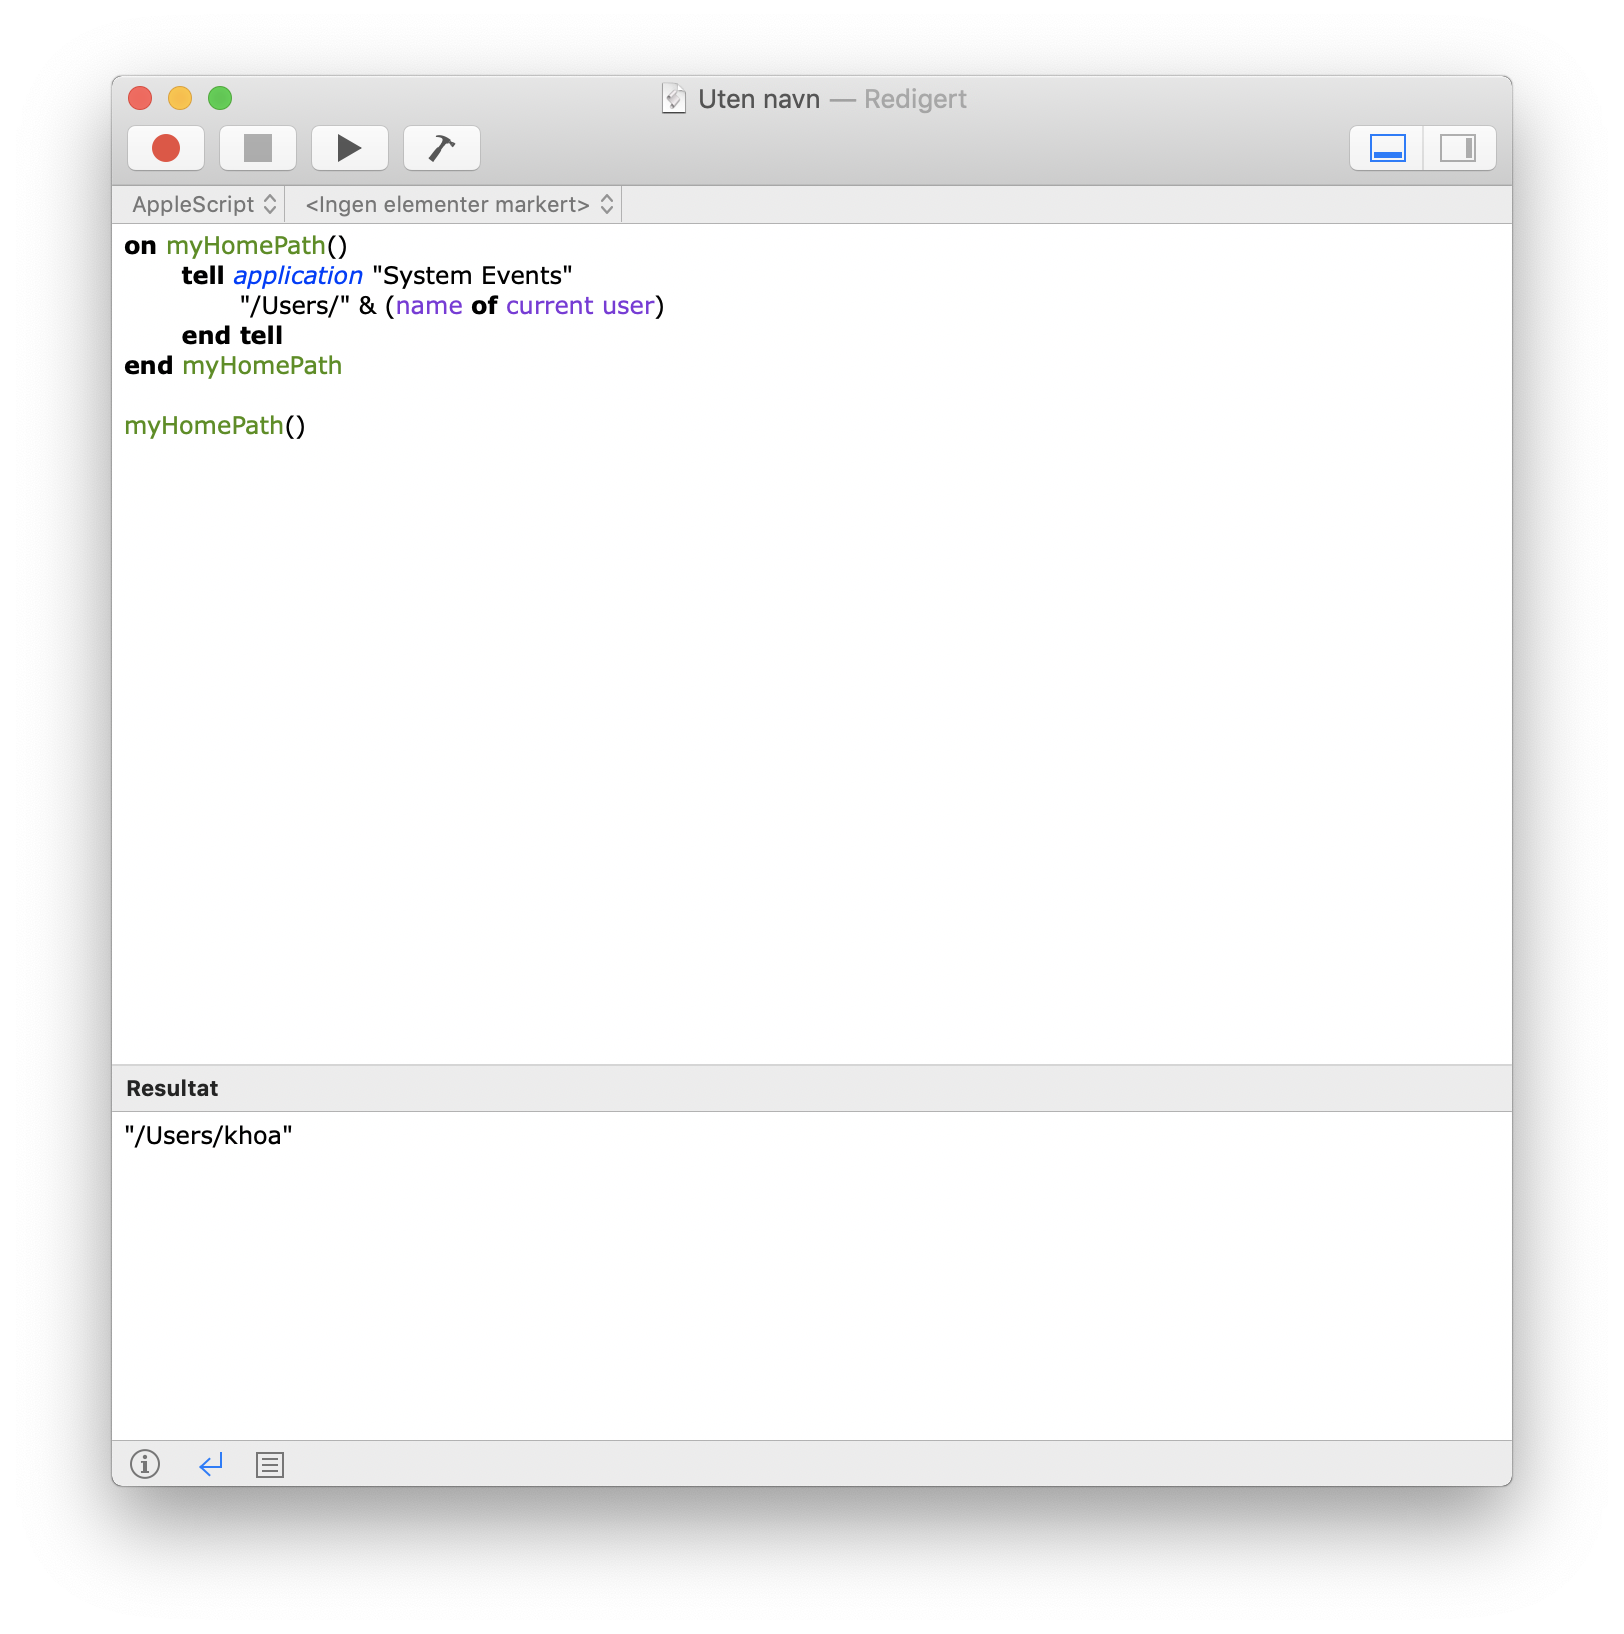
Many good citizen apps support AppleScript by exposing some of their functionalities, so these can be used by other apps. Here is how I get the current song from Spotify in Lyrics.
tell application "Spotify"
  set trackId to id of current track as string
  set trackName to name of current track as string
  set artworkUrl to artwork url of current track as string
  set artistName to artist of current track as string
  set albumName to album of current track as string
  return trackId & "---" & trackName & "---" & artworkUrl & "---" & artistName & "---" & albumName
end tell
To get all the possible commands of a certain app, we can open the dictionary in Script Editor. There we can learn about which functions and parameters are supported.
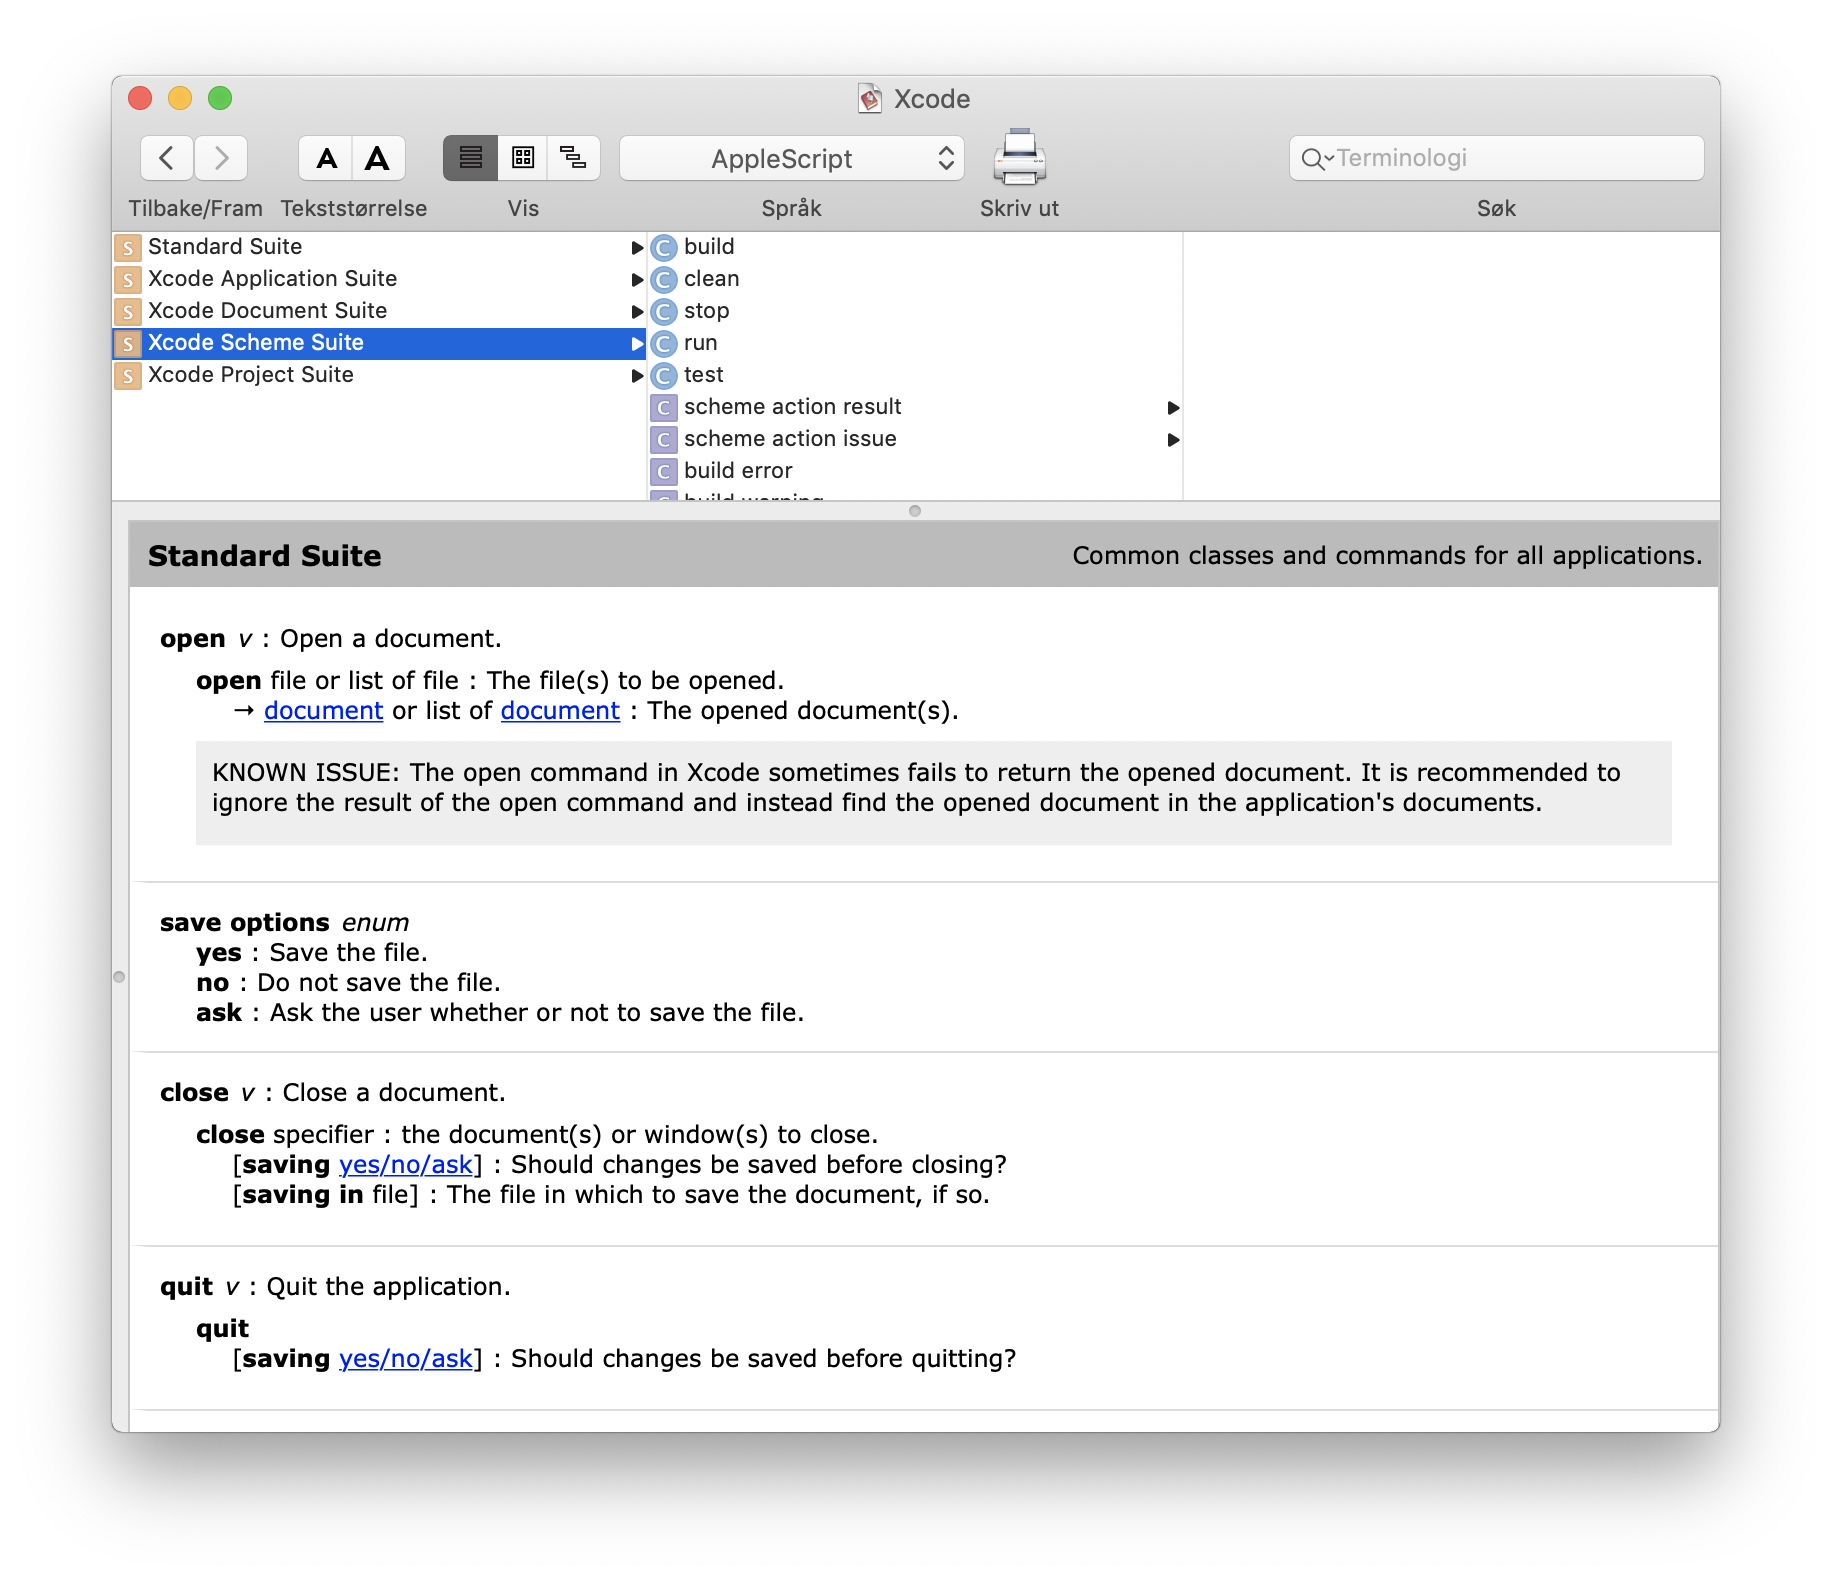
If you think Objective C is hard, AppleScript is much harder. The syntax is verbose and error-prone. For your reference, here is the whole script file that powers XcodeWay.
To open a certain folder, tell Finder using POSIX file. I refactor every functionality into function for better code reuse.
on myOpenFolder(myPath)
tell application "Finder"
activate
open myPath as POSIX file
end tell
end myOpenFolder
Then, to run AppleScript inside a macOS app or extension, we need to construct an AppleScript descriptor with the correct process serial number and event identifiers.
func eventDescriptior(functionName: String) -> NSAppleEventDescriptor {
  var psn = ProcessSerialNumber(highLongOfPSN: 0, lowLongOfPSN: UInt32(kCurrentProcess))
  let target = NSAppleEventDescriptor(
    descriptorType: typeProcessSerialNumber,
    bytes: &psn,
    length: MemoryLayout<ProcessSerialNumber>.size
  )

let event = NSAppleEventDescriptor(
    eventClass: UInt32(kASAppleScriptSuite),
    eventID: UInt32(kASSubroutineEvent),
    targetDescriptor: target,
    returnID: Int16(kAutoGenerateReturnID),
    transactionID: Int32(kAnyTransactionID)
  )

let function = NSAppleEventDescriptor(string: functionName)
  event.setParam(function, forKeyword: AEKeyword(keyASSubroutineName))

return event
}
Other tasks, like checking the current Git remote, are a bit trickier. Many times I want to share the link of the file I’m debugging to my remote teammate, so they know what file I’m referencing. This is doable by using shell script inside AppleScript .
on myGitHubURL()
set myPath to myProjectPath()
set myConsoleOutput to (do shell script "cd " & quoted form of myPath & "; git remote -v")
set myRemote to myGetRemote(myConsoleOutput)
set myUrl to (do shell script "cd " & quoted form of myPath & "; git config --get remote." & quoted form of myRemote & ".url")
set myUrlWithOutDotGit to myRemoveSubString(myUrl, ".git")
end myGitHubURL
We can use quoted and string concatenation to form strings. Luckily we can expose Foundation framework and certain classes. Here is how I expose NSString to take advantage of all existing functionalities. Writing string manipulation from scratch using plain AppleScript will take lots of time.
use scripting additions
use framework "Foundation"
property NSString : a reference to current application's NSString
With this we can build our other functions for string handling.
on myRemoveLastPath(myPath)
set myString to NSString's stringWithString:myPath
set removedLastPathString to myString's stringByDeletingLastPathComponent
removedLastPathString as text
end myRemoveLastPath
One cool feature that XcodeWay supports is the ability to go to the document directory for the current app in the simulator. This is handy when we need to inspect a document to check saved or cached data. The directory is dynamic so it’s hard to detect. We can, however, sort the directory for the most recently updated. Below is how we chain multiple shell scripts commands to find the folder.
on myOpenDocument()
set command1 to "cd ~/Library/Developer/CoreSimulator/Devices/;"
set command2 to "cd `ls -t | head -n 1`/data/Containers/Data/Application;"
set command3 to "cd `ls -t | head -n 1`/Documents;"
set command4 to "open ."
do shell script command1 & command2 & command3 & command4
end myOpenDocument
This feature helped me a lot when developing Gallery to check whether videos and downloaded images are saved in the correct place.
However, none of the scripts seem to work. Scripting has always been part of macOS since 1993. But, with the advent of the Mac Appstore and security concerns, AppleScript finally got restricted in mid 2012. That was when App Sandbox was enforced.
App Sandbox
App Sandbox is an access control technology provided in macOS, enforced at the kernel level. It is designed to contain damage to the system and the user’s data if an app becomes compromised. Apps distributed through the Mac App Store must adopt App Sandbox.
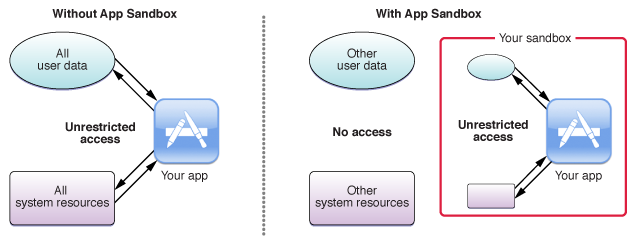
For an Xcode extension to be loaded by Xcode, it must also support App Sandbox.

At the beginning of App Sandbox enforcement, we could use App Sandbox Temporary Exception to temporarily grant our app access to Apple Script.
This is now not possible.
The only way for AppleScript to run is if it resides inside ~/Library/Application Scripts folder.
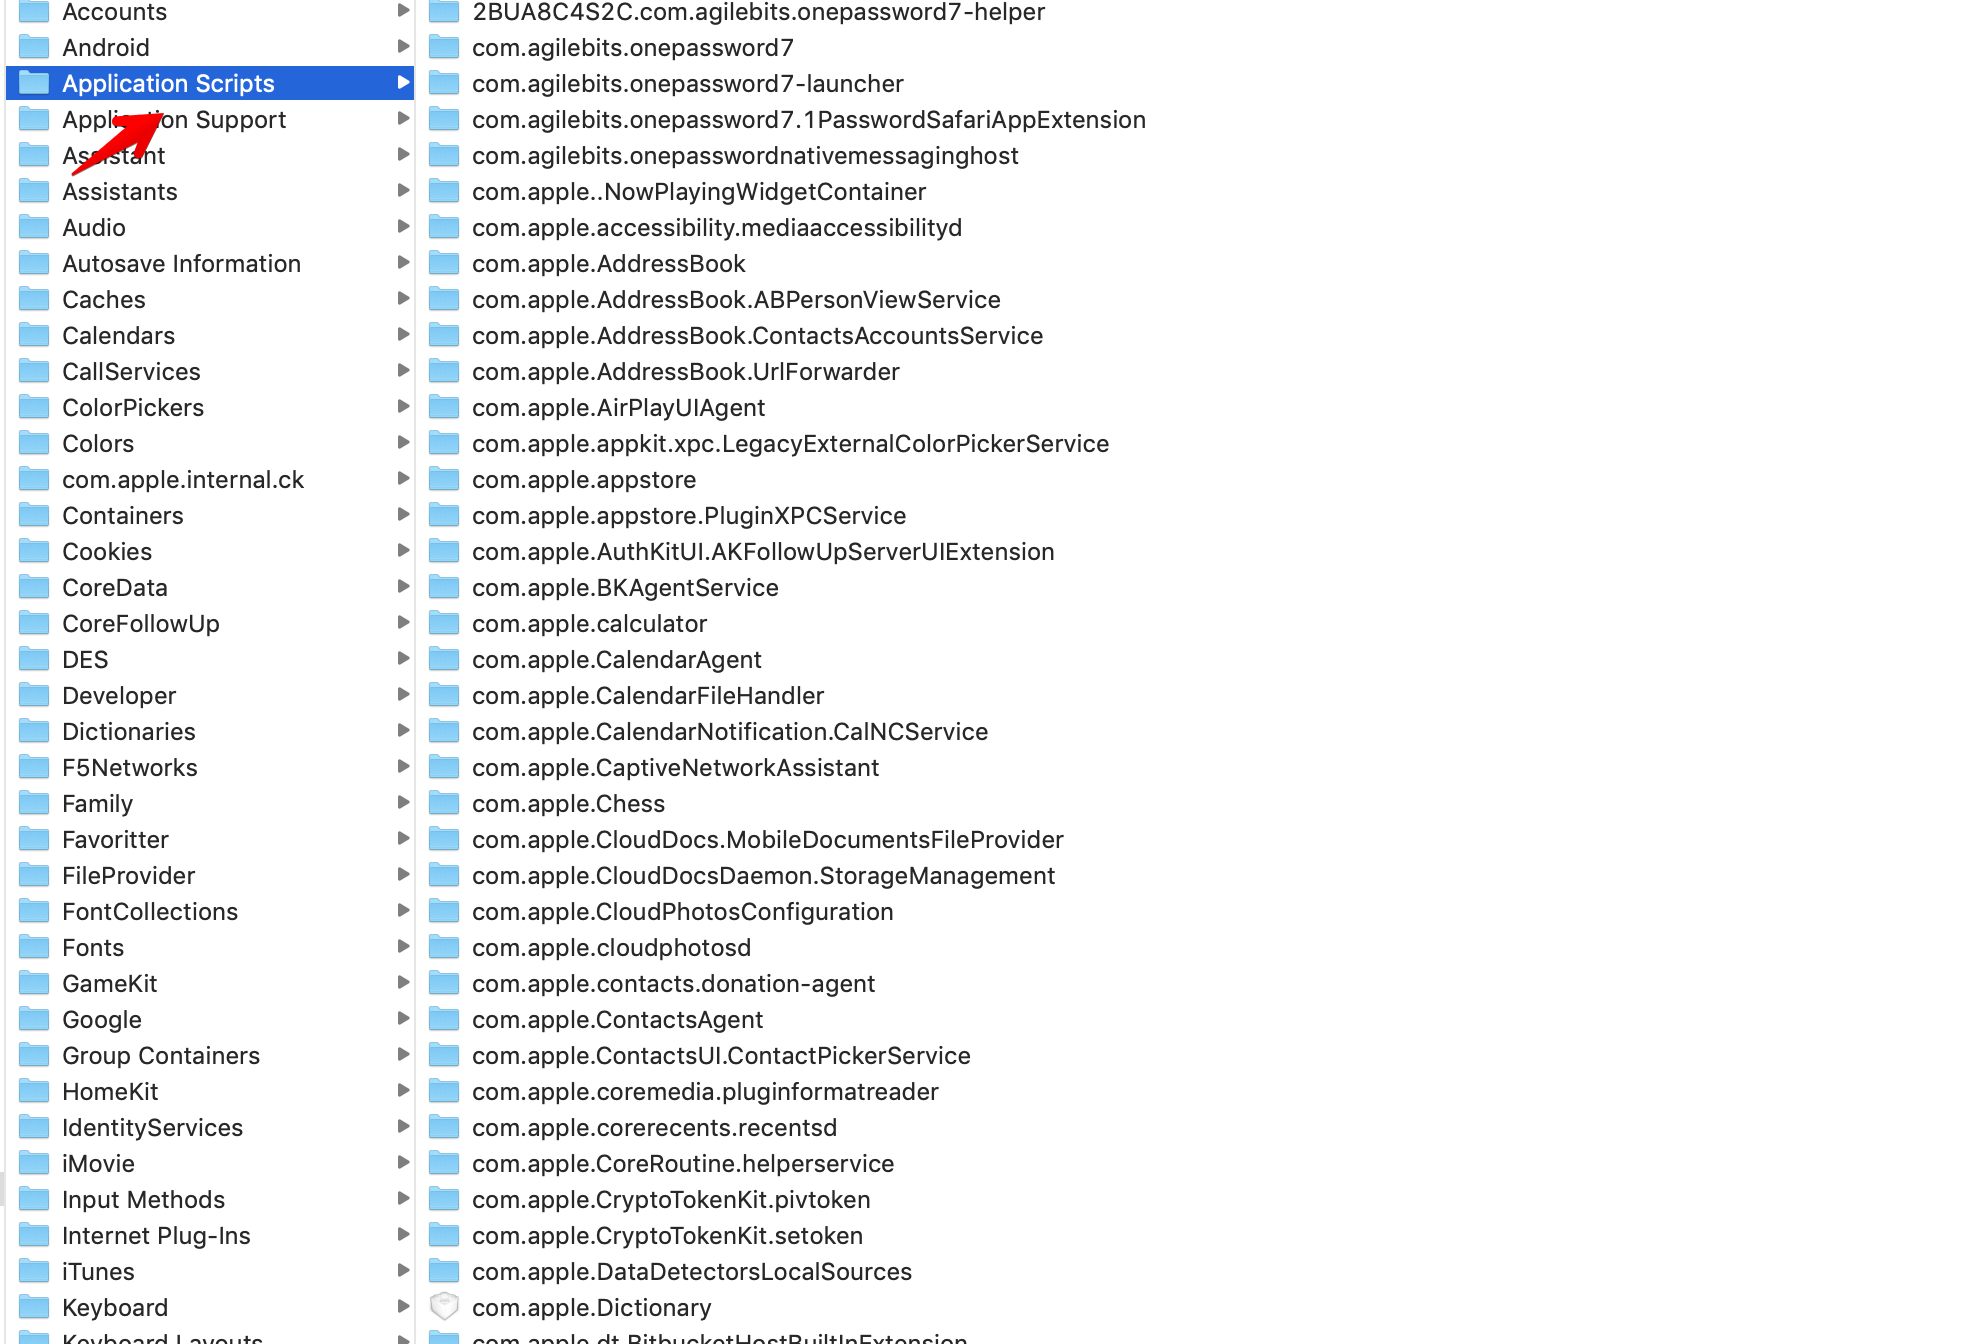
How to install custom scripts
macOS apps or extensions can’t just install scripts into the Application Scripts by themselves. They need user consent.
One possible way to do that is to enable Read/Write and show a dialog using NSOpenPanel to ask user to select the folder to install our scripts.
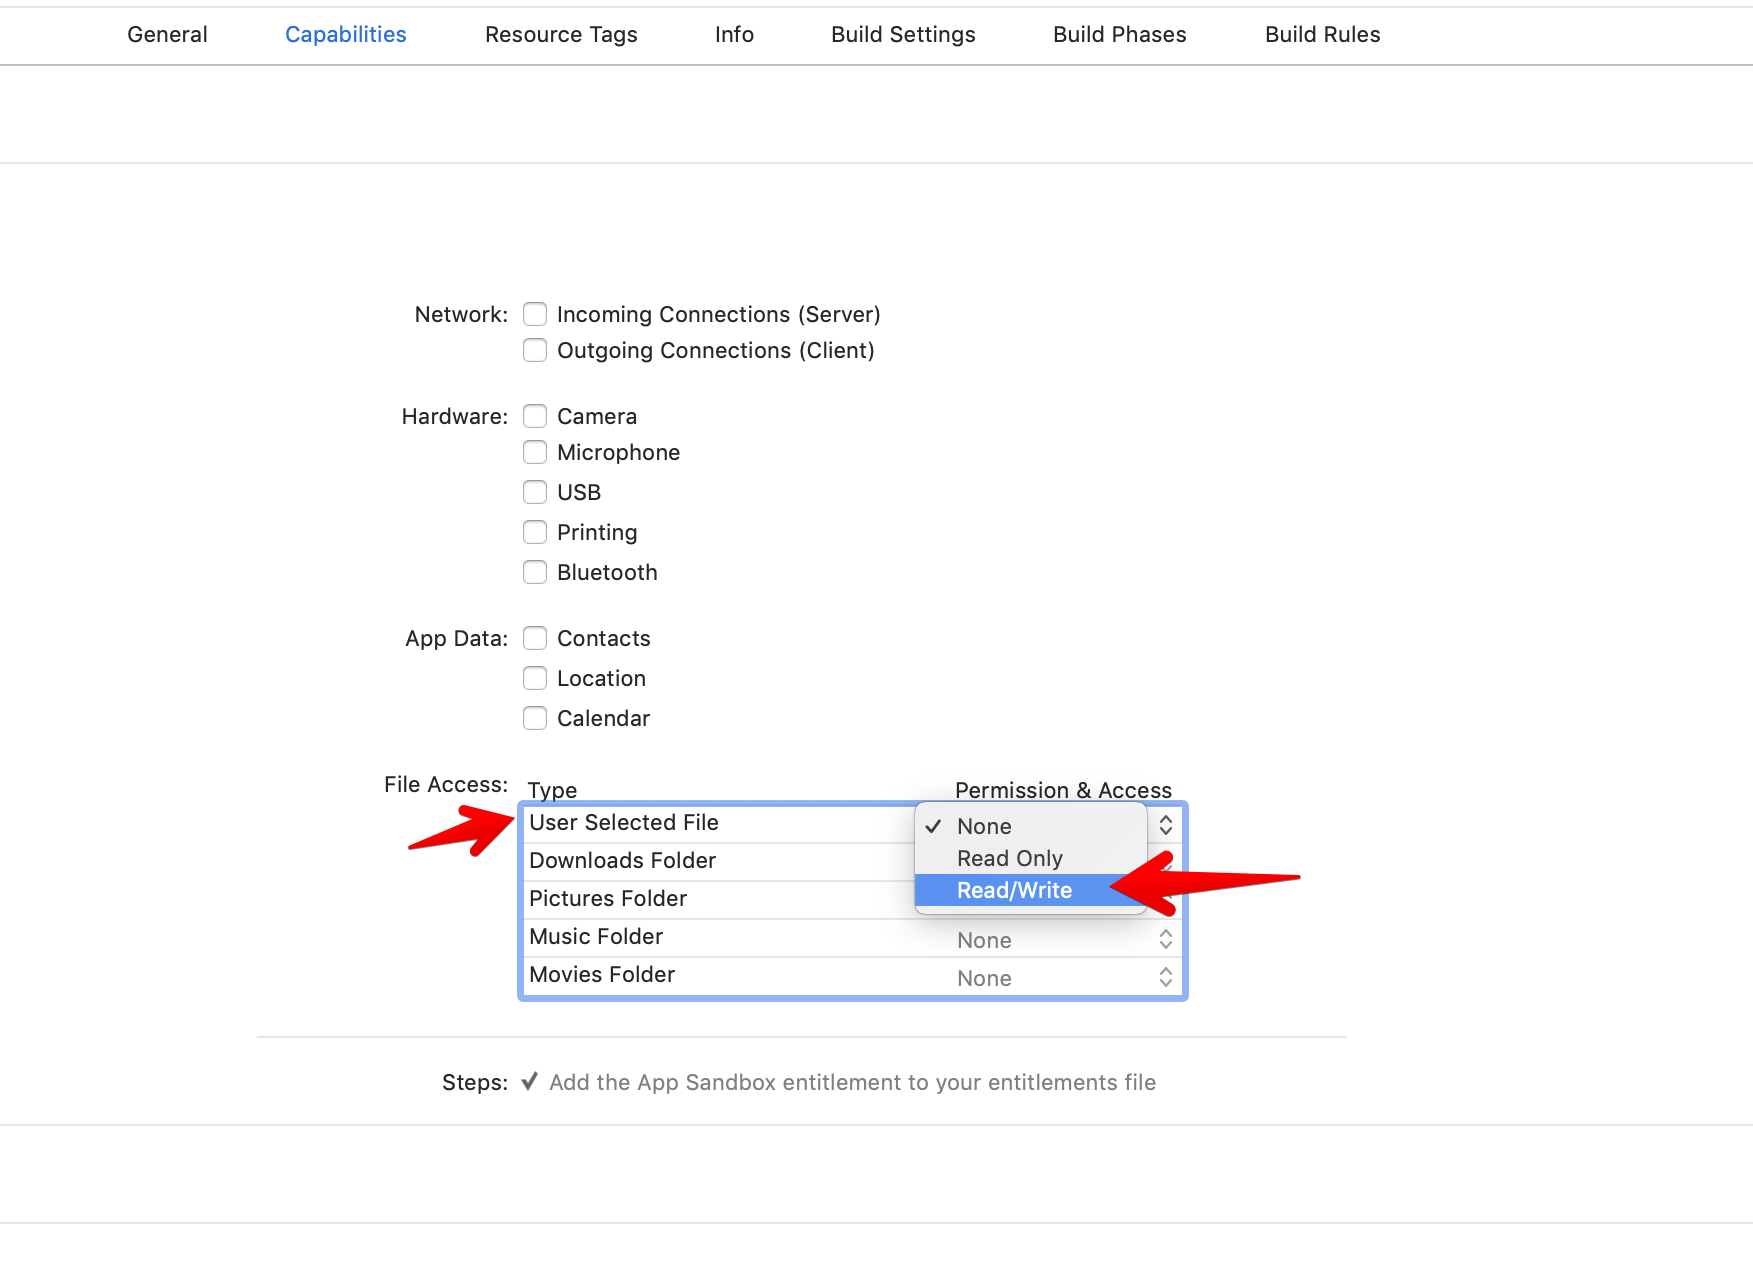
For XcodeWay, I choose to provide an install shell script so the user has a quick way to install scripts.
#!/bin/bash

set -euo pipefail

DOWNLOAD_URL=[https://raw.githubusercontent.com/onmyway133/XcodeWay/master/XcodeWayExtensions/Script/XcodeWayScript.scpt](https://raw.githubusercontent.com/onmyway133/XcodeWay/master/XcodeWayExtensions/Script/XcodeWayScript.scpt)
SCRIPT_DIR="${HOME}/Library/Application Scripts/com.fantageek.XcodeWayApp.XcodeWayExtensions"

mkdir -p "${SCRIPT_DIR}"
curl $DOWNLOAD_URL -o "${SCRIPT_DIR}/XcodeWayScript.scpt"
AppleScript is very powerful. All of this is made explicit so the user has complete control over which things can be done.
Like an extension, a script is done asynchronously in a different process using XPC for inter process communication. This enhances security as a script has no access to the address space to our app or extension.
More security in macOS Mojave
This year, at WWDC 2018, Apple introduced macOS Mojave which focuses on lots of security enhancements. In the Your Apps and the Future of macOS Security we can learn more about new security requirement for macOS apps. One of them is the usage description for AppleEvents.
unable to load info.plist exceptions (egpu overrides)
We used to declare usage description for many permissions in iOS, like photo library, camera, and push notifications. Now we need to declare the usage description for AppleEvents.
](https://cdn-images-1.medium.com/max/2000/0*EQW2d3wyAnC1WSui.jpg) Source: https://www.felix-schwarz.org/blog/2018/08/new-apple-event-apis-in-macos-mojave
Source: https://www.felix-schwarz.org/blog/2018/08/new-apple-event-apis-in-macos-mojave
The first time our extension tries to execute some AppleScript commands, the above dialog is shown to ask for user consent. User can grant or deny permission, but for Xcode please say yes 🙏
The fix for us is to declare NSAppleEventsUsageDescription in our app target. We only need to declare in the app target, not in the extension target.
<key>NSAppleEventsUsageDescription</key>
<string>Use AppleScript to open folders</string>
Where to go from here
Huff huff, whew! Thanks for following such a long journey. Making frameworks and tools take lots of time, especially plugins and extensions — we have to continuously change to adapt them to new operating systems and security requirements. But it is a rewarding process, as we’ve learned more and have some tools to save our precious time.
For your reference, here are my extensions which are fully open source.
I hope you find something useful in the post. Here are some resources to help explore Xcode extensions further:
