How to map from Swift 5 Resul to RxSwift PublishSubject

Issue #214

1
2
3
4
5
6
7
8
9
10
extension Result {
func to(subject: PublishSubject<Success>) {
switch self {
case .success(let value):
subject.onNext(value)
case .failure(let error):
subject.onError(error)
}
}
}

How to update NSMenuItem while NSMenu is showing in macOS

Issue #213

Use Runloop

1
2
3
4
5
6
timer = Timer.scheduledTimer(withTimeInterval: 1, repeats: true, block: { [weak self] _ in
let date = Date()
self?.updateStopItem(seconds: finishDate.timeIntervalSince1970 - date.timeIntervalSince1970)
})

RunLoop.main.add(timer!, forMode: .common)

Use Dispatch

1
2
3
4
5
6
timer = Timer.scheduledTimer(withTimeInterval: 1, repeats: true, block: { [weak self] _ in
let date = Date()
DispatchQueue.main.async {
self?.updateStopItem(seconds: finishDate.timeIntervalSince1970 - date.timeIntervalSince1970)
}
})

Updated at 2020-09-08 07:54:36

How to use Timer in Swift

Issue #212

Pre iOS 10

1
2
3
4
5
6
7
8
9
10
func schedule() {
DispatchQueue.main.async {
self.timer = Timer.scheduledTimer(timeInterval: 20, target: self,
selector: #selector(self.timerDidFire(timer:)), userInfo: nil, repeats: false)
}
}

@objc private func timerDidFire(timer: Timer) {
print(timer)
}

iOS 10+

1
2
3
4
5
DispatchQueue.main.async {
self.timer = Timer.scheduledTimer(withTimeInterval: 20, repeats: false) { timer in
print(timer)
}
}

Note that

  • It needs to be on the main queue
  • Callback function can be public, private, …
  • Callback function needs to be @objc

Original answer https://stackoverflow.com/a/42273141/1418457

How to overload functions in Swift

Issue #211

Function

Functions in Swift are distinguishable by

  • parameter label
  • parameter type
  • return type

so that these are all valid, and works for subscript as well

1
2
3
4
5
6
7
8
9
10
11
12
13
14
15
16
17
18
19
20
21
22
23
24
25
26
27
28
struct A {

// return type
func get() -> String { return "" }
func get() -> Int { return 1 }

// mix of parameter type and return type
func get(param: String) -> String { return "" }
func get(param: String) -> Int { return 1 }
func get(param: Int) -> Int { return 1 }
func get(param: Int) -> String { return "" }

subscript(param: String) -> String { return "" }
subscript(param: String) -> Int { return 1 }
subscript(param: Int) -> Int { return 1 }
subscript(param: Int) -> String { return "" }

// parameter label
func set(int: Int) {}
func set(string: String) {}

// concrete type from generic
func get(param: Array<String>) -> String { return "" }
func get(param: Array<Int>) -> Int { return 1 }

subscript(param: Array<String>) -> String { return "" }
subscript(param: Array<Int>) -> Int { return 1 }
}

When you specialize a generic type, like Array<Int>, you’re actually using a concrete type

Unfortunately, this does not work for NSObject subclass

Method ‘get()’ with Objective-C selector ‘get’ conflicts with previous declaration with the same Objective-C selector

1
2
3
4
5
class B: NSObject {

func get() -> String { return "" }
func get() -> Int { return 1 }
}

Generic function

We can overload generic functions as well

1
2
3
4
5
6
7
8
9
10
11
func f<T>(t: T) {
print("T")
}

func f(string: String) {
print("String")
}

func f(int: Int) {
print("Int")
}

Understanding AVFoundation and MediaPlayer frameworks in iOS

Issue #210

Depending on what features we want to achieve, we need to go with either AVFoundation or MediaPlayer framework. As someone who worked with many apps that involve media playback, here are some of my observations

MPMoviePlayerController vs AVPlayer

At first, I use MPMoviePlayerController because it is very simple, in fact, it is a wrapper around AVPlayer. It offers a lot of useful notifications and properties.

But when my requirements change, a lot more features are needed, I need to change to AVPlayer to have more control. And that is the wisest decision I’ve ever made

You should use AVPlayer as soon as possible. Using it cost you just a little longer time than MPMoviePlayerController, but you have a lot of control.

Custom controls

When building your own player, the built in controls of MPMoviePlayerController may not satisfy your need. I see many questions on SO are about custom controls.

MPMoviePlayerController

You have to set controlStyle to MPMovieControlStyleNone, set up Timer because currentPlaybackTime is not KVO compliance

AVPlayer

AVPlayer has no built in controls, but it has addPeriodicTimeObserverForInterval:queue:usingBlock: that makes handling the current time easily. The nicer thing about periodTimeObserver is that “The block is also invoked whenever time jumps and whenever playback starts or stops”

Notification

MPMoviePlayerController

It has a lot of useful notifications, like MPMoviePlayerNowPlayingMovieDidChangeNotification, MPMoviePlayerLoadStateDidChangeNotification, MPMovieDurationAvailableNotification, …

AVPlayer

The AVPlayerItem has some notifications AVPlayerItemDidPlayToEndTimeNotification, AVPlayerItemPlaybackStalledNotification, …
If you want to have those same notifications as MPMoviePlayerController, you have to KVO some properties of AVPlayer like currentItem, currentTime, duration, … You have to read documents to make sure which property is KVO compliance

Seek

MPMoviePlayerController

You can change the currentPlaybackTime to seek, but it results in jumping, because of efficiency and buffer status. I have to manually disable slider during seeking

AVPlayer

AVPlayer has this seekToTime:toleranceBefore:toleranceAfter:completionHandler: which allows you to specify the tolerance. Very nice

Subtitle

MPMoviePlayerController

I have to schedule a timer that “wake” and “sleep” at the beginning and end time of a certain subtitle marker, respectively.

AVPlayer

AVPlayer has this addBoundaryTimeObserverForTimes:queue:usingBlock: that perfectly suits my need. I setup 2 boundary time observers, 1 for the beginning times, 1 for the end times. The beginning times is an array containing all beginning timestamps that a subtitle marker appears.

Time scale

AVPlayer uses CMTime that offers timescale, which is a more comfortable way to specify more accurate time

Volume

AVPlayer has volume property (relative to system volume) that allows me to programmatically changes the player volume

Playable duration

MPMoviePlayerController

It has playableDuration property

AVPlayer

You have to compute yourself. See http://stackoverflow.com/questions/6815316/how-can-i-get-the-playable-duration-of-avplayer

Full screen

MPMoviePlayerController achieves full screen mode by creating another UIWindow, you learn from this to support full screen using AVPlayer, too

Movie Source Type

MPMoviePlayerController

It has movieSourceType that provides clues to the playback system, hence improving load time

“ If you know the source type of the movie, setting the value of this property before playback begins can improve the load times for the movie content.”

AVPlayer

Read Handling Different Types of Asset on AV Foundation Programming Guide

“To create and prepare an HTTP live stream for playback. Initialize an instance of AVPlayerItem using the URL. (You cannot directly create an AVAsset instance to represent the media in an HTTP Live Stream.)”

AVAsset

AVPlayer allows you to access AVAsset, which provides you more information about the playback and load state

Allow a range within a video to be playable

AVPlayerItem has forwardPlaybackEndTime and reversePlaybackEndTime that is used to specify a range that the player can play. When forwardPlaybackEndTime is specified and the playhead passes this points, AVPlayerItem will trigger AVPlayerItemDidPlayToEndTimeNotification

But it doesn’t work in my case forwardPlaybackEndTime does not work

You can have many instances of AVPlayer playing at the same time

Read more

  1. AV Foundation Programming Guide
  2. WWDC 2011 Session 405 Exploring AV Foundation
  3. WWDC 2011 Session 415 Working With Media In AV Foundation
  4. WWDC 2014 Session 503 Mastering Modern Media Playback
  5. WWDC 2011 Session 406 AirPlay and External Displays in iOS apps
  6. AVPlayerDemo
  7. VKVideoPlayer
  8. ALMoviePlayerController
  9. AV Foundation Playing Videos
  10. AVPlayer and MPMoviePlayerController differences
  11. MPMoviePlayer Tips

How to handle reachability in iOS

Issue #209

Here are what I learn about reachability handling in iOS, aka checking for internet connection. Hope you will find it useful, too.

This post starts with techniques from Objective age, but many of the concepts still hold true

The naive way

Some API you already know in UIKit can be used for checking internet connection. Most of them are synchronous code, so you ‘d better call them in a background thread

1
2
3
4
5
6
7
8
- (BOOL)connectedToInternet
{
NSString *string = [NSString stringWithContentsOfURL:[NSURL URLWithString:@"http://www.google.com"]
encoding:NSUTF8StringEncoding
error:nil];

return string ? YES : NO;
}
1
2
3
4
5
6
7
8
9
10
- (BOOL)connectedToInternet
{
NSURL *url = [NSURL URLWithString:@"http://www.google.com"];
NSMutableURLRequest *request = [NSMutableURLRequest requestWithURL:url];
[request setHTTPMethod:@"HEAD"];
NSHTTPURLResponse *response;
[NSURLConnection sendSynchronousRequest:request returningResponse:&response error: NULL];

return ([response statusCode] == 200) ? YES : NO;
}

Using SystemConfiguration framework

After importing the SystemConfiguration framework, you can use either SCNetworkReachabilityGetFlags to synchronously get the reachability status, or provide a callback to SCNetworkReachabilitySetCallback to be notified about reachability status change.

Note that SCNetworkReachabilityGetFlags is synchronous.

The System Configuration framework reachability API () operates synchronously by default. Thus, seemingly innocuous routines like SCNetworkReachabilityGetFlags can get you killed by the watchdog. If you’re using the reachability API, you should use it asynchronously. This involves using the SCNetworkReachabilityScheduleWithRunLoop routine to schedule your reachability queries on the run loop

1
2
3
4
5
6
7
8
9
10
11
12
13
14
15
16
- (BOOL) isConnectionAvailable
{
SCNetworkReachabilityFlags flags;
BOOL receivedFlags;

SCNetworkReachabilityRef reachability = SCNetworkReachabilityCreateWithName(CFAllocatorGetDefault(), [@"dipinkrishna.com" UTF8String]);
receivedFlags = SCNetworkReachabilityGetFlags(reachability, &flags);
CFRelease(reachability);

if (!receivedFlags || (flags == 0) )
{
return FALSE;
} else {
return TRUE;
}
}

Note that SCNetworkReachabilitySetCallback notifies only when reachability status changes

Assigns a client to the specified target, which receives callbacks when the reachability of the target changes

Using some libraries

Libraries make our life easier, but to live well with them, you must surely understand them. There are many reachability libraries on Github, but here I want to mention the most popular: Reachability from tonymillion and AFNetworkReachabilityManager (a submodule of AFNetworking) from mattt. Both use SystemConfiguration under the hood.

Reachability

Some people use Reachability like this

1
2
3
4
5
6
7
8
9
10
11
12
13
14
15
16
17
18
19
20
21
22
23
24
- (void)testInternetConnection
{
internetReachableFoo = [Reachability reachabilityWithHostname:@"www.google.com"];

// Internet is reachable
internetReachableFoo.reachableBlock = ^(Reachability*reach)
{
// Update the UI on the main thread
dispatch_async(dispatch_get_main_queue(), ^{
NSLog(@"Yayyy, we have the interwebs!");
});
};

// Internet is not reachable
internetReachableFoo.unreachableBlock = ^(Reachability*reach)
{
// Update the UI on the main thread
dispatch_async(dispatch_get_main_queue(), ^{
NSLog(@"Someone broke the internet :(");
});
};

[internetReachableFoo startNotifier];
}

Looking into the method “startNotifier”, you will see that it only uses SCNetworkReachabilitySetCallback and it means this callback will only be called if reachability status changes.

If you want to know the reachability status directly, for example, the reachability status at app launch, you must use the method “isReachable”. This method under the hood uses SCNetworkReachabilityGetFlags which is synchronous, and it locks the calling thread.

Reachability has reachabilityForLocalWiFi, which is interesting :)

1
2
3
4
5
6
7
8
9
10
11
+(Reachability*)reachabilityForLocalWiFi
{
struct sockaddr_in localWifiAddress;
bzero(&localWifiAddress, sizeof(localWifiAddress));
localWifiAddress.sin_len = sizeof(localWifiAddress);
localWifiAddress.sin_family = AF_INET;
// IN_LINKLOCALNETNUM is defined in <netinet/in.h> as 169.254.0.0
localWifiAddress.sin_addr.s_addr = htonl(IN_LINKLOCALNETNUM);

return [self reachabilityWithAddress:&localWifiAddress];
}

AFNetworkReachabilityManager

With AFNetworkReachabilityManager, all you have to do is

1
2
3
4
5
6
7
- (void)trackInternetConnection
{
[[AFNetworkReachabilityManager sharedManager] startMonitoring];
[[AFNetworkReachabilityManager sharedManager] setReachabilityStatusChangeBlock:^(AFNetworkReachabilityStatus status) {
// Handle the status
}];
}

What is nice about AFNetworkReachabilityManager is that in the “startMonitoring” method, it both uses SCNetworkReachabilitySetCallback and calls AFNetworkReachabilityStatusForFlags to get the initial reachability status in a background thread, and calls the AFNetworkReachabilityStatusBlock. So in the user ‘s point of view, all we care about is the AFNetworkReachabilityStatusBlock handler.

AFNetworking has all the features that Reachability has, and its code is well structured. Another cool thing about it is that it is already in your AFNetworking pod. It’s hard to find projects without AFNetworking these days

isReachableViaWWAN vs isReachableViaWiFi

Take a look at the method AFNetworkReachabilityStatusForFlags and you will know the story

1
2
3
4
5
6
7
8
9
10
11
12
13
14
15
16
17
static AFNetworkReachabilityStatus AFNetworkReachabilityStatusForFlags(SCNetworkReachabilityFlags flags) {
[...]
status = AFNetworkReachabilityStatusUnknown;
if (isNetworkReachable == NO) {
status = AFNetworkReachabilityStatusNotReachable;
}
#if TARGET_OS_IPHONE
else if ((flags & kSCNetworkReachabilityFlagsIsWWAN) != 0) {
status = AFNetworkReachabilityStatusReachableViaWWAN;
}
#endif
else {
status = AFNetworkReachabilityStatusReachableViaWiFi;
}

return status;
}

isReachableViaWWAN is supposed to be for iOS Device

How to use AFNetworkReachabilityManager

I’ve asked a question here Issue 2262, you should take a look at it

The safe way is not to use the sharedManager, but use managerForDomain

1
2
3
4
5
6
7
8
AFNetworkReachabilityManager *afReachability = [AFNetworkReachabilityManager managerForDomain:@"www.google.com"];
[afReachability setReachabilityStatusChangeBlock:^(AFNetworkReachabilityStatus status) {
if (status < AFNetworkReachabilityStatusReachableViaWWAN) {
[FTGAlertView showMessage:@"No internet connection"];
}
}];

[afReachability startMonitoring];

You should read the question 7 and 8 in the Reference below to know more about SCNetworkReachabilityCreateWithName vs SCNetworkReachabilityCreateWithAddress, and about the zero address

Reachability.swift

In Swift, there is this popular Reachability.swift to check for network reachability status

Connectivity

Sometimes, a more robust way is just to ping certain servers, that how’s Connectivy works

Also, read more Solving the Captive Portal Problem on iOS

In order to detect that it has connected to a Wi-Fi network with a captive portal, iOS contacts a number of endpoints hosted by Apple — an example being https://www.apple.com/library/test/success.html. Each endpoint hosts a small HTML page of the form:

Read more

  1. Reachability
  2. AFNetworkReachabilityManager
  3. How to check for internet connection synchronously?
  4. iOS: Check whether internet connection is available
  5. Check if Active Internet Connection Exists on iOS Device
  6. Technical Q&A QA1693 Synchronous Networking On The Main Thread
  7. How to check for network reachability on iOS in a non-blocking manner?
  8. understanding INADDR_ANY for socket programming - c

Dealing with CSS responsiveness in Wordpress

Issue #208

During the alpha test of LearnTalks, some of my friends reported that the screen is completely blank in the search page, and this happened in mobile only. This article is how I identify the problem and found a workaround for the issue, it may not be the solution, but at least the screen does not appear blank anymore.

As someone who likes to keep up with tech via watching conference videos, I thought it might be a good idea to collect all of these to better search and explore later. So I built a web app with React and Firebase, it is a work in progress for now. Due to time constraints, I decided to go first with Wordpress to quickly play with the idea. So there is LearnTalks.

The theme Marinate that I used didn’t want to render the search page correctly. So I head over to Chrome Dev Tool for Responsive Viewport Mode and Safari for Web Inspector

a1

a2

The tests showed that the problem only happened on certain screen resolutions. This must be due to CSS @media query which displays different layouts for different screen sizes. And somehow it didn’t work for some sizes.

1
2
3
4
5
@media screen and (max-width: 800px) {
#site-header {
display: none;
}
}

A bit about the rules

The @media rule is used in media queries to apply different styles for different media types/devices.

Media queries can be used to check many things, such as:

width and height of the viewport
width and height of the device
orientation (is the tablet/phone in landscape or portrait mode?)
resolution
Using media queries are a popular technique for delivering a tailored style sheet (responsive web design) to desktops, laptops, tablets, and mobile phones.

So I go to Wordpress Dashboard -> Appearance -> Editor to examine CSS files. Unsurprisingly, there are a bunch of media queries

1
2
3
4
5
6
7
8
9
10
11
12
13
14
15
16
17
18
@media (min-width: 600px) and (max-width: 767px) {
.main-navigation {
padding: 0;
}
.site-header .pushmenu {
margin-top:0px;
}
.social-networks li a {
line-height:2.1em !Important;
}
.search {
display: none !important;
}
.customer blockquote {
padding: 10px;
text-align: justify;
}
}

The .search selector is suspicious display: none !important;

The important directive is, well, quite important

It means, essentially, what it says; that ‘this is important, ignore subsequent rules, and any usual specificity issues, apply this rule!’

In normal use, a rule defined in an external stylesheet is overruled by a style defined in the head of the document, which, in turn, is overruled by an in-line style within the element itself (assuming equal specificity of the selectors). Defining a rule with the !important 'attribute' (?) discards the normal concerns as regards the ‘later’ rule overriding the ‘earlier’ ones.

Luckily, this theme allows the ability to Edit CSS, so I can override that to a block attribute to always show search page

a3

How to launch app at start up in macOS

Issue #205

ServiceManagement framework

https://developer.apple.com/documentation/servicemanagement/1501557-smloginitemsetenabled

SMLoginItemSetEnabled

Enable a helper application located in the main application bundle’s “Contents/Library/LoginItems” directory.

Login items

macOS Sierra: Open items automatically when you log in

You can have apps, documents, folders, or server connections open automatically whenever you log in to your Mac.

Add or remove automatic items
Choose Apple menu > System Preferences, then click Users & Groups.

How to fix mismatched deployment between app and test target in Xcode

Issue #204

  • My macOS app target has deployment target 10.12, but when running test, I get
1
Compiling for OS X 10.11, but module 'MyApp' has a minimum deployment target of OS X 10.12: /Users/khoa/MyApp/DerivedData/MyApp/Build/Products/Debug/MyApp.framework/Modules/MyApp.swiftmodule/x86_64.swiftmodule
  • The fix is go to test target -> Build Settings -> Deployment
    Ensure deployments match
build

Updated at 2020-05-14 07:53:33

How to notarize macOS app

Issue #203

New Notarization Requirements

https://developer.apple.com/news/?id=04102019a

With the public release of macOS 10.14.5, we require that all developers creating a Developer ID certificate for the first time notarize their apps, and that all new and updated kernel extensions be notarized as well

Signing Your Apps for Gatekeeper

https://developer.apple.com/developer-id/

Unpublished Software. It’s easy to get unpublished software notarized with the Export process or xcodebuild. Custom build workflows are supported by the xcrun altool command line tool for uploading, and you can use xcrun stapler to attach the ticket to the package.

Published Software. To submit software you’ve already published, upload it using the xcrun altool command line tool. Several file types are supported, including .zip, .pkg, and .dmg, so you can upload the same package you already distribute to users.

Notarizing Your App Before Distribution

https://developer.apple.com/documentation/security/notarizing_your_app_before_distribution

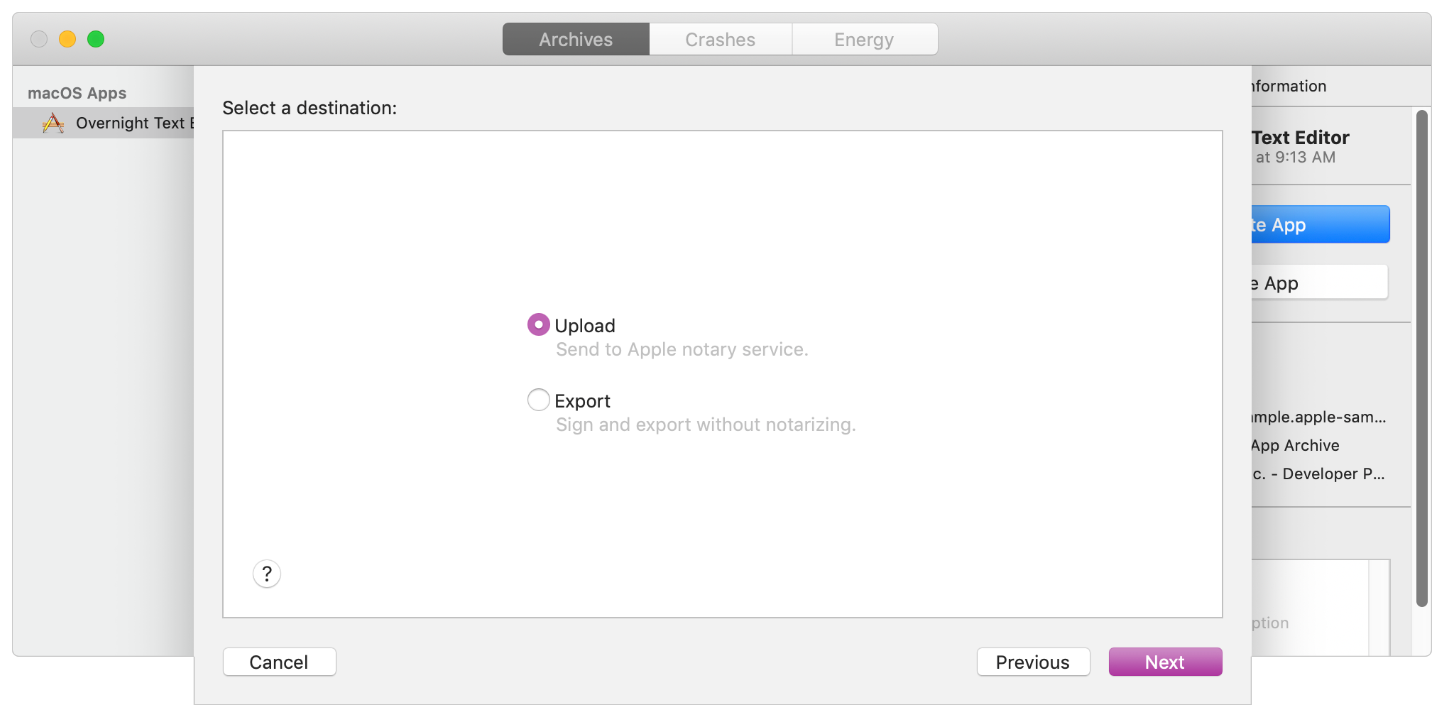
When you click Next, Xcode uploads your archive to the notary service. When the upload is complete, the notary service begins the scanning process, which usually takes less than an hour. While the notary service scans your software, you can continue to prepare your archive for distribution. For example, you can export the archive and perform any final testing that you require prior to making your software available to customers.

When the notarization process finishes, Xcode downloads the ticket and staples it to your archive. At that point, export your archive again to receive a distributable version of your software that includes the notary ticket.

Upload a macOS app to be notarized

https://help.apple.com/xcode/mac/current/#/dev88332a81e

First, upload your macOS app to Apple to be notarized. If the upload fails, view the upload logs to find the problem. For example, you must enable hardened runtime (macOS) before you upload the app. Otherwise, check the notarization status and when the status is “Ready for distribution”, export the app for distribution.

Distribute outside the Mac App Store (macOS)

https://help.apple.com/xcode/mac/current/#/dev033e997ca

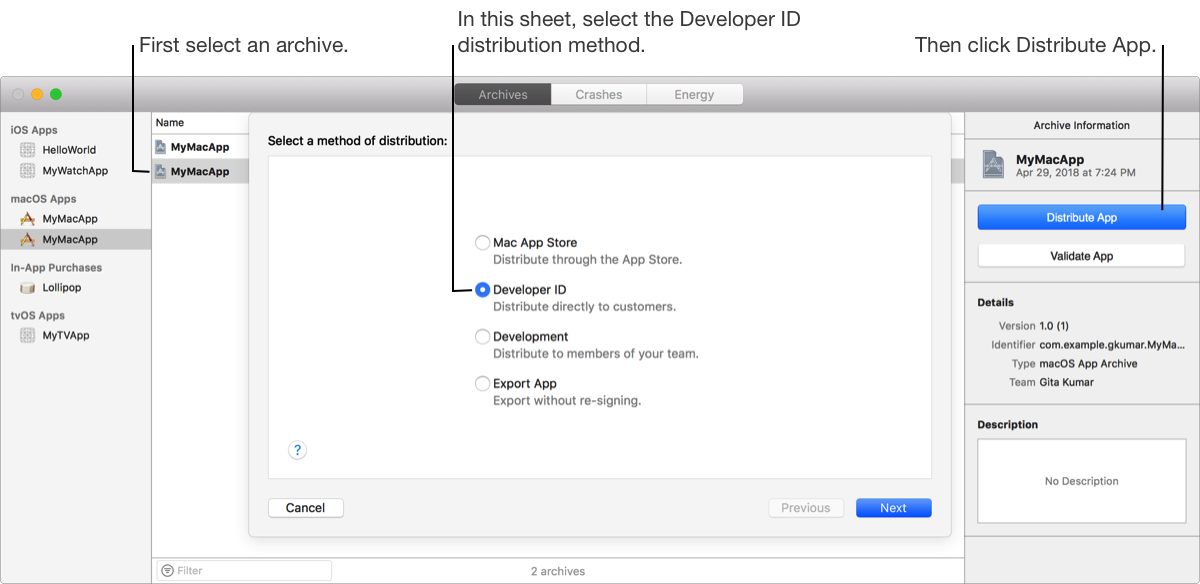
In some cases, you may want to distribute an app outside of the Mac App Store. Because the app won’t be distributed by Apple, assure users that you are a trusted developer by signing your app with a Developer ID certificate. Users gain additional assurance if your Developer ID-signed app is also notarized by Apple.

On macOS, if your app isn’t downloaded from the Mac App Store or signed with a Developer ID certificate, it won’t launch unless the user completely disables Gatekeeper. Users have the option of enabling or disabling identified developers in System Preferences.

How to use shared AppGroup UserDefaults in macOS and Xcode extension

Issue #201

  • Go to both app and extension target, under Capabilities, enable AppGroup

  • Specify $(TeamIdentifierPrefix)group.com.onmyway133.MyApp

  • $(TeamIdentifierPrefix) will expand to something like T78DK947F3., with .

  • Then using is like a normal UserDefaults

1
2
3
4
let defaults = UserDefaults(suiteName: "T78DK947F3 .group.com.onmyway133.MyApp")

defaults?.set(true, forKey: "showOptions")
defaults?.synchronize()

Updated at 2020-11-12 19:57:33

How to check file under Library in macOS

Issue #200

1
2
3
let home = NSSearchPathForDirectoriesInDomains(.applicationScriptsDirectory, .userDomainMask, true).first!
let path = home.appending(".XcodeWayExtensions/XcodeWayScript.scpt")
let exists = FileManager.default.fileExists(atPath: path)

How to parse json in Go

Issue #199

Unmarshal using encoding/json

  • property in struct needs to be first letter capitalized
1
2
3
4
5
6
7
8
9
10
11
12
13
14
15
16
17
18
19
20
21
22
23
24
25
26
27
28
29
30
31
32
33
import (
"net/http"
"encoding/json"
"io/ioutil"
"fmt"
)

type MyJsonObject struct {
Id string `json:"id"`
Name string `json:"name"`
}

type MyJsonArray struct {
Data []MyJsonObject `json:"data"`
}

func FetchJson() {
url := "https://myapp.com/json"
client := http.Client{
Timeout: time.Second * 10
}

request, requestError := http.NewRequest(http.MethodGet, url, nil)
request.Header.Set("User-Agent", "myapp")
response, responseError := client.Do(request)
body, readError := ioutil.ReadAll(response.Body)

fmt.Println(requestError, responseError, readError)

myJsonArray := MyJsonArray{}
marshalError := json.Unmarshal(body, &myJsonArray)
fmt.Println(jsonResponse, marshalError)
}

Map

And how to map to another struct
https://gobyexample.com/collection-functions

1
2
3
4
5
6
7
8
9
10
11
12
13
14
15
16
17
18
func Map(vs []JsonStop, f func(JsonStop) *api.Stop) []*api.Stop {
vsm := make([]*api.Stop, len(vs))
for i, v := range vs {
vsm[i] = f(v)
}
return vsm
}

stops := Map(jsonResponse.Data, func(jsonStop JsonStop) *api.Stop {
stop := api.Stop{
Id: jsonStop.Id,
Name: jsonStop.Name,
Address: jsonStop.Address,
Lat: jsonStop.Lat,
Long: jsonStop.Long}

return &stop
})

json to protobuf

How to resolve deep json object in Dart

Issue #198

If we are not on the edge with GRPC and Protocol Buffer, then most likely we are going to deal with Restful and JSON. In one of my Flutter apps I needed to consume JSON

JSON and serialization

The guide at https://flutter.dev/docs/development/data-and-backend/json is definitely the way to go.

Currently there are 2 ways. One is to manually use dart:convert package

1
Map<String, dynamic> user = jsonDecode(jsonString);

The other way is to use json_serializable to generate parsing code

1
2
3
4
5
6
7
8
9
10
11
12
13
14
15
16
17
18
19
20
21
22
23
24
25
26
27
import 'package:json_annotation/json_annotation.dart';

/// This allows the `User` class to access private members in
/// the generated file. The value for this is *.g.dart, where
/// the star denotes the source file name.
part 'user.g.dart';

/// An annotation for the code generator to know that this class needs the
/// JSON serialization logic to be generated.
@JsonSerializable()

class User {
User(this.name, this.email);

String name;
String email;

/// A necessary factory constructor for creating a new User instance
/// from a map. Pass the map to the generated `_$UserFromJson()` constructor.
/// The constructor is named after the source class, in this case User.
factory User.fromJson(Map<String, dynamic> json) => _$UserFromJson(json);

/// `toJson` is the convention for a class to declare support for serialization
/// to JSON. The implementation simply calls the private, generated
/// helper method `_$UserToJson`.
Map<String, dynamic> toJson() => _$UserToJson(this);
}

json_resolve

The problem with manual approach is that it involves lot of boilerplate code, especially when accessing property inside deeply nested json. The problem with code generation approach is that it does not always fit our need and may lack of customization.

Therefore I created json_resolve which allows us to access json using keypath, with type checking and safety in mind. The code is small, simple to reason and tested.

1
2
3
4
5
6
7
8
9
10
11
final String byProperty = resolve(json: json, path: "movie", defaultValue: "error");
expect(byProperty, "isFun");

final int byInt = resolve(json: json, path: "earth", defaultValue: 0);
expect(byInt, 199999);

final String byIndex = resolve(json: json, path: "dc.2.name", defaultValue: "error");
expect(byIndex, "Wonder Woman");

final String byIndexThenProperty = resolve(json: json, path: "marvel.0.appear.1.title", defaultValue: "error");
expect(byIndexThenProperty, "The Dark World");

How to generate grpc protobuf files

Issue #197

protoc

https://grpc.io/docs/quickstart/go.html

Install the protoc compiler that is used to generate gRPC service code. The simplest way to do this is to download pre-compiled binaries for your platform(protoc--.zip) from here: https://github.com/google/protobuf/releases

Unzip this file.
Update the environment variable PATH to include the path to the protoc binary file.

Go protoc plugin

https://github.com/golang/protobuf

1
2
3
go get -u github.com/golang/protobuf/protoc-gen-go
export PATH=$PATH:$GOPATH/bin
source ~/.zshrc

Swift protoc plugin

https://github.com/grpc/grpc-swift

The recommended way to use Swift gRPC is to first define an API using the
Protocol Buffer
language and then use the
Protocol Buffer Compiler
and the Swift Protobuf
and Swift gRPC plugins to
generate the necessary support code.

1
2
3
4
git clone https://github.com/grpc/grpc-swift.git
cd grpc-swift
make
sudo cp protoc-gen-swift protoc-gen-swiftgrpc /usr/local/bin

Generate

1
protoc --swift_out=MyApp/Api --swiftgrpc_out=Client=true,Server=false:MyApp/Api --go_out=plugins=grpc:server/api api.proto

In case we need to cd

1
2
3
cd MyApp/Library/Models/Proto

protoc --swift_out=../Generated --swiftgrpc_out=Client=true,Server=false:../Generated api.proto

Empty

If remote import is needed, then the workaround is to download the that proto locally, for example empty.proto https://github.com/protocolbuffers/protobuf/blob/master/src/google/protobuf/empty.proto

Inside SwiftProtobuf pod, there is generated empty.pb.swift

1
2
3
4
5
6
7
8
9
public struct Google_Protobuf_Empty {
// SwiftProtobuf.Message conformance is added in an extension below. See the
// `Message` and `Message+*Additions` files in the SwiftProtobuf library for
// methods supported on all messages.

public var unknownFields = SwiftProtobuf.UnknownStorage()

public init() {}
}

To consume, we can

1
2
3
import SwiftProtobuf

let empty = Google_Protobuf_Empty()

oneof mode

1
2
3
4
5
6
message Person {
oneof mode {
Human human = 1;
Superman superman = 2;
}
}

Cannot convert value of type ‘Server_Person.OneOf_Mode’ to expected argument type ‘Server_Human’

Need to assign the mode

1
2
var person = Person()
person.mode = Person.OneOf_Mode.Human()

How to cache CocoaPods

Issue #196

CocoaPods vs Carthage

CocoaPods will build and compile our frameworks every time whenever you are doing the clean build or run pod install or pod update for the project.

Cache Carthage

Cache CocoaPods

It will compile the source code of pods during the pod install process, and make CocoaPods use them. Which pod should be compiled is controlled by the flag in Podfile.

Xcode 10 new build system

Understanding framework

How to build a networking in Swift

Issue #195

Miami

Concerns

Parameter encoding is confusing

-https://github.com/Alamofire/Alamofire/blob/master/Documentation/Usage.md#parameter-encoding

Query and body builder

HTTP

Lazy execution

Catch error

Implementation

Use Promise to handle chain and error

https://github.com/onmyway133/Miami/blob/master/Sources/Shared/Future/Future.swift

1
2
3
4
5
6
7
8
9
10
11
12
13
14
15
16
17
18
19
20
21
22
23
24
25
26
27
28
29
30
31
32
33
34
35
36
37
38
39
40
41
42
43
44
45
46
47
48
49
50
51
52
53
54
55
56
57
58
59
60
61
62
63
64
65
66
67
68
69
70
71
72
73
74
75
76
77
78
79
80
81
82
83
84
85
86
87
88
89
90
91
92
93
94
95
96
97
98
99
100
101
102
103
104
105
106
107
108
109
110
111
112
113
114
115
116
117
118
119
120
121
122
123
124
125
126
127
128
129
130
131
132
133
134
135
136
137
138
139
140
141
142
143
144
145
146
147
148
149
150
151
152
153
154
155
156
157
158
159
160
161
162
163
164
165
166
167
168
169
170
171
172
173
174
175
176
177
178
179
180
181
182
183
184
185
186
187
188
189
190
191
192
193
194
195
196
197
198
199
200
201
202
import Foundation

public class Token {
private let lock = NSRecursiveLock()
private var _isCancelled = false
private var callbacks: [() -> Void] = []

public init() {}

public func isCancelled() -> Bool {
return lock.whenLock {
return _isCancelled
}
}

public func cancel() {
lock.whenLock {
guard self._isCancelled == false else {
return
}

self._isCancelled = true
self.callbacks.forEach { $0() }
self.callbacks.removeAll()
}
}

public func onCancel(_ callback: @escaping () -> Void) {
lock.whenLock {
self.callbacks.append(callback)
}
}
}

public class Resolver<T> {
public let queue: DispatchQueue
public let token: Token
private var callback: (Result<T, Error>) -> Void

public init(queue: DispatchQueue, token: Token, callback: @escaping (Result<T, Error>) -> Void) {
self.queue = queue
self.token = token
self.callback = callback
}

public func complete(value: T) {
self.handle(result: .success(value))
}

public func fail(error: Error) {
self.handle(result: .failure(error))
}

public func handle(result: Result<T, Error>) {
queue.async {
self.callback(result)
self.callback = { _ in }
}
}
}

public class Future<T> {
public let work: (Resolver<T>) -> Void

public init(work: @escaping (Resolver<T>) -> Void) {
self.work = work
}

public static func fail(error: Error) -> Future<T> {
return Future<T>.result(.failure(error))
}

public static func complete(value: T) -> Future<T> {
return .result(.success(value))
}

public static func result(_ result: Result<T, Error>) -> Future<T> {
return Future<T>(work: { resolver in
switch result {
case .success(let value):
resolver.complete(value: value)
case .failure(let error):
resolver.fail(error: error)
}
})
}

public func run(queue: DispatchQueue = .serial(), token: Token = Token(), completion: @escaping (Result<T, Error>) -> Void) {
queue.async {
if (token.isCancelled()) {
completion(.failure(NetworkError.cancelled))
return
}

let resolver = Resolver<T>(queue: queue, token: token, callback: completion)
self.work(resolver)
}
}

public func map<U>(transform: @escaping (T) -> U) -> Future<U> {
return Future<U>(work: { resolver in
self.run(queue: resolver.queue, token: resolver.token, completion: { result in
resolver.handle(result: result.map(transform))
})
})
}

public func flatMap<U>(transform: @escaping (T) -> Future<U>) -> Future<U> {
return Future<U>(work: { resolver in
self.run(queue: resolver.queue, token: resolver.token, completion: { result in
switch result {
case .success(let value):
let future = transform(value)
future.run(queue: resolver.queue, token: resolver.token, completion: { newResult in
resolver.handle(result: newResult)
})
case .failure(let error):
resolver.fail(error: error)
}
})
})
}

public func catchError(transform: @escaping (Error) -> Future<T>) -> Future<T> {
return Future<T>(work: { resolver in
self.run(queue: resolver.queue, token: resolver.token, completion: { result in
switch result {
case .success(let value):
resolver.complete(value: value)
case .failure(let error):
let future = transform(error)
future.run(queue: resolver.queue, token: resolver.token, completion: { newResult in
resolver.handle(result: newResult)
})
}
})
})
}

public func delay(seconds: TimeInterval) -> Future<T> {
return Future<T>(work: { resolver in
resolver.queue.asyncAfter(deadline: DispatchTime.now() + seconds, execute: {
self.run(queue: resolver.queue, token: resolver.token, completion: { result in
resolver.handle(result: result)
})
})
})
}

public func log(closure: @escaping (Result<T, Error>) -> Void) -> Future<T> {
return Future<T>(work: { resolver in
self.run(queue: resolver.queue, token: resolver.token, completion: { result in
closure(result)
resolver.handle(result: result)
})
})
}

public static func sequence(futures: [Future<T>]) -> Future<Sequence<T>> {
var index = 0
var values = [T]()

func runNext(resolver: Resolver<Sequence<T>>) {
guard index < futures.count else {
let sequence = Sequence(values: values)
resolver.complete(value: sequence)
return
}

let future = futures[index]
index += 1

future.run(queue: resolver.queue, token: resolver.token, completion: { result in
switch result {
case .success(let value):
values.append(value)
runNext(resolver: resolver)
case .failure(let error):
resolver.fail(error: error)
}
})
}

return Future<Sequence<T>>(work: runNext)
}
}

extension NSLocking {
@inline(__always)
func whenLock<T>(_ closure: () throws -> T) rethrows -> T {
lock()
defer { unlock() }
return try closure()
}

@inline(__always)
func whenLock(_ closure: () throws -> Void) rethrows {
lock()
defer { unlock() }
try closure()
}
}

Query builder to build query

1
2
3
4
5
6
7
8
9
10
11
12
13
14
15
16
17
18
19
20
21
22
23
24
25
26
27
28
29
30
31
32
33
34
35
36
37
38
39
40
41
42
import Foundation

public protocol QueryBuilder {
func build() -> [URLQueryItem]
}

public class DefaultQueryBuilder: QueryBuilder {
public let parameters: JSONDictionary

public init(parameters: JSONDictionary = [:]) {
self.parameters = parameters
}

public func build() -> [URLQueryItem] {
var components = URLComponents()

let parser = ParameterParser()
let pairs = parser
.parse(parameters: parameters)
.map({ $0 })
.sorted(by: <)

components.queryItems = pairs.map({ key, value in
URLQueryItem(name: key, value: value)
})

return components.queryItems ?? []
}

public func build(queryItems: [URLQueryItem]) -> String {
var components = URLComponents()
components.queryItems = queryItems.map({
return URLQueryItem(name: escape($0.name), value: escape($0.value ?? ""))
})

return components.query ?? ""
}

public func escape(_ string: String) -> String {
return string.addingPercentEncoding(withAllowedCharacters: .urlQueryAllowed) ?? ""
}
}

Body builder to build body

1
2
3
4
5
6
7
8
9
10
11
12
13
14
15
16
17
18
19
20
21
22
import Foundation

public class JsonBodyBuilder: BodyBuilder {
public let parameters: JSONDictionary

public init(parameters: JSONDictionary) {
self.parameters = parameters
}

public func build() -> ForBody? {
guard let data = try? JSONSerialization.data(
withJSONObject: parameters,
options: JSONSerialization.WritingOptions()
) else {
return nil
}

return ForBody(body: data, headers: [
Header.contentType.rawValue: "application/json"
])
}
}

Make request with networking

1
2
3
4
5
6
7
8
9
10
11
12
13
14
15
16
17
18
19
20
21
22
23
24
25
26
27
28
29
30
31
32
33
34
35
36
37
38
39
40
41
42
43
44
45
46
47
48
49
50
51
52
53
54
import Foundation

public class Networking {
public let session: URLSession
public let mockManager = MockManager()

public var before: (URLRequest) -> URLRequest = { $0 }
public var catchError: (Error) -> Future<Response> = { error in Future.fail(error: error) }
public var validate: (Response) -> Future<Response> = { Future.complete(value: $0) }
public var logResponse: (Result<Response, Error>) -> Void = { _ in }

public init(session: URLSession = .shared) {
self.session = session
}

public func make(options: Options, baseUrl: URL) -> Future<Response> {
let builder = UrlRequestBuilder()
do {
let request = try builder.build(options: options, baseUrl: baseUrl)
return make(request: request)
} catch {
return Future<Response>.fail(error: error)
}
}

public func make(request: URLRequest) -> Future<Response> {
if let mock = mockManager.findMock(request: request) {
return mock.future.map(transform: { Response(data: $0, urlResponse: URLResponse()) })
}

let future = Future<Response>(work: { resolver in
let task = self.session.dataTask(with: request, completionHandler: { data, response, error in
if let data = data, let urlResponse = response {
resolver.complete(value: Response(data: data, urlResponse: urlResponse))
} else if let error = error {
resolver.fail(error: NetworkError.urlSession(error, response))
} else {
resolver.fail(error: NetworkError.unknownError)
}
})

resolver.token.onCancel {
task.cancel()
}

task.resume()
})

return future
.catchError(transform: self.catchError)
.flatMap(transform: self.validate)
.log(closure: self.logResponse)
}
}

Mock a request

1
2
3
4
5
6
7
8
9
10
11
12
13
14
15
16
17
18
19
20
21
22
23
24
25
26
27
28
29
30
import Foundation

public class Mock {
public let options: Options
public let future: Future<Data>

public init(options: Options, future: Future<Data>) {
self.options = options
self.future = future
}

public static func on(options: Options, data: Data) -> Mock {
return Mock(options: options, future: Future.complete(value: data))
}

public static func on(options: Options, error: Error) -> Mock {
return Mock(options: options, future: Future.fail(error: error))
}

public static func on(options: Options, file: String, fileExtension: String, bundle: Bundle = Bundle.main) -> Mock {
guard
let url = bundle.url(forResource: file, withExtension: fileExtension),
let data = try? Data(contentsOf: url)
else {
return .on(options: options, error: NetworkError.invalidMock)
}

return .on(options: options, data: data)
}
}

How to construct URL with URLComponents and appendPathComponent in Swift

Issue #193

1
2
3
var components = URLComponents(string: "https://google.com/")
components?.path = "abc/"
components?.url

-> nil

1
2
3
4
var components = URLComponents(string: "https://google.com/")
components?.path = "/abc/"
components?.url
components?.queryItems = [URLQueryItem(name: "q", value: "pokemon")]

-> https://google.com/abc/?q=pokemon

1
2
3
var url = URL(string: "https://google.com/")
url?.appendPathComponent("/abc?q=pokemon")
url

-> https://google.com//abc%3Fq=pokemon

How to catch error in ApolloClient

Issue #192

Read https://www.apollographql.com/docs/react/features/error-handling
How to catch actual error https://github.com/apollographql/apollo-client/issues/4016 🤔

1
2
3
4
5
6
7
8
9
10
11
12
13
14
15
16
17
18
19
20
21
22
23
24
25
26
27
28
29
30
31
32
33
34
35
36
37
38
39
40
41
42
43
44
45
46
47
48
49
50
51
52
53
54
55
56
57
58
59
60
61
62
63
64
65
66
67
68
69
70
71
72
73
74
75
import { Observable } from 'apollo-link'
import ApolloClient from 'apollo-boost'
import Token from 'library/models/Token'
import TokenService from './TokenService'
import { TokenRefreshException } from 'library/utils/Exception'

const client = new ApolloClient({
uri: 'https://www.myapp.no/api/',
request: async (operation) => {
const token = await TokenService.loadToken()
updateOperation(operation, token)
},
onError: (error) => {
console.log('ApolloClient error', error)
if (isAuthError(error)) {
return handleAuthError(error)
} else {
return error.forward(error.operation)
}
},
fetchOptions: {
mode: 'no-cors',
}
})

const isValidErrorCode = (statusCode) => {
if (typeof (statusCode) === 'undefined' || statusCode === null) {
return false
} else {
return true
}
}

const isAuthError = (error) => {
console.log('client error', error)
if (error.networkError) {
return error.networkError.statusCode === 401
} else {
return false
}
}

const handleAuthError = (error) => {
return new Observable((observer) => {
TokenService.refreshToken()
.then((token) => {
updateOperation(error.operation, token)
})
.then(() => {
const subscriber = {
next: observer.next.bind(observer),
error: observer.error.bind(observer),
complete: observer.complete.bind(observer)
}

error.forward(error.operation).subscribe(subscriber)
})
.catch((e) => {
observer.error(e)
})
})
}

const updateOperation = (operation, token: Token) => {
const tokenHeader = `${token.token_type} ${token.access_token}`

operation.setContext((context) => {
return {
headers: {
authorization: tokenHeader,
'Content-Type': 'application/json'
}
}
})
}

How to do clustering with Google Maps in iOS

Issue #191

Basic with Google Maps

Add to Podfile pod 'GoogleMaps'

Add a custom marker

1
2
3
4
5
6
7
8
9
10
11
12
13
14
15
16
17
import GoogleMaps

final class StopMarker: GMSMarker {
let stop: Stop

init(stop: Stop) {
self.stop = stop
super.init()
self.title = stop.name
self.position = stop.toCoordinate()

let imageView = UIImageView(frame: CGRect(x: 0, y: 0, width: 30, height: 30))
imageView.layer.cornerRadius = 15
imageView.image = UIImage(named: "pin")
self.iconView = imageView
}
}

Show markers

1
2
3
4
5
6
7
8
9
func handle(stops: [Stop]) {
self.stops = stops
stops
.map({ StopMarker(stop: $0) })
.forEach {
$0.map = mapView
}

}

Assigning $0.map = mapView means telling GMSMapView to start rendering markers

Handle tap

1
2
3
4
5
6
7
8
9
10
11
12
13
14
15
extension ViewController: GMSMapViewDelegate {
func mapView(_ mapView: GMSMapView, didTap marker: GMSMarker) -> Bool {
zoomIn(coordinate: marker.position)
return false
}

func mapView(_ mapView: GMSMapView, didTapInfoWindowOf marker: GMSMarker) {
guard let stopMarker = marker as? StopMarker else {
return
}

let detailViewController = StopDetailViewController(stop: stopMarker.stop)
presentPanModal(detailViewController)
}
}

Clustering

Add google-maps-ios-utils manually by following https://github.com/googlemaps/google-maps-ios-utils/blob/master/Swift.md

Otherwise, with CocoaPods, we get error

1
[!] The 'Pods-MyApp' target has transitive dependencies that include static binaries: (/Users/khoa/Projects/MyApp/Pods/GoogleMaps/Base/Frameworks/GoogleMapsBase.framework, /Users/khoa/Projects/MyApp/Pods/GoogleMaps/Maps/Frameworks/GoogleMaps.framework, and /Users/khoa/Projects/MyApp/Pods/GoogleMaps/Maps/Frameworks/GoogleMapsCore.framework)

Add ClusterItem

1
2
3
4
5
6
7
8
9
10
11
12
import Foundation
import CoreLocation

class ClusterItem: NSObject, GMUClusterItem {
let position: CLLocationCoordinate2D
let stop: Stop

init(stop: Stop) {
self.stop = stop
self.position = stop.toCoordinate()
}
}

Set up cluster manager

1
2
3
4
5
6
let iconGenerator = GMUDefaultClusterIconGenerator()
let algorithm = GMUNonHierarchicalDistanceBasedAlgorithm()
let renderer = GMUDefaultClusterRenderer(mapView: mapView, clusterIconGenerator: iconGenerator)
renderer.delegate = self
clusterManager = GMUClusterManager(map: mapView, algorithm: algorithm, renderer: renderer)
clusterManager.setDelegate(self, mapDelegate: self)

Default algorithm GMUNonHierarchicalDistanceBasedAlgorithm

1
2
3
4
5
6
7
8
9
A simple clustering algorithm with O(nlog n) performance. Resulting clusters are not
* hierarchical.
* High level algorithm:
* 1. Iterate over items in the order they were added (candidate clusters).
* 2. Create a cluster with the center of the item.
* 3. Add all items that are within a certain distance to the cluster.
* 4. Move any items out of an existing cluster if they are closer to another cluster.
* 5. Remove those items from the list of candidate clusters.
* Clusters have the center of the first element (not the centroid of the items within it).

Make ClusterItem and add to clusterManager. In the end, call clusterManager.cluster()

1
2
3
4
5
6
7
8
9
10
11
func handle(stops: [Stop]) {
self.stops = stops
stops
.map({ StopMarker(stop: $0) })
.forEach {
let item = ClusterItem(stop: $0.stop)
clusterManager.add(item)
}

clusterManager.cluster()
}

By default, clusterManager uses renderer to render default pin marker. Implement GMUClusterRendererDelegate to use our custom StopMarker

1
2
3
4
5
6
7
8
9
10
extension ViewController: GMUClusterRendererDelegate {
func renderer(_ renderer: GMUClusterRenderer, markerFor object: Any) -> GMSMarker? {
switch object {
case let clusterItem as ClusterItem:
return StopMarker(stop: clusterItem.stop)
default:
return nil
}
}
}

Finally handle tapping on cluster and cluster item

1
2
3
4
5
6
7
8
9
10
11
extension ViewController: GMUClusterManagerDelegate {
func clusterManager(_ clusterManager: GMUClusterManager, didTap cluster: GMUCluster) -> Bool {
print("tap cluster")
return false
}

func clusterManager(_ clusterManager: GMUClusterManager, didTap clusterItem: GMUClusterItem) -> Bool {
print("tap cluster item")
return false
}
}

How to handle file picker in React

Issue #190

1
2
3
4
5
6
7
8
9
10
11
12
13
14
render() {
<Button color="inherit" onClick={this.onImagePress} >Image</Button>
<input ref="fileInput" type="file" id="myFile" multiple accept="image/*" style={{display: 'none'}} onChange={this.handleFiles}></input>
}

onImagePress = () => {
const fileInput = this.refs.fileInput
fileInput.click()
}

handleFiles = (e) => {
e.persist()
const file = e.target.files[0]
}

How to fix ApiException 10 in Flutter for Android

Issue #188

Get error com.google.android.gms.common.api.ApiException: 10 with google_sign_in package.

Read https://developers.google.com/android/guides/client-auth

Certain Google Play services (such as Google Sign-in and App Invites) require you to provide the SHA-1 of your signing certificate so we can create an OAuth2 client and API key for your app

console.developers.google.com/apis/credentials

Credentials -> OAuth client id
If we specify SHA1 in firebase, then console.developers.google.com will generate an Android oauth for us

1
keytool -list -v -keystore {keystore_name} -alias {alias_name}

Use correct keystore for debug and release

1
2
3
4
5
6
7
8
9
10
buildTypes {
release {
// TODO: Add your own signing config for the release build.
// Signing with the debug keys for now, so `flutter run --release` works.
signingConfig signingConfigs.release
}
debug {
signingConfig signingConfigs.debug
}
}

Updated at 2020-10-05 13:23:34

How to get Google account photo in Flutter

Issue #187

If you use Flutter, then you can access it via people.googleapis.com endpoint, code uses google_sign_in library

1
2
3
4
5
6
7
8
9
10
11
12
13
import 'package:google_sign_in/google_sign_in.dart';

Future<String> getPhotoUrl(GoogleSignInAccount account, String userId) async {
// final authentication = await account.authentication;
final url = 'https://people.googleapis.com/v1/people/${userId}?personFields=photos';
final response = await http.get(
url,
headers: await account.authHeaders
);

final data = json.decode(response.body);
return data['photos'].first['url'];
}

You will get something like

1
2
3
4
5
6
{
resourceName: people/998812322529259873423,
etag: %EgQBAzcabcQBAgUH,
photos: [{metadata: {primary: true, source: {type: PROFILE, id: 107721622529987673423}},
url: https://lh3.googleusercontent.com/a-/abcdefmB2p1VWxLsNT9WSV0yqwuwo6o2Ba21sh_ra7CnrZ=s100}]
}

where url is an accessible image url.

Getting activity name through HKWorkoutActivityType in HealthKit

Issue #186

After fetching workouts with HKObjectType.workoutType() , we get HKWorkoutActivityType , which is an enum enum HKWorkoutActivityType : UInt . As of Swift 4.2, there are no way to get enum case as String because this enum has type UInt .

Though there will be some manual involved, we can build a generator to get all the enum case names. Here we will write code to generate code, and use that generated code to examine all the values.

Execute this Swift code in our iOS app

1
2
3
4
5
6
7
8
9
10
11
12
13
14
15
16
func makeCode(string: String) {
let pattern = “case \\w*”
let range = NSMakeRange(0, string.count-1)
let regex = try! NSRegularExpression(pattern: pattern, options: [])
regex
.matches(in: string, options: [], range: range)
.forEach({ result in
let start = string.index(string.startIndex, offsetBy: result.range.lowerBound)
let end = string.index(string.startIndex, offsetBy: result.range.upperBound)
let substring = String(string[start…end])
let name = substring
.replacingOccurrences(of: “case”, with: “”)
.replacingOccurrences(of: “ “, with: “”)
.replacingOccurrences(of: “\n”, with: “”
print(“dictionary[HKWorkoutActivityType.\(name).rawValue] = \”\(name)\””)
})

Where string is all the cases from HKWorkoutActivityType, for example

case archery
The constant for shooting archery.

case bowling
The constant for bowling

case fencing
The constant for fencing.

case gymnastics
Performing gymnastics.

case trackAndField
Participating in track and field events, including shot put, javelin, pole vaulting, and related sports.

What the code does is to use regular expression to examine all the names after case , and build our code

1
2
3
4
5
dictionary[HKWorkoutActivityType.americanFootball.rawValue] = “americanFootball”
dictionary[HKWorkoutActivityType.archery.rawValue] = “archery”
dictionary[HKWorkoutActivityType.australianFootball.rawValue] = “australianFootball”
dictionary[HKWorkoutActivityType.badminton.rawValue] = “badminton”
dictionary[HKWorkoutActivityType.baseball.rawValue] = “baseball”

The above generated code with dictionary contains rawValue as key and the enum case name as value .

Later when we get any HKWorkoutActivityType , we can compare with this dictionary to find the actual name. This is better than hardcode activity name with numbers because those rawValue are just implementation detail