Dealing with updated pod in BuddyBuild

Issue #149

We’re using BuddyBuild as our CI. Today one of our dependencies gets a sweat update https://github.com/hyperoslo/BarcodeScanner/releases/tag/4.1.1. So we pod update BarcodeScanner in one of our projects that depends on it. All is fine when running locally. So I make a Pull Request and wait for the build to kick off in BuddyBuild.

For some reason, BuddyBuild can’t pick up the right version of Cocoapods, hence can’t update the new pods.

1
2
3
4
5
6
7
8
9
10
11
12
13
14
15
16
17
18
19
20
21
22
23
24
25
26
27
28
29
30
31
32
33
34
35
36
37
38
39
40
41
42
43
44
45
46
47
[!] The version of CocoaPods used to generate the lockfile (1.3.1) is higher than the version of the current executable (1.1.1). Incompatibility issues may arise.

=== CocoaPods ===
104
Switching CocoaPods version to 1.1.1
105
Using Command Line: gem cleanup "cocoapods"
106
Using Command Line: gem uninstall "cocoapods" --all --executables --force
107
Using Command Line: gem install "cocoapods" --no-rdoc --no-ri --version "1.1.1"
108
Unpacking caches - cocoapods pod specs
109
Using Command Line: pod install --no-repo-update
110
Analyzing dependencies
111
Pre-downloading: `Tailor` from `https://github.com/zenangst/Tailor`, tag `3.0.0`
112
[!] Unable to satisfy the following requirements:
113
- `BarcodeScanner (~> 4.0)` required by `Podfile`
114
- `BarcodeScanner (~> 4.0)` required by `Podfile`
115
- `BarcodeScanner (~> 4.0)` required by `Podfile`
116
- `BarcodeScanner (~> 4.0)` required by `Podfile`
117
- `BarcodeScanner (~> 4.0)` required by `Podfile`
118
- `BarcodeScanner (~> 4.0)` required by `Podfile`
119
- `BarcodeScanner (= 4.1.1)` required by `Podfile.lock`
120
None of your spec sources contain a spec satisfying the dependencies: `BarcodeScanner (~> 4.0), BarcodeScanner (= 4.1.1)`.
121
You have either:
122
* out-of-date source repos which you can update with `pod repo update`.
123
* mistyped the name or version.
124
* not added the source repo that hosts the Podspec to your Podfile.
125
Note: as of CocoaPods 1.0, `pod repo update` does not happen on `pod install` by default.

Trying script

So I thought I could run some custom script to force BuddyBuild to update the pods. Start with https://docs.buddybuild.com/builds/custom_build_steps.html

I commit the file buddybuild_postclone.sh with

1
2
3
4
#!/usr/bin/env bash

pod repo update
pod update BarcodeScanner

Didn’t work. I then update the script with

1
2
3
4
5
#!/usr/bin/env bash

pod repo remove master
pod setup
pod install

Didn’t work. Taking a closer look at the log. I see

1
Switching CocoaPods version to 1.1.1

It seems BuddyBuild is using cocoapods 1.1.1. Mine is 1.4.0.

Specifying cocoapods version

So I need to specify the correct cocoapods version to make sure I and BuddyBuild are on the same page

1
2
gem install bundler
bundler init

And in my Gemfile

1
2
3
4
5
6
7
# frozen_string_literal: true

source "https://rubygems.org"

git_source(:github) {|repo_name| "https://github.com/#{repo_name}" }

gem "cocoapods", '~> 1.0'

Then run

1
bundler install

And check Gemfile.lock to make sure everything is OK

Finally

Commit the changes, and now BuddyBuild is picking up the right cocoapods version, hence using the new pods

1
2
3
4
5
6
7
8
9
10
11
12
13
14
15


=== CocoaPods ===
45
Switching CocoaPods version to 1.4.0
46
Using Command Line: gem cleanup "cocoapods"
47
Using Command Line: gem uninstall "cocoapods" --all --executables --force
48
Using Command Line: gem install "cocoapods" --no-rdoc --no-ri --version "1.4.0"
49
Unpacking caches - cocoapods pod specs
50
Using Command Line: pod install --no-repo-update

Learning from Open Source Generic Factory

Issue #148

From https://github.com/devxoul/Pure/blob/master/Sources/Pure/FactoryModule.swift

1
2
3
4
5
6
7
8
public protocol FactoryModule: Module {

/// A factory for `Self`.
associatedtype Factory = Pure.Factory<Self>

/// Creates an instance of a module with a dependency and a payload.
init(dependency: Dependency, payload: Payload)
}

From https://github.com/devxoul/Pure/blob/master/Sources/Pure/Factory.swift

1
2
3
4
5
6
7
8
9
10
11
12
13
14
15
16
17
18
19
20
21
22
open class Factory<Module: FactoryModule> {
private let dependencyClosure: () -> Module.Dependency

/// A static dependency of a module.
open var dependency: Module.Dependency {
return self.dependencyClosure()
}

/// Creates an instance of `Factory`.
///
/// - parameter dependency: A static dependency which should be resolved in a composition root.
public init(dependency: @autoclosure @escaping () -> Module.Dependency) {
self.dependencyClosure = dependency
}

/// Creates an instance of a module with a runtime parameter.
///
/// - parameter payload: A runtime parameter which is required to construct a module.
open func create(payload: Module.Payload) -> Module {
return Module.init(dependency: self.dependency, payload: payload)
}
}

From https://github.com/devxoul/Pure/blob/master/Tests/PureTests/PureSpec.swift#L72

1
2
3
4
5
6
let factory = FactoryFixture<Dependency, Payload>.Factory(dependency: .init(
networking: "Networking A"
))
let instance = factory.create(payload: .init(id: 100))
expect(instance.dependency.networking) == "Networking A"
expect(instance.payload.id) == 100

Using camelCase for abbreviations

Issue #147

Each language and platform has its own coding style guide. This goes true when it comes to abbreviations. I’ve had some debates about whether to use JSON or Json, URL or Url, HTTP or Http.

I personally prefer camelCase, so I’m very happy to see that Kotlin is on my side. See Kotlin Style guide, I think this guide should be applied in other languages, such as Swift 😛

Sometimes there is more than one reasonable way to convert an English phrase into camel case, such as when acronyms or unusual constructs like “IPv6” or “iOS” are present. To improve predictability, use the following scheme.

Beginning with the prose form of the name:

  1. Convert the phrase to plain ASCII and remove any apostrophes. For example, “Müller’s algorithm” might become “Muellers algorithm”.
  1. Divide this result into words, splitting on spaces and any remaining punctuation (typically hyphens).

Recommended: if any word already has a conventional camel-case appearance in common usage, split this into its constituent parts (e.g., “AdWords” becomes “ad words”). Note that a word such as “iOS” is not really in camel case per se; it defies any convention, so this recommendation does not apply.

  1. Now lowercase everything (including acronyms), then uppercase only the first character of:

…each word, to yield pascal case, or

…each word except the first, to yield camel case

  1. Finally, join all the words into a single identifier.

Note that the casing of the original words is almost entirely disregarded.

Prose form Correct Incorrect
“XML Http Request” XmlHttpRequest XMLHTTPRequest
“new customer ID” newCustomerId newCustomerID
“inner stopwatch” innerStopwatch innerStopWatch
“supports IPv6 on iOS” supportsIpv6OnIos supportsIPv6OnIOS
“YouTube importer” YouTubeImporterYoutubeImporter*

About iOS or IOS, I think I would go with IOS. I think React Native thinks so too

NavigatorIOS looks and feels just like UINavigationController, because it is actually built on top of it.

Read more

How to fix Uncaught Error Cannot find module react

Issue #145

This is my story through dealing with many dependencies when trying to package an electron app. Thanks to my friend https://github.com/timkurvers for helping me out ❤️ This is like a note for my future self

Fixing event

The other I got an issue https://github.com/onmyway133/PushNotifications/issues/3 that reports there’s something wrong with production environment. The problem is that I used RadioButton and its onChange callback takes 2 parameters instead of 1.

Trying packaging

After the fix, I bump version in package.json and run yarn release. To my surprise, the built app was just blank. I tried win.toggleDevTools() to see what’s going on. I can’t use shortcut to open the dev tool any more in production, but there are tools https://github.com/sindresorhus/electron-debug.

The console says that it can’t find the module ‘react’. I then submitted an issue https://github.com/electron-userland/electron-packager/issues/787

Uncaught Error: Cannot find module ‘react’

My environment

  • Node v8.4.0
  • npm 5.3.0
  • yarn 1.3.2
  • macOS 10.13.2

Inspecting with debug mode

I then need to run in debug mode to see what’s really happening

1
DEBUG=electron-packager npm run release

The log says something about npm

Command failed: npm prune –production

Digging a little, I found that this is quite a common issue

I think the issue may be because of I changed from https://github.com/creationix/nvm to https://github.com/nodenv/nodenv

Updating nodenv

The latest stable version of https://nodejs.org/en/ is 8.9.4. To enable nodenv to see it, we need

1
brew upgrade node-build

Run the following so that you actually see the 8.9.4

1
nodenv install --list

Updating node.js

Install version 8.9.4

1
2
3
nodenv install 8.9.4
nodenv global 8.9.4
nodenv rehash

Updating npm

Run the following to update npm to 5.6.0

1
npm update -g np

Installing dependencies from scratch

Clear old node_modules and package-lock.json

1
2
rm -rf node_modules
rm -rf package-lock.json

Then install again

1
npm install

Packaging

The final step is to package the app again

1
yarn release

How to use standalone UINavigationBar in iOS

Issue #144

There are times we want the same UIViewController to look good when it’s presented modally or pushed from UINavigationController stack. Take a look at BarcodeScanner and the PR https://github.com/hyperoslo/BarcodeScanner/pull/82

When it is presented, we need a header view so that we can show a title and a close button. We can create a custom HeaderView that inherits from UIView or either embed it in a UINavigationController before presenting.

If we go with the controller being embedded in UINavigationController approach, it will collide with the other UINavigationController when it is pushed.

If we go with custom HeaderView, then we need to layout the view so that it looks good on both portrait and landscape, and on iPhone X that as safeAreaLayoutGuide.

Using standalone UINavigationBar

Since UINavigationController uses UINavigationBar under the hood, which uses UINavigationItem info to present the content. We can imitate this behavior by using a standalone UINavigationBar. See Adding Content to a Standalone Navigation Bar

In the vast majority of scenarios you will use a navigation bar as part of a navigation controller. However, there are situations for which you might want to use the navigation bar UI and implement your own approach to content navigation. In these situations, you can use a standalone navigation bar.

A navigation bar manages a stack of UINavigationItem objects

The beauty is that our standalone UINavigationBar and that of UINavigationController are the same, use the same UINavigationItem and no manual layout are needed

Declare UINavigationItem

We can just set properties like we did with a normal navigationItem

1
2
3
let standaloneItem = UINavigationItem()
standaloneItem.leftBarButtonItem = UIBarButtonItem(customView: closeButton)
standaloneItem.titleView = UILabel()

Adding UINavigationBar

Customise your bar, then declare layout constraints. You only need to pin left, right, and top. Note that you need to implement UINavigationBarDelegate to attach bar to status bar, so that it appears good on iPhone X too

1
2
3
4
5
6
7
8
9
10
11
12
13
14
15
let navigationBar = UINavigationBar()
navigationBar.isTranslucent = false
navigationBar.delegate = self
navigationBar.backgroundColor = .white
navigationBar.items = [standaloneItem]

navigationBar.translatesAutoresizingMaskIntoConstraints = false
navigationBar.leftAnchor.constraint(equalTo: view.leftAnchor).isActive = true
navigationBar.rightAnchor.constraint(equalTo: view.rightAnchor).isActive = true

if #available(iOS 11, *) {
navigationBar.topAnchor.constraint(equalTo: view.safeAreaLayoutGuide.topAnchor).isActive = true
} else {
navigationBar.topAnchor.constraint(equalTo: view.topAnchor).isActive = true
}
1
2
3
4
5
extension BarcodeScannerController: UINavigationBarDelegate {
public func position(for bar: UIBarPositioning) -> UIBarPosition {
return .topAttached
}
}

Inside UINavigationController

When this UIViewController is pushed from a UINavigationController stack, we just need to hide our standalone navigationBar. If we prefer the default back button, we don’t need to set leftBarButtonItem

On iOS 10, you need to call sizeToFit for any items in UINavigationItem for it to get actual size

1
2
3
4
5
6
7
8
9
10
11
12
override func viewWillAppear(_ animated: Bool) {
super.viewWillAppear(animated)

if navigationController != nil {
let label = HeaderElement.makeLabel()
label.sizeToFit()
navigationItem.titleView = label
navigationBar.isHidden = true
} else {
navigationBar.isHidden = false
}
}

How to deal with animation in UITests in iOS

Issue #143

Today I was writing tests and get this error related to app idle

1
t =    23.06s         Assertion Failure: <unknown>:0: Failed to scroll to visible (by AX action) Button, 0x6000003827d0, traits: 8858370049, label: 'cart', error: Error -25204 performing AXAction 2003 on element <XCAccessibilityElement: 0x7fc391a2bd60> pid: 91461, elementOrHash.elementID: 140658975676048.128

It turns out that the project uses a HUD that is performing some progress animation. Even it was being called HUD.hide(), the problem still exists.

1
2
3
4
t =    31.55s     Wait for no.example.MyApp to idle
t = 91.69s App animations complete notification not received, will attempt to continue.
t = 91.70s Tap Target Application 0x6040002a1260
t = 91.70s Wait for no.example.MyApp to id

No matter how I call sleep,wait`, still the problem

1
2
3
sleep(10)
app.tap()
_ = checkoutButton.waitForExistence(timeout: 10)

The fix is to disable animation. Start with setting argument when running tests

1
2
app.launchArguments.append("--UITests")
app.launch

Then in AppDelegate

1
2
3
4
5
func application(_ application: UIApplication, didFinishLaunchingWithOptions launchOptions: [UIApplicationLaunchOptionsKey: Any]?) -> Bool {
if CommandLine.arguments.contains("--UITests") {
UIView.setAnimationsEnabled(false)
}
}

How to generate QR code in AppKit

Issue #140

I need to generate QR code in https://github.com/onmyway133/AddressGenerator. Fortunately with CoreImage filter, it is very easy. Code is in Swift 4

1
2
3
4
5
6
7
8
9
10
11
12
13
14
15
16
17
18
19
20
21
22
23
24
25
26
27
28
29
30
31
32
33
34
35
36
import AppKit

final class QRCodeGenerator {
func generate(string: String, size: CGSize) -> NSImage? {
guard let data = string.data(using: .utf8) else {
return nil
}

// Filter
guard let filter = CIFilter(name: "CIQRCodeGenerator") else {
return nil
}

filter.setValue(data, forKey: "inputMessage")
filter.setValue("Q", forKey: "inputCorrectionLevel")

// CIImage
guard let ciImage = filter.outputImage else {
return nil
}

// NSImage
let rep = NSCIImageRep(ciImage: ciImage)
let image = NSImage(size: rep.size)
image.addRepresentation(rep)

// Scale
let finalImage = NSImage(size: size)
finalImage.lockFocus()
NSGraphicsContext.current?.imageInterpolation = .none
image.draw(in: NSRect(origin: .zero, size: size))
finalImage.unlockFocus()

return finalImage
}
}

How to use Function Literals with Receiver in Kotlin

Issue #139

From https://kotlinlang.org/docs/reference/lambdas.html

1
2
3
4
5
6
7
8
9
10
11
12
13
14
class HTML {
fun body() { ... }
}

fun html(init: HTML.() -> Unit): HTML {
val html = HTML() // create the receiver object
html.init() // pass the receiver object to the lambda
return html
}


html { // lambda with receiver begins here
body() // calling a method on the receiver object
}

From https://github.com/JetBrains/kotlin/blob/master/libraries/stdlib/src/kotlin/util/Standard.kt

1
2
3
4
5
6
7
8
9
10
11
12
13
@kotlin.internal.InlineOnly
public inline fun <T> T.apply(block: T.() -> Unit): T {
contract {
callsInPlace(block, InvocationKind.EXACTLY_ONCE)
}
block()
return this
}

val person = Person().apply {
name = "Superman"
age = 20
}

From https://academy.realm.io/posts/kau-jake-wharton-testing-robots/

1
2
3
4
5
6
7
8
9
10
11
12
13
14
15
16
17
18
19
20
21
22
23
24
25
26
27
28
29
fun payment(func: PaymentRobot.() -> Unit) = PaymentRobot().apply { func() }

class PaymentRobot {
fun amount(amount: Long) {

}

fun recipient(recipient: String) {

}

infix fun send(func: ResultRobot.() -> Unit): ResultRobot {
// ...
return ResultRobot().apply { func() }
}
}

class ResultRobot {
func isSuccess() {

}
}

payment {
amount(4200)
recipient(superman@google.com)
} send {
isSuccess()
}

How to use R.swift in UITest in iOS

Issue #138

Here is how to use R.swift in UITest target

  • Add Localizable.strings to UITest target
  • Declare pod
1
2
3
target 'MyAppUITests' do
pod 'R.swift', '~> 4.0'
end
  • In UITest target settings, add $(FRAMEWORK_SEARCH_PATHS) to Runpath Search Path
  • Add R.generated.swift to UITest target

Hiding back button in navigation bar in iOS

Issue #137

Use a custom NavigationController

1
2
3
4
5
6
7
8
9
10
11
12
13
14
15
16
import UIKit

class NavigationController: UINavigationController {
override func viewDidLoad() {
super.viewDidLoad()
navigationBar.tintColor = .white
navigationBar.barStyle = .black
navigationBar.isTranslucent = false
}

override func pushViewController(_ viewController: UIViewController, animated: Bool) {
viewController.navigationItem.backBarButtonItem =
UIBarButtonItem(title: "", style: .plain, target: nil, action: nil)
super.pushViewController(viewController, animated: animated)
}
}

Learning from Open Source Making Deferred in Kotlin

Issue #135

From https://github.com/JakeWharton/retrofit2-kotlin-coroutines-adapter/blob/master/src/main/java/com/jakewharton/retrofit2/adapter/kotlin/coroutines/experimental/CoroutineCallAdapterFactory.kt#L86

1
2
3
4
5
6
7
8
9
10
11
12
13
14
15
16
17
18
19
20
21
22
23
24
25
override fun adapt(call: Call<T>): Deferred<T> {
val deferred = CompletableDeferred<T>()

deferred.invokeOnCompletion {
if (deferred.isCancelled) {
call.cancel()
}
}

call.enqueue(object : Callback<T> {
override fun onFailure(call: Call<T>, t: Throwable) {
deferred.completeExceptionally(t)
}

override fun onResponse(call: Call<T>, response: Response<T>) {
if (response.isSuccessful) {
deferred.complete(response.body()!!)
} else {
deferred.completeExceptionally(HttpException(response))
}
}
})

return deferred
}

Using dlopen in iOS

Issue #133

With dlopen we can make uses of some private frameworks. It will be fun

From iPhone X home button

1
2
3
4
5
6
7
#import <dlfcn.h>

// somewhere in viewDidLoad
dlopen([binaryPath cStringUsingEncoding:NSUTF8StringEncoding], RTLD_NOW);
UIView *const view = [[NSClassFromString(@"SBHomeGrabberView") alloc] init];
[view sizeToFit];
[self.view addSubview:view];

Learning from Open Source Hit testing with UIWindow

Issue #132

From https://github.com/Flipboard/FLEX/blob/master/Classes/ExplorerInterface/FLEXWindow.m

1
2
3
4
5
6
7
8
9
10
11
12
13
14
15
16
17
18
19
20
21
22
- (id)initWithFrame:(CGRect)frame
{
self = [super initWithFrame:frame];
if (self) {
self.backgroundColor = [UIColor clearColor];
// Some apps have windows at UIWindowLevelStatusBar + n.
// If we make the window level too high, we block out UIAlertViews.
// There's a balance between staying above the app's windows and staying below alerts.
// UIWindowLevelStatusBar + 100 seems to hit that balance.
self.windowLevel = UIWindowLevelStatusBar + 100.0;
}
return self;
}

- (BOOL)pointInside:(CGPoint)point withEvent:(UIEvent *)event
{
BOOL pointInside = NO;
if ([self.eventDelegate shouldHandleTouchAtPoint:point]) {
pointInside = [super pointInside:point withEvent:event];
}
return pointInside;
}

From https://github.com/Flipboard/FLEX/blob/master/Classes/ExplorerInterface/FLEXExplorerViewController.m

1
2
3
4
5
6
7
8
9
10
11
12
13
14
15
16
17
18
19
20
21
22
23
24
25
26
27
28
- (BOOL)shouldReceiveTouchAtWindowPoint:(CGPoint)pointInWindowCoordinates
{
BOOL shouldReceiveTouch = NO;

CGPoint pointInLocalCoordinates = [self.view convertPoint:pointInWindowCoordinates fromView:nil];

// Always if it's on the toolbar
if (CGRectContainsPoint(self.explorerToolbar.frame, pointInLocalCoordinates)) {
shouldReceiveTouch = YES;
}

// Always if we're in selection mode
if (!shouldReceiveTouch && self.currentMode == FLEXExplorerModeSelect) {
shouldReceiveTouch = YES;
}

// Always in move mode too
if (!shouldReceiveTouch && self.currentMode == FLEXExplorerModeMove) {
shouldReceiveTouch = YES;
}

// Always if we have a modal presented
if (!shouldReceiveTouch && self.presentedViewController) {
shouldReceiveTouch = YES;
}

return shouldReceiveTouch;
}

How to make NSCollectionView programatically in Swift

Issue #131

Here’s how to create NSCollectionView programatically. We need to embed it inside NScrollView for scrolling to work. Code is in Swift 4

NSCollectionView

1
2
3
4
5
6
7
8
9
10
11
12
13
14
let layout = NSCollectionViewFlowLayout()
layout.minimumLineSpacing = 4

collectionView = NSCollectionView()
collectionView.dataSource = self
collectionView.delegate = self
collectionView.collectionViewLayout = layout
collectionView.allowsMultipleSelection = false
collectionView.backgroundColors = [.clear]
collectionView.isSelectable = true
collectionView.register(
Cell.self,
forItemWithIdentifier: NSUserInterfaceItemIdentifier(rawValue: "Cell")
)

NScrollView

1
2
3
scrollView = NSScrollView()
scrollView.documentView = collectionView
view.addSubview(scrollView)

NSCollectionViewItem

1
2
3
4
5
6
7
8
9
final class Cell: NSCollectionViewItem {
let label = Label()
let myImageView = NSImageView()

override func loadView() {
self.view = NSView()
self.view.wantsLayer = true
}
}

NSCollectionViewDataSource

1
2
3
4
5
6
7
8
9
10
11
12
13
14
15
16
17
18
19
func collectionView(_ collectionView: NSCollectionView, numberOfItemsInSection section: Int) -> Int {
return coins.count
}

func collectionView(_ collectionView: NSCollectionView, itemForRepresentedObjectAt indexPath: IndexPath) -> NSCollectionViewItem {
let cell = collectionView.makeItem(
withIdentifier: NSUserInterfaceItemIdentifier(rawValue: "Cell"),
for: indexPath
) as! Cell

let coin = coins[indexPath.item]

cell.label.stringValue = coin.name
cell.coinImageView.image =
NSImage(named: NSImage.Name(rawValue: "USD"))
?? NSImage(named: NSImage.Name(rawValue: "Others"))

return cell
}

NSCollectionViewDelegateFlowLayout

1
2
3
4
5
6
7
8
9
10
11
12
13
14
15
16
17
18
19
20
21
func collectionView(_ collectionView: NSCollectionView, didSelectItemsAt indexPaths: Set<IndexPath>) {
guard let indexPath = indexPaths.first,
let cell = collectionView.item(at: indexPath) as? Cell else {
return
}
}

func collectionView(_ collectionView: NSCollectionView, didDeselectItemsAt indexPaths: Set<IndexPath>) {
guard let indexPath = indexPaths.first,
let cell = collectionView.item(at: indexPath) as? Cell else {
return
}
}

func collectionView(_ collectionView: NSCollectionView, layout collectionViewLayout: NSCollectionViewLayout, sizeForItemAt indexPath: IndexPath) -> NSSize {

return NSSize(
width: collectionView.frame.size.width,
height: 40
)
}

Updated at 2020-05-22 11:48:15

UnsafePointer in Swift

Issue #130

Code is in Swift 4

Constructing UnsafeMutablePointer

1
2
let byteCount = 32
let result = UnsafeMutablePointer<UInt8>.allocate(capacity: byteCount)

Data to UnsafePointer

1
2
3
4
5
6
7
8
9
10
11
12
13
14
15
extension Data {
func toPointer() -> UnsafePointer<UInt8>? {
let buffer = UnsafeMutablePointer<UInt8>.allocate(capacity: count)
let stream = OutputStream(toBuffer: buffer, capacity: count)

stream.open()
withUnsafeBytes({ (p: UnsafePointer<UInt8>) -> Void in
stream.write(p, maxLength: count)
})

stream.close()

return UnsafePointer<UInt8>(buffer)
}
}

UnsafePointer to Data

1
2
3
4
5
extension UnsafePointer {
func toData() -> Data {
return Data(bytes: UnsafeRawPointer(self), count: 32)
}
}

Dealing with C API

This is how to do keccak hash using C API from https://github.com/ethereum/ethash/blob/master/src/libethash/sha3.c

1
2
3
4
5
6
7
8
9
10
11
12
13
class KeccakHash {
func hash(data: Data) throws -> Data {
guard let dataPointer = data.toPointer() else {
throw InteralError.invalid
}

let byteCount = 32

let result = UnsafeMutablePointer<UInt8>.allocate(capacity: byteCount)
sha3_256(result, byteCount, dataPointer, data.count)
return result.toData()
}
}

Read more

How to prevent UIVisualEffectView crash

Issue #124

We all know that there’s a potential crash with UIVisualEffectView on iOS 11. The fix is to not add sub views directly to UIVisualEffectView, but to its contentView. So we should change

1
effectView.addSubview(button)

to

1
effectView.contentView.addubView(button)

Here we don’t need to perform iOS version check, because effectView.contentView works for any iOS versions.

Potential cases for crashes

Here are some cases you can potentially cause the crashes

Strange namings

Normally we name our UIVisualEffectView as blurView, effectView. But there’s times we name it differently like navigationView, containerView, boxView, … This way we may completely forget that it’s a UIVisualEffectView 🙀

1
2
containerView.addSubview(button)
boxView.insertSubview(label, at: 0)

Custom loadView

Sometimes it’s convenient to have our UIViewController 's view as a whole blur view, so that all things inside have a nice blur effect background

1
2
3
4
5
6
7
8
9
10
11
12
13
class OverlayController: UIViewController {
let blurView = UIVisualEffectView(effect: UIBlurEffect(style: .dark))
override func loadView() {
super.loadView()
self.view = blurView
}

override func viewDidLoad() {
super.viewDidLoad()

view.addSubview(button)
}
}

By setting our blurView as view in loadView, we have no idea afterwards that view is actually a UIVisualEffectView 🙀

Inheritance

What happen if we have another UIViewController that inherits from our OverlayController, all it knows about view is UIView, it does not know that it is a disguising UIVisualEffectView 🙀

1
2
3
4
5
6
7
class ClocksController: OverlayController {
override func viewDidLoad() {
super.viewDidLoad()

view.addSubview(timeLabel)
}
}

Superclass type

Sometimes declare our things but with protocol or superclass types. Consumers of our API have no clue to know that it is UIVisualEffectView 🙀

1
let view: UIView = UIVisualEffectView(effect: UIBlurEffect(style: .dark))

Here it appears to us that view is of type UIView

Legacy codebase

Now imagine you ‘ve handled a legacy codebase to deal with. Perform finding and replacing all those things related to UIVisualEffectView is very hard task. Especially since we tend to write less tests for UI

Making it impossible to crash

I like concept like Phantom type to limit interface. Here we’re not using type but a wrapper

1
2
3
4
5
6
7
8
9
10
11
12
13
14
15
16
17
18
19
20
21
22
23
24
final class BlurView: UIView {
private let effectView: UIVisualEffectView

init(style: UIBlurEffectStyle, backgroundColor: UIColor? = nil) {
self.effectView = UIVisualEffectView(effect: UIBlurEffect(style: style))
self.effectView.backgroundColor = backgroundColor
super.init(frame: .zero)
insertSubview(effectView, at: 0)
}

required init?(coder aDecoder: NSCoder) {
fatalError()
}

override func addSubview(_ view: UIView) {
effectView.contentView.addSubview(view)
}

override func layoutSubviews() {
super.layoutSubviews()

effectView.frame = bounds
}
}

Here we override addSubview to always add views to effectView.contentView. In the init method, we need to call insertSubview instead because of our overriden addSubview

Now BlurView has a blur effect thanks to is underlying UIVisualEffectView, but expose only addSubview because of its UIView interface. This way it is impossible to cause crashes 😎

1
2
let blurView = BlurView(style: .dark)
blurView.addSubview(button(

Understanding suspend function in Kotlin Coroutine in Android

Issue #123

Getting to know Coroutine

From https://kotlinlang.org/docs/reference/coroutines.html

To continue the analogy, await() can be a suspending function (hence also callable from within an async {} block) that suspends a coroutine until some computation is done and returns its result:

From https://kotlinlang.org/docs/tutorials/coroutines-basic-jvm.html

We are using the delay() function that’s like Thread.sleep(), but better: it doesn’t block a thread, but only suspends the coroutine itself. The thread is returned to the pool while the coroutine is waiting, and when the waiting is done, the coroutine resumes on a free thread in the pool.

await() can not be called outside a coroutine, because it needs to suspend until the computation finishes, and only coroutines can suspend in a non-blocking way

What does suspend function mean in Kotlin Coroutine 🤔

https://stackoverflow.com/questions/47871868/what-does-suspend-function-mean-in-kotlin-coroutine

I’m reading Kotlin Coroutine and know that it is based on suspend function. But what does suspend mean?

Coroutine or function gets suspended?

From https://kotlinlang.org/docs/reference/coroutines.html

Basically, coroutines are computations that can be suspended without blocking a thread

I heard people often say “suspend function”. But I think it is the coroutine who gets suspended because it is waiting for the function to finished? “suspend” usually means “cease operation”, in this case the coroutine is idle.

Should we say the coroutine is suspended ?

Which coroutine gets suspended?

From https://kotlinlang.org/docs/reference/coroutines.html

To continue the analogy, await() can be a suspending function (hence also callable from within an async {} block) that suspends a coroutine until some computation is done and returns its result:

1
2
3
4
5
6
async { // Here I call it the outer async coroutine
...
// Here I call computation the inner coroutine
val result = computation.await()
...
}

🤔 It says “that suspends a coroutine until some computation is done”, but coroutine is like a lightweight thread. So if the coroutine is suspended, how can the computation is done ?

We see await is called on computation, so it might be async that returns Deferred, which means it can start another coroutine

1
2
3
4
5
fun computation(): Deferred<Boolean> {
return async {
true
}
}

🤔 The quote say that suspends a coroutine. Does it mean suspend the outer async coroutine, or suspend the inner computation coroutine?

Does suspend mean that while outer async coroutine is waiting (await) for the inner computation coroutine to finish, it (the outer async coroutine) idles (hence the name suspend) and returns thread to the thread pool, and when the child computation coroutine finishes, it (the outer async coroutine) wakes up, takes another thread from the pool and continues?

The reason I mention the thread is because of https://kotlinlang.org/docs/tutorials/coroutines-basic-jvm.html

The thread is returned to the pool while the coroutine is waiting, and when the waiting is done, the coroutine resumes on a free thread in the pool

Understanding async

From https://github.com/Kotlin/kotlinx.coroutines/blob/master/coroutines-guide.md

Conceptually, async is just like launch. It starts a separate coroutine which is a light-weight thread that works concurrently with all the other coroutines. The difference is that launch returns a Job and does not carry any resulting value, while async returns a Deferred – a light-weight non-blocking future that represents a promise to provide a result later. You can use .await() on a deferred value to get its eventual result, but Deferred is also a Job, so you can cancel it if needed.

1
2
3
4
5
6
7
8
fun main(args: Array<String>) = runBlocking<Unit> {
val time = measureTimeMillis {
val one = async { doSomethingUsefulOne() }
val two = async { doSomethingUsefulTwo() }
println("The answer is ${one.await() + two.await()}")
}
println("Completed in $time ms")
}

There is a laziness option to async using an optional start parameter with a value of CoroutineStart.LAZY. It starts coroutine only when its result is needed by some await or if a start function is invoked. Run the following example that differs from the previous one only by this option:

1
2
3
4
5
6
7
8
fun main(args: Array<String>) = runBlocking<Unit> {
val time = measureTimeMillis {
val one = async(start = CoroutineStart.LAZY) { doSomethingUsefulOne() }
val two = async(start = CoroutineStart.LAZY) { doSomethingUsefulTwo() }
println("The answer is ${one.await() + two.await()}")
}
println("Completed in $time ms")
}

What is the difference between launch/join and async/await in Kotlin coroutines

https://stackoverflow.com/a/48079738/1418457

I find this guide https://github.com/Kotlin/kotlinx.coroutines/blob/master/coroutines-guide.md to be useful. I will quote the essential parts

🦄 coroutine

Essentially, coroutines are light-weight threads.

So you can think of coroutine as something that manages thread in a very efficient way.

🐤 launch

1
2
3
4
5
6
7
8
fun main(args: Array<String>) {
launch { // launch new coroutine in background and continue
delay(1000L) // non-blocking delay for 1 second (default time unit is ms)
println("World!") // print after delay
}
println("Hello,") // main thread continues while coroutine is delayed
Thread.sleep(2000L) // block main thread for 2 seconds to keep JVM alive
}

So launch starts a background thread, does something, and returns a token immediately as Job. You can call join on this Job to block until this launch thread completes

1
2
3
4
5
6
7
8
fun main(args: Array<String>) = runBlocking<Unit> {
val job = launch { // launch new coroutine and keep a reference to its Job
delay(1000L)
println("World!")
}
println("Hello,")
job.join() // wait until child coroutine completes
}

🦆 async

Conceptually, async is just like launch. It starts a separate coroutine which is a light-weight thread that works concurrently with all the other coroutines. The difference is that launch returns a Job and does not carry any resulting value, while async returns a Deferred – a light-weight non-blocking future that represents a promise to provide a result later.

So async starts a background thread, does something, and returns a token immediately as Deferred.

1
2
3
4
5
6
7
8
fun main(args: Array<String>) = runBlocking<Unit> {
val time = measureTimeMillis {
val one = async { doSomethingUsefulOne() }
val two = async { doSomethingUsefulTwo() }
println("The answer is ${one.await() + two.await()}")
}
println("Completed in $time ms")
}

You can use .await() on a deferred value to get its eventual result, but Deferred is also a Job, so you can cancel it if needed.

So Deferred is actually a Job. See https://kotlin.github.io/kotlinx.coroutines/kotlinx-coroutines-core/kotlinx.coroutines.experimental/-deferred/index.html

1
interface Deferred<out T> : Job (source)

🦋 async is eager by default

There is a laziness option to async using an optional start parameter with a value of CoroutineStart.LAZY. It starts coroutine only when its result is needed by some await or if a start function is invoked.

Understand Kotlin Coroutines on Android (Google I/O’19)

https://www.youtube.com/watch?v=BOHK_w09pVA

cor

Hashable and Set in Swift

Issue #122

From Set

You can create a set with any element type that conforms to the Hashable protocol. By default, most types in the standard library are hashable, including strings, numeric and Boolean types, enumeration cases without associated values, and even sets themselves.

From Hashable

The Hashable protocol inherits from the Equatable protocol, so you must also add an equal-to operator (==) function for your custom type.

1
2
3
4
5
6
7
8
public protocol Hashable : Equatable {

/// The hash value.
///
/// Hash values are not guaranteed to be equal across different executions of
/// your program. Do not save hash values to use during a future execution.
public var hashValue: Int { get }
}

Read more

Generic declaration in Swift

Issue #121

These are different

1
class DiffService<T: MKAnnotation & Equatable>
1
class DiffService<T: MKAnnotation, Equatable>

A taste of MVVM and Reactive paradigm

Issue #120

Original post https://medium.com/flawless-app-stories/a-taste-of-mvvm-and-reactive-paradigm-5288a819cca1


A taste of MVVM and Reactive paradigm

I like Swift, like many other object oriented programming languages. Swift allows you to represent real world objects that have some characteristics and can perform some action.

I tend to think of an app as a world where each object is a person. They work and communicate. If a person can’t do the work alone, he needs to ask for help. Take a project, for example, if the manager has to do all of the work by himself, he will go crazy. So there is a need to organise and delegate tasks, and for many persons to collaborate on the project: designer, tester, scrum master, developer. After the task is done, the manager needs to be informed.

This may not a good example. But at least you get the importance of communication and delegation in OOP. I was very intrigued by the word “architecture” when I started iOS programming. But after doing for a while, it all comes down to identifying and splitting responsibilities. This article tells a bit about MVC and simple Extract Classrefactoring to MVVM, and how to go further with Rx. You are free to create your own architecture, but whatever you do, consistence is key as to not confuse or surprise your teammates.

Model View Controller

Take a look at the architecture you know the best, MVC, short for Model View Controller. You always get one when you create a new iOS project. View is where you present your data, using UIView, UIButton, UILabel. Model is just a fancy word for data. It can be your entity, data from networking, object from database, or from cache. The controller is the thing that mediates between the model and the view.
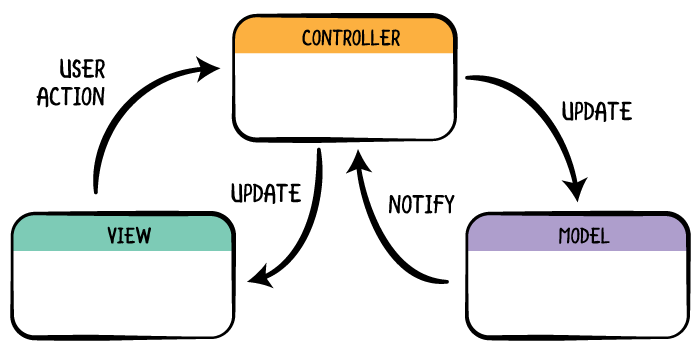
UIViewController is the center of the universe

The problem with ViewController is that it tends to be huge. Apple puts it as the center of the universe, where it has lots of properties and responsibilities. There are many things that you can only do with a UIViewController. Things like interacting with storyboard, managing the view, configuring view rotation, state restoration. UIViewController is designed with lots of hooks for you to override and customize.

Take a look at the many sections in UIViewController documentation, you can’t do the following without a UIViewController.

func viewDidLoad()
var preferredStatusBarStyle: UIStatusBarStyle { get }
UITableViewDataSource
var presentationController: UIPresentationController? { get }
func childViewControllerForScreenEdgesDeferringSystemGestures() -> UIViewController?
func didMove(toParentViewController parent: UIViewController?)
var systemMinimumLayoutMargins: NSDirectionalEdgeInsets
var edgesForExtendedLayout: UIRectEdge
var previewActionItems: [UIPreviewActionItem]
var navigationItem: UINavigationItem
var shouldAutorotate: Bool

As your app grows, we need to add more code for other logic. Such as networking, data source, handling multiple delegates, presenting child view controllers. We can, of course, put all the stuff on the view controller, but that results in big view controller and improvement in your scrolling skill. This is where you lose the big picture of responsibilities because all stuff stays in the mega view controller. You tend to introduce code duplication and bugs are hard to fix because they are all over the places.

The same goes with Page in Windows Phone or Activity in Android. They are intended for a screen or partial screen of functionality. There are certain actions that can only be done through them like Page.OnNavigatedTo, Activity.onCreate.
The buzzwords of architecture

What do you do when the ViewController is doing a lot? You offset the work to other components. By the way, if you want another object to do the user input handling, you can use the Presenter. If the Presenter is doing too much, then it can offset the business logic to the Interactor. Also, there are more buzzwords that can be used.

let buzzWords = [
  "Model", "View", "Controller", "Entity", "Router", "Clean", "Reactive", 
  "Presenter", "Interactor", "Megatron", "Coordinator", "Flow", "Manager"
]
let architecture = buzzWords.shuffled().takeRandom()
let acronym = architecture.makeAcronym()
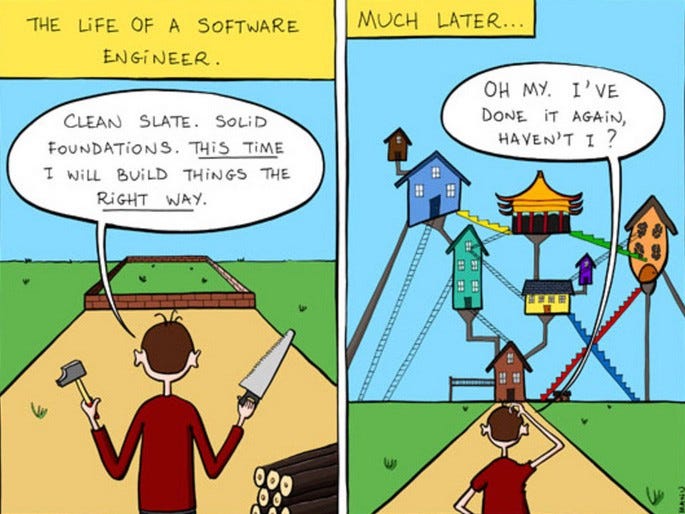
After all the buzzwords are assembled, we get an architecture. There are many of them, ranging from simple extract class refactoring, embracing MVC or taking inspiration from Clean Code, Rx, EventBus or Redux. The choice depends on project, and some teams prefer one architecture over the other.

The pragmatic programmer

People have different opinion about what is good architecture. For me, it is about clear separation of concern, good communication pattern and being comfortable to use. Each component in the architecture should be identifiable and have a specific role. The communication must be clear so that we know which object is talking to each other. This together with good dependency injection will make testing easier.

Things that sound good in theory may not work well in practice. Separated domain objects are cool, protocol extensions are cool, multiple layers of abstraction are cool. But too many of them can be a problem.

If you read enough about design patterns, you know they all come down to these simple principles:

  • Encapsulate what varies: identify the aspects of your application that vary and separate them from what stays the same.

  • Program to an interface, not an implementation

  • Prefer composition over inheritance

If there’s one thing we should master, it’s composition. The key is to identify responsibility and compose them in a reasonable and consistent way. Consult with your team mates on what suits the most. Always writing code with the thought that you will also be the future maintainer. Then you will write it differently.

Don’t fight against the system

Some architectures introduce completely new paradigm. Some of them are cumbersome that there people write scripts to generate boiler plate code. It’s good that there are many approaches to a problem. But for me sometimes it feels they are fighting the system. Some tasks are made easy while some trivial tasks become extremely hard. We should not constrain ourselves to one architecture simply because it are trendy. Be pragmatic, not dogmatic.

In iOS, we should embrace MVC. UIViewController is not meant for a full screen of content. They can contain and be composed to split the functionalities. We can use Coordinator and FlowController to manage dependencies and handle flow. Containerfor state transition, embedded logic controller, part of full screen content. This embracing ViewController approach play nicely with MVC in iOS and is my preferable way of doing.

Model View ViewModel

Another good-enough way is to offload some of the tasks to another object, let’s call it ViewModel. The name does not matter, you can name it Reactor, Maestro, Dinosaur. The important thing is your team get an agreed name. ViewModel takes some tasks from the ViewController and reports when it’s done. There are communication patterns in Cocoa Touch such as delegate, closures to use.

ViewModel is self-contained, has no reference to UIKit, and has just input and output. We can put a lot of things into ViewModel like calculation, formatting, networking, business logic. Also, if you don’t like the ViewModel to become massive, you surely need to create some dedicated objects. ViewModel is the first step to get a slim ViewController.

Synchronously

Below is a very simple ViewModel, which formats data based on User model. This is done synchronously.

class ProfileController: UIViewController {
  override func viewDidLoad() {
    super.viewDidLoad()
    let viewModel = ViewModel(user: user)
    nameLabel.text = viewModel.name
    birthdayLabel.text = viewModel.birthdayString
    salaryLabel.text = viewModel.salary
    piLabel.text = viewModel.millionthDigitOfPi
  }
}

Asynchronously

We work with asynchronous API all the time. What if we want to show the user’s number of Facebook friends? For this to work we need to call Facebook API and this operation takes time. The ViewModel can report back via closure.

viewModel.getFacebookFriends { friends in
  self.friendCountLabel.text = "\(friends.count)"
}

Internally, the ViewModel may offload the task to a dedicated Facebook API client object.

class ViewModel {
  func getFacebookFriends(completion: [User] -> Void) {
    let client = APIClient()
    client.getFacebookFriends(for: user) { friends in
      DispatchQueue.main.async {
        completion(friends)
      }
    }
  }
}

Jetpack in Android
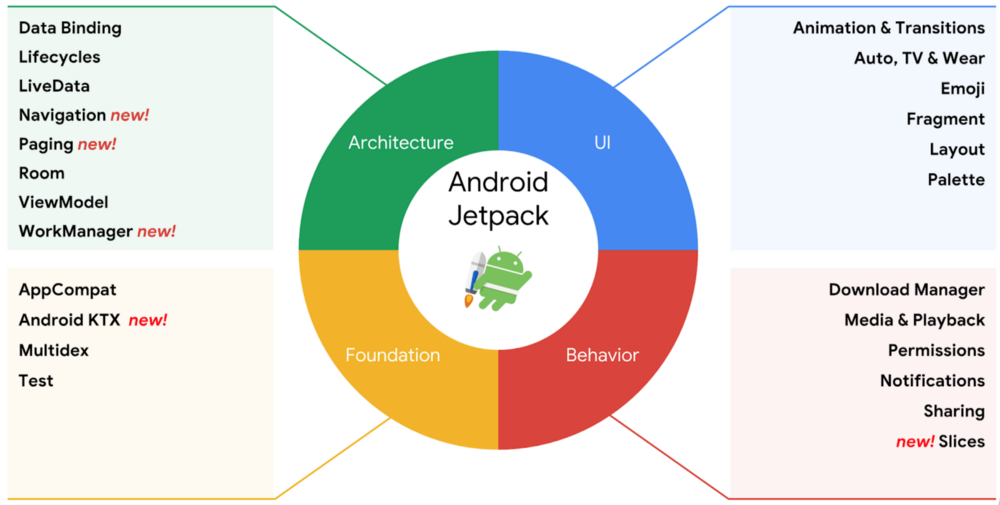
Google introduced Android Architecture Component, now part of Jetpack, at Google IO 2017. It has ViewModel and LiveData, which is also a type of MVVM applied in Android. ViewModel survives through configuration changes, and notify results in terms of LiveData for Activity to consume.

class MyActivity : AppCompatActivity() {
    override fun onCreate(savedInstanceState: Bundle?, persistentState: PersistableBundle?) {
        super.onCreate(savedInstanceState, persistentState)

        val model = ViewModelProviders.of(this).get(MyViewModel::class.java)
        model.getUsers().observe(this, { users ->
            // update UI
        })
    }
}

This is one of the reason I like ViewModel. If we follow ViewModel like this, then code structures between iOS and Android become similar. There should be no need for some random Javascript cross platform solutions. You learn the concept once, and apply it on both iOS and Android. I learn ViewModel, RxSwift on iOS and feel right at home when I work with RxJava and RxBinding on Android. The Kickstarter project also proves that this works well in their iOS and Android apps.

Binding

To encapsulate the closure, we can create a class called Binding, which can notify one or multiple listeners. It takes advantage of didSet, and the observable property becomes clear.

class Binding<T> {
  var value: T {
    didSet {
      listener?(value)
    }
  }
  private var listener: ((T) -> Void)?
  init(value: T) {
    self.value = value
  }
  func bind(_ closure: @escaping (T) -> Void) {
    closure(value)
    listener = closure
  }
}

Here is how to use it inside ViewModel:

class ViewModel {
  let friends = Binding<[User]>(value: [])
  init() {
    getFacebookFriends {
      friends.value = $0
    }
  }
  func getFacebookFriends(completion: ([User]) -> Void) {
      // Do the work
  }
}

When ever friends are fetched, or changed, the ViewController is updated accordingly. This is called reaction to changes.

override func viewDidLoad() {
  super.viewDidLoad()
  viewModel.friends.bind { friends in
    self.friendsCountLabel.text = "\(friends.count)"
  }
}

You often see MVVM introduction with reactive frameworks, and it is for a reason. They offer many chaining operators and make reactive programming easier and more declarative.

RxSwift

Perhaps the most common reactive framework in Swift is RxSwift. The thing I like about it is that it follows ReactiveX pattern. So you will feel more familiar if you already use RxJava, RxJs, or RxKotlin.

Observable

RxSwift unifies sync and async operations through Observable. This is how you make one.

class ViewModel {
  let friends: Observable<[User]>
  init() {
    let client = APIClient()
    friends = Observable<[User]>.create({ subscriber in
      client.getFacebookFriends(completion: { friends in
        subscriber.onNext(friends)
        subscriber.onCompleted()
      })
      return Disposables.create()
    })
  }
}

The power of RxSwift lies in its numerous operators, which help you chain Observables. Here you can call 2 network requests, wait for both of them to finish, then sum up the friends. This is very streamlined and saves you lots of time. Here you can just subscribe to the Observable, it will be triggered when the request completes:

override func viewDidLoad() {
  super.viewDidLoad()
  viewModel.friends.subscribe(onNext: { friends in
    self.friendsCountLabel.text = "\(friends.count)"
  })
}

Input and output

One thing that is nice about ViewModel and Rx is that we can separate input and output using Observable, which gives a clear interface. Read more at Learning from Open Source: Input and output container.

Below it is clear that we fetch is an input, and friends is the viable output.

class ViewModel {
  class Input {
    let fetch = PublishSubject<()>()
  }
  class Output {
    let friends: Driver<[User]>
  }
  let apiClient: APIClient
  let input: Input
  let output: Output
  init(apiClient: APIClient) {
    self.apiClient = apiClient
    // Connect input and output
  }
}

class ProfileViewController: BaseViewController<ProfileView> {
  let viewModel: ProfileViewModelType
  init(viewModel: ProfileViewModelType) {
    self.viewModel = viewModel
  }
  override func viewDidLoad() {
    super.viewDidLoad()
    // Input
    viewModel.input.fetch.onNext(())
    // Output
    viewModel.output.friends.subscribe(onNext: { friends in
      self.friendsCountLabel.text = "\(friends.count)"
    })
  }
}

How reactive works

If you feel like Rx, it’s good to get an understanding of them after using some frameworks for a while. There are some concepts like Signal, SignalProducer, Observable, Promise, Future, Task, Job, Launcher, Async and some people can have a very distinction about them. Here I simply call it Signal, which is something that can signal values.

Monad

Signal and its Result are just monads, which are thing that can be mapped and chained.

Signal makes use of deferred execution callback closures. It can be pushed or pulled. Which is just how the Signal updates its value and the order the callbacks are called.

Execution callback closure means that we pass a function to another function. And the passed in function will get called when appropriated.

Sync vs Async

Monad can be in either sync or async mode. Sync is easier to understand, but async is somewhat you’re already familiar and used in practice.

Basically,

  • Sync: you get the returned value right away via return

  • Async: you get the returned value via callback block

Here is an example of simple sync and async free functions:

// Sync
func sum(a: Int, b: Int) -> Int {
    return a + b
}

// Async
func sum(a: Int, b: Int, completion: Int -> Void) {
    // Assumed it is a very long task to get the result
    let result = a + b

    completion(result)
}

And how sync and async apply to Result type. Notice the async version, we get the transformed value in a completion closure instead of immediate return from function.

enum Result<T> {
  case value(value: T)
  case failure(error: Error)

  // Sync
  public func map<U>(f: (T) -> U) -> Result<U> {
    switch self {
    case let .value(value):
      return .value(value: f(value))
    case let .failure(error):
      return .failure(error: error)
    }
  }

  // Async
  public func map<U>(f: @escaping ((T), (U) -> Void) -> Void) -> (((Result<U>) -> Void) -> Void) {
    return { g in   // g: Result<U> -> Void
      switch self {
      case let .value(value):
        f(value) { transformedValue in  // transformedValue: U
          g(.value(value: transformedValue))
        }
      case let .failure(error):
        g(.failure(error: error))
      }
    }
  }
}

Push Signal

Given a chained signals like this:

A -(map)-> B -(flatMap)-> C -(flatMap)-> D -(subscribe)

Push Signal, means that when the source signal A is sent an event, it propagates that event via callbacks. PushSignal is similar to PublishSubject in RxSwift.

  • Triggered by sending event to the source signal.

  • We must keep A as it keeps the others around

  • We subscribe the last D

  • We send event to the first A

  • A ‘s callback gets called, it it in turn calls callback of B with the result of A ‘s map, then B ‘s callback calls C ‘s callback with the result of B‘s flatMap, and so on.

It is similar to Promise A+, you can see my Swift implementation of Promise A+ in my Then framework. For now, here is the Swift 4 implementation of a simple PushSignal.

public final class PushSignal<T> {
  var event: Result<T>?
  var callbacks: [(Result<T>) -> Void] = []
  let lockQueue = DispatchQueue(label: "Serial Queue")

  func notify() {
    guard let event = event else {
      return
    }

    callbacks.forEach { callback in
      callback(event)
    }
  }

  func update(event: Result<T>) {
    lockQueue.sync {
      self.event = event
    }

    notify()
  }

  public func subscribe(f: @escaping (Result<T>) -> Void) -> Signal<T> {
    // Callback
    if let event = event {
      f(event)
    }

    callbacks.append(f)

    return self
  }

  public func map<U>(f: @escaping (T) -> U) -> Signal<U> {
    let signal = Signal<U>()

    _ = subscribe { event in
      signal.update(event: event.map(f: f))
    }

    return signal
  }
}

Below is how a PushSignal is used to transform a chain from string to its length, you should see 4, the length of the string “test” printed.

let signal = PushSignal<String>()

_ = signal.map { value in
  return value.count
}.subscribe { event in
  if case let .value(value) = event {
    print(value)
  } else {
    print("error")
  }
}

signal.update(event: .value(value: "test"))

Pull Signal

Given a chained signals like this:

A -(map)-> B -(flatMap)-> C -(flatMap)-> D -(subscribe)

Pull Signal, sometimes called Future, means when we subscribe to the final signal D, it causes the previous signals to action:

  • Triggered by subscribing to the final signal D;

  • We must keep D as it keeps the others around;

  • We subscribe the last D;

  • D ‘s operation runs, and it cause C ‘s operation to runs, … then A ‘s operation runs. It is in A that the task is performed (like fetching network, retrieving database, file access, heavy computation, …) to get the result, and A ‘s completion gets called. Then A’s completion calls B ‘s completion with the result mapped by B ‘s map, … all the way to the subscriber ‘s completion block.

Here is a Swift 4 implementation of PullSignal. PullSignal is similar to Observablein RxSwift and SignalProducer in ReactiveSwift.

public struct PullSignal<T> {
  let operation: ((Result<T>) -> Void) -> Void

  public init(operation: @escaping ((Result<T>) -> Void) -> Void) {
    self.operation = operation
  }

  public func start(completion: (Result<T>) -> Void) {
    operation() { event in
      completion(event)
    }
  }

  public func map<U>(f: @escaping (T) -> U) -> PullSignal<U> {
    return PullSignal<U> { completion in
      self.start { event in
        completion(event.map(f: f))
      }
    }
  }
}

The chain is inactive until you call start at the last signal in the chain, which triggers operation flow all over to the first signal. Run this snippet and you should see 4, the length of the string “test” printed on the console.

let signal = PullSignal<String> { completion in
  // There should be some long running operation here
  completion(Result.value(value: "test"))
}

signal.map { value in
  value.count
}.start { event in
  if case let .value(value) = event {
    print(value)
  } else {
    print("error")
  }
}

I hope those snippets are simple enough to help you understand how signal works under the hood, and how to differentiate hot and cold signals. To get a fully working Signal framework, you need to implement more operations. Such as retry, rebounce, throttle, queue, flatten, filter, delay, combine and add support for UIKit like RxCocoa does. Find out how to implement in my Signal repo.

Where to go from here

Architecture is a very opinionated topic. Hopefully this article gives you some ideas to add into your decision points. MVC is dominant in iOS, MVVM is a good friend and Rx is a powerful tool. Here are some more interesting readings:

Collection Update

Issue #119

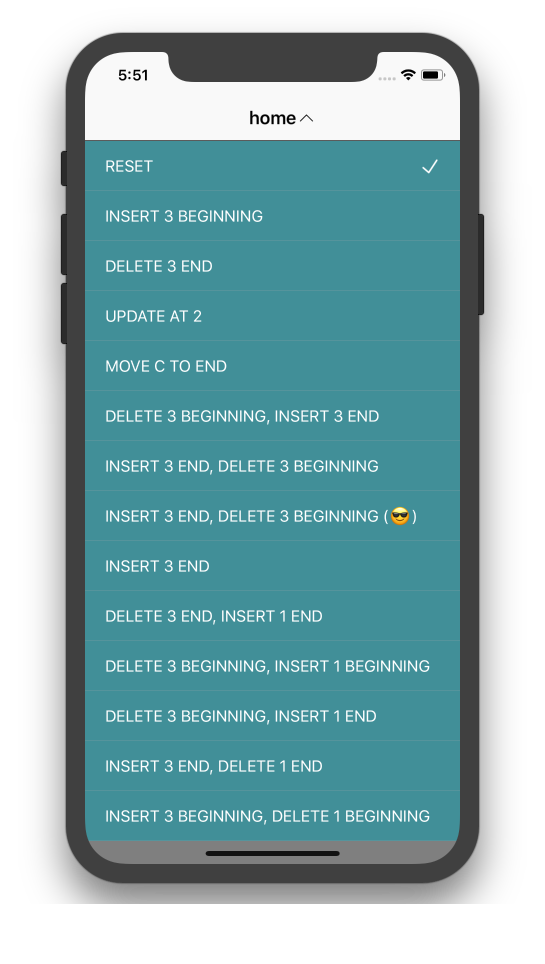
This is about collection update, how to provide correct IndexPath and a simple diffing algorithm

CollectionView

It’s hard to imagine of any apps that don’t use Table View or CollectionView. And by CollectionView, I actually mean UICollectionView 😉 . Most of the time, we show something with response from backend, then potentially update and insert new items as data changed.

collectionview

We can totally call reloadData to reflect the changes, but an animation is better here as it gives user better understanding of what’s going on, and to not surprise them.

This talks about UICollectionView, but UITableView behaves the same

Drag and Drop

Let’s imagine an app where user are allowed to customise their experience by moving items from one collection to another.

You can take a look at the example DragAndDrop which is using the new drag and drop API in iOS 11.

ipad

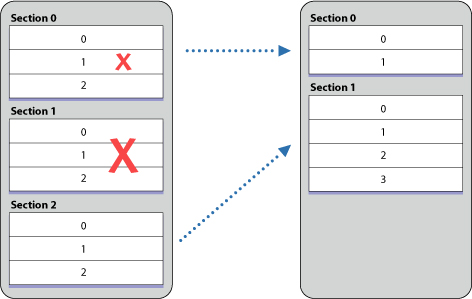
You must ensure that your data is changed before calling update methods on UICollectionView. And then we call deleteItems and insertItems to reflect data changes. UICollectionView performs a nice animation for you

1
2
3
4
5
6
7
8
9
10
11
12
13
func collectionView(_ collectionView: UICollectionView, performDropWith coordinator: UICollectionViewDropCoordinator) {

let destinationIndexPath = coordinator.destinationIndexPath
let sourceIndexPath = coordinator.items.last?.dragItem.localObject as! IndexPath

// remove
sourceItems.remove(at: sourceIndexPath.item)
sourceCollectionView.deleteItems(at: [sourceIndexPath])

// insert
destinationItems.insert(draggedItem, at: destinationIndexPath.item)
destinationCollectionView.insertItems(at: [destinationIndexPath])
}

NSInternalInconsistencyException

If you have large number of items with many insertions and deletions from backend response, you need to calculate the correct IndexPath to call, which are not easy thing. Most the time you will get the following crashes

Terminating app due to uncaught exception ‘NSInternalInconsistencyException’,
reason: ‘Invalid update: invalid number of items in section 0.
The number of items contained in an existing section after the update (213)
must be equal to the number of items contained in that section before
the update (154), plus or minus the number of items inserted or
deleted from that section (40 inserted, 0 deleted) and plus
or minus the number of items moved into or out of
that section (0 moved in, 0 moved out).’

In my experience it happened randomly because everyone has different data. Although the message is very descriptive, it may take a while to figure it out.

Game of IndexPath

Let’s refine our knowledge of IndexPath by going through some examples. With a collection of 6 items, we perform some update operations and figure out what IndexPath should be.

1
items = ["a", "b", "c", "d", "e", "f"]

Take a look at my example here CollectionUpdateExample, there are many more examples

index vs offset

Before we go any further, I just want to mention that, by index I actually mean offset from the start. If you take a look at the enumerated function, it suggests the name as offset instead of index

1
2
3
Array(0..<10).enumerated().forEach { (offset, element) in

}

This zero based numbering could shed some light on this matter

Particularly in C, where arrays are closely tied to pointer arithmetic, this makes for a simpler implementation: the subscript refers to an offset from the starting position of an array, so the first element has an offset of zero.

1. Insert 3 items at the end

1
2
3
4
5
6
items.append(contentsOf: ["g", "h", "i"])

// a, b, c, d, e, f, g, h, i

let indexPaths = Array(6...8).map { IndexPath(item: $0, section: 0) }
collectionView.insertItems(at: indexPaths)

2. Delete 3 items at the end

1
2
3
4
5
6
7
8
items.removeLast()
items.removeLast()
items.removeLast()

// a, b, c

let indexPaths = Array(3...5).map { IndexPath(item: $0, section: 0) }
collectionView.deleteItems(at: indexPaths)

3. Update item at index 2

1
2
3
4
5
6
items[2] = "👻"

// a, b, 👻, d, e, f

let indexPath = IndexPath(item: 2, section: 0)
collectionView.reloadItems(at: [indexPath])

4. Move item “c” to the end

1
2
3
4
5
6
7
8
9
items.remove(at: 2)
items.append("c")

// a, b, d, e, f, c

collectionView.moveItem(
at: IndexPath(item: 2, section: 0),
to: IndexPath(item: 5, section :0)
)

5. Delete 3 items at the beginning, then insert 3 items at the end

With multiple different operations, we should use performBatchUpdates

You can use this method in cases where you want to make multiple changes to the collection view in one single animated operation, as opposed to in several separate animations. You might use this method to insert, delete, reload, or move cells or use it to change the layout parameters associated with one or more cells

1
2
3
4
5
6
7
8
9
10
11
12
13
14
15
items.removeFirst()
items.removeFirst()
items.removeFirst()

items.append(contentsOf: ["g", "h", "i"])

// d, e, f, g, h, i

collectionView.performBatchUpdates({
let deleteIndexPaths = Array(0...2).map { IndexPath(item: $0, section: 0) }
collectionView.deleteItems(at: deleteIndexPaths)

let insertIndexPaths = Array(3...5).map { IndexPath(item: $0, section: 0) }
collectionView.insertItems(at: insertIndexPaths)
}, completion: nil)

6. Insert 3 items at the end, then delete 3 items beginning

1
2
3
4
5
6
7
8
9
10
11
12
13
14
15
items.append(contentsOf: ["g", "h", "i"])

items.removeFirst()
items.removeFirst()
items.removeFirst()

// d, e, f, g, h, i

collectionView.performBatchUpdates({
let insertIndexPaths = Array(6...8).map { IndexPath(item: $0, section: 0) }
collectionView.insertItems(at: insertIndexPaths)

let deleteIndexPaths = Array(0...2).map { IndexPath(item: $0, section: 0) }
collectionView.deleteItems(at: deleteIndexPaths)
}, completion: nil)

🙀

If you run the example 6, you will get a crash

1
2
3
4
Terminating app due to uncaught exception 
'NSInternalInconsistencyException',
reason: 'attempt to insert item 6 into section 0,
but there are only 6 items in section 0 after the update'

performBatchUpdates

It is because the way performBatchUpdates works. If you take a look at the documentation

Deletes are processed before inserts in batch operations. This means the indexes for the deletions are processed relative to the indexes of the collection view’s state before the batch operation, and the indexes for the insertions are processed relative to the indexes of the state after all the deletions in the batch operation.

No matter how we call insert or delete, performBatchUpdates always performs deletions first. So we need to call deleteItems and insertItems as if the deletions occur first.

1
2
3
4
5
6
7
8
9
10
11
12
13
14
15
items.append(contentsOf: ["g", "h", "i"])

items.removeFirst()
items.removeFirst()
items.removeFirst()

// d, e, f, g, h, i

collectionView.performBatchUpdates({
let deleteIndexPaths = Array(0...2).map { IndexPath(item: $0, section: 0) }
collectionView.deleteItems(at: deleteIndexPaths)

let insertIndexPaths = Array(3...5).map { IndexPath(item: $0, section: 0) }
collectionView.insertItems(at: insertIndexPaths)
}, completion: nil)

Operations

There are many operations on UICollectionView, and there are operations to update whole section as well. Take a look Ordering of Operations and Index Paths

1
2
3
4
5
insertItems(at indexPaths: [IndexPath])
deleteItems(at indexPaths: [IndexPath])
reloadItems(at indexPaths: [IndexPath])
moveItem(at indexPath: IndexPath, to newIndexPath: IndexPath)
performBatchUpdates(_ updates, completion)
1
2
3
4
insertSections(_ sections: IndexSet)
deleteSections(_ sections: IndexSet)
reloadSections(_ sections: IndexSet)
moveSection(_ section: Int, toSection newSection: Int)

inline

Edit distance

Doing these calculations by hand is quite tedious and error prone. We can build our own abstraction using some algorithms. The naive one is Wagner–Fischer algorithm which uses Dynamic Programming to tell the edit distance between two strings of characters.

Edit distance means the number of steps needed to change from one string to another. String is just a collection of characters, so we can generalise this concept to make it work for any collection of items. Instead of comparing character, we require items to conform to Equatable

“kit” -> “kat”

How can we transform form the word “kit” to “kat”? What kinds of operations do we nede to perform? You may tell “just change the i to a”, but this trivial example helps you understand the algorithm. Let’s get started.

inline

Deletions

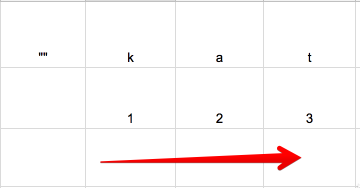
If we go from “kit” to an empty string “”, we need 3 deletions

inline

“k” -> “” 👉 1 deletion
“ki” -> “” 👉 2 deletions
“kit” -> “” 👉 3 deletions

Insertions

If we go from an empty string “” to “kat”, we need 3 insertions

inline

“” -> “k” 👉 1 insertion
“” -> “ka” 👉 2 insertions
“” -> “kat” 👉 3 insertions

If equal, take value from the top left

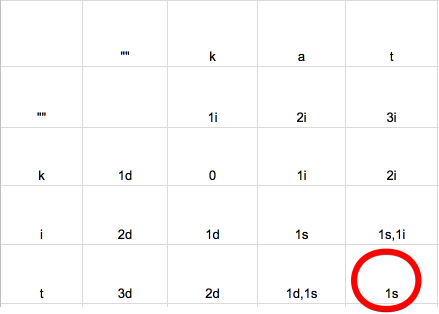
You can think of the algorithm as if we go from source string, to empty string, to destination string. We try to find the minimum steps to update. Going horizontally means insertions, vertically means deletions and diagonally means substitutions

This way we can build our matrix, iterate from row to row, column by column. First, the letter “k” from source collection is the same with letter “k” from destination collection, we simply take value from the top left, which is 0 substituion

inline

If not equal

We continue with the next letter from the destination collection. Here “k” and “a” are not the same. We take minimum value from left, top, top left. Then increase by one

inline

Here we take value from left, which is horizontally, so we increase by 1 insertion

“k” -> “kat” 👉 2 insertions

Continue, they are not the same, so we take value from left horizontally. Here you can see it kind makes sense, as to go from “k” to “kat”, we need 2 insertions, which is to insert letters “a” and “t”

inline

The bottom right value

Continue with the next row, and next row until we got to the bottom right value, which gives you the edit distance. Here 1 substitution means that we need to perform 1 substitution to go from “kit” to “kat”, which is update “i” with “a’

final

You can easily see that we need to update index 1. But how do we know that it is index 1 🤔

Edit steps

In each step, we need to associate the index of item in source and destination collection. You can take a look at my implementation DeepDiff

inline

Complexity

We iterate through the matrix, with m and n are the length of source and destination collection respectively, we can see that the complexity of this algorithm is 0(mn).

Also the performance greatly depends on the size of the collection and how complex the item is. The more complex and how deep you want to perform Equatable can greatly affect your performance.

Improving performance

The section How does it work shows several ways we can improve performance.

Firstly, instead of building a matrix, which costs memory m*n, we can just use temporary arrays as holder.

Secondly, to quickly compare 2 items, we can use Hashable, as 2 identical items will always have the same hash.

More performance

If you want better performance, then algorithms with linear complexity may be interested to you. Take a look at Diff algorithm

Badge in GitHub

Issue #117

GitHub is so awesome. It is where people around the world collaborate with each other.
It is more awesome to show more about you in your GitHub profile. How about a badge? a welcome text?
It is doable with organization. GitHub takes time and name of the organiazations you joined to determined how it displays on your profile

This used to be what shown on my GitHub profile https://github.com/onmyway133

1_61enfsc61onicous7vdwkw

For me, I display the text “Hello World”, so I have to create organizations for “h”, “e”, “l”, “l”, “o”, “w”, “o”, “r”, “l”, “d”
To ensure the order, you can name your organization like “org-h”, “org-he”, “org-hel”, “org-hell”, “org-hello”, … and you must join the organization in the correct order
I create another GitHub account called https://github.com/fantabot to manage my organizations
Your imaginary is your limit. May your code continue to compile :grin:

Case sensitivity in HTTP

Issue #115

Is URL case sensitive ?

According to HTML and URLs

URLs in general are case-sensitive (with the exception of machine names). There may be URLs, or parts of URLs, where case doesn’t matter, but identifying these may not be easy. Users should always consider that URLs are case-sensitive.

Is header case sensitive?

According to RFC 7230

Each header field consists of a case-insensitive field name followed by a colon (“:”), optional leading whitespace, the field value, and optional trailing whitespace.

Is method case sensitive?

Using URLSession, mostly we will get 200 with request.httpMethod = "GET" and 400 with request.httpMethod = "get". Generally speaking, you should use some popular wrappers Alamofire or Malibu as they are mature enough. Spend your precious time solving more important problems instead.

According to RFC 7231

The method token is case-sensitive because it might be used as a gateway to object-based systems with case-sensitive method names.

Understanding let, apply, with, run in Kotlin

Issue #114

Picture worths thousand words. Code worths thousand pictures. I don’t understand much until I take a look at Standard.kt in Kotlin standard library.

1
2
3
4
5
6
7
8
9
10
11
12
13
14
15
16
17
18
19
20
21
22
/**
* Calls the specified function [block] with `this` value as its receiver and returns `this` value.
*/
@kotlin.internal.InlineOnly
public inline fun <T> T.apply(block: T.() -> Unit): T {
contract {
callsInPlace(block, InvocationKind.EXACTLY_ONCE)
}
block()
return this
}

/**
* Calls the specified function [block] with `this` value as its argument and returns its result.
*/
@kotlin.internal.InlineOnly
public inline fun <T, R> T.let(block: (T) -> R): R {
contract {
callsInPlace(block, InvocationKind.EXACTLY_ONCE)
}
return block(this)
}

Kotlin provides the ability to call a function literal with a specified receiver object. Inside the body of the function literal, you can call methods on that receiver object without any additional qualifiers. This is similar to extension functions, which allow you to access members of the receiver object inside the body of the function

Using Playground with CocoaPods

Issue #113

This is a follow up from my post Learning from Open Source: Using Playground on how to actually add a playground to your production project.

The idea is simple: create a framework so that Playground can access the code. This demo an iOS project with CocoaPods. See the demo https://github.com/onmyway133/UsingPlayground

This is also my question to this question https://stackoverflow.com/questions/47589855/how-to-expose-your-project-code-to-a-xcode-playground-when-using-cocoapods/47595120#47595120

1. Add a pod

Create a new project called UsingPlayground. Create a Podfile with a pod Cheers because we want something fun 😄

1
2
3
4
5
6
platform :ios, '9.0'
use_frameworks!

pod 'Cheers'

target 'UsingPlayground'

2. Use the pod in your project

This is very straightforward. Just to make sure the pod work

1
2
3
4
5
6
7
8
9
10
11
12
13
14
15
16
17
18
19
import UIKit
import Cheers

class ViewController: UIViewController {

override func viewDidLoad() {
super.viewDidLoad()

let cheerView = CheerView()
view.addSubview(cheerView)
cheerView.frame = view.bounds

// Configure
cheerView.config.particle = .confetti

// Start
cheerView.start()
}
}

Build and run the project to enjoy a very fascinating confetti 🎊

3. Add a CocoaTouch framework

In your workspace, select the UsingPlayground project, add new CocoaTouch framework. Let’s call it AppFramework.

framework

Then add source files to this framework. For now, just check file ViewController.swift add add it to the AppFramework target too.

targets

4. Public

Swift types and methods are internal by default. So in order for them to be visible in the Playground, we need to declare them as public.

1
2
3
public class ViewController: UIViewController {
...
}

5. Add pod to AppFramework

In order for AppFramework to use our pods, we need to add those pods into framework target as well. Add target 'AppFramework' to your Podfile

1
2
3
4
5
6
7
8
9

platform :ios, '9.0'

use_frameworks!

pod 'Cheers'

target 'UsingPlayground'
target 'AppFramework'

Now run pod install again. In some rare cases, you need to run pod deintegrate and pod install to start from a clean slate

6. Add a Playground

Add a Playground and drag that to our workspace. Let’s call it MyPlayground

play

6. Enjoy

Now edit our MyPlayground. You can import frameworks from pod and our AppFramework

1
2
3
4
5
6
7
8
9
10
11
12
13
14
15
16
17
import UIKit
import Cheers
import AppFramework
import PlaygroundSupport

let cheerView = CheerView()
cheerView.frame = CGRect(x: 0, y: 50, width: 200, height: 400)

// Configure
cheerView.config.particle = .confetti

// Start
cheerView.start()

let myController = ViewController()

PlaygroundPage.current.liveView = myController.view

Remember to toggle Editor Mode so you can see Playground result

enjoy