How to use synthetic property in Kotlin Android Extension

Issue #555

Synthetic properties generated by Kotlin Android Extensions plugin needs a view for Fragment/Activity to be set before hand.

In your case, for Fragment, you need to use view.btn_K in onViewCreated

override fun onCreateView(inflater: LayoutInflater, container: ViewGroup?, savedInstanceState: Bundle?): View? {
    super.onCreateView(inflater, container, savedInstanceState)
    val view = inflater.inflate(R.layout.fragment_card_selector, container, false)
    view.btn_K.setOnClickListener{} // access with `view`
    return view
}

Or better, you should only access synthetic properties in onViewCreated

override fun onCreateView(inflater: LayoutInflater, container: ViewGroup?, savedInstanceState: Bundle?): View? {
    super.onCreateView(inflater, container, savedInstanceState)
    return inflater.inflate(R.layout.fragment_card_selector, container, false)
}

override fun onViewCreated(view: View, savedInstanceState: Bundle?) {
    super.onViewCreated(view, savedInstanceState)
    btn_K.setOnClickListener{} // access without `view`
}

Please notice that savedInstanceState parameter should be nullable Bundle?, and also check Importing synthetic properties

It is convenient to import all widget properties for a specific layout
in one go:

import kotlinx.android.synthetic.main.<layout>.*

Thus if the layout filename is activity_main.xml, we’d import
kotlinx.android.synthetic.main.activity_main.*.

If we want to call the synthetic properties on View, we should also
import kotlinx.android.synthetic.main.activity_main.view.*.

Read more

How to access view in fragment in Kotlin

Issue #497

Synthetic properties generated by Kotlin Android Extensions plugin needs a view for Fragment/Activity to be set before hand.

In your case, for Fragment, you need to use view.btn_K in onViewCreated

override fun onCreateView(inflater: LayoutInflater, container: ViewGroup?, savedInstanceState: Bundle?): View? {
    super.onCreateView(inflater, container, savedInstanceState)
    val view = inflater.inflate(R.layout.fragment_card_selector, container, false)
    view.btn_K.setOnClickListener{} // access with `view`
    return view
}

Or better, you should only access synthetic properties in onViewCreated

override fun onCreateView(inflater: LayoutInflater, container: ViewGroup?, savedInstanceState: Bundle?): View? {
    super.onCreateView(inflater, container, savedInstanceState)
    return inflater.inflate(R.layout.fragment_card_selector, container, false)
}

override fun onViewCreated(view: View, savedInstanceState: Bundle?) {
    super.onViewCreated(view, savedInstanceState)
    btn_K.setOnClickListener{} // access without `view`
}

Please notice that savedInstanceState parameter should be nullable Bundle?, and also check Importing synthetic properties

It is convenient to import all widget properties for a specific layout
in one go:

import kotlinx.android.synthetic.main.<layout>.*

Thus if the layout filename is activity_main.xml, we’d import
kotlinx.android.synthetic.main.activity_main.*.

If we want to call the synthetic properties on View, we should also
import kotlinx.android.synthetic.main.activity_main.view.*.


Original answer https://stackoverflow.com/questions/34541650/nullpointerexception-when-trying-to-access-views-in-a-kotlin-fragment/51674381#51674381

How to show error message like Snack Bar in iOS

Issue #472

Build error view

Use convenient code from Omnia

To make view height dynamic, pin UILabel to edges and center

1
2
3
4
5
6
7
8
9
10
11
12
13
14
15
16
17
18
19
20
21
22
23
24
25
26
27
28
29
30
31
32
33
34
35
36
37
38
39
40
41
42
43
import UIKit

final class ErrorMessageView: UIView {
let box: UIView = {
let view = UIView()
view.backgroundColor = R.color.primary
view.layer.cornerRadius = 6
return view
}()

let label: UILabel = {
let label = UILabel()
label.styleAsText()
label.textColor = R.color.darkText
label.numberOfLines = 0
return label
}()

override init(frame: CGRect) {
super.init(frame: frame)
setup()
}

required init?(coder: NSCoder) {
fatalError()
}

private func setup() {
addSubviews([box, label])
NSLayoutConstraint.on([
box.pinEdges(view: self, inset: UIEdgeInsets.all(16)),
label.pinEdges(view: box, inset: UIEdgeInsets.all(8))
])

NSLayoutConstraint.on([
box.heightAnchor.constraint(greaterThanOrEqualToConstant: 48)
])

NSLayoutConstraint.on([
label.centerYAnchor.constraint(equalTo: centerYAnchor)
])
}
}

Show and hide

Use Auto Layout and basic UIView animation. Use debouncer to avoid hide gets called for the new show. Use debouncer instead of DispatchQueue.main.asyncAfter because it can cancel the previous DispatchWorkItem

1
2
3
4
5
6
7
8
9
10
11
12
13
14
15
16
17
18
19
20
21
22
23
24
25
26
27
28
29
30
31
32
33
34
35
36
37
38
39
40
41
42
43
import UIKit

final class ErrorMessageHandler {
let view: UIView
let errorMessageView = ErrorMessageView()
let debouncer = Debouncer(delay: 0.5)

init(view: UIView) {
self.view = view
}

func show(text: String) {
self.errorMessageView.label.text = text
view.addSubview(errorMessageView)
NSLayoutConstraint.on([
errorMessageView.leftAnchor.constraint(equalTo: view.leftAnchor),
errorMessageView.rightAnchor.constraint(equalTo: view.rightAnchor),
errorMessageView.bottomAnchor.constraint(equalTo: view.safeAreaLayoutGuide.bottomAnchor)
])

toggle(shows: true)
debouncer.run {
self.hide()
}
}

func hide() {
toggle(shows: false)
}

private func toggle(shows: Bool) {
self.errorMessageView.alpha = shows ? 0 : 1.0
UIView.animate(withDuration: 0.25, animations: {
self.errorMessageView.alpha = shows ? 1.0 : 0
}, completion: { _ in
if shows {
self.view.bringSubviewToFront(self.errorMessageView)
} else {
self.errorMessageView.removeFromSuperview()
}
})
}
}

Handle keyboard

If we add this error message on UIView in ViewController and we use KeyboardHandler to scroll the entire view, then this snack bar will move up as well

1
2
3
4
5
6
7
8
9
10
final class ErrorMessageHandler {
private let errorMessageView = ErrorMessageView()
private var view = UIView()
private var bottomOffset: CGFloat = 0

func on(view: UIView, bottomOffset: CGFloat) {
self.view = view
self.bottomOffset = bottomOffset
}
}

UIView animation completion

One tricky thing is that if we call hide and then show immediately, the completion of hide will be called after and then remove the view.

When we start animation again, the previous animation is not finished, so we need to check

Read UIView.animate

completion
A block object to be executed when the animation sequence ends. This block has no return value and takes a single Boolean argument that indicates whether or not the animations actually finished before the completion handler was called. If the duration of the animation is 0, this block is performed at the beginning of the next run loop cycle. This parameter may be NULL.

1
2
3
4
5
6
7
8
9
10
11
12
13
14
private func toggle(shows: Bool) {
self.errorMessageView.alpha = shows ? 0 : 1.0
UIView.animate(withDuration: 0.25, delay: 0, options: .curveEaseInOut, animations: {
self.errorMessageView.alpha = shows ? 1.0 : 0
}, completion: { finished in
if shows {
self.view.bringSubviewToFront(self.errorMessageView)
} else if finished {
self.errorMessageView.removeFromSuperview()
} else {
// No op
}
})
}

How to structure classes

Issue #466

iOS

1
View Controller -> View Model | Logic Handler -> Data Handler -> Repo

Android

1
Activity -> Fragment -> View Model | Logic Handler -> Data Handler -> Repo

How to add AdMob to Android app

Issue #431

Use AdMob with Firebase

build.gradle

1
2
3
4
5
6
7
8
9
10
buildscript {
repositories {
google()
jcenter()

}
dependencies {
classpath 'com.google.gms:google-services:4.3.2'
}
}

app/build.gradle

1
2
3
4
5
6
7
8
9
10
11
12
13
class Version {
class Firebase {
static def analytics = "17.2.0"
static def ads = "18.2.0"
}
}

dependencies {
implementation "com.google.firebase:firebase-analytics:$Version.Firebase.analytics"
implementation "com.google.firebase:firebase-ads:$Version.Firebase.ads"
}

apply plugin: 'com.google.gms.google-services'

Manifest.xml

1
2
3
4
5
6
7
8
<manifest>
<application>
<!-- Sample AdMob App ID: ca-app-pub-3940256099942544~3347511713 -->
<meta-data
android:name="com.google.android.gms.ads.APPLICATION_ID"
android:value="[ADMOB_APP_ID]"/>
</application>
</manifest>

MyApplication.kt

1
2
3
4
5
6
7
class MyApplication: Application() {
override fun onCreate() {
super.onCreate()

MobileAds.initialize(this)
}
}

AdView

fragment.xml

1
2
3
4
5
6
7
8
9
10
<com.google.android.gms.ads.AdView
xmlns:ads="http://schemas.android.com/apk/res-auto"
android:id="@+id/adView"
android:layout_width="match_parent"
android:layout_height="wrap_content"
ads:adSize="BANNER"
ads:adUnitId="ca-app-pub-123456/123456"
ads:layout_constraintBottom_toBottomOf="parent"
ads:layout_constraintLeft_toLeftOf="parent"
ads:layout_constraintRight_toRightOf="parent"/>

Fragment.kt

1
2
3
4
5
import com.google.android.gms.ads.AdRequest
import com.google.android.gms.ads.AdView

val request = AdRequest.Builder().build()
adView.loadAd(request)

Troubleshooting

app/build.gradle

1
2
3
dependencies {
implementation 'com.google.android.gms:play-services-ads:18.2.0'
}

Cannot fit requested classes in a single dex file

app/build.gradle

1
2
3
4
5
6
7
8
9
10

android {
defaultConfig {
multiDexEnabled true
}
}

dependencies {
implementation 'com.android.support:multidex:1.0.3'
}

Read more

How to do launch screen in Android

Issue #397

We recommend that, rather than disabling the preview window, you follow the common Material Design patterns. You can use the activity’s windowBackground theme attribute to provide a simple custom drawable for the starting activity.

styles.xml

1
2
3
<style name="LaunchTheme" parent="Theme.AppCompat.NoActionBar">
<item name="android:windowBackground">@drawable/launch_background</item>
</style>

Set android:theme="@style/LaunchTheme" to activity element

AndroidManifest.xml

1
2
3
4
5
6
7
8
9
10
11
12
13
14
15
16
17
18
19
20
21
22
23
24
25
<?xml version="1.0" encoding="utf-8"?>
<manifest xmlns:android="http://schemas.android.com/apk/res/android"
package="com.onmyway133.whatsupintech">
<uses-permission android:name="android.permission.INTERNET" />

<application
android:name=".MyApplication"
android:allowBackup="true"
android:icon="@mipmap/ic_launcher"
android:label="@string/app_name"
android:roundIcon="@mipmap/ic_launcher_round"
android:supportsRtl="true"
android:theme="@style/AppTheme">
<activity
android:name=".features.main.MainActivity"
android:label="@string/app_name"
android:theme="@style/LaunchTheme">
<intent-filter>
<action android:name="android.intent.action.MAIN"/>
<category android:name="android.intent.category.LAUNCHER"/>
</intent-filter>
</activity>
</application>

</manifest>

MainActivity.kt

1
2
3
4
5
6
7
8
class MainActivity : AppCompatActivity() {

override fun onCreate(savedInstanceState: Bundle?) {
setTheme(R.style.AppTheme_NoActionBar)
super.onCreate(savedInstanceState)
setContentView(R.layout.main_activity)
}
}

Read more

How to add header to NavigationView in Android

Issue #396

Use app:headerLayout

1
2
3
4
5
6
7
8
9
10
<com.google.android.material.navigation.NavigationView
android:layout_width="wrap_content"
android:layout_height="match_parent"
android:id="@+id/navigationView"
android:fitsSystemWindows="true"
android:layout_gravity="start"
app:menu="@menu/drawer_menu"
app:itemIconTint="@color/title"
app:itemTextColor="@color/title"
app:headerLayout="@layout/navigation_header" />

navigation_header.xml

1
2
3
4
5
6
7
8
9
10
11
12
13
14
15
<?xml version="1.0" encoding="utf-8"?>
<androidx.constraintlayout.widget.ConstraintLayout xmlns:android="http://schemas.android.com/apk/res/android"
android:layout_width="match_parent"
android:layout_height="match_parent"
xmlns:app="http://schemas.android.com/apk/res-auto">
<androidx.appcompat.widget.AppCompatImageView
android:layout_width="0dp"
android:layout_height="wrap_content"
android:src="@drawable/icon"
app:layout_constraintLeft_toLeftOf="parent"
app:layout_constraintRight_toRightOf="parent"
app:layout_constraintTop_toTopOf="parent"
app:layout_constraintBottom_toBottomOf="parent"/>

</androidx.constraintlayout.widget.ConstraintLayout>

How to create bounce animation programmatically in Android

Issue #383

Right click res -> New -> Android Resource Directory, select anim and name it anim
Right click res/anim -> New -> Android Resource file, name it bounce

1
2
3
4
5
6
7
8
9
10
11
12
13
14
15
16
17
<?xml version="1.0" encoding="utf-8"?>
<set xmlns:android="http://schemas.android.com/apk/res/android">
<translate
android:fromYDelta="0"
android:toYDelta="-100"
android:repeatCount="infinite" />
</set>
```

We have to set `repeatCount` in xml, setting in code does not work !!

```kt
val bounce = AnimationUtils.loadAnimation(context, R.anim.bounce)
bounce.repeatMode = Animation.REVERSE
bounce.duration = (1000..2000).random().toLong()

imageView.startAnimation(bounce)

How to use point in dp programmatically in Android

Issue #382

1
2
3
4
5
6
7
8
9
10
import android.content.Context

fun Int.toDp(context: Context?): Int {
if (context != null) {
val scale = context.resources.displayMetrics.density
return (this.toFloat() * scale + 0.5f).toInt()
} else {
return 0
}
}
1
2
val set = ConstraintSet()
set.setMargin(imageView.id, ConstraintSet.RIGHT, rightMargin.toDp(150))

Read more

How to create constraints programmatically with ConstraintLayout in Android

Issue #381

From API < 17, there is ViewCompat.generateViewId()
For API 17, there is View.generateViewId()

Note that to use ConstraintSet, all views under ConstraintLayout inside xml must have unique id

1
2
3
4
5
6
7
8
9
val imageView = ImageView(context)
imageView.id = View.generateViewId()
imageView.setImageResource(resId)
constraintLayout.addView(imageView)

val set = ConstraintSet()
set.clone(constraintLayout)
set.connect(imageView.id, ConstraintSet.RIGHT, ConstraintSet.PARENT_ID, ConstraintSet.RIGHT)
set.applyTo(constraintLayout)

How to use custom font as resource in Android

Issue #380

Downloadable fonts

https://developer.android.com/guide/topics/ui/look-and-feel/downloadable-fonts

Android 8.0 (API level 26) and Android Support Library 26 introduce support for APIs to request fonts from a provider application instead of bundling files into the APK or letting the APK download fonts. The feature is available on devices running Android API versions 14 and higher through the Support Library 26

Before

  • Select File -> New -> Folder -> Assets Folder to create src/main/assets/fonts
1
2
al myTypeface = Typeface.createFromAsset(assets, "fonts/myFont.ttf")
myTextView.typeface = myTypeface

In res

Create font directory

Right click res -> New -> Android Resource Directory, select font and name the folder font

Add custom fonts to res/font folder. Note that name must be lower case and underscore, like opensans_extrabolditalic.ttf

Right click res/font -> New -> Font resource file to create font family

opensans.xml

1
2
3
4
5
6
7
8
9
10
11
12
13
14
15
16
17
18
19
20
21
22
23
24
25
26
27
28
29
30
31
32
33
34
35
<?xml version="1.0" encoding="utf-8"?>
<font-family
xmlns:android="http://schemas.android.com/apk/res/android"
xmlns:app="http://schemas.android.com/apk/res-auto" >
<font
android:font="@font/opensans_regular"
android:fontStyle="normal"
android:fontWeight="400"
app:fontFamily="@font/opensans_regular"
app:fontStyle="normal"
app:fontWeight="400" />
<font
android:font="@font/opensans_semibold"
android:fontStyle="normal"
android:fontWeight="400"
app:fontFamily="@font/opensans_semibold"
app:fontStyle="normal"
app:fontWeight="400" />
<font
android:font="@font/opensans_bold"
android:fontStyle="normal"
android:fontWeight="400"
app:fontFamily="@font/opensans_bold"
app:fontStyle="normal"
app:fontWeight="400" />
</font-family>
```

Then use

```xml
<TextView
android:fontFamily="@font/opensans_bold"
android:textSize="26dp"
/>

Read more

How to get Hacker News top stories using parallel coroutine and Retrofit

Issue #379

1
2
3
4
5
6
7
interface Api {
@GET("topstories.json?print=pretty")
suspend fun getTopStories(): List<Int>

@GET("item/{id}.json?print=pretty")
suspend fun getStory(@Path("id") id: Int): Item
}
1
2
3
4
5
6
7
8
9
class Repo {
fun api(): Api {
return Retrofit.Builder()
.baseUrl("https://hacker-news.firebaseio.com/v0/")
.addConverterFactory(MoshiConverterFactory.create())
.build()
.create(Api::class.java)
}
}
1
2
3
4
5
6
7
8
9
10
11
12
13
14
15
16
17
18
class ViewModel(val repo: Repo): ViewModel() {
val items = MutableLiveData<ArrayList<Item>>()

suspend fun load() {
try {
val ids = repo.api()
.getTopStories()
.take(20)

val items = ids.map {
repo.api().getStory(it)
}
this.items.value = items.toCollection(ArrayList())
} catch (e: Exception) {
this.items.value = arrayListOf()
}
}
}

Running parallel

The above run in serial. To run in parallel, we can use async

1
2
3
4
5
6
7
8
9
10
11
12
13
14
15
16
17
18
19
20
21
22
23
24
25
import kotlinx.coroutines.async
import kotlinx.coroutines.coroutineScope

class ViewModel(val repo: Repo): ViewModel() {
val items = MutableLiveData<ArrayList<Item>>()

suspend fun load() {
try {
val ids = repo.api()
.getTopStories()
.take(20)

coroutineScope {
val items = ids
.map { async { repo.api().getStory(it) } }
.awaitAll()

this@ViewModel.items.value = items.toCollection(ArrayList())
}

} catch (e: Exception) {
this.items.value = arrayListOf()
}
}
}

Parallel decomposition

https://medium.com/@elizarov/structured-concurrency-722d765aa952

With structured concurrency async coroutine builder became an extension on CoroutineScope just like launch did. You cannot simply write async { … } anymore, you have to provide a scope. A proper example of parallel decomposition becomes:

coroutineScope

https://proandroiddev.com/part-2-coroutine-cancellation-and-structured-concurrency-2dbc6583c07d

coroutineScope function can be used to create a custom scope that suspends and only completes when all coroutines launched within that scope complete. If any of the children coroutines within the coroutineScope throws an exception, all other running sibling coroutines gets cancelled and this exception is propagated up the hierarchy. If the parent coroutine at the top of the hierarchy does not handle this error, it will also be cancelled.

awaitAll

https://kotlin.github.io/kotlinx.coroutines/kotlinx-coroutines-core/kotlinx.coroutines/await-all.html

Awaits for completion of given deferred values without blocking a thread and resumes normally with the list of values when all deferred computations are complete or resumes with the first thrown exception if any of computations complete exceptionally including cancellation.

This function is not equivalent to deferreds.map { it.await() } which fails only when it sequentially gets to wait for the failing deferred, while this awaitAll fails immediately as soon as any of the deferreds fail.

This suspending function is cancellable. If the Job of the current coroutine is cancelled or completed while this suspending function is waiting, this function immediately resumes with CancellationException.

Read more

How to show generic list in Fragment in Android

Issue #378

After having a generic RecyclerView, if we want to show multiple kinds of data in Fragment, we can use generic.

We may be tempted to use interface or protocol, but should prefer generic.

1
2
3
4
5
6
7
8
9
10
11
12
13
14
15
16
17
18
19
class FeedFragment() : Fragment() {
override fun onActivityCreated(savedInstanceState: Bundle?) {
super.onActivityCreated(savedInstanceState)

val mainViewModel: MainViewModel = ViewModelProviders.of(activity!!).get(MainViewModel::class.java)
mainViewModel.resId.observe(viewLifecycleOwner, Observer {
when (it) {
R.id.gitHub -> { handleGitHub() }
R.id.hackerNews -> { handleHackerNews() }
R.id.reddit -> { handleReddit() }
R.id.dev -> { handleDev() }
R.id.productHunt -> { handleProductHunt() }
else -> {}
}
})

recyclerView.layoutManager = LinearLayoutManager(context)
}
}

The difference between each kind are

  • The type of model
  • The type of Adapter
  • How to observe from viewModel
  • How to load from viewModel

Here we also use lifecycleScope from lifecycle runtime ktx

1
implementation "androidx.lifecycle:lifecycle-runtime-ktx:2.2.0-alpha01"
1
2
3
4
5
6
7
8
9
10
11
12
13
14
15
16
17
18
19
20
21
22
23
24
25
private fun <T> handle(
makeResId: () -> Int,
makeAdapter: () -> com.myapp.Adapter<T>,
observe: ((ArrayList<T>) -> Unit) -> Unit,
load: suspend () -> Unit
) {
(activity as AppCompatActivity).toolbar.title = getString(makeResId())
val adapter = makeAdapter()
recyclerView.adapter = adapter
observe {
adapter.update(it)
}
fun doLoad() {
viewLifecycleOwner.lifecycleScope.launch {
progressBar.visibility = View.VISIBLE
load()
progressBar.visibility = View.GONE
swipeRefreshLayout.isRefreshing = false
}
}
doLoad()
swipeRefreshLayout.setOnRefreshListener {
doLoad()
}
}

Then we just need to provide the required data

1
2
3
4
5
6
7
8
9
10
11
12
13
14
15
private fun handleDev() {
val viewModel: com.myapp.ViewModel by viewModel()
handle(
{ R.string.menu_dev },
{ com.myapp.Adapter(items = arrayListOf()) },
{ completion ->
viewModel.items.observe(viewLifecycleOwner, Observer {
completion(it)
})
},
{
viewModel.load()
}
)
}

Read more

How to use Product Hunt GraphQL API with Retrofit

Issue #370

Define response model

1
2
3
4
5
6
7
8
9
10
11
12
13
14
15
16
17
18
19
20
21
22
23
24
25
26
27
28
29
30
31
32
import com.squareup.moshi.Json

data class Response(
@field:Json(name="data") val data: ResponseData
)

data class ResponseData(
@field:Json(name="posts") val posts: Posts
)

data class Posts(
@field:Json(name="edges") val edges: List<Edge>
)

data class Edge(
@field:Json(name="node") val node: Item
)

data class Item(
@field:Json(name="id") val id: String,
@field:Json(name="name") val name: String,
@field:Json(name="url") val url: String,
@field:Json(name="tagline") val tagline: String,
@field:Json(name="featuredAt") val featuredAt: String,
@field:Json(name="votesCount") val votesCount: Int,
@field:Json(name="commentsCount") val commentsCount: Int,
@field:Json(name="thumbnail") val thumbnail: Thumbnail
)

data class Thumbnail(
@field:Json(name="url") val ur: String
)

Here is the query

1
2
3
4
5
6
7
8
9
10
11
12
13
14
15
16
17
18
{
posts {
edges {
node {
id
name
url
tagline
featuredAt
votesCount
commentsCount
thumbnail {
url
}
}
}
}
}

Here’s how request looks in Insomnia

1
2
3
4
5
6
7
8
9
10
> POST /v2/api/graphql HTTP/1.1
> Host: api.producthunt.com
> User-Agent: insomnia/6.6.2
> Cookie: __cfduid=d9a588136cbb286b156d8e4a873d52a301566795296
> Accept: application/json
> Content-Type: application/json
> Authorization: Bearer 068665d215cccad9123449841463b1248da07123418915a192a1233dedfd23b2
> Content-Length: 241

| {"query":"{\n posts {\n edges {\n node {\n id\n name\n url\n tagline\n featuredAt\n votesCount\n commentsCount\n thumbnail {\n url\n }\n }\n }\n }\n}"}

To post as json, need to use object for Moshi to convert

1
2
3
4
5
6
7
8
9
10
11
12
13
14
15
16
17
18
data class GetTopBody(
@field:Json(name="query") val queryString: String
)

interface Api {
@Headers(
"Content-Type: application/json",
"Accept: application/json",
"Authorization: Bearer 068665d215cccad9123449841463b1248da07123418915a192a1233dedfd23b2",
"Host: api.producthunt.com",
"User-Agent: insomnia/6.6.2"
)

@POST("./")
suspend fun getTop(
@Body body: GetTopBody
): Response
}

And consume it in ViewModel. Use multiline string interpolation. No need to set contentLength

1
2
3
4
5
6
7
8
9
10
11
12
13
14
15
16
17
18
19
20
21
22
23
24
25
26
27
28
29
30
31
32
33
34
35
class ViewModel(val repo: Repo): ViewModel() {
val items = liveData {
val queryString = """
{
posts {
edges {
node {
id
name
url
tagline
featuredAt
votesCount
commentsCount
thumbnail {
url
}
}
}
}
}
""".trimIndent()

val body = GetTopBody(queryString)

try {
val response = repo.api().getTop(body)
val items = response.data.posts.edges.map { it.node }
emit(items.toCollection(ArrayList()))
} catch (e: Exception) {
emit(arrayListOf<Item>())
}

}
}

The response looks like

1
2
3
4
5
6
7
8
9
10
11
12
13
14
15
16
17
18
19
20
21
22
23
24
25
26
27
28
29
30
31
32
33
34
35
36
{
"data": {
"posts": {
"edges": [
{
"node": {
"id": "158359",
"name": "Toast",
"url": "https://www.producthunt.com/posts/toast-2?utm_campaign=producthunt-api&utm_medium=api-v2&utm_source=Application%3A+PH+API+Explorer+%28ID%3A+9162%29",
"tagline": "Organise tabs into organised sessions",
"featuredAt": "2019-08-25T07:00:00Z",
"votesCount": 318,
"commentsCount": 16,
"thumbnail": {
"url": "https://ph-files.imgix.net/a169654a-850d-4b1c-80ba-be289f973fb7?auto=format&fit=crop"
}
}
},
{
"node": {
"id": "165621",
"name": "Tree",
"url": "https://www.producthunt.com/posts/tree-2?utm_campaign=producthunt-api&utm_medium=api-v2&utm_source=Application%3A+PH+API+Explorer+%28ID%3A+9162%29",
"tagline": "Write documents in tree-like organisation with Markdown",
"featuredAt": "2019-08-25T09:10:53Z",
"votesCount": 227,
"commentsCount": 11,
"thumbnail": {
"url": "https://ph-files.imgix.net/68b1f007-e630-4c79-8a27-756ec364343f?auto=format&fit=crop"
}
}
}
]
}
}
}

Map

Instead of using an object, we can use Map. If using HashMap, I get

Unable to create @Body converter for java.util.HashMap<java.lang.String, java.lang.String>

1
2
3
4
5
6
@POST("./")
suspend fun getTop(
@Body body: Map<String, String>
): Response

val body = mapOf("query" to queryString)

Troubleshooting

Use Network Profiler to inspect failure View > Tool Windows > Profiler

query

Read more

How to get trending repos on GitHub using Retrofit

Issue #367

1
https://api.github.com/search/repositories?sort=stars&order=desc&q=language:javascript,java,swift,kotlin&q=created:>2019-08-21
1
2
3
4
5
6
7
8
interface Api {
@GET("https://api.github.com/search/repositories")
suspend fun getTrendingRepos(
@Query("sort") sort: String,
@Query("order") order: String,
@Query("q") qs: List<String>
): Response
}
1
2
3
4
5
6
7
8
9
10

class Repo {
fun api(): Api {
return Retrofit.Builder()
.baseUrl("https://api.github.com/")
.addConverterFactory(MoshiConverterFactory.create())
.build()
.create(Api::class.java)
}
}
1
2
3
4
5
6
7
8
9
10
11
12
13
14
15
16
17
18
19
20
21
class ViewModel(val repo: Repo, val dateProvider: DateProvider): ViewModel() {
val items = MutableLiveData<ArrayList<Item>>()

suspend fun load() {
try {
val order = "desc"
val sort = "star"

val formatter = SimpleDateFormat("YYYY-MM-dd")
val qs = listOf(
"language:javascript,java,swift,kotlin",
"q=created:>${formatter.format(dateProvider.yesterday)}"
)

val response = repo.api().getTrendingRepos(sort=sort, order=order, qs=qs)
this.items.value = response.items.toCollection(ArrayList())
} catch (e: Exception) {
this.items.value = arrayListOf()
}
}
}

How to use Retrofit in Android

Issue #366

Code uses Retrofit 2.6.0 which has Coroutine support

app/build.gradle

1
2
3
4
5
6
implementation "androidx.lifecycle:lifecycle-livedata-ktx:2.2.0-alpha01"

implementation "com.squareup.moshi:moshi:$Version.moshi"

implementation "com.squareup.retrofit2:retrofit:$Version.retrofit"
implementation "com.squareup.retrofit2:converter-moshi:$Version.retrofit"

Api.kt

1
2
3
4
5
6
import retrofit2.http.GET

interface Api {
@GET("api/articles")
suspend fun getArticles(): List<Article>
}

Repo.kt

1
2
3
4
5
6
7
8
9
10
11
12
import retrofit2.Retrofit
import retrofit2.converter.moshi.MoshiConverterFactory

class Repo {
fun get(): Api {
return Retrofit.Builder()
.baseUrl("https://dev.to")
.addConverterFactory(MoshiConverterFactory.create())
.build()
.create(Api::class.java)
}
}

ViewModel.kt

1
2
3
4
5
6
7
8
9
import androidx.lifecycle.ViewModel
import androidx.lifecycle.liveData
import kotlinx.coroutines.Dispatchers

class ViewModel(val repo: Repo): ViewModel() {
val articles = liveData(Dispatchers.Main) {
emit(repo.get().getArticles().toCollection(ArrayList()))
}
}

Article.kt

1
2
3
4
5
6
import com.squareup.moshi.Json

data class Article(
@field:Json(name="type_of") val typeOf: String,
@field:Json(name="title") val title: String
)

How to use ViewModel and ViewModelsProviders in Android

Issue #363

ViewModels a simple example

https://medium.com/androiddevelopers/viewmodels-a-simple-example-ed5ac416317e

Rotating a device is one of a few configuration changes that an app can go through during its lifetime, including keyboard availability and changing the device’s language. All of these configuration changes cause the Activity to be torn down and recreated

The ViewModel class is designed to hold and manage UI-related data in a life-cycle conscious way. This allows data to survive configuration changes such as screen rotations.

The ViewModel exists from when the you first request a ViewModel (usually in the onCreate the Activity) until the Activity is finished and destroyed. onCreate may be called several times during the life of an Activity, such as when the app is rotated, but the ViewModel survives throughout.

Storing an Application context in a ViewModel is okay because an Application context is tied to the Application lifecycle. This is different from an Activity context, which is tied to the Activity lifecycle. In fact, if you need an Application context, you should extend AndroidViewModel which is simply a ViewModel that includes an Application reference.

The first time the ViewModelProviders.of method is called by MainActivity, it creates a new ViewModel instance. When this method is called again, which happens whenever onCreate is called, it will return the pre-existing ViewModel associated with the specific Court-Counter MainActivity

1
ViewModelProviders.of(<THIS ARGUMENT>).get(ScoreViewModel.class);

This allows you to have an app that opens a lot of different instances of the same Activity or Fragment, but with different ViewModel information

Dive deep into Android’s ViewModel — Android Architecture Components

https://android.jlelse.eu/dive-deep-into-androids-viewmodel-android-architecture-components-e0a7ded26f70

1
2
3
4
5
6
7
8
9
10
11
12
13
14
15
16
17
18
19
20
21
22
23
/**
* Utilities methods for {@link ViewModelStore} class.
*/
public class ViewModelProviders {
/**
* Creates a {@link ViewModelProvider}, which retains ViewModels while a scope of given Activity
* is alive. More detailed explanation is in {@link ViewModel}.
* <p>
* It uses {@link ViewModelProvider.AndroidViewModelFactory} to instantiate new ViewModels.
*
* @param activity an activity, in whose scope ViewModels should be retained
* @return a ViewModelProvider instance
*/
@NonNull
@MainThread
public static ViewModelProvider of(@NonNull FragmentActivity activity) {
ViewModelProvider.AndroidViewModelFactory factory =
ViewModelProvider.AndroidViewModelFactory.getInstance(
checkApplication(activity));
return new ViewModelProvider(ViewModelStores.of(activity), factory);
}

}

It seems like ViewModelProviders.of is just a factory of ViewModelProvider, which depends upon ViewModelFactory and a ViewModelStore.

1
2
MyViewModelFactory factory = new MyViewModelFactory(data1, data2);
ViewModelProviders.of(this, factory).get(MyViewModel.class);
1
2
3
public class ViewModelStore {
private final HashMap<String, ViewModel> mMap = new HashMap<>();
}

HolderFragment

HolderFragment is a regular Android Headless Fragment. It is the scope where all ViewModels inside the ViewModelStore will live.

1
2
3
4
5

public class HolderFragment extends Fragment implements ViewModelStoreOwner {
private static final HolderFragmentManager sHolderFragmentManager = new HolderFragmentManager();
private ViewModelStore mViewModelStore = new ViewModelStore();
}
1
2
3
4
static class HolderFragmentManager {
private Map<Activity, HolderFragment> mNotCommittedActivityHolders = new HashMap<>();
private Map<Fragment, HolderFragment> mNotCommittedFragmentHolders = new HashMap<>();
}

Who owns the HolderFragment?

The HolderFragment has an inner static class named HolderFragmentManager. The HolderFragmentManager creates and manages HolderFragment instances.
After creating the instances it associates them with an Activity or Fragment.

The whole process is done using the methods holderFragmentFor(Activity) and holderFragmentFor(Fragment).

How does HolderFragment retains the state ?

By setting retain instance to true and not providing a view, the HolderFragment becomes essentially a headless Fragment that is retained for as long as the Activity is not destroyed.

1
2
3
public HolderFragment() {
setRetainInstance(true);
}

void setRetainInstance (boolean retain)

Control whether a fragment instance is retained across Activity re-creation (such as from a configuration change). This can only be used with fragments not in the back stack. If set, the fragment lifecycle will be slightly different when an activity is recreated:

Retrieving ViewModel instance

1
get(MyViewModel.class)

It tries to retrieve a MyViewModel instance from the store. If none is there, it uses the factory to create it and then stores it into HashMap<String, ViewModel>. In order to retrieve the already created ViewModel, it generates a key from the class qualified name.

How to inject view model with Koin in Android

Issue #359

app/build.gradle

1
2
3
implementation "org.koin:koin-core:$Version.koin"
implementation "org.koin:koin-androidx-scope:$Version.koin"
implementation "org.koin:koin-androidx-viewmodel:$Version.koin"

MyApplication.kt

1
2
3
4
5
6
7
8
9
10
11
12
13
14
15
16
17
18
19
20
21
22
23
import android.app.Application
import org.koin.android.ext.koin.androidContext
import org.koin.android.ext.koin.androidLogger
import org.koin.androidx.viewmodel.dsl.viewModel
import org.koin.core.context.startKoin
import org.koin.dsl.module

class MyApplication: Application() {
var appModule = module {
single { MyRepo() }
viewModel { MyViewModel(get()) }
}

override fun onCreate() {
super.onCreate()

startKoin {
androidLogger()
androidContext(this@MyApplication)
modules(appModule)
}
}
}

MyFragment.kt

1
2
3
import org.koin.androidx.viewmodel.ext.android.viewModel

val viewModel: MyViewModel by viewModel()

How to use coroutine LiveData in Android

Issue #358

app/build.gradle

1
implementation "androidx.lifecycle:lifecycle-livedata-ktx:2.2.0-alpha01"
1
2
3
4
5
6
7
8
9
10
11
12
13
import androidx.lifecycle.ViewModel
import androidx.lifecycle.liveData
import kotlinx.coroutines.Dispatchers

class MainViewModel : ViewModel() {
val repository: TodoRepository = TodoRepository()

val firstTodo = liveData(Dispatchers.IO) {
val retrivedTodo = repository.getTodo(1)

emit(retrivedTodo)
}
}

Use coroutines with LiveData

https://developer.android.com/topic/libraries/architecture/coroutines

The liveData building block serves as a structured concurrency primitive between coroutines and LiveData. The code block starts executing when LiveData becomes active and is automatically canceled after a configurable timeout when the LiveData becomes inactive.

Source code

https://android.googlesource.com/platform/frameworks/support/+/androidx-master-dev/lifecycle/lifecycle-livedata-ktx/src/main/java/androidx/lifecycle/CoroutineLiveData.kt
https://android.googlesource.com/platform/frameworks/support/+/androidx-master-dev/lifecycle/lifecycle-livedata-ktx/src/main/java/androidx/lifecycle/FlowLiveData.kt

CoroutineLiveData.kt

1
2
3
4
5
6
@UseExperimental(ExperimentalTypeInference::class)
fun <T> liveData(
context: CoroutineContext = EmptyCoroutineContext,
timeoutInMs: Long = DEFAULT_TIMEOUT,
@BuilderInference block: suspend LiveDataScope<T>.() -> Unit
): LiveData<T> = CoroutineLiveData(context, timeoutInMs, block)

a LiveData that tries to load the User from local cache first and then tries from the server and also yields the updated value

1
2
3
4
5
6
7
8
9
10
11
12
13
14
15
16
val user = liveData {
// dispatch loading first
emit(LOADING(id))
// check local storage
val cached = cache.loadUser(id)

if (cached != null) {
emit(cached)
}

if (cached == null || cached.isStale()) {
val fresh = api.fetch(id) // errors are ignored for brevity
cache.save(fresh)
emit(fresh)
}
}

Read more

How to declare generic RecyclerView adapter in Android

Issue #357

generic/Adapter.kt

1
2
3
4
5
6
7
8
9
10
11
12
13
14
15
16
17
18
19
20
21
22
23
24
25
26
27
28
29
30
31
package com.onmyway133.generic

import android.view.LayoutInflater
import android.view.View
import android.view.ViewGroup
import androidx.recyclerview.widget.RecyclerView

abstract class Adapter<T>(var items: ArrayList<T>): RecyclerView.Adapter<RecyclerView.ViewHolder>() {
abstract fun configure(item: T, holder: ViewHolder)

fun update(items: ArrayList<T>) {
this.items = items
notifyDataSetChanged()
}

override fun getItemCount(): Int = items.count()

override fun onCreateViewHolder(parent: ViewGroup, viewType: Int): RecyclerView.ViewHolder {
val view = LayoutInflater
.from(parent.context)
.inflate(viewType, parent, false)
return ViewHolder(view)
}

override fun onBindViewHolder(holder: RecyclerView.ViewHolder, position: Int) {
configure(items[position], holder as ViewHolder)
}

}

class ViewHolder(view: View): RecyclerView.ViewHolder(view) {}

hero/HeroAdapter.kt

1
2
3
4
5
6
7
8
9
10
11
12
13
package com.onmyway133.hero
import kotlinx.android.synthetic.main.hero_item_view.view.*

class Adapter(items: ArrayList<Hero>): com.onmyway133.generic.Adapter<Hero>(items) {
override fun configure(item: Hero, holder: ViewHolder) {
holder.itemView.titleLabel.text = item.name
holder.itemView.descriptionLabel.text = item.description
}

override fun getItemViewType(position: Int): Int {
return R.layout.hero_item_view
}
}

May run into https://stackoverflow.com/questions/49512629/default-interface-methods-are-only-supported-starting-with-android-n

app/build.gradle

1
2
3
4
5
6
android {
compileOptions {
sourceCompatibility JavaVersion.VERSION_1_8
targetCompatibility JavaVersion.VERSION_1_8
}
}

How to define version property in gradle

Issue #351

From Gradle tips and recipes, Configure project-wide properties

For projects that include multiple modules, it might be useful to define properties at the project level and share them across all modules. You can do this by adding extra properties to the ext block in the top-level build.gradle file.

1
2
3
4
5
ext {
navigationVersion = "2.0.0"
}

rootProject.ext.navigationVersion

Versions are used mostly in dependencies block so having them defined in global ext is not quite right. We can use def to define variables

1
2
3
4
dependencies {
def navigationVersion = "2.0.0"
implementation "androidx.navigation:navigation-fragment-ktx:$navigationVersion"
}

For better namespacing, we can use a class

1
2
3
4
5
6
7
8
9
10
class Version {
static def navigation = "2.0.0"
static def drawerLayout = "1.0.0"
static def koin = "2.0.1"
static def moshi = "1.8.0"
}

dependencies {
implementation "androidx.navigation:navigation-fragment-ktx:$Version.navigation"
}

How to use Navigation component with DrawerLayout in Android

Issue #349

Screenshot_1565169686

build.gradle

1
2
3
dependencies {
classpath 'android.arch.navigation:navigation-safe-args-gradle-plugin:1.0.0-alpha05'
}

app/build.gradle

1
2
3
4
5
6
7
8
9
10
apply plugin: 'androidx.navigation.safeargs'

dependencies {
def navigationVersion = "2.0.0"
def drawerLayoutVersion = "1.0.0"

implementation "androidx.drawerlayout:drawerlayout:$drawerLayoutVersion"
implementation "androidx.navigation:navigation-fragment-ktx:$navigationVersion"
implementation "androidx.navigation:navigation-ui-ktx:$navigationVersion"
}

main_activity.xml

  • Use CoordinatorLayout and ToolBar
  • Define layout_gravity for NavigationView
1
2
3
4
5
6
7
8
9
10
11
12
13
14
15
16
17
18
19
20
21
22
23
24
25
26
27
28
29
30
31
32
33
34
35
36
37
<?xml version="1.0" encoding="utf-8"?>
<androidx.drawerlayout.widget.DrawerLayout
android:layout_height="match_parent"
android:layout_width="match_parent"
xmlns:android="http://schemas.android.com/apk/res/android"
xmlns:app="http://schemas.android.com/apk/res-auto"
xmlns:tools="http://schemas.android.com/tools"
android:id="@+id/drawerLayout"
tools:context=".MainActivity">

<androidx.coordinatorlayout.widget.CoordinatorLayout
android:layout_width="match_parent"
android:layout_height="match_parent">
<com.google.android.material.appbar.AppBarLayout
android:layout_width="match_parent"
android:layout_height="wrap_content">
<androidx.appcompat.widget.Toolbar
android:layout_width="match_parent"
android:layout_height="?attr/actionBarSize"
android:id="@+id/toolbar"/>
</com.google.android.material.appbar.AppBarLayout>
<fragment
android:layout_width="match_parent"
android:layout_height="match_parent"
android:id="@+id/hostFragment"
android:name="androidx.navigation.fragment.NavHostFragment"
app:defaultNavHost="true"
app:navGraph="@navigation/navigation_graph"/>
</androidx.coordinatorlayout.widget.CoordinatorLayout>
<com.google.android.material.navigation.NavigationView
android:layout_width="wrap_content"
android:layout_height="match_parent"
android:id="@+id/navigationView"
android:fitsSystemWindows="true"
android:layout_gravity="start"
app:menu="@menu/drawer_menu"/>
</androidx.drawerlayout.widget.DrawerLayout>

navigation/navigation_graph.xml

1
2
3
4
5
6
7
8
9
10
11
12
13
14
15
16
17
18
19
20
21
<?xml version="1.0" encoding="utf-8"?>
<navigation xmlns:android="http://schemas.android.com/apk/res/android"
xmlns:app="http://schemas.android.com/apk/res-auto"
android:id="@+id/navigationGraph"
xmlns:tools="http://schemas.android.com/tools"
app:startDestination="@id/aboutFragment">
<fragment
android:id="@+id/aboutFragment"
android:name="com.onmyway133.whatsupintech.AboutFragment"
android:label="@string/menu_about"
tools:layout="@layout/about_fragment" />
<fragment
android:id="@+id/feedFragment"
android:name="com.onmyway133.whatsupintech.FeedFragment"
android:label="@string/menu_git_hub"
tools:layout="@layout/feed_fragment" />
<fragment
android:id="@+id/webFragment"
android:name="com.onmyway133.whatsupintech.WebFragment"
tools:layout="@layout/web_fragment"/>
</navigation>

menu/drawer_menu.xml

1
2
3
4
5
6
7
8
9
10
11
12
13
14
15
16
17
18
19
20
21
22
<?xml version="1.0" encoding="utf-8"?>
<menu xmlns:android="http://schemas.android.com/apk/res/android"
android:layout_width="match_parent"
android:layout_height="match_parent">
<group android:checkableBehavior="single">
<item
android:id="@+id/about"
android:title="@string/menu_about" />
<item
android:id="@+id/hackerNews"
android:title="@string/menu_hacker_news" />
<item
android:id="@+id/reddit"
android:title="@string/menu_reddit" />
<item
android:id="@+id/dev"
android:title="@string/menu_dev" />
<item
android:id="@+id/gitHub"
android:title="@string/menu_git_hub" />
</group>
</menu>

MainActivity.kotlin

  • Use AppBarConfiguration to define multiple top level destinations
  • Convert Toolbar to ActionBar
1
2
3
4
5
6
7
8
9
10
11
12
13
14
15
16
17
18
19
20
21
22
23
24
25
26
27
28
29
30
31
32
33
34
35
36
37
38
39
40
41
42
43
44
45
46
47
48
49
50
51
52
53
54
55
package com.onmyway133.whatsupintech

import android.os.Bundle
import androidx.appcompat.app.AppCompatActivity;
import androidx.core.view.GravityCompat
import androidx.navigation.findNavController
import androidx.navigation.ui.AppBarConfiguration
import androidx.navigation.ui.navigateUp
import androidx.navigation.ui.setupActionBarWithNavController
import androidx.navigation.ui.setupWithNavController
import kotlinx.android.synthetic.main.main_activity.*

class MainActivity : AppCompatActivity() {

lateinit var appBarConfig: AppBarConfiguration

override fun onCreate(savedInstanceState: Bundle?) {
super.onCreate(savedInstanceState)
setContentView(R.layout.main_activity)
setupNavigationController()
}

fun setupNavigationController() {
val navigationController = findNavController(R.id.hostFragment)

setSupportActionBar(toolbar)

appBarConfig = AppBarConfiguration(setOf(R.id.aboutFragment, R.id.feedFragment), drawerLayout)
setupActionBarWithNavController(navigationController, appBarConfig)
navigationView.setupWithNavController(navigationController)
navigationView.setNavigationItemSelectedListener { menuItem ->
drawerLayout.closeDrawers()
menuItem.isChecked = true
when (menuItem.itemId) {
R.id.about -> navigationController.navigate(R.id.aboutFragment)
R.id.gitHub, R.id.reddit, R.id.hackerNews, R.id.dev -> navigationController.navigate(R.id.feedFragment)
}

true
}
}

override fun onSupportNavigateUp(): Boolean {
val navigationController = findNavController(R.id.hostFragment)
return navigationController.navigateUp(appBarConfig) || super.onSupportNavigateUp()
}

override fun onBackPressed() {
if (drawerLayout.isDrawerOpen(GravityCompat.START)) {
drawerLayout.closeDrawer(GravityCompat.START)
} else {
return super.onBackPressed()
}
}
}

Update UI components with NavigationUI

Tie destinations to menu items

NavigationUI also provides helpers for tying destinations to menu-driven UI components. NavigationUI contains a helper method, onNavDestinationSelected(), which takes a MenuItem along with the NavController that hosts the associated destination. If the id of the MenuItem matches the id of the destination, the NavController can then navigate to that destination.

Add a navigation drawer

The drawer icon is displayed on all top-level destinations that use a DrawerLayout. Top-level destinations are the root-level destinations of your app. They do not display an Up button in the app bar.

Read more

How to use ext in gradle in Android

Issue #338

Gradle uses Groovy and it has ext, also known as ExtraPropertiesExtension

Additional, ad-hoc, properties for Gradle domain objects.

Extra properties extensions allow new properties to be added to existing domain objects. They act like maps, allowing the storage of arbitrary key/value pairs. All ExtensionAware Gradle domain objects intrinsically have an extension named “ext” of this type.

1
2
3
4
5
6
7
8
9
project.ext {
myprop = "a"
}
assert project.myprop == "a"
assert project.ext.myprop == "a"

project.myprop = "b"
assert project.myprop == "b"
assert project.ext.myprop == "b"

In root build.gradle, ext adds extra property to rootProject object. There we can access rootProject.ext or just ext

1
2
3
ext {
myLibraryVersion = '1.0.0'
}

In module app/build.gradle, ext adds extra property to project object. There we can access project.ext or just ext

1
2
3
ext {
myLibraryVersion = '1.0.0'
}

How to use Gradle Kotlin DSL in Android

Issue #285

kts

settings.gradle.kts

1
include(":app")

build.gradle.kts

1
2
3
4
5
6
7
8
9
10
11
12
13
14
15
16
17
18
19
20
21
22
23
24
25
26
27
28
29
30
31
32
33
34
35
36
37
38
39
40
41
42
43
44
45
46
47
48
49
50
51
52
53
54
55
56
57
58
59
60
61
62
63
64
65
66
67
68
69
70
71
72
73
74
75
76
77
78
79
80
81
82
83
84
85
86
87
88
import org.gradle.kotlin.dsl.apply
import org.gradle.kotlin.dsl.dependencies
import org.gradle.kotlin.dsl.kotlin
import org.gradle.kotlin.dsl.*
import org.jetbrains.kotlin.config.KotlinCompilerVersion

plugins {
id("com.android.application")
kotlin("android")
kotlin("android.extensions")
}

//apply {
// from("$rootDir/tools/grgit.gradle")
// from("$rootDir/buildSrc/quality.gradle.kts")
// from("$rootDir/tools/ktlint.gradle")
// from("$rootDir/tools/detekt.gradle")
//}

android {
compileSdkVersion(28)
flavorDimensions("default")

defaultConfig {
applicationId = "com.onmyway133.myapp"
minSdkVersion(26)
targetSdkVersion(28)
// versionCode = ext.get("gitCommitCount") as? Int
versionCode = 1
versionName = "1.0"
testInstrumentationRunner = "androidx.test.runner.AndroidJUnitRunner"
}

signingConfigs {
create("release") {
keyAlias = "keyalias"
keyPassword = "keypassword"
storePassword = "storepassword"
storeFile = file("/Users/khoa/Android/Key/keystore")
}
}

buildTypes {
getByName("debug") {
signingConfig = signingConfigs.getByName("debug")
isMinifyEnabled = true
proguardFiles(getDefaultProguardFile("proguard-android-optimize.txt"), "$project.rootDir/tools/proguard-rules-debug.pro")
}

getByName("release") {
signingConfig = signingConfigs.getByName("release")
isMinifyEnabled = true
isShrinkResources = true
proguardFiles(getDefaultProguardFile("proguard-android-optimize.txt"), "$project.rootDir/tools/proguard-rules.pro")
}
}

productFlavors {
create("staging") {

}

create("production") {

}
}

lintOptions {
lintConfig = file("$project.rootDir/tools/lint-rules.xml")
htmlOutput = file("$project.buildDir/outputs/lint/lint.html")
xmlReport = false
htmlReport = true
}
}

dependencies {
implementation(fileTree(mapOf("dir" to "libs", "include" to listOf("*.jar"))))
implementation(kotlin("stdlib-jdk7", KotlinCompilerVersion.VERSION))
implementation("androidx.appcompat:appcompat:1.0.2")
implementation("androidx.core:core-ktx:1.0.2")
implementation("androidx.constraintlayout:constraintlayout:1.1.3")
implementation("com.google.android.material:material:1.0.0")
testImplementation("junit:junit:4.12")
androidTestImplementation("androidx.test:runner:1.1.1")
androidTestImplementation("androidx.test.espresso:espresso-core:3.1.1")
}

tasks.getByName("check").dependsOn("lint")

tools/quality.gradle.kts

1
2
3
4
5
6
7
8
9
10
11
12
13
14
15
16
17
18
19
20
21
22
23
24
25
26
27
28
29
30
31
32
33
34
35
36
37
38
39
40
41
42
43
44
45
46
47
48
49
50
51
52
53
54
55
plugins {
id("findbugs")
id("pmd")
id("checkstyle")
}

tasks {
val findbugs by registering(FindBugs::class) {
ignoreFailures = false
effort = "max"
reportLevel = "low"
classes = files("$project.buildDir/intermediates/javac")

setExcludeFilter(file("$rootProject.rootDir/tools/findbugs-exclude.xml"))

source = fileTree("src/main/java/")
classpath = files()

reports {
xml.isEnabled = false
html.isEnabled = true
html.destination = file("$project.buildDir/outputs/findbugs/findbugs-output.html")
}
}

val pmd by registering(Pmd::class) {
ruleSetFiles = files("${project.rootDir}/tools/pmd-rules.xml")
ignoreFailures = false
ruleSets = listOf<String>()

fileTree()
source(fileTree(baseDir = "src/main/java"))
include("**/*.kt")
exclude("**/gen/**")

reports {
xml.isEnabled = false
html.isEnabled = true
html.destination = file("$project.buildDir/outputs/pmd/pmd.html")
}
}

val checkstyle by registering(Checkstyle::class) {
description = "Check code standard"
group = "verification"

configFile = file("$project.rootDir/tools/checkstyle.xml")
source(fileTree(baseDir = "src"))
include("**/*.kt")
exclude("**/gen/**")

classpath = files()
ignoreFailures = false
}
}

Reference

About Gradle

How to run Android apps in Bitrise

Issue #273

Original post https://hackernoon.com/using-bitrise-ci-for-android-apps-fa9c48e301d8


CI, short for Continuous Integration, is a good practice to move fast and confidently where code is integrated into shared repository many times a day. The ability to have pull requests get built, tested and release builds get distributed to testers allows team to verify automated build and identify problems quickly.

I ‘ve been using BuddyBuild for both iOS and Android apps and were very happy with it. The experience from creating new apps and deploying build is awesome. It works so well that Apple acquired it, which then lead to the fact that Android apps are no longer supported and new customers can’t register.

We are one of those who are looking for new alternatives. We’ve been using TravisCI, CircleCI and Jenkins to deploy to Fabric. There is also TeamCity that is promising. But after a quick survey with friends and people, Bitrise is the most recommended. So maybe I should try that.

The thing I like about Bitrise is its wide range support of workflow. They are just scripts that execute certain actions, and most of them are open source. There’s also yml config file, but all things can be done using web interface, so I don’t need to look into pages of documentation just to get the configuration right.

This post is not a promote for Bitrise, it is just about trying and adapting to new things. There is no eternal thing in tech, things come ad go fast. Below are some of the lessons I learn after using Bitrise, hope you find them useful.

Variant to build

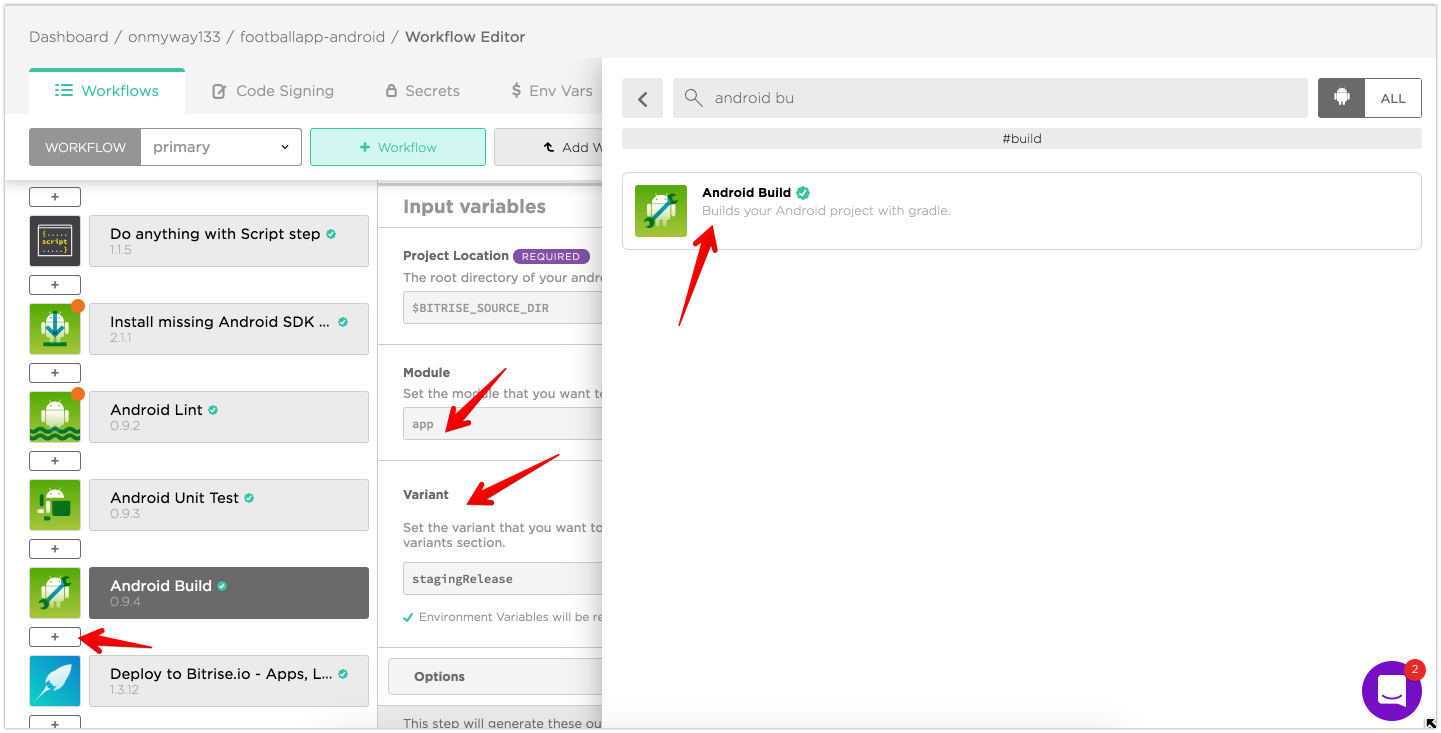
There is no Android Build step in the default ‘primary’ workflow, as primary is generally used for testing the code for every push. There is an Android Build step in the deploy workflow and the app gets built by running this workflow. However, I like to have the Android Build step in my primary workflow, so I added it there.

Usually I want app module and stagingRelease build variant as we need to deploy staging builds to internal testers.
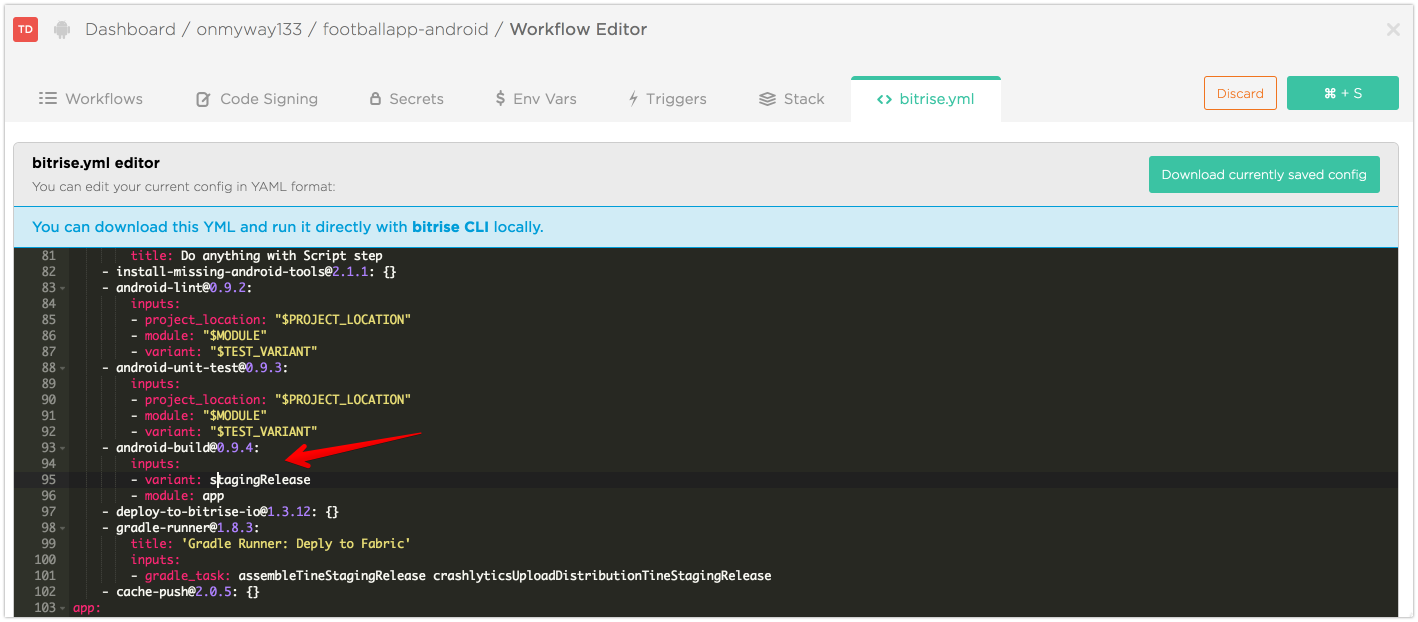
If you go to Bitrise.yml tab you can see that the configuration file has been updated. This is very handy. I’ve used some other CI services and I needed to lookup their documentation on how to make this yml work.
Bump version code automatically

I’ve used some other CI services before and the app version code surely does not start from 0. So it makes sense that Bitrise can auto bump version code from the current number. There are some predefined steps in Workflow but they don’t serve my need
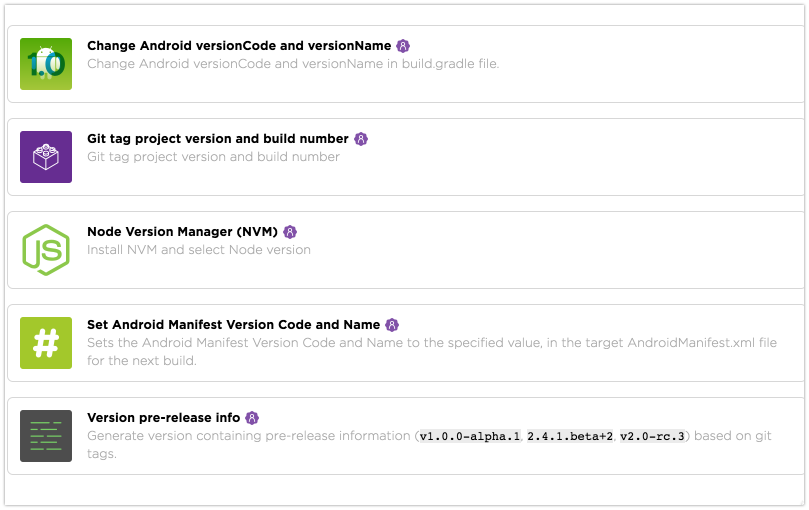
For the Set Android Manifest Version code and name step, the source code is here so I understand what it does. It works by modify AndroidManifest.xml file using sed . This article Adjust your build number is not clear enough.
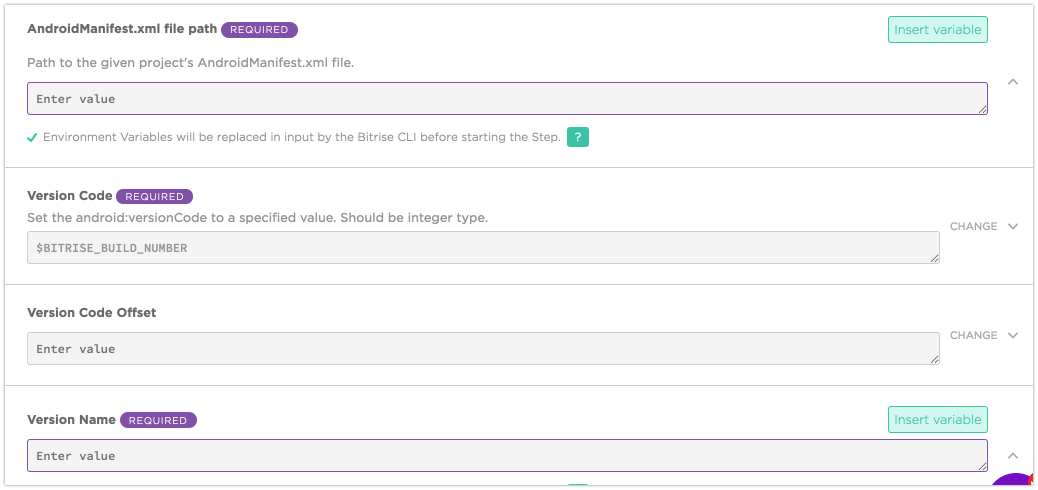
sed -i.bak “s/android:versionCode=”\”${VERSIONCODE}\””/android:versionCode=”\”${CONFIG_new_version_code}\””/” ${manifest_file}

In our projects, the versionCode is from an environment variable BUILD_NUMBER in Jenkins, so we need look up the same thing in Available Environment Variables, and it is BITRISE_BUILD_NUMBER , which is a build number of the build on bitrise.io.

This is how versionCode looks like in build.gradle

versionCode (System.*getenv*("BITRISE_BUILD_NUMBER") as Integer ?: System.*getenv*("BUILD_NUMBER") as Integer ?: 243)

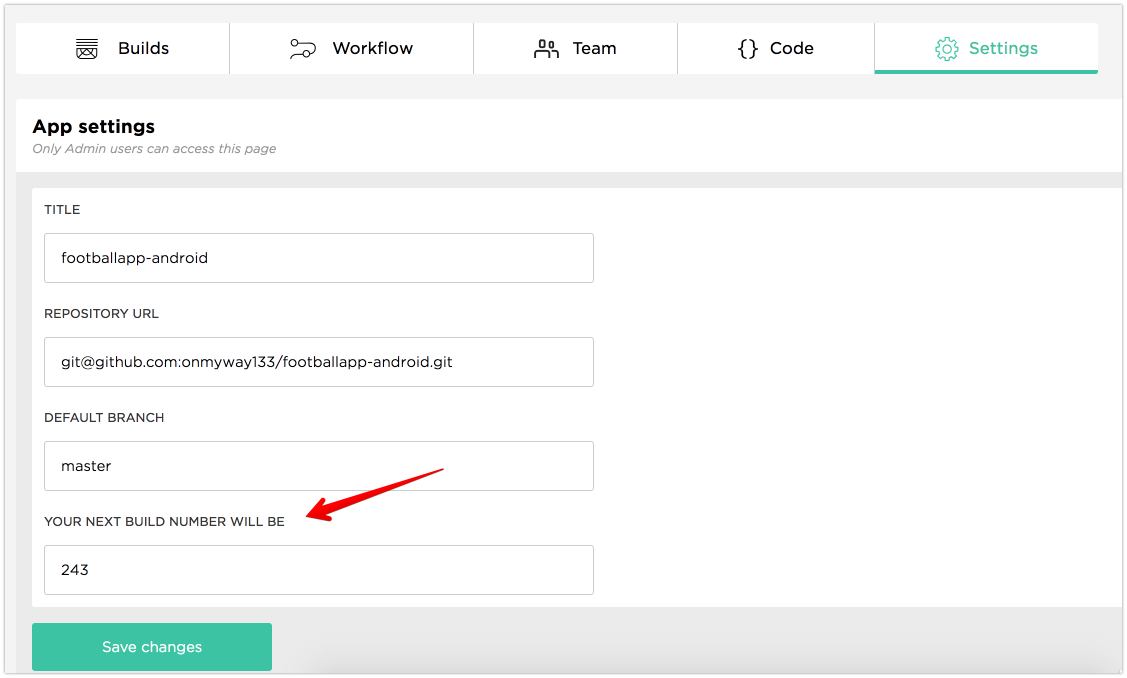
243 is the current version code of this project, so let’s go to app’s Settings and change Your next build number will be
Deploy to Fabric

I hope Bitrise has its own Crash reporting tool. For now I use Crashlytics in Fabric. And despite that Bitrise can distribute builds to testers, I still need to cross deploy to Fabric for historial reasons.

There is only script steps-fabric-crashlytics-beta-deploy to deploy IPA file for iOS apps, so we need something for Android. Fortunately I can use the Fabric plugin for gradle.

Add Fabric plugin

Follow Install Crashlytics via Gradle to add Fabric plugin. Basically you need to add these dependencies to your app ‘s build.gradle

buildscript {
    repositories {
        google()
        maven { url 'https://maven.fabric.io/public' }
    }

    dependencies {
        classpath 'io.fabric.tools:gradle:1.+'
    }
}

apply plugin: 'io.fabric'

dependencies {
    compile('com.crashlytics.sdk.android:crashlytics:2.9.4@aar') {
        transitive = true;
    }
}

and API credentials in Manifest file

<meta-data
 android:name=”io.fabric.ApiKey”
 android:value=”67ffdb78ce9cd50af8404c244fa25df01ea2b5bc”
 />

Deploy command

Modern Android Studio usually includes a gradlew execution file in the root of your project. Run ./gradlew tasks for the list of tasks that you app can perform, look for Build tasks that start with assemble . Read more Build your app from the command line

You can execute all the build tasks available to your Android project using the Gradle wrapper command line tool. It’s available as a batch file for Windows (gradlew.bat) and a shell script for Linux and Mac (gradlew.sh), and it’s accessible from the root of each project you create with Android Studio.

For me, I want to deploy staging release build variant, so I run. Check that the build is on Fabric.

./gradlew assembleStagingRelease crashlyticsUploadDistributionStagingRelease

Manage tester group

Go to your app on Fabric.io and create group of testers. Note that alias that is generated for the group
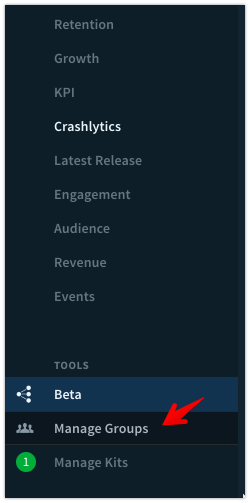
Go to your app’s build.gradle and add ext.betaDistributionGroupAliases=’my-internal-testers’ to your desired productFlavors or buildTypes . For me I add to staging under productFlavors

productFlavors {
   staging {
     // …
     ext.betaDistributionGroupAliases=’hyper-internal-testers-1'
   }
   production {
     // …
   }
}

Now that the command is run correctly, let’s add that to Bitrise

Gradle Run step

Go to Workflow tab and add a Gradle Run step and place it below Deploy to Bitrise.io step.
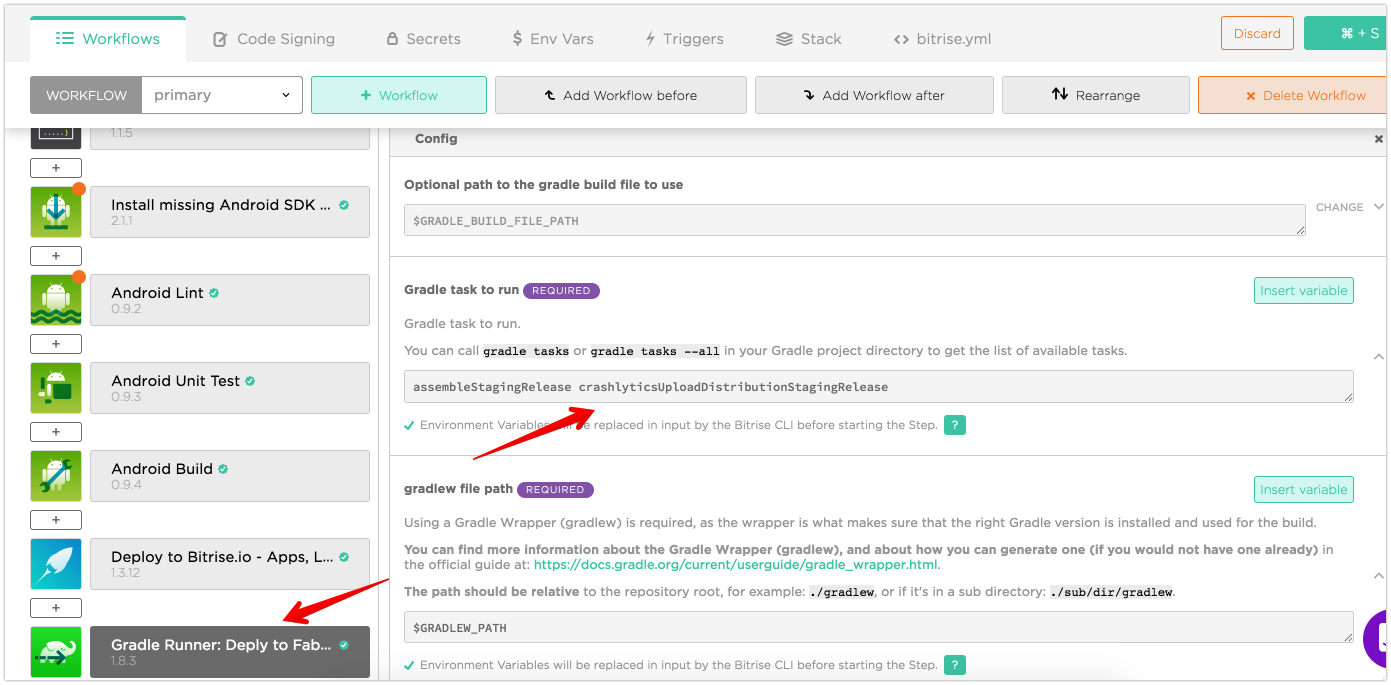
Expand Config, and add assembleStagingRelease crashlyticsUploadDistributionStagingRelease to Gradle task to run .

Now start a new build in Bitrise manually or trigger new build by making pull request, you can see that the version code is increased for every build, crossed build gets deployed to Fabric to your defined tester groups.

As an alternative, you can also use Fabric/Crashlytics deployer, just update config with your apps key and secret found in settings.

Where to go from here

I hope those tips are useful to you. Here are some more links to help you explore further

How to setup Android projects

Issue #257

checkstyle (Java)

Checkstyle is a development tool to help programmers write Java code that adheres to a coding standard. It automates the process of checking Java code to spare humans of this boring (but important) task. This makes it ideal for projects that want to enforce a coding standard.

app/build.gradle

1
2
3
4
5
6
7
8
9
10
11
12
13
14
apply plugin: 'checkstyle'

task checkstyle(type: Checkstyle) {
description 'Check code standard'
group 'verification'

configFile file('$project.rootDir/tools/checkstyle.xml')
source 'src'
include '**/*.kt'
exclude '**/gen/**'

classpath = files()
ignoreFailures = false
}

tools/chekcstyle

1
2
3
4
5
6
7
8
9
10
11
12
13
14
15
16
17
18
19
20
21
22
23
24
25
26
<?xml version="1.0"?><!DOCTYPE module PUBLIC
"-//Puppy Crawl//DTD Check Configuration 1.2//EN"
"http://www.puppycrawl.com/dtds/configuration_1_2.dtd">
<module name="Checker">
<module name="FileTabCharacter"/>
<module name="TreeWalker">

<!-- Checks for Naming Conventions -->
<!-- See http://checkstyle.sourceforge.net/config_naming.html -->
<module name="MethodName"/>
<module name="ConstantName"/>

<!-- Checks for Imports -->
<!-- See http://checkstyle.sourceforge.net/config_imports.html-->
<module name="AvoidStarImport"/>
<module name="UnusedImports"/>

<!-- Checks for Size -->
<!-- See http://checkstyle.sourceforge.net/config_sizes -->
<module name="ParameterNumber">
<property name="max" value="6"/>
</module>

<!-- other rules ignored for brevity -->
</module>
</module>

findbugs (Java)

A program which uses static analysis to look for bugs in Java code

app/build.gradle

1
2
3
4
5
6
7
8
9
10
11
12
13
14
15
16
17
18
19
apply plugin: 'findbugs'

task findbugs(type: FindBugs) {
ignoreFailures = false
effort = "max"
reportLevel = "low"
classes = files("$project.buildDir/intermediates/javac")

excludeFilter = file("$rootProject.rootDir/tools/findbugs-exclude.xml")

source = fileTree('src/main/java/')
classpath = files()

reports {
xml.enabled = false
html.enabled = true
html.destination file("$project.buildDir/outputs/findbugs/findbugs-output.html")
}
}

tools/findbugs-exclude.xml

1
2
3
4
5
6
7
8
9
10
11
12
13
14
15
16
17
18
19
20
21
<FindBugsFilter>
<!-- Do not check auto-generated resources classes -->
<Match>
<Class name="~.*R\$.*"/>
</Match>

<!-- Do not check auto-generated manifest classes -->
<Match>
<Class name="~.*Manifest\$.*"/>
</Match>

<!-- Do not check auto-generated classes (Dagger puts $ into class names) -->
<Match>
<Class name="~.*Dagger*.*"/>
</Match>

<!-- http://findbugs.sourceforge.net/bugDescriptions.html#ST_WRITE_TO_STATIC_FROM_INSTANCE_METHOD-->
<Match>
<Bug pattern="ST_WRITE_TO_STATIC_FROM_INSTANCE_METHOD" />
</Match>
</FindBugsFilter>

pmd (Java)

PMD is a source code analyzer. It finds common programming flaws like unused variables, empty catch blocks, unnecessary object creation, and so forth

app/build.gradle

1
2
3
4
5
6
7
8
9
10
11
12
13
14
15
16
17
apply plugin: 'pmd'

task pmd(type: Pmd) {
ruleSetFiles = files("${project.rootDir}/tools/pmd-rules.xml")
ignoreFailures = false
ruleSets = []

source 'src'
include '**/*.kt'
exclude '**/gen/**'

reports {
xml.enabled = false
html.enabled = true
html.destination = file("$project.buildDir/outputs/pmd/pmd.html")
}
}

tools/pmd-rules.xml

1
2
3
4
5
6
7
8
9
10
11
12
13
14
15
16
17
18
19
20
<?xml version="1.0"?>
<ruleset xmlns:xsi="http://www.w3.org/2001/XMLSchema-instance"
xmlns="http://pmd.sourceforge.net/ruleset/2.0.0"
xsi:schemaLocation="http://pmd.sourceforge.net/ruleset/2.0.0 http://pmd.sourceforge.net/ruleset_2_0_0.xsd">
<exclude-pattern>.*/R.java</exclude-pattern>
<exclude-pattern>.*/gen/.*</exclude-pattern>

<rule ref="rulesets/java/basic.xml" />

<rule ref="rulesets/java/braces.xml" />

<rule ref="rulesets/java/strings.xml" />

<rule ref="rulesets/java/design.xml" >
<exclude name="AvoidDeeplyNestedIfStmts"/>
</rule>

<rule ref="rulesets/java/unusedcode.xml" />

</ruleset>

lint

Android Studio provides a code scanning tool called lint that can help you to identify and correct problems with the structural quality of your code without your having to execute the app or write test cases

app/build.gradle

1
2
3
4
5
6
7
8
9
10
android {
lintOptions {
lintConfig file("$project.rootDir/tools/lint-rules.xml")
htmlOutput file("$project.buildDir/outputs/lint/lint.html")
warningsAsErrors true
xmlReport false
htmlReport true
abortOnError false
}
}

tools/lint-rules.xml

1
2
3
4
5
6
7
8
9
10
11
12
13
14
15
16
<?xml version="1.0" encoding="UTF-8"?>

<lint>
<issue id="GoogleAppIndexWarning" severity="ignore" />

<issue id="InvalidPackage" severity="error">
<ignore regexp="okio.*jar" />
<ignore regexp="retrofit.*jar" />
</issue>

<!-- Disable the given check in this project -->
<issue id="IconMissingDensityFolder" severity="ignore" />

<!-- Change the severity of hardcoded strings to "error" -->
<issue id="HardcodedText" severity="error" />
</lint>

Strict mode

1
2
3
4
5
6
7
8
9
10
11
12
13
14
15
16
17
18
19
20
21
22
23
24
25
26
27
28
import android.app.Application
import android.os.StrictMode

class App: Application() {
override fun onCreate() {
super.onCreate()

enableStrictMode()
}

private fun enableStrictMode() {
if (BuildConfig.DEBUG) {
StrictMode.setThreadPolicy(
StrictMode.ThreadPolicy.Builder()
.detectAll()
.penaltyLog()
.build()
)

StrictMode.setVmPolicy(
StrictMode.VmPolicy.Builder()
.detectAll()
.penaltyLog()
.build()
)
}
}
}

Version code

tools/grgit.gradle

1
2
3
4
5
6
7
8
9
10
11
12
13
14
15
16
17
18
19
buildscript {
repositories {
jcenter()
}
dependencies {
classpath 'org.ajoberstar:grgit:1.5.0'
}
}

import org.ajoberstar.grgit.Grgit

ext {
git = Grgit.open(currentDir: projectDir)
gitCommitCount = git.log().size()
}

task printVersion() {
println("Commit count: $gitCommitCount")
}

app/build.gradle

1
2
3
4
5
android {
defaultConfig {
versionCode gitCommitCount
}
}

Obfuscation

To make your app as small as possible, you should enable shrinking in your release build to remove unused code and resources. When enabling shrinking, you also benefit from obfuscation, which shortens the names of your app’s classes and members, and optimization, which applies more aggressive strategies to further reduce the size of your app

When you use Android Studio 3.4 or Android Gradle plugin 3.4.0 and higher, R8 is the default compiler that converts your project’s Java bytecode into the DEX format that runs on the Android platform

app/build.gradle

1
2
3
4
5
6
7
8
9
10
11
12
13
14
15
16
android {
buildTypes {
debug {
signingConfig signingConfigs.debug
minifyEnabled true
proguardFiles getDefaultProguardFile('proguard-android-optimize.txt'), '$project.rootDir/tools/proguard-rules-debug.pro'
}

release {
signingConfig signingConfigs.release
minifyEnabled true
shrinkResources true
proguardFiles getDefaultProguardFile('proguard-android-optimize.txt'), '$project.rootDir/tools/proguard-rules.pro'
}
}
}

tools/proguard-rules.pro

1
2
3
4
5
6
7
8
9
10
11
-ignorewarnings

# Remove logs
-assumenosideeffects class android.util.Log {
public static boolean isLoggable(java.lang.String, int);
public static int v(...);
public static int i(...);
public static int w(...);
public static int d(...);
public static int e(...);
}

tools/proguard-rules-debug.pro

1
2
3
4
-ignorewarnings
-dontobfuscate
-dontoptimize
-ignorewarnings

More proguard snippets https://github.com/krschultz/android-proguard-snippets

quality

tools/quality.gradle

1
2
3
task findbugs
task pmd
task checkstyle

app/build.gradle

1
apply from: "$project.rootDir/tools/quality.gradle"

File format

You don’t need to use ktlint or detekt to ensure that your code is formatted consistently. Simply enable “File is not formatted according to project settings” in the inspection settings.

ktlint (Kotlin)

An anti-bikeshedding Kotlin linter with built-in formatter

app/build.gradle

1
apply from: "$project.rootDir/tools/ktlint.gradle"

tools/ktlint.gradle

1
2
3
4
5
6
7
8
9
10
11
12
13
14
15
16
17
18
19
20
21
22
23
24
25
26
27
28
29
repositories {
jcenter()
}

configurations {
ktlint
}

dependencies {
ktlint "com.pinterest:ktlint:0.32.0"
// additional 3rd party ruleset(s) can be specified here
// just add them to the classpath (e.g. ktlint 'groupId:artifactId:version') and
// ktlint will pick them up
}

task ktlint(type: JavaExec, group: "verification") {
description = "Check Kotlin code style."
classpath = configurations.ktlint
main = "com.pinterest.ktlint.Main"
args "src/**/*.kt", "--reporter=checkstyle, output=${buildDir}/outputs/ktlint.xml"
}


task ktlintFormat(type: JavaExec, group: "formatting") {
description = "Fix Kotlin code style deviations."
classpath = configurations.ktlint
main = "com.pinterest.ktlint.Main"
args "-F", "src/**/*.kt"
}

.editorconfig

1
2
[*.{kt,kts}]
indent_size=4

detekt (Kotlin)

Static code analysis for Kotlin

build.gradle

1
2
3
4
5
6
7
buildscript {}

plugins {
id "io.gitlab.arturbosch.detekt" version "1.0.0-RC14"
}

allprojects {}

tools/detekt.gradle

1
2
3
4
5
6
7
detekt {
toolVersion = "1.0.0-RC14"
input = files("src/main")
filters = ".*/resources/.*,.*/build/.*"
baseline = file("${project.rootDir}/tools/detekt-baseline.xml")
config = files(file("$project.rootDir/tools/detekt.yml"))
}

tools/detekt.xml

The intention of a whitelist is that only new code smells are printed on further analysis. The blacklist can be used to write down false positive detections (instead of suppressing them and polute your code base).

1
2
3
4
5
6
7
8
9
10
<SmellBaseline>
<Blacklist>
<ID>CatchRuntimeException:Junk.kt$e: RuntimeException</ID>
</Blacklist>
<Whitelist>
<ID>NestedBlockDepth:Indentation.kt$Indentation$override fun procedure(node: ASTNode)</ID>
<ID>TooManyFunctions:LargeClass.kt$io.gitlab.arturbosch.detekt.rules.complexity.LargeClass.kt</ID>
<ID>ComplexMethod:DetektExtension.kt$DetektExtension$fun convertToArguments(): MutableList&lt;String&gt;</ID>
</Whitelist>
</SmellBaseline>

tools/detekt.yml

detekt uses a yaml style configuration file for various things:

1
2
3
4
5
6
7
8
9
autoCorrect: true

build:
maxIssues: 10
weights:
# complexity: 2
# LongParameterList: 1
# style: 1
# comments: 1

Run

1
./gradlew detekt

check

app/build.gradle

1
check.dependsOn 'checkstyle', 'findbugs', 'pmd', 'lint', 'ktlint', 'detekt'

Run

1
./gradlew check

Gradle Kotlin DSL

Reference

How to fix ApiException 10 in Flutter for Android

Issue #188

Get error com.google.android.gms.common.api.ApiException: 10 with google_sign_in package.

Read https://developers.google.com/android/guides/client-auth

Certain Google Play services (such as Google Sign-in and App Invites) require you to provide the SHA-1 of your signing certificate so we can create an OAuth2 client and API key for your app

console.developers.google.com/apis/credentials

Credentials -> OAuth client id
If we specify SHA1 in firebase, then console.developers.google.com will generate an Android oauth for us

1
keytool -list -v -keystore {keystore_name} -alias {alias_name}

Use correct keystore for debug and release

1
2
3
4
5
6
7
8
9
10
buildTypes {
release {
// TODO: Add your own signing config for the release build.
// Signing with the debug keys for now, so `flutter run --release` works.
signingConfig signingConfigs.release
}
debug {
signingConfig signingConfigs.debug
}
}

Updated at 2020-10-05 13:23:34

How to fix SSLPeerUnverifiedException in Android

Issue #184

Get error javax.net.ssl.SSLPeerUnverifiedException: No peer certificate in Android API 16 to API 19

Getting started

Read about HTTPS and SSL https://developer.android.com/training/articles/security-ssl
Check backend TLS https://www.ssllabs.com/index.html
TLS by default in Android P https://android-developers.googleblog.com/2018/04/protecting-users-with-tls-by-default-in.html

TLS version

Read https://developer.android.com/reference/javax/net/ssl/SSLSocket.html

This class extends Sockets and provides secure socket using protocols such as the “Secure Sockets Layer” (SSL) or IETF “Transport Layer Security” (TLS) protocols.

ssl

TLS 1.1 and 1.2 are supported from API 16, but not enabled by default until API 20.

Install TLS 1.2 when needed

Read https://medium.com/tech-quizlet/working-with-tls-1-2-on-android-4-4-and-lower-f4f5205629a

The first thing we realized was that despite documentation suggesting otherwise, not all devices on Android 4.1+ actually support TLS 1.2. Even though it is likely due to device manufacturers not fully following the official Android specs, we had to do what we could to ensure this would work for our users.

Luckily, Google Play Services provides a way to do this. The solution is to use ProviderInstaller from Google Play Services to try to update the device to support the latest and greatest security protocols.

1
2
3
4
5
6
7
8
9
10
11
fun Context.installTls12() {
try {
ProviderInstaller.installIfNeeded(this)
} catch (e: GooglePlayServicesRepairableException) {
// Prompt the user to install/update/enable Google Play services.
GoogleApiAvailability.getInstance()
.showErrorNotification(this, e.connectionStatusCode)
} catch (e: GooglePlayServicesNotAvailableException) {
// Indicates a non-recoverable error: let the user know.
}
}

Does not seem to work, as the root problem was that TLS was not enabled

Try normal HttpsUrlConnection

If we use any networking library and suspect it is the cause, then try using normal HttpsUrlConnection to check.

1
2
3
4
5
6
7
8
9
10
11
12
13
14
15
16
17
18
19
20
21
22
23
24
25
26
27
28
29
30
31
32
33
34
35
36
37
38
39
40
41
42
43
44
45
46
47
48
49
50
51
52
53
54
55
56
57
58
59
60
61
62
63
64
65
66
67
68
69
70
71
72
73
74
75
76
77
78
79
80
81
82
83
84
85
86
87
88
89
90
91
92
93
94
95
96
97
98
class MyHttpRequestTask extends AsyncTask<String,Integer,String> {

@Override
protected String doInBackground(String... params) {
String my_url = params[0];
try {
URL url = new URL(my_url);
HttpsURLConnection httpURLConnection = (HttpsURLConnection) url.openConnection();
httpURLConnection.setSSLSocketFactory(new MyFactory());
// setting the Request Method Type
httpURLConnection.setRequestMethod("GET");
// adding the headers for request
httpURLConnection.setRequestProperty("Content-Type", "application/json");


String result = readStream(httpURLConnection.getInputStream());
Log.e("HttpsURLConnection", "data" + result.toString());


}catch (Exception e){
e.printStackTrace();
Log.e("HttpsURLConnection ", "error" + e.toString());
}

return null;
}

private static String readStream(InputStream is) throws IOException {
final BufferedReader reader = new BufferedReader(new InputStreamReader(is, Charset.forName("US-ASCII")));
StringBuilder total = new StringBuilder();
String line;
while ((line = reader.readLine()) != null) {
total.append(line);
}
if (reader != null) {
reader.close();
}
return total.toString();
}
}

class MyFactory extends SSLSocketFactory {

private javax.net.ssl.SSLSocketFactory internalSSLSocketFactory;

public MyFactory() throws KeyManagementException, NoSuchAlgorithmException {
SSLContext context = SSLContext.getInstance("TLS");
context.init(null, null, null);
internalSSLSocketFactory = context.getSocketFactory();
}

@Override
public String[] getDefaultCipherSuites() {
return internalSSLSocketFactory.getDefaultCipherSuites();
}

@Override
public String[] getSupportedCipherSuites() {
return internalSSLSocketFactory.getSupportedCipherSuites();
}

@Override
public Socket createSocket() throws IOException {
return enableTLSOnSocket(internalSSLSocketFactory.createSocket());
}

@Override
public Socket createSocket(Socket s, String host, int port, boolean autoClose) throws IOException {
return enableTLSOnSocket(internalSSLSocketFactory.createSocket(s, host, port, autoClose));
}

@Override
public Socket createSocket(String host, int port) throws IOException, UnknownHostException {
return enableTLSOnSocket(internalSSLSocketFactory.createSocket(host, port));
}

@Override
public Socket createSocket(String host, int port, InetAddress localHost, int localPort) throws IOException, UnknownHostException {
return enableTLSOnSocket(internalSSLSocketFactory.createSocket(host, port, localHost, localPort));
}

@Override
public Socket createSocket(InetAddress host, int port) throws IOException {
return enableTLSOnSocket(internalSSLSocketFactory.createSocket(host, port));
}

@Override
public Socket createSocket(InetAddress address, int port, InetAddress localAddress, int localPort) throws IOException {
return enableTLSOnSocket(internalSSLSocketFactory.createSocket(address, port, localAddress, localPort));
}

private Socket enableTLSOnSocket(Socket socket) {
if(socket != null && (socket instanceof SSLSocket)) {
((SSLSocket)socket).setEnabledProtocols(new String[] {"TLSv1.1", "TLSv1.2"});
}
return socket;
}
}

The key is setEnabledProtocols. Then use

1
2
String url = "https://www.myserver.com/data"
new MyHttpRequestTask().execute(url);

Use custom SSLSocketFactory in some networking libraries

If our custom MyFactory works for HttpsUrlConnection, then the problem lies in some 3rd party networking libraries.

Read https://blog.dev-area.net/2015/08/13/android-4-1-enable-tls-1-1-and-tls-1-2/

The Android documentation for SSLSocket says that TLS 1.1 and TLS 1.2 is supported within android starting API level 16+ (Android 4.1, Jelly Bean). But it is by default disabled but starting with API level 20+ (Android 4.4 for watch, Kitkat Watch and Android 5.0 for phone, Lollipop) they are enabled. But it is very hard to find any documentation about how to enable it for phones running 4.1 for example.

The first thing you need to do is to make sure that your minimum required API level is 16 to have the following code working in your project.

To enable TLS 1.1 and 1.2 you need to create a custom SSLSocketFactory that is going to proxy all calls to a default SSLSocketFactory implementation. In addition to that do we have to override all createSocket methods and callsetEnabledProtocols on the returned SSLSocket to enable TLS 1.1 and TLS 1.2. For an example implementation just follow the link below.

1
2
3
4
5
6
7
8
9
10
11
12
13
14
15
16
17
18
19
20
21
22
23
24
25
26
27
28
29
30
31
32
33
34
35
36
37
38
39
40
41
42
43
import javax.net.ssl.SSLSocketFactory;

class MyFactory extends org.apache.http.conn.ssl.SSLSocketFactory {

public static KeyStore getKeyStore() {
KeyStore trustStore = null;
try {
trustStore = KeyStore.getInstance(KeyStore.getDefaultType());
trustStore.load(null, null);
} catch (Throwable t) {
t.printStackTrace();
}
return trustStore;
}


private SSLSocketFactory internalSSLSocketFactory;

public MyFactory(KeyStore truststore) throws NoSuchAlgorithmException, KeyManagementException, KeyStoreException, UnrecoverableKeyException {
super(truststore);
SSLContext context = SSLContext.getInstance("TLS");
context.init(null, null, null);
internalSSLSocketFactory = context.getSocketFactory();
}


@Override
public Socket createSocket() throws IOException {
return enableTLSOnSocket(internalSSLSocketFactory.createSocket());
}

@Override
public Socket createSocket(Socket socket, String host, int port, boolean autoClose) throws IOException, UnknownHostException {
return enableTLSOnSocket(internalSSLSocketFactory.createSocket(socket, host, port, autoClose));
}

private Socket enableTLSOnSocket(Socket socket) {
if(socket != null && (socket instanceof SSLSocket)) {
((SSLSocket)socket).setEnabledProtocols(new String[] {"TLSv1.1", "TLSv1.2"});
}
return socket;
}
}

Then maybe use it in a library, for example the ancient AsyncHttpClient

1
2
3
asyncHttpClient = new AsyncHttpClient();
asyncHttpClient.setTimeout(HTTP_GET_TIMEOUT);
asyncHttpClient.setSSLSocketFactory(new MyFactory(MyFactory.getKeyStore()));

Updated at 2020-08-11 16:27:22

Make your own sliding menu on Android tutorial – Part 2

Issue #152

This is the part 2 of the tutorial. If you forget, here is the link to part 1.

Link to Github

In the first part, we learn about the idea, the structure of the project and how MainActivity uses the MainLayout. Now we learn how to actually implement the MainLayout

DISPLAY MENU AND CONTENT VIEW

First we have MainLayout as a subclass of LinearLayout

1
public class MainLayout extends LinearLayout

We then need declare the constructors

Read More