Coordinator and FlowController

Issue #106

Every new architecture that comes out, either iOS or Android, makes me very excited. I’m always looking for ways to structure apps in a better way. But after some times, I see that we’re too creative in creating architecture, aka constraint, that is too far away from the platform that we’re building. I often think “If we’re going too far from the system, then it’s very hard to go back”

I like things that embrace the system. One of them is Coordinator which helps in encapsulation and navigation. Thanks to my friend Vadym for showing me Coordinator in action.

The below screenshot from @khanlou ‘s talk at CocoaHeads Stockholm clearly says many things about Coordinator
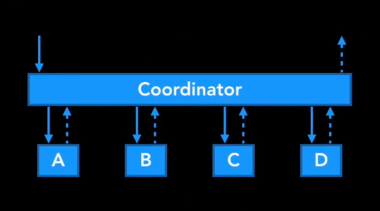

But after reading A Better MVC, I think we can leverage view controller containment to do navigation using UIViewController only.

Since I tend to call view controllers as LoginController, ProfileController, ... and the term flow to group those related screens, what should we call a Coordinator that inherits from UIViewController 🤔 Let’s call it FlowController 😎 .

The name is not that important, but the concept is simple. FlowController was also inspired by this Flow Controllers on iOS for a Better Navigation Control back in 2014. The idea is from awesome iOS people, this is just a sum up from my experience 😇

So FlowController can just a UIViewController friendly version of Coordinator. Let see how FlowController fits better into MVC

1. FlowController and AppDelegate

Your application starts from AppDelegate, in that you setup UIWindow. So we should follow the same “top down” approach for FlowController, starting with AppFlowController. You can construct all dependencies that your app need for AppFlowController, so that it can pass to other child FlowController.

AppDelegate is also considered Composition Root

Here is how to declare AppFlowController in AppDelegate

1
2
3
4
5
6
7
8
9
10
11
12
13
14
15
16
17
18
19
20
21
22
23
24
25
26
27
28
29
30
31
32
33
34
35
36
struct DependencyContainer: AuthServiceContainer, PhoneServiceContainer, NetworkingServiceContainer,
LocationServiceContainer, MapServiceContainer, HealthServiceContainer {

let authService: AuthServiceProtocol
let phoneService: PhoneService
let networkingService: NetworkingService
let locationService: LocationService
let mapService: MapService
let healthService: HealthService

static func make() -> DependencyContainer {
// Configure and make DependencyContainer here
}
}

@UIApplicationMain
class AppDelegate: UIResponder, UIApplicationDelegate {

var window: UIWindow?
var appFlowController: AppFlowController!

func application(_ application: UIApplication,
didFinishLaunchingWithOptions launchOptions: [UIApplicationLaunchOptionsKey: Any]?) -> Bool {
appFlowController = AppFlowController(
dependencyContainer: DependencyContainer.make()
)

window = UIWindow(frame: UIScreen.main.bounds)
window?.rootViewController = appFlowController
window?.makeKeyAndVisible()

appFlowController.start()

return true
}
}

Here are some hypothetical FlowController that you may encounter

  • AppFlowController: manages UIWindow and check whether to show onboarding, login or main depending on authentication state
    • OnboardingFlowController: manages UIPageViewController and maybe ask for some permissions
    • LoginFlowController: manages UINavigationController to show login, sms verification, forget password, and optionally start SignUpFlowController
    • MainFlowController: manages UITabBarController with each tab serving main features
      • FeedFlowController: show feed with list of items
      • ProfileFlowController: show profile
      • SettingsFlowController: show settings, and maybe call logout, this will delegates up the FlowController chain.

The cool thing about FlowController is it makes your code very self contained, and grouped by features. So it’s easy to move all related things to its own package if you like.

2. FlowController as container view controller

In general, a view controller should manage either sequence or UI, but not both.

Basically, FlowController is just a container view controller to solve the sequence, based on a simple concept called composition. It manages many child view controllers in its flow. Let’ say we have a ProductFlowController that groups together flow related to displaying products, ProductListController, ProductDetailController, ProductAuthorController, ProductMapController, … Each can delegate to the ProductFlowController to express its intent, like ProductListController can delegate to say “product did tap”, so that ProductFlowController can construct and present the next screen in the flow, based on the embedded UINavigationController inside it.

Normally, a FlowController just displays 1 child FlowController at a time, so normally we can just update its frame

1
2
3
4
5
6
7
final class AppFlowController: UIViewController {
override func viewDidLayoutSubviews() {
super.viewDidLayoutSubviews()

childViewControllers.first?.view.frame = view.bounds
}
}

3. FlowController as dependency container

Each view controller inside the flow can have different dependencies, so it’s not fair if the first view controller needs to carry all the stuff just to be able to pass down to the next view controllers. Here are some dependencies

  • ProductListController: ProductNetworkingService
  • ProductDetailController: ProductNetworkingService, ImageDowloaderService, ProductEditService
  • ProductAuthorController: AuthorNetworkingService, ImageDowloaderService
  • ProductMapController: LocationService, MapService

Instead the FlowController can carry all the dependencies needed for that whole flow, so it can pass down to the view controller if needed.

1
2
3
4
5
6
7
8
9
10
11
12
13
14
15
16
17
18
19
20
21
22
23
24
25
26
27
28
29
struct ProductDependencyContainer {
let productNetworkingService: ProductNetworkingService
let imageDownloaderService: ImageDownloaderService
let productEditService: ProductEditService
let authorNetworkingService: AuthorNetworkingService
let locationService: LocationService
let mapService: MapService
}

class ProductFlowController {
let dependencyContainer: ProductDependencyContainer

init(dependencyContainer: ProductDependencyContainer) {
self.dependencyContainer = dependencyContainer
}
}

extension ProductFlowController: ProductListControllerDelegate {
func productListController(_ controller: ProductListController, didSelect product: Product) {
let productDetailController = ProductDetailController(
productNetworkingService: dependencyContainer.productNetworkingService,
productEditService: dependencyContainer.productEditService,
imageDownloaderService: dependencyContainer.imageDownloaderService
)

productDetailController.delegate = self
embeddedNavigationController.pushViewController(productDetailController, animated: true)
}
}

Here are some ways that you can use to pass dependencies into FlowController

4. Adding or removing child FlowController

Coordinator

With Coordinator, you need to keep an array of child Coordinators, and maybe use address (=== operator) to identify them

1
2
3
4
5
6
7
8
9
10
11
12
13
14
15
16
17
18
19
20
21
22
23
class Coordinator {
private var children: [Coordinator] = []

func add(child: Coordinator) {
guard !children.contains(where: { $0 === child }) else {
return
}

children.append(child)
}

func remove(child: Coordinator) {
guard let index = children.index(where: { $0 === child }) else {
return
}

children.remove(at: index)
}

func removeAll() {
children.removeAll()
}
}

FlowController

With FlowController, since it is UIViewController subclass, it has viewControllers to hold all those child FlowController. Just add these extensions to simplify your adding or removing of child UIViewController

1
2
3
4
5
6
7
8
9
10
11
12
13
extension UIViewController {
func add(childController: UIViewController) {
addChildViewController(childController)
view.addSubview(childController.view)
childController.didMove(toParentViewController: self)
}

func remove(childController: UIViewController) {
childController.willMove(toParentViewController: nil)
childController.view.removeFromSuperview()
childController.removeFromParentViewController()
}
}

And see in action how AppFlowController work with adding

1
2
3
4
5
6
7
8
9
10
11
12
13
14
15
16
17
18
19
20
21
22
23
final class AppFlowController: UIViewController {
func start() {
if authService.isAuthenticated {
startMain()
} else {
startLogin()
}
}

private func startLogin() {
let loginFlowController = LoginFlowController(
loginFlowController.delegate = self
add(childController: loginFlowController)
loginFlowController.start()
}

fileprivate func startMain() {
let mainFlowController = MainFlowController()
mainFlowController.delegate = self
add(childController: mainFlowController)
mainFlowController.start()
}
}

and with removing when the child FlowController finishes

1
2
3
4
5
6
extension AppFlowController: LoginFlowControllerDelegate {
func loginFlowControllerDidFinish(_ flowController: LoginFlowController) {
remove(childController: flowController)
startMain()
}
}

5. AppFlowController does not need to know about UIWindow

Coordinator

Usually you have an AppCoordinator, which is held by AppDelegate, as the root of your Coordinator chain. Based on login status, it will determine which LoginController or MainController will be set as the rootViewController, in order to do that, it needs to be injected a UIWindow

1
2
3
4
window = UIWindow(frame: UIScreen.main.bounds)
appCoordinator = AppCoordinator(window: window!)
appCoordinator.start()
window?.makeKeyAndVisible()

You can guess that in the start method of AppCoordinator, it must set rootViewController before window?.makeKeyAndVisible() is called.

1
2
3
4
5
6
7
8
9
10
11
12
13
14
15
final class AppCoordinator: Coordinator {
private let window: UIWindow

init(window: UIWindow) {
self.window = window
}

func start() {
if dependencyContainer.authService.isAuthenticated {
startMain()
} else {
startLogin()
}
}
}

FlowController

But with AppFlowController, you can treat it like a normal UIViewController, so just setting it as the rootViewController

1
2
3
4
5
6
appFlowController = AppFlowController(
window = UIWindow(frame: UIScreen.main.bounds)
window?.rootViewController = appFlowController
window?.makeKeyAndVisible()

appFlowController.start()

6. LoginFlowController can manage its own flow

Supposed we have login flow based on UINavigationController that can display LoginController, ForgetPasswordController, SignUpController

Coordinator

What should we do in the start method of LoginCoordinator? Construct the initial controller LoginController and set it as the rootViewController of the UINavigationController? LoginCoordinator can create this embedded UINavigationController internally, but then it is not attached to the rootViewController of UIWindow, because UIWindow is kept privately inside the parent AppCoordinator.

We can pass UIWindow to LoginCoordinator but then it knows too much. One way is to construct UINavigationController from AppCoordinator and pass that to LoginCoordinator

1
2
3
4
5
6
7
8
9
10
11
12
13
14
15
16
17
18
19
20
21
22
23
24
25
26
27
28
29
final class AppCoordinator: Coordinator {
private let window: UIWindow

private func startLogin() {
let navigationController = UINavigationController()

let loginCoordinator = LoginCoordinator(navigationController: navigationController)

loginCoordinator.delegate = self
add(child: loginCoordinator)
window.rootViewController = navigationController
loginCoordinator.start()
}
}

final class LoginCoordinator: Coordinator {
private let navigationController: UINavigationController

init(navigationController: UINavigationController) {
self.navigationController = navigationController
}

func start() {
let loginController = LoginController(dependencyContainer: dependencyContainer)
loginController.delegate = self

navigationController.viewControllers = [loginController]
}
}

FlowController

LoginFlowController leverages container view controller so it fits nicely with the way UIKit works. Here AppFlowController can just add LoginFlowController and LoginFlowController can just create its own embeddedNavigationController.

1
2
3
4
5
6
7
8
9
10
11
12
13
14
15
16
17
18
19
20
21
22
23
24
25
26
27
28
29
30
31
32
final class AppFlowController: UIViewController {
private func startLogin() {
let loginFlowController = LoginFlowController(
dependencyContainer: dependencyContainer
)

loginFlowController.delegate = self
add(childController: loginFlowController)
loginFlowController.start()
}
}

final class LoginFlowController: UIViewController {
private let dependencyContainer: DependencyContainer
private var embeddedNavigationController: UINavigationController!
weak var delegate: LoginFlowControllerDelegate?

init(dependencyContainer: DependencyContainer) {
self.dependencyContainer = dependencyContainer
super.init(nibName: nil, bundle: nil)

embeddedNavigationController = UINavigationController()
add(childController: embeddedNavigationController)
}

func start() {
let loginController = LoginController(dependencyContainer: dependencyContainer)
loginController.delegate = self

embeddedNavigationController.viewControllers = [loginController]
}
}

7. FlowController and responder chain

Coordinator

Sometimes we want a quick way to bubble up message to parent Coordinator, one way to do that is to replicate UIResponder chain using associated object and protocol extensions, like Inter-connect with Coordinator

1
2
3
4
5
6
7
8
9
10
11
12
13
14
15
16
17
18
19
20
21
22
extension UIViewController {
private struct AssociatedKeys {
static var ParentCoordinator = "ParentCoordinator"
}

public var parentCoordinator: Any? {
get {
return objc_getAssociatedObject(self, &AssociatedKeys.ParentCoordinator)
}
set {
objc_setAssociatedObject(self, &AssociatedKeys.ParentCoordinator, newValue, .OBJC_ASSOCIATION_ASSIGN)
}
}
}

open class Coordinator<T: UIViewController>: UIResponder, Coordinating {
open var parent: Coordinating?

override open var coordinatingResponder: UIResponder? {
return parent as? UIResponder
}
}

FlowController

Since FlowController is UIViewController, which inherits from UIResponder, responder chain happens out of the box

Responder objects—that is, instances of UIResponder—constitute the event-handling backbone of a UIKit app. Many key objects are also responders, including the UIApplication object, UIViewController objects, and all UIView objects (which includes UIWindow). As events occur, UIKit dispatches them to your app’s responder objects for handling.

8. FlowController and trait collection

FlowController

I very much like how Kickstarter uses trait collection in testing. Well, since FlowController is a parent view controller, we can just override its trait collection, and that will affect the size classes of all view controllers inside that flow.

As in A Better MVC, Part 2: Fixing Encapsulation

The huge advantage of this approach is that system features come free. Trait collection propagation is free. View lifecycle callbacks are free. Safe area layout margins are generally free. The responder chain and preferred UI state callbacks are free. And future additions to UIViewController are also free.

From setOverrideTraitCollection

When implementing a custom container view controller, you can use this method to change the traits of any embedded child view controllers to something more appropriate for your layout. Making such a change alters other view controller behaviors associated with that child

1
2
3
4
5
6
7
let trait = UITraitCollection(traitsFrom: [
.init(horizontalSizeClass: .compact),
.init(verticalSizeClass: .regular),
.init(userInterfaceIdiom: .phone)
])

appFlowController.setOverrideTraitCollection(trait, forChildViewController: loginFlowController)

9. FlowController and back button

Coordinator

One problem with UINavigationController is that clicking on the default back button pops the view controller out of the navigation stack, so Coordinator is not aware of that. With Coordinator you needs to keep Coordinator and UIViewController in sync, add try to hook up UINavigationControllerDelegate in order to clean up. Like in Back Buttons and Coordinators

1
2
3
4
5
6
7
8
9
10
11
12
13
14
15
16
17
extension Coordinator: UINavigationControllerDelegate {    
func navigationController(navigationController: UINavigationController,
didShowViewController viewController: UIViewController, animated: Bool) {

// ensure the view controller is popping
guard
let fromViewController = navigationController.transitionCoordinator?.viewController(forKey: .from),
!navigationController.viewControllers.contains(fromViewController) else {
return
}

// and it's the right type
if fromViewController is FirstViewControllerInCoordinator) {
//deallocate the relevant coordinator
}
}
}

Or creating a class called NavigationController that inside manages a list of child coordinators. Like in Navigation coordinators

1
2
3
4
5
6
7
8
9
10
11
12
13
14
15
16
17
18
19
20
21
22
final class NavigationController: UIViewController {
// MARK: - Inputs

private let rootViewController: UIViewController

// MARK: - Mutable state

private var viewControllersToChildCoordinators: [UIViewController: Coordinator] = [:]

// MARK: - Lazy views

private lazy var childNavigationController: UINavigationController =
UINavigationController(rootViewController: self.rootViewController)

// MARK: - Initialization

init(rootViewController: UIViewController) {
self.rootViewController = rootViewController

super.init(nibName: nil, bundle: nil)
}
}

FlowController

Since FlowController is just plain UIViewController, you don’t need to manually manage child FlowController. The child FlowController is gone when you pop or dismiss. If we want to listen to UINavigationController events, we can just handle that inside the FlowController

1
2
3
4
5
6
7
8
9
10
11
12
13
14
15
16
17
18
19
20
final class LoginFlowController: UIViewController {
private let dependencyContainer: DependencyContainer
private var embeddedNavigationController: UINavigationController!
weak var delegate: LoginFlowControllerDelegate?

init(dependencyContainer: DependencyContainer) {
self.dependencyContainer = dependencyContainer
super.init(nibName: nil, bundle: nil)

embeddedNavigationController = UINavigationController()
embeddedNavigationController.delegate = self
add(childController: embeddedNavigationController)
}
}

extension LoginFlowController: UINavigationControllerDelegate {
func navigationController(_ navigationController: UINavigationController, willShow viewController: UIViewController, animated: Bool) {

}
}

10. FlowController and callback

We can use delegate pattern to notify FlowController to show another view controller in the flow

1
2
3
4
5
6
7
8
9
10
11
12
extension ProductFlowController: ProductListControllerDelegate {
func productListController(_ controller: ProductListController, didSelect product: Product) {
let productDetailController = ProductDetailController(
productNetworkingService: dependencyContainer.productNetworkingService,
productEditService: dependencyContainer.productEditService,
imageDownloaderService: dependencyContainer.imageDownloaderService
)

productDetailController.delegate = self
embeddedNavigationController.pushViewController(productDetailController, animated: true)
}
}

Another approach is to use closure as callback, as proposed by @merowing_, and also in his post Improve your iOS Architecture with FlowControllers

Using closures as triggers rather than delegate allows for more readable and specialized implementation, and multiple contexts

1
2
3
4
5
6
7
8
9
10
11
12
13
final class ProductFlowController {
func start() {
let productListController = ProductListController(
productNetworkingService: dependencyContainer.productNetworkingService
)

productListController.didSelectProduct = { [weak self] product in
self?.showDetail(for: product)
}

embeddedNavigationController.viewControllers = [productListController]
}
}

11. FlowController and deep linking

TBD. In the mean while, here are some readings about the UX

It's good to have a CI

Issue #101

I have Unit tests and UI tests pass on my simulator and device, locally. But when I make the build on Buddybuild, it fails with the reason Activity cannot be used after its scope has completed. People seem to have the same issue too.

Taking a look at the log in Buddybuild

1
2
3
4
5
6
7
8
9
10
11
12
13
14
15
16
17
18
19
20
21
22
23
24
25
26
27
 t =     8.89s     Staging: UIStatusBarWindow
t = 8.95s Staging: (CoreFoundation) Sending Updated Preferences to System CFPrefsD
t = 8.95s Staging: Setup BuddybuildSDK
t = 8.98s Staging: [BuddyBuildSDK] In app store - Instant Replay Disabled
t = 8.98s Staging: Setting up the remote notifications for UI Tests video recording
t = 9.07s CL: CLLocationManager
t = 9.07s Staging: (CoreLocation) [com.apple.locationd.Core.Client] {"msg":"CLLocationManager", "event":activity, "_cmd":initWithEffectiveBundleIdentifier:bundle:, "self":"0x600000205140", "identifier":(null), "bundle":(null)}
t = 9.07s Staging: (CoreLocation) [com.apple.locationd.Core.Core] {"msg":"state transition", "event":state_transition, "state":LocationManager, "id":"0x600000205140", "property":init, "new":'00 00 00 00 00 00 F0 BF 00 00 00 00 00 00 F0 BF 00 00 00 00 00 00 00 00 00 00 00 00 00 00 F0 3F 01 01 00 00 00 00 00 00 00 00 00 00 00 00 00 00 00 00 00 00 00 00 00 00 00 00 00 00 00 00 00 01 00 00 00 00 00 00 00 00'}
t = 9.07s Staging: (CoreLocation) [com.apple.locationd.Core.Core] {"msg":"state transition", "event":state_transition, "state":LocationManager, "id":"0x600000205140", "property":lifecycle, "old":"0x0", "new":"0x6040000ddd50"}
t = 9.07s CL: _CLClientCreateWithBundleIdentifierAndPath
t = 9.07s Staging: (CoreLocation) [com.apple.locationd.Core.Client] {"msg":"_CLClientCreateWithBundleIdentifierAndPath", "event":activity, "effectiveBundleIdentifier":(null), "effectiveBundlePath":(null)}
t = 9.07s Staging: (CoreLocation) [com.apple.locationd.Core.Client] {"msg":"client allocated", "client":"0x7f84c64e0990"}
t = 9.07s CL: _CLClientCreateConnection
t = 9.07s Staging: (CoreLocation) [com.apple.locationd.Core.Client] {"msg":"_CLClientCreateConnection", "event":activity, "client":"0x7f84c64e0990"}
t = 9.07s CL: Sending cached messages to daemon
t = 9.07s Staging: (CoreLocation) [com.apple.locationd.Core.Client] {"msg":"Sending cached messages to daemon", "event":activity}
t = 9.07s Staging: (CoreLocation) [com.apple.locationd.Core.Client] #Warning No cached registration message
t = 9.07s Staging: (CoreLocation) [com.apple.locationd.Core.Core] {"msg":"state transition", "event":state_transition, "state":LocationManager, "id":"0x600000205140", "property":pausesLocationUpdatesAutomatically, "old":0, "new":1}
t = 9.10s CL: CLLocationManager
t = 9.11s Staging: (CoreLocation) [com.apple.locationd.Core.Client] {"msg":"CLLocationManager", "event":activity, "_cmd":setDelegate:, "self":"0x600000205140", "delegate":"0x60400028bef0"}
t = 9.12s error: unexpectedly found nil while unwrapping an Optional value
t = 9.12s Unable to monitor event loop
t = 10.13s Tap "Onboarding.Continue" Button
t = 10.13s Wait for no.hyper.MyApp-Staging to idle
t = 10.16s Find the "Onboarding.Continue" Button
t = 11.28s Assertion Failure: <unknown>:0: no.hyper.MyApp-Staging crashed in MyApp_Staging.AppDelegate.(makeDependencyContainer in _5D394B3D7D393F9C3C550E61780517BB)() -> MyApp_Staging.DependencyContainer
t = 11.33s Wait for com.apple.springboard to idle

Did you see unexpectedly found nil while unwrapping an Optional value? It crashed in CLLocationManager. It is because when location changes, CLLocationManager needs to report it via didUpdateLocations function, but we haven’t implemented it. Strangely that it didn’t happen when testing locally.

The proposed fix is to implement a dummy method with no operation

1
2
3
func locationManager(_ manager: CLLocationManager, didUpdateLocations locations: [CLLocation]) {
// No op
}

But it is not the solution. It appears that BuddyBuild is doing some hacks with how push notification and UIWindow, hence causing the issue.

Diff algorithm

Issue #99

I’ve been searching for efficient ways to diff collections, here are some interesting papers that I find

Myers

Wu

Wagner–Fischer

Common Longest Subsequence

Heckel

Hunt-Szymanski

Read more

How to use safeAreaLayoutGuide in iOS 10

Issue #98

The safeAreaLayoutGuide was introduced in iOS 11. And it is advised to stop using topLayoutGuide bottomLayoutGuide as these are deprecated.

To use safeAreaLayoutGuide, you need to do iOS version check

1
2
3
4
5
if #available(iOS 11.0, *) {
headerView.topAnchor.constraint(equalTo: view.safeAreaLayoutGuide.topAnchor, constant: 20)
} else {
headerView.topAnchor.constraint(equalTo: view.topAnchor, constant: 20)
}

Maybe we can introduce a common property that can be used across many iOS versions, let’s call it compatibleSafeAreaLayoutGuide

1
2
3
4
5
6
7
8
9
10
11
12
13
14
15
16
17
18
19
20
21
22
23
24
25
26
27
28
29
30
31
32
33
34
35
36
37
38
39
40
41
42
43
44
extension UIView {
/// Use safeAreaLayoutGuide on iOS 11+, otherwise default to dummy layout guide
var compatibleSafeAreaLayoutGuide: UILayoutGuide {
if #available(iOS 11, *) {
return safeAreaLayoutGuide
} else {
if let layoutGuide = self.associatedLayoutGuide {
return layoutGuide
} else {
let layoutGuide = UILayoutGuide()
Constraint.on(
layoutGuide.topAnchor.constraint(equalTo: topAnchor),
layoutGuide.bottomAnchor.constraint(equalTo: bottomAnchor),
layoutGuide.leftAnchor.constraint(equalTo: leftAnchor),
layoutGuide.rightAnchor.constraint(equalTo: rightAnchor)
)

self.associatedLayoutGuide = layoutGuide

return layoutGuide
}
}
}

private struct AssociatedKeys {
static var layoutGuide = "layoutGuide"
}

fileprivate var associatedLayoutGuide: UILayoutGuide? {
get {
return objc_getAssociatedObject(self, &AssociatedKeys.layoutGuide) as? UILayoutGuide
}

set {
if let newValue = newValue {
objc_setAssociatedObject(
self, &AssociatedKeys.layoutGuide,
newValue as UILayoutGuide?,
.OBJC_ASSOCIATION_RETAIN_NONATOMIC
)
}
}
}
}

This way we can simply do

1
headerView.topAnchor.constraint(equalTo: view.compatibleSafeAreaLayoutGuide.topAnchor, constant: 20)

Read more

Learning from Open Source Using Coordinator

Issue #97

The Coordinator pattern can be useful to manage dependencies and handle navigation for your view controllers. It can be seen from BackchannelSDK-iOS, take a look at BAKCreateProfileCoordinator for example

1
2
3
4
5
6
7
8
9
10
11
12
13
14
15
16
17
18
19
20
21
22
23
24
25
26
27
28
29
30
@implementation BAKCreateProfileCoordinator

- (instancetype)initWithUser:(BAKUser *)user navigationController:(UINavigationController *)navigationController configuration:(BAKRemoteConfiguration *)configuration {
self = [super init];
if (!self) return nil;

_navigationController = navigationController;
_user = user;
_profileViewController = [[BAKProfileFormViewController alloc] init];
[self configureProfileForm];
_configuration = configuration;

return self;
}

- (void)start {
[self.profileViewController updateDisplayName:self.user.displayName];
[self.navigationController pushViewController:self.profileViewController animated:YES];
}

- (void)profileViewControllerDidTapAvatarButton:(BAKProfileFormViewController *)profileViewController {
BAKChooseImageCoordinator *imageChooser = [[BAKChooseImageCoordinator alloc] initWithViewController:self.navigationController];
imageChooser.delegate = self;
[self.childCoordinators addObject:imageChooser];
[imageChooser start];
}

- (void)imageChooserDidCancel:(BAKChooseImageCoordinator *)imageChooser {
[self.childCoordinators removeObject:imageChooser];
}

Look how it holds navigationController as root element to do navigation, and how it manages childCoordinators

coordinator

Read more

Learning from Open Source Managing dependencies

Issue #96

Another cool thing about ios-oss is how it manages dependencies. Usually you have a lot of dependencies, and it’s good to keep them in one place, and inject it to the objects that need.

The Environment is simply a struct that holds all dependencies throughout the app

1
2
3
4
5
6
7
8
9
10
11
12
13
14
15
16
17
18
/**
A collection of **all** global variables and singletons that the app wants access to.
*/
public struct Environment {
/// A type that exposes endpoints for fetching Kickstarter data.
public let apiService: ServiceType

/// The amount of time to delay API requests by. Used primarily for testing. Default value is `0.0`.
public let apiDelayInterval: DispatchTimeInterval

/// A type that exposes how to extract a still image from an AVAsset.
public let assetImageGeneratorType: AssetImageGeneratorType.Type

/// A type that stores a cached dictionary.
public let cache: KSCache

/// ...
}

Then there’s global object called AppEnvironment that manages all these Environment in a stack

1
2
3
4
5
6
7
8
9
10
11
12
13
14
15
16
17
18
19
20
21
22
23
24
25
26
27
28
29
30
31
32
33
34
35
36
37
38
39
40
41
42
43
44
45
46
47
48
49
50
51
52
53
54
55
56
57
58
59
public struct AppEnvironment {
/**
A global stack of environments.
*/
fileprivate static var stack: [Environment] = [Environment()]

/**
Invoke when an access token has been acquired and you want to log the user in. Replaces the current
environment with a new one that has the authenticated api service and current user model.

- parameter envelope: An access token envelope with the api access token and user.
*/
public static func login(_ envelope: AccessTokenEnvelope) {
replaceCurrentEnvironment(
apiService: current.apiService.login(OauthToken(token: envelope.accessToken)),
currentUser: envelope.user,
koala: current.koala |> Koala.lens.loggedInUser .~ envelope.user
)
}

/**
Invoke when we have acquired a fresh current user and you want to replace the current environment's
current user with the fresh one.

- parameter user: A user model.
*/
public static func updateCurrentUser(_ user: User) {
replaceCurrentEnvironment(
currentUser: user,
koala: current.koala |> Koala.lens.loggedInUser .~ user
)
}

public static func updateConfig(_ config: Config) {
replaceCurrentEnvironment(
config: config,
koala: AppEnvironment.current.koala |> Koala.lens.config .~ config
)
}

// Invoke when you want to end the user's session.
public static func logout() {
let storage = AppEnvironment.current.cookieStorage
storage.cookies?.forEach(storage.deleteCookie)

replaceCurrentEnvironment(
apiService: AppEnvironment.current.apiService.logout(),
cache: type(of: AppEnvironment.current.cache).init(),
currentUser: nil,
koala: current.koala |> Koala.lens.loggedInUser .~ nil
)
}

// The most recent environment on the stack.
public static var current: Environment! {
return stack.last
}

}

Then whenever there’s event that triggers dependencies update, we call it like

1
2
3
4
5
self.viewModel.outputs.logIntoEnvironment
.observeValues { [weak self] accessTokenEnv in
AppEnvironment.login(accessTokenEnv)
self?.viewModel.inputs.environmentLoggedIn()
}

The cool thing about Environment is that we can store and retrieve them

1
2
3
4
5
6
// Returns the last saved environment from user defaults.
public static func fromStorage(ubiquitousStore: KeyValueStoreType,
userDefaults: KeyValueStoreType) -> Environment {
// retrieval

}

And we can mock in tests

1
2
3
4
5
6
7
8
9
AppEnvironment.replaceCurrentEnvironment(
apiService: MockService(
fetchDiscoveryResponse: .template |> DiscoveryEnvelope.lens.projects .~ [
.todayByScottThrift,
.cosmicSurgery,
.anomalisa
]
)
)

Learning from Open Source Using Playground

Issue #94

One thing I like about kickstarter-ios is how they use Playground to quickly protoyping views.

We use Swift Playgrounds for iterative development and styling. Most major screens in the app get a corresponding playground where we can see a wide variety of devices, languages and data in real time.

This way we don’t need Injection or using React Native anymore. Take a look at all the pages https://github.com/kickstarter/ios-oss/tree/master/Kickstarter-iOS.playground/Pages

Read more

Testing keychain in iOS

Issue #92

Today I was upgrading Keychain to swift 4, and take this opportunity to fix the test. The tests pass on macOS, but on iOS, I get -25300 error for

1
var status = SecItemCopyMatching(query as CFDictionary, nil)

It is because there is no Keychain entitlement for test target. But this is a framework, how can I add entitlement 🤔 The solution is to use a Test Host to host the XCTest tests. See my pull request

Create test host target

target

First create an iOS app to act as a test host, you can name it TestHost_iOS

Enable Keychain capability

Then enable Keychain capability to let Xcode automatically create an entitlement file for you. Note that you can just enter the Keychain group. You don’t need go to Apple Developer dashboard to configure anything

keychain

Specify Test Host

Then in you test target, specify Test Host by using $(BUILT_PRODUCTS_DIR)/TestHost_iOS.app/TestHost_iOS

test host

Now run your test again, it should pass 🎉

What about performance?

Issue #85

That’s the question I hear often when people are introduced to a new framework. It’s a valid concern. But it seems to me that they ask this just for fun. To my surprise, most people just don’t care, and the frameworks with the most stars often perform the worst.

Now take a look back at performance. Here are some benchmarks

From https://github.com/ibireme/YYModel, compare different JSON mappers for ObjC

From https://github.com/bwhiteley/JSONShootout, compare different JSON mappers for Swift

From https://github.com/onmyway133/DeepDiff#among-different-frameworks, compare different diffing frameworks

I use it because it has many stars

Take a look at the stars, the ones with the most stars often perform the slowest 🙀

I don’t say that more stars mean better. I don’t believe in stars. Stars may just be a result of your marketing effort. The same framework, without any code change, but after featured in some newsletters, gets additional thousand stars. The code remains the same, so what do stars really tell here?

I’m not talking about closed source. I like open source. When deciding an open source framework, there are many factors. It can be issues and pull requests that indicate how the community care about it. It can be good code and good tests, that make it easy to maintain. It can be good documentation, that says how much dedication the developers have put in.

And here’s the fact, when you see a project with many stars, you tend to star it too 😉 for the sake of bookmarking. Stars mean little, but they give us some ideas on how popular a project is.

I just need to get work done

OK.

What about performance?

Honestly, do you really care?

How to do implement notification in iOS with Firebase

Issue #64

Note: This applies to Firebase 4.0.4

Preparing push notification certificate

Go to Member Center -> Certificates -> Production

Certificate

You can now use 1 certificate for both sandbox and production environment
push

Auth Key

Configure push notification

  • Go to Firebase Console -> Settings -> Project Settings -> Cloud Messaging -> iOS app configuration
    • If you use certificate, use just 1 Apple Push Notification service SSL for both fields
    • If you use Authenticate Key, fill in APNS auth key

firebase

Adding pod

In your Podfile, declare

1
2
pod 'Firebase/Core'
pod 'Firebase/Messaging'

Disabling app delegate swizzling

1
2
<key>FirebaseAppDelegateProxyEnabled</key>
<false/>

Read more on Messaging.messaging().apnsToken

This property is used to set the APNS Token received by the application delegate.
FIRMessaging uses method swizzling to ensure the APNS token is set automatically. However, if you have disabled swizzling by setting FirebaseAppDelegateProxyEnabled to NO in your app’s Info.plist, you should manually set the APNS token in your application delegate’s -application:didRegisterForRemoteNotificationsWithDeviceToken: method.
If you would like to set the type of the APNS token, rather than relying on automatic detection, see: -setAPNSToken:type:.

Configuring Firebase

You can and should configure Firebase in code

1
2
3
4
5
6
7
8
import Firebase

let options = FirebaseOptions(googleAppID: "", gcmSenderID: "")
options.bundleID = ""
options.apiKey = ""
options.projectID = ""
options.clientID = ""
FirebaseApp.configure(options: options)

Handling device token

1
2
3
4
5
import Firebase

func application(_ application: UIApplication, didRegisterForRemoteNotificationsWithDeviceToken deviceToken: Data) {
Messaging.messaging().apnsToken = deviceToken
}

Getting FCM token

Retrieving FCM token

Read Access the registration token

By default, the FCM SDK generates a registration token for the client app instance on initial startup of your app. Similar to the APNs device token, this token allows you to target notification messages to this particular instance of the app.

1
Messaging.messaging().fcmToken

Observing for FCM token change

Read Monitor token generation

1
2
3
4
5
6
7
Messaging.messaging().delegate = self

// MARK: - MessagingDelegate

func messaging(_ messaging: Messaging, didRefreshRegistrationToken fcmToken: String) {
print(fcmToken)
}

Pixel and point

Issue #59

TL;DR: Don’t use nativeScale and nativeBounds, unless you’re doing some very low level stuff

What is point and pixel

From https://developer.apple.com/library/content/documentation/2DDrawing/Conceptual/DrawingPrintingiOS/GraphicsDrawingOverview/GraphicsDrawingOverview.html

In iOS there is a distinction between the coordinates you specify in your drawing code and the pixels of the underlying device

The purpose of using points (and the logical coordinate system) is to provide a consistent size of output that is device independent. For most purposes, the actual size of a point is irrelevant. The goal of points is to provide a relatively consistent scale that you can use in your code to specify the size and position of views and rendered content

On a standard-resolution screen, the scale factor is typically 1.0. On a high-resolution screen, the scale factor is typically 2.0

How about scale and nativeScale

From https://developer.apple.com/documentation/uikit/uiscreen

  • var bounds: CGRect: The bounding rectangle of the screen, measured in points.
  • var nativeBounds: CGRect: The bounding rectangle of the physical screen, measured in pixels.
  • var scale: CGFloat: The natural scale factor associated with the screen.
  • var nativeScale: CGFloat: The native scale factor for the physical screen.

The scale factor and display mode

See this for a whole list of devices and their scale factors https://www.paintcodeapp.com/news/ultimate-guide-to-iphone-resolutions

The iPhone 6 and 6+ introduced display mode https://www.cnet.com/how-to/explaining-display-zoom-on-iphone-6-and-6-plus/

You can see that currently the iPhone 6+, 6s+, 7+ phones have scale factor of 2.88 in zoomed mode, and 2.6 in standard mode

You can also see that in zoomed mode, iPhone 6 has the same logical size as the iPhone 5

Simulator vs device

This is to show you the differences in nativeScale in simulators and devices in zoomed mode, hence differences in nativeBounds.

iPhone 6+ simulator

1
2
3
4
5
6
7
8
9
10
11
12
13
14
15
16
17
18
19
20
21
22
23
(lldb) po UIScreen.main.scale
3.0

(lldb) po UIScreen.main.bounds
▿ (0.0, 0.0, 414.0, 736.0)
▿ origin : (0.0, 0.0)
- x : 0.0
- y : 0.0
▿ size : (414.0, 736.0)
- width : 414.0
- height : 736.0

(lldb) po UIScreen.main.nativeScale
3.0

(lldb) po UIScreen.main.nativeBounds
▿ (0.0, 0.0, 1242.0, 2208.0)
▿ origin : (0.0, 0.0)
- x : 0.0
- y : 0.0
▿ size : (1242.0, 2208.0)
- width : 1242.0
- height : 2208.0

iPhone 6+ device

1
2
3
4
5
6
7
8
9
10
11
12
13
14
15
16
17
18
19
20
21
22
23
(lldb) po UIScreen.main.scale
3.0

(lldb) po UIScreen.main.bounds
▿ (0.0, 0.0, 375.0, 667.0)
▿ origin : (0.0, 0.0)
- x : 0.0
- y : 0.0
▿ size : (375.0, 667.0)
- width : 375.0
- height : 667.0

(lldb) po UIScreen.main.nativeScale
2.88

(lldb) po UIScreen.main.nativeBounds
▿ (0.0, 0.0, 1080.0, 1920.0)
▿ origin : (0.0, 0.0)
- x : 0.0
- y : 0.0
▿ size : (1080.0, 1920.0)
- width : 1080.0
- height : 1920.0

Favorite WWDC 2017 sessions

Issue #56

  1. Introducing Core ML
  • Core ML
  1. Introducing ARKit: Augmented Reality for iOS
  • ARKit
  1. What’s New in Swift
  • String
  • Generic
  • Codable
  1. Advanced Animations with UIKit
  • Multiple animation
  • Interactive animation
  1. Natural Language Processing and your Apps
  • NSLinguisticTagger
  1. What’s New in Cocoa Touch
  • Large title
  • Drag and drop
  • File management
  • Safe area
  1. What’s New in Foundation
  • KeyPath
  • Observe
  • Codable
  1. Debugging with Xcode 9
  • Wireless debugging
  • View controller debugging
  1. Core ML in depth
  • Model
  • Core ML tools
  1. Vision Framework: Building on Core ML
  • Detection
  • Track
  1. What’s New in Testing
  • Parallel testing
  • Wait
  • Screenshot
  • Multiple app scenario

How to run UITests with map view in iOS

Issue #45

Mock a location

You should mock a location to ensure reliable test

Create the gpx file

Go to Xcode -> File -> New -> GPX File

gpx

It looks like

1
2
3
4
5
6
7
8
9
10
11
<?xml version="1.0"?>
<gpx version="1.1" creator="Xcode">
<wpt lat="59.913590" lon="10.733750">
<name>Oslo S</name>
<time>2017-05-31T14:55:37Z</time>
</wpt>
<wpt lat="59.913590" lon="10.733750">
<name>Oslo S</name>
<time>2017-05-31T14:55:40Z</time>
</wpt>
</gpx>

The gpx file is very powerful, as it allows you to specify a route with different movement speed.

Provide one or more waypoints containing a latitude/longitude pair. If you provide one
waypoint, Xcode will simulate that specific location. If you provide multiple waypoints,
Xcode will simulate a route visiting each waypoint.

Optionally provide a time element for each waypoint. Xcode will interpolate movement
at a rate of speed based on the time elapsed between each waypoint. If you do not provide
a time element, then Xcode will use a fixed rate of speed. Waypoints must be sorted by time in ascending order.

Use the gpx file

  • Declare the gpx file in app target, not UITests target. Go to your app scheme -> Run -> Options

location

  • Go to Simulator -> Debug -> Location -> Custom Location and select that same location, just to make sure. It does not need to be the same, but I see that without Custom Location, it does not work in UITests

Test that you’re near the initial location

1
2
3
4
5
6
7
let map = app.maps.element(boundBy: 0)
let predicate = NSPredicate(format: "label CONTAINS 'City Hall'")
let cityHall = map.otherElements.matching(predicate).element(boundBy: 0)

// wait for the map to finish loading and zooming
wait(for: cityHall, timeout: 2)
XCTAssertTrue(cityHall.exists)

The wait function is from https://github.com/onmyway133/blog/issues/44

Test that you can interact with your custom pin

You need to specify accessibilityIdentifier, like

1
2
3
4
5
6
7
class MyPin: MKAnnotationView {
override func didMoveToSuperview() {
super.didMoveToSuperview()

accessibilityIdentifier = "myPin"
}
}

and then query for that pin. Not that it is not inside map, it is inside app

1
2
let pin = app.otherElements.matching(identifier: "myPin").element(boundBy: 0)
XCTAssertTrue(pin.exists)

You should use accessibilityIdentifier

accessibilityIdentifier is from UIAccessibilityIdentification protocol. You should not use accessibilityLabel, see https://github.com/kif-framework/KIF/issues/243

Given that accessibilityLabel is an outwardly-facing string that is actually used by accessibility screen readers (and should be localized to the device user’s language), Apple now provides an alternate property (iOS 5+) that is specifically intended for UI Automation purposes

How to use MainController in iOS

Issue #36

Usually in an app, we have these flows: onboarding, login, main. And we usually set OnboardingController, LoginController and MainController as the root view controller respectively depending on the state.

I find it useful to have the MainController as the container for main flow. It can be a tab controller, swipe menu controller or contains just 1 child view controller. The screens are provided by child view controllers, but the MainController does the following jobs

  • Status bar style

We usually need to call preferredStatusBarStyle on the parent controller. See https://stackoverflow.com/questions/19022210/preferredstatusbarstyle-isnt-called

  • App did become active

Usually when app is brought to foreground, we need to fetch logged in user profile to see if there’s changes. We do this by listening to app did become active in MainController.

  • Mock to open

This can be anti pattern. But in UI Tests, for laziness, we can just use some launch arguments and check to present some specific screens to test, because MainController is the root for main flow.

  • Logout

Because things originate from MainController, things can terminate in MainController. We can handle logout, clear states, and tell MainController to tell AppDelegate to switch to another root controller

How to handle Auto Layout with different screen sizes

Issue #35

Auto Layout is awesome. Just declare the constraints and the views are resized accordingly to their parent ‘s bounds changes. But sometimes it does not look good, because we have fixed values for padding, width, height, and even fixed font size.

Read more How to make Auto Layout more convenient in iOS

This can be solved by some degree using Size Class. The idea of size class is that we have many sets of constraints, and based on the device traits, we enabled some of them. This is more convenient to do in Storyboard (although very hard to reason about), but if we’re doing in code (my prefer way), then it is a lot of code. And a lot of code means a lot of bugs.

If you take a look at iOSRes, we see the ratio 16:9 (height:width)

  • iPhone SE (320 x 568): 1.775
  • iPhone 6 (375 x 667): 1.778
  • iPhone 6+ (414 x 736): 1.778

They mostly have the same ratio. So we can have a simple approach, that scale elements based on ratio. Given the fact that the designer usually designs for iPhone 6 size, we can make that a base.

In this approach, the content will scale up or down depending on its ratio. You may argue that the idea of bigger phone is to display more, not to show the same content bigger. You may be right, in that case you need to create different constraints and different UIs. But if you want simple solutions that work, this is one of them

This is the technique I used when doing Windows Phone development, but it applies to many platforms as well

Calculate the ratio

1
2
3
4
5
6
7
8
class Device {
// Base width in point, use iPhone 6
static let base: CGFloat = 375

static var ratio: CGFloat {
return UIScreen.main.bounds.width / base
}
}

Extension to make it convenient

We can have a computed property called adjusted that adjusts the size based on the ratio

1
2
3
4
5
6
7
8
9
10
11
12
13
14
15
16
17
18
19
20
extension CGFloat {

var adjusted: CGFloat {
return self * Device.ratio
}
}

extension Double {

var adjusted: CGFloat {
return CGFloat(self) * Device.ratio
}
}

extension Int {

var adjusted: CGFloat {
return CGFloat(self) * Device.ratio
}
}

Use the ratio

You can adjust as much as you want

1
2
3
4
5
6
label.font = UIFont.systemFont(ofSize: 23.adjusted)

phoneTextField.leftAnchor.constraint(equalTo: container.leftAnchor, constant: 30.adjusted),
phoneTextField.rightAnchor.constraint(equalTo: container.rightAnchor, constant: -30.adjusted),

imageView.widthAnchor.constraint(equalToConstant: 80.adjusted), imageView.heightAnchor.constraint(equalToConstant: 90.adjusted),

How to define SDK and Deployment Target in iOS

Issue #33

I see that my answer to the question What’s the meaning of Base SDK, iOS deployment target, Target, and Project in xcode gets lots of views, so I think I need to elaborate more about it

Good read

base

Base SDK

  • We can’t configure this anymore, as Xcode will use the latest SDK. For Xcode 7, the SDK is iOS 9
  • If we upgrade Xcode, it will use the newer version of the SDK. Like Xcode 7.2, the SDK is iOS 9.1
  • Choosing the latest SDK for your project lets you use the new APIs introduced in the OS update that corresponds to that SDK. When new functionality is added as part of a system update, the system update itself does not typically contain updated header files reflecting the change. The SDKs, however, do contain updated header files.

Deployment Target

  • We can set in Xcode -> Target -> Deployment Info -> Deployment Target
  • State that we support this iOS version

What does it mean

So, a modern App might use iOS 9 as the Target SDK, and iOS 7 as the deployment target. This means that you can run on iOS 7, iOS 8 and iOS 9, and that you have available to you any iOS 9 calls when actually running on iOS 9.

.

Each .sdk directory resembles the directory hierarchy of the operating system release it represents: It has usr, System, and Developer directories at its top level. OS X .sdk directories also contain a Library directory. Each of these directories in turn contains subdirectories with the headers and libraries that are present in the corresponding version of the operating system with Xcode installed.

.

The libraries in an iOS or OS X SDK are stubs for linking only; they do not contain executable code but just the exported symbols. SDK support works only with native build targets.

So the SDK is just like stub and header only. It means that we can use certain APIs, but on OS that does not have the real symbols for those APIs, it crashes

available

Swift 2 introduces available construct that guards against failure when trying to use newer APIs.

Note that available is runtime, not compile time. All the code is inside your executable

1
2
3
4
5
if #available(iOS 9, OSX 10.10, *) {
// Code to execute on iOS 9, OS X 10.10
} else {

}

deprecated APIs

Always check to see if you are using deprecated APIs; though still available, deprecated APIs are not guaranteed to be available in the future

Compile time vs Runtime

1
2
3
4
5
#if (arch(i386) || arch(x86_64)) && os(iOS)
// code inside gets inserted into executable when builds for simulator
#else
// code inside gets inserted into executable when builds for device
#endif
1
2
3
4
5
#if os(OSX)
import Cocoa
#elseif os(iOS)
import UIKit
#endif
1
2
3
4
5
6
// All the code gets inserted into executable, but is run depending on the version of the OS
if #available(iOS 9, *) {
// use UIStackView
} else {
// show your manual Auto Layout skill
}

Weakly vs strongly linked

For example, suppose in Xcode you set the deployment target (minimum required version) to “OS X v10.5” and the base SDK (maximum allowed version) to “OS X v10.6”. During compilation, the compiler would weakly link interfaces that were introduced in OS X v10.6 while strongly linking interfaces defined in earlier versions of the OS. This would allow your application to run in OS X v10.5 and take advantage of newer features when available.

.

None of the (platform) frameworks is really “included in the bundle”. Instead, your app has a reference (“link”) to a framework once you add it to the “Link Binary with Library” build phase. The frameworks are pre-installed on the devices. When you run an app, all the app’s framework references are resolved by the dynamic linker (on the device), which means the framework code is loaded so your app can use it.

Reference


Updated at 2020-12-08 06:31:54

App backed by website in iOS 9

Issue #32

iOS 9 introduces new ways for your app to work better, backed by your websites

Smart App Banners

If the app is already installed on a user’s device, the banner intelligently changes its action, and tapping the banner will simply open the app. If the user doesn’t have your app on his device, tapping on the banner will take him to the app’s entry in the App Store

To add a Smart App Banner to your website, include the following meta tag in the head of each page where you’d like the banner to appear:

1
<meta name="apple-itunes-app" content="app-id=myAppStoreID, affiliate-data=myAffiliateData, app-argument=myURL">

When you support universal links, iOS 9 users can tap a link to your website and get seamlessly redirected to your installed app without going through Safari. If your app isn’t installed, tapping a link to your website opens your website in Safari.

Web Markup

If some or all of your app’s content is also available on your website, you can use web markup to give users access to your content in search results. Using web markup lets the Applebot web crawler index your content in Apple’s server-side index, which makes it available to all iOS users in Spotlight and Safari search results.

Shared Web Credentials

Shared web credentials is a programming interface that enables native iOS apps to share credentials with their website counterparts. For example, a user may log in to a website in Safari, entering a user name and password, and save those credentials using the iCloud Keychain. Later, the user may run a native app from the same developer, and instead of the app requiring the user to reenter a user name and password, shared web credentials gives it access to the credentials that were entered earlier in Safari.

Reference

How to make lighter AppDelegate in iOS

Issue #24

There is Lighter View Controllers, and there is Lighter AppDelegate, too

Since working with iOS, I really like the delegate pattern, in which it helps us defer the decision to another party.

The iOS application delegates its event to AppDelegate, which over time will be a big mess. Usually, the AppDelegate is where you put your root view controller setup, crash tracking, push notification, debugging, … and we just somehow violent the Single Responsibility principle. Moreover, it makes us hard to reason about code in AppDelegate

Service

I like to think of each task in AppDelegate as a service. And the AppDelegate distributes the events into each service via ServiceDispatcher. Simple plain old composition and looping

I tend to have RootService as a place to setup root view controllers

It looks like this

ServiceDispatcher.swift

1
2
3
4
5
6
7
8
9
10
11
12
13
14
15
16
17
18
19
20
21
22
23
24
25
26
27
28
29
30
31
32
33
34
35
36
37
38
39
40
41
class ServiceDispatcher : NSObject, UIApplicationDelegate {
let services: [UIApplicationDelegate]

init(services: [UIApplicationDelegate]) {
self.services = services
}

func application(application: UIApplication,
didFinishLaunchingWithOptions launchOptions: [NSObject : AnyObject]?) -> Bool {

services.forEach { service in
service.application?(application, didFinishLaunchingWithOptions: launchOptions)
}

return true
}

func applicationDidBecomeActive(application: UIApplication) {
services.forEach { service in
service.applicationDidBecomeActive?(application)
}
}

func applicationWillResignActive(application: UIApplication) {
services.forEach { service in
service.applicationWillResignActive?(application)
}
}

func applicationWillEnterForeground(application: UIApplication) {
services.forEach { service in
service.applicationWillEnterForeground?(application)
}
}

func applicationDidEnterBackground(application: UIApplication) {
services.forEach { service in
service.applicationDidEnterBackground?(application)
}
}
}

RootService.swift

1
2
3
4
5
6
7
8
9
10
11
12
13
14
15
16
17
18
19
20
21
22
23
24
25
class RootService : NSObject, UIApplicationDelegate {
func application(application: UIApplication,
didFinishLaunchingWithOptions launchOptions: [NSObject : AnyObject]?) -> Bool {

appDelegate().window = UIWindow(frame: UIScreen.mainScreen().bounds)
showHome()
appDelegate().window?.makeKeyAndVisible()

return true
}
}

extension RootService {
func showHome() {
let home = HomeWireframe().makeHome()
let navC = UINavigationController(rootViewController: home!)
appDelegate().window?.rootViewController = navC
}
}

extension RootService {
func appDelegate() -> AppDelegate {
return UIApplication.sharedApplication().delegate as! AppDelegate
}
}

AppDelegate.swift

1
2
3
4
5
6
7
8
9
10
11
12
13
14
15
16
17
18
19
20
21
22
23
24
25
26
27
28
29
30
@UIApplicationMain
class AppDelegate: UIResponder, UIApplicationDelegate {

var window: UIWindow?
let serviceDispatcher = ServiceDispatcher(services: [RootService()])


func application(application: UIApplication, didFinishLaunchingWithOptions launchOptions: [NSObject: AnyObject]?) -> Bool {

serviceDispatcher.application(application, didFinishLaunchingWithOptions: launchOptions)

return true
}

func applicationWillResignActive(application: UIApplication) {
serviceDispatcher.applicationWillResignActive(application)
}

func applicationDidEnterBackground(application: UIApplication) {
serviceDispatcher.applicationDidEnterBackground(application)
}

func applicationWillEnterForeground(application: UIApplication) {
serviceDispatcher.applicationWillEnterForeground(application)
}

func applicationDidBecomeActive(application: UIApplication) {
serviceDispatcher.applicationDidBecomeActive(application)
}
}

I have more services like DebugService, PushNotificationService, CrashTrackingService, …

The downside to this approach is that in real life, there will be dependencies between those services, like that UserService must be called before RootService? In this case, I have to use comment to explain why I have that decision, which is hard for newcomers to understand at first. Take a look at How to Move Bootstrapping Code Out of AppDelegate for how dependencies are managed

JSDecoupledAppDelegate comes with another approach, in which service events are named according to the functions, like appStateDelegate, appDefaultOrientationDelegate, watchInteractionDelegate, …

But for me, Service and ServiceDispatcher suit my need

Reference

How to debug Auto Layout

Issue #23

hasAmbiguousLayout

Returns whether the constraints impacting the layout of the view incompletely specify the location of the view.

exerciseAmbiguityInLayout

This method randomly changes the frame of a view with an ambiguous layout between its different valid values, causing the view to move in the interface. This makes it easy to visually identify what the valid frames are and may enable the developer to discern what constraints need to be added to the layout to fully specify a location for the view.

_autolayoutTrace

This returns a string describing the whole view tree which tells you when a view has an ambiguous layout.

NSLayoutConstraint identifier

The name that identifies the constraint.

UIViewAlertForUnsatisfiableConstraints

DETECTED_MISSING_CONSTRAINTS

https://forums.developer.apple.com/thread/63811

View Debugger search by address

Read more

How to create a piano using iOS 9 Auto Layout

Issue #22

In the beginning, people use frame and Autoresizing Mask, then they use Auto Layout, then iOS 9 encourages them to use NSLayoutAnchor, UILayoutGuide and UIStackView

For more convenient Auto Layout, check How to make Auto Layout more convenient in iOS and Anchors

NSLayoutAnchor

The NSLayoutAnchor class is a factory class for creating NSLayoutConstraint objects using a fluent API. Use these constraints to programmatically define your layout using Auto Layout.

It has 3 subclasses

NSLayoutDimension

  • func constraintEqualToConstant(_ c: CGFloat) -> NSLayoutConstraint!

NSLayoutXAxisAnchor

  • Allows working with horizontal constraints
  • Prevent these
1
2
// This constraint generates an incompatible pointer type warning
cancelButton.leadingAnchor.constraintEqualToAnchor(saveButton.topAnchor, constant: 8.0).active = true

NSLayoutYAxisAnchor

  • Allows working with vertical constraints
  • Prevent these
1
2
// This constraint generates an incompatible pointer type warning
cancelButton.topAnchor.constraintEqualToAnchor(saveButton.trailingAnchor, constant: 8.0).active = true

UILayoutGuide

Previously, we used dummy views to aid constraints. Now we use UILayoutGuide

Define an equal spacing between a series of views

uilayoutguide_spacing

See full gist

1
2
3
4
5
6
7
8
9
10
11
12
13
14
let space1 = UILayoutGuide()
view.addLayoutGuide(space1)

let space2 = UILayoutGuide()
view.addLayoutGuide(space2)

space1.widthAnchor.constraintEqualToAnchor(space2.widthAnchor).active = true

saveButton.trailingAnchor.constraintEqualToAnchor(space1.leadingAnchor).active = true

cancelButton.leadingAnchor.constraintEqualToAnchor(space1.trailingAnchor).active = true
cancelButton.trailingAnchor.constraintEqualToAnchor(space2.leadingAnchor).active = true

clearButton.leadingAnchor.constraintEqualToAnchor(space2.trailingAnchor).active = true

Layout guides can also act as a black box, containing a number of other views and controls

uilayoutguide_container

See the full gist

1
2
3
4
5
6
7
8
9
10
11
12
13
14
15
16
17
18
19
20
21
22
23
24
25
26
27
28
let container = UILayoutGuide()
view.addLayoutGuide(container)

// Set interior constraints
label.lastBaselineAnchor.constraintEqualToAnchor(textField.lastBaselineAnchor).active = true
label.leadingAnchor.constraintEqualToAnchor(container.leadingAnchor).active = true

textField.leadingAnchor.constraintEqualToAnchor(label.trailingAnchor, constant: 8.0).active = true
textField.trailingAnchor.constraintEqualToAnchor(container.trailingAnchor).active = true

textField.topAnchor.constraintEqualToAnchor(container.topAnchor).active = true
textField.bottomAnchor.constraintEqualToAnchor(container.bottomAnchor).active = true

// Set exterior constraints
// The contents of the container can be treated as a black box
let margins = view.layoutMarginsGuide

container.leadingAnchor.constraintEqualToAnchor(margins.leadingAnchor).active = true
container.trailingAnchor.constraintEqualToAnchor(margins.trailingAnchor).active = true

// Must use NSLayoutConstraint with the scene's top and bottom layout guides.
NSLayoutConstraint(item: container,
attribute: .Top,
relatedBy: .Equal,
toItem: topLayoutGuide,
attribute: .Bottom,
multiplier: 1.0,
constant: 20.0).active = true

layoutMarginsGuide

Margins are now represented as layoutMarginsGuide, a subclass of UILayoutGuide

topLayoutGuide and bottomLayoutGuide

In the container example, we saw how we must use NSLayoutConstraint with the topLayoutGuide. topLayoutGuide and bottomLayoutGuide are object conforming to UILayoutSupport protocol

layoutFrame

The layout guide defines a rectangular space in its owning view’s coordinate system. This property contains a valid CGRect value by the time its owning view’s layoutSubviews method is called.

In the above container example, the container layout guide frame is

1
(16.0, 40.0, 343.0, 21.0)

Piano

piano

See Piano on Github on how to create a Piano using UILayoutGuide, NSLayoutAnchor and UIStackView

How to handle RefreshControl in iOS

Issue #20

The other day I was doing refresh control, and I saw this Swift Protocols with Default Implementations as UI Mixins

1
2
3
4
5
6
7
8
9
10
11
12
13
14
15
16
17
18
19
20
extension Refreshable where Self: UIViewController
{
/// Install the refresh control on the table view
func installRefreshControl()
{
let refreshControl = UIRefreshControl()
refreshControl.tintColor = .primaryColor
refreshControl.addTarget(self, action: #selector(handleRefresh(_:)), for: .valueChanged)
self.refreshControl = refreshControl

if #available(iOS 10.0, *)
{
tableView.refreshControl = refreshControl
}
else
{
tableView.backgroundView = refreshControl
}
}
}

Protocol extension is cool but somehow I’m not a fan of it. I always consider composition first, to extract the specific task to one entity that does that well. It looks like this

1
2
3
4
5
6
7
8
9
10
11
12
13
14
15
16
17
18
19
20
class RefreshHandler: NSObject {
let refresh = PublishSubject<Void>()
let refreshControl = UIRefreshControl()

init(view: UIScrollView) {
super.init()
view.addSubview(refreshControl)
refreshControl.addTarget(self, action: #selector(refreshControlDidRefresh(_: )), for: .valueChanged)
}

// MARK: - Action

func refreshControlDidRefresh(_ control: UIRefreshControl) {
refresh.onNext(())
}

func end() {
refreshControl.endRefreshing()
}
}

It is a bit Rx, we can use block if we like, but the idea is we can declare this RefreshHandler and use it everywhere we want

1
2
3
4
5
6
refreshHandler = RefreshHandler(view: scrollView)

refreshHandler.refresh
.startWith(())
.bindTo(viewModel.input.fetch)
.addDisposableTo(bag)

How to hack iOS apps

Issue #19

We need to care about security nowadays, here are some links I find useful to read more about this matter

Detecting languages and framework

iOS Security

Private frameworks

Hack macOS apps

Private frameworks

Hacking Apple

Hack Android apps


Updated at 2021-02-23 10:56:28

Hello world, again

Issue #1

I’ve used Wordpress, then moved to GitHub Pages with Jekyll, Octopress, Hexo, Hugo. You can view my page here http://fantageek.com/. It was good with all the custom themes and Disqus

But then I was a bit lazy with all the commands generate, commit, deploy, it hinders me from writing, so I moved to Medium.

The only thing I like about Medium is its discovery, your posts have high chanced of finding and viewing by people. What’s the point of writing if no one read it? But then I miss all the awesome markdown features of GitHub Pages. Medium is easy to use, but it seems it’s not for hackers, and I find it really uncomfortable when adding code block and headings. Medium also lists my comments as stories, which is kind of 😲

I like to write fast, and with good comments system, and I love Markdown.

I like GitHub. I use GitHub for my notes, so I think I will use it for my blog as well. Hope all these GitHub convenience will encourage me to write more often. This will, of course, be less discoverable by people. So if you by any chance visit this blog, ohayou from me 👋

Updated at 2020-12-17 17:12:38