How to make focusable NSTextField in macOS

Issue #589

Use onTapGesture

1
2
3
4
5
6
7
8
9
10
11
12
13
14
15
16
17
18
19
20
21
22
23
24
25
26
27
28
29
30
31
32
33
34
35
36
37
38
39
40
41
42
43
44
45
46
47
48
49
50
51
52
53
54
55
56
57
58
59
60
61
62
63
64
65
66
67
68
69
70
71
72
73
74
75
import SwiftUI

struct MyTextField: View {
@Binding
var text: String
let placeholder: String
@State
private var isFocus: Bool = false

var body: some View {
FocusTextField(text: $text, placeholder: placeholder, isFocus: $isFocus)
.padding()
.cornerRadius(4)
.overlay(
RoundedRectangle(cornerRadius: 4)
.stroke(isFocus ? Color.accentColor: Color.separator)
)
.onTapGesture {
isFocus = true
}
}
}

private struct FocusTextField: NSViewRepresentable {
@Binding
var text: String
let placeholder: String
@Binding
var isFocus: Bool

func makeNSView(context: Context) -> NSTextField {
let tf = NSTextField()
tf.focusRingType = .none
tf.isBordered = false
tf.isEditable = true
tf.isSelectable = true
tf.drawsBackground = false
tf.delegate = context.coordinator
tf.placeholderString = placeholder
return tf
}

func updateNSView(
_ nsView: NSTextField,
context: Context
) {
nsView.font = NSFont.preferredFont(forTextStyle: .body, options: [:])
nsView.textColor = NSColor.labelColor
nsView.stringValue = text
}

func makeCoordinator() -> FocusTextField.Coordinator {
Coordinator(parent: self)
}

class Coordinator: NSObject, NSTextFieldDelegate {
let parent: FocusTextField
init(parent: FocusTextField) {
self.parent = parent
}

func controlTextDidBeginEditing(_ obj: Notification) {
parent.isFocus = true
}

func controlTextDidEndEditing(_ obj: Notification) {
parent.isFocus = false
}

func controlTextDidChange(_ obj: Notification) {
let textField = obj.object as! NSTextField
parent.text = textField.stringValue
}
}
}

becomeFirstResponder

1
2
3
4
5
6
7
8
9
10
11
12
13
14
15
class FocusAwareTextField: NSTextField {
var onFocusChange: (Bool) -> Void = { _ in }

override func becomeFirstResponder() -> Bool {
let textView = window?.fieldEditor(true, for: nil) as? NSTextView
textView?.insertionPointColor = R.nsColor.action
onFocusChange(true)
return super.becomeFirstResponder()
}
}

textField.delegate // NSTextFieldDelegate
func controlTextDidEndEditing(_ obj: Notification) {
onFocusChange(false)
}

NSTextField and NSText

https://stackoverflow.com/questions/25692122/how-to-detect-when-nstextfield-has-the-focus-or-is-its-content-selected-cocoa

When you clicked on search field, search field become first responder once, but NSText will be prepared sometime somewhere later, and the focus will be moved to the NSText.

I found out that when NSText is prepared, it is set to self.currentEditor() . The problem is that when becomeFirstResponder()’s call, self.currentEditor() hasn’t set yet. So becomeFirstResponder() is not the method to detect it’s focus.

On the other hand, when focus is moved to NSText, text field’s resignFirstResponder() is called, and you know what? self.currentEditor() has set. So, this is the moment to tell it’s delegate that that text field got focused

Use NSTextView

Any time you want to customize NSTextField, use NSTextView instead

1
2
3
4
5
6
7
8
// NSTextViewDelegate
func textDidBeginEditing(_ notification: Notification) {
parent.isFocus = true
}

func textDidEndEditing(_ notification: Notification) {
parent.isFocus = false
}

Updated at 2021-02-23 22:32:07

How to observe focus event of NSTextField in macOS

Issue #589

becomeFirstResponder

1
2
3
4
5
6
7
8
9
10
11
12
13
14
15
class FocusAwareTextField: NSTextField {
var onFocusChange: (Bool) -> Void = { _ in }

override func becomeFirstResponder() -> Bool {
let textView = window?.fieldEditor(true, for: nil) as? NSTextView
textView?.insertionPointColor = R.nsColor.action
onFocusChange(true)
return super.becomeFirstResponder()
}
}

textField.delegate // NSTextFieldDelegate
func controlTextDidEndEditing(_ obj: Notification) {
onFocusChange(false)
}

NSTextField and NSText

https://stackoverflow.com/questions/25692122/how-to-detect-when-nstextfield-has-the-focus-or-is-its-content-selected-cocoa

When you clicked on search field, search field become first responder once, but NSText will be prepared sometime somewhere later, and the focus will be moved to the NSText.

I found out that when NSText is prepared, it is set to self.currentEditor() . The problem is that when becomeFirstResponder()’s call, self.currentEditor() hasn’t set yet. So becomeFirstResponder() is not the method to detect it’s focus.

On the other hand, when focus is moved to NSText, text field’s resignFirstResponder() is called, and you know what? self.currentEditor() has set. So, this is the moment to tell it’s delegate that that text field got focused

Use NSTextView

Any time you want to customize NSTextField, use NSTextView instead

1
2
3
4
5
6
7
8
// NSTextViewDelegate
func textDidBeginEditing(_ notification: Notification) {
parent.isFocus = true
}

func textDidEndEditing(_ notification: Notification) {
parent.isFocus = false
}

How to change caret color of NSTextField in macOS

Issue #588

1
2
3
4
5
6
7
8
9
10
11
12
13
14
15
16
class FocusAwareTextField: NSTextField {
var onFocus: () -> Void = {}
var onUnfocus: () -> Void = {}

override func becomeFirstResponder() -> Bool {
onFocus()
let textView = window?.fieldEditor(true, for: nil) as? NSTextView
textView?.insertionPointColor = R.nsColor.action
return super.becomeFirstResponder()
}

override func resignFirstResponder() -> Bool {
onUnfocus()
return super.resignFirstResponder()
}
}

How to make TextView in SwiftUI for macOS

Issue #587

Use NSTextVIew

From https://github.com/twostraws/ControlRoom/blob/main/ControlRoom/NSViewWrappers/TextView.swift

1
2
3
4
5
6
7
8
9
10
11
12
13
14
15
16
17
18
19
20
21
22
23
24
25
26
27
28
29
30
31
32
33
34
35
36
37
38
39
40
41
42
43
44
45
46
47
48
49
50
51
52
53
54
55
56
57
58
59
60
61
62
63
64
65
66
import SwiftUI

/// A wrapper around NSTextView so we can get multiline text editing in SwiftUI.
struct TextView: NSViewRepresentable {
@Binding private var text: String
private let isEditable: Bool

init(text: Binding<String>, isEditable: Bool = true) {
_text = text
self.isEditable = isEditable
}

init(text: String) {
self.init(text: Binding<String>.constant(text), isEditable: false)
}

func makeNSView(context: Context) -> NSScrollView {
let text = NSTextView()
text.backgroundColor = isEditable ? .textBackgroundColor : .clear
text.delegate = context.coordinator
text.isRichText = false
text.font = NSFont.monospacedSystemFont(ofSize: NSFont.systemFontSize, weight: .regular)
text.autoresizingMask = [.width]
text.translatesAutoresizingMaskIntoConstraints = true
text.isVerticallyResizable = true
text.isHorizontallyResizable = false
text.isEditable = isEditable

let scroll = NSScrollView()
scroll.hasVerticalScroller = true
scroll.documentView = text
scroll.drawsBackground = false

return scroll
}

func updateNSView(_ view: NSScrollView, context: Context) {
let text = view.documentView as? NSTextView
text?.string = self.text

guard context.coordinator.selectedRanges.count > 0 else {
return
}

text?.selectedRanges = context.coordinator.selectedRanges
}

func makeCoordinator() -> Coordinator {
Coordinator(self)
}

class Coordinator: NSObject, NSTextViewDelegate {
var parent: TextView
var selectedRanges = [NSValue]()

init(_ parent: TextView) {
self.parent = parent
}

func textDidChange(_ notification: Notification) {
guard let textView = notification.object as? NSTextView else { return }
parent.text = textView.string
selectedRanges = textView.selectedRanges
}
}
}

Use xib

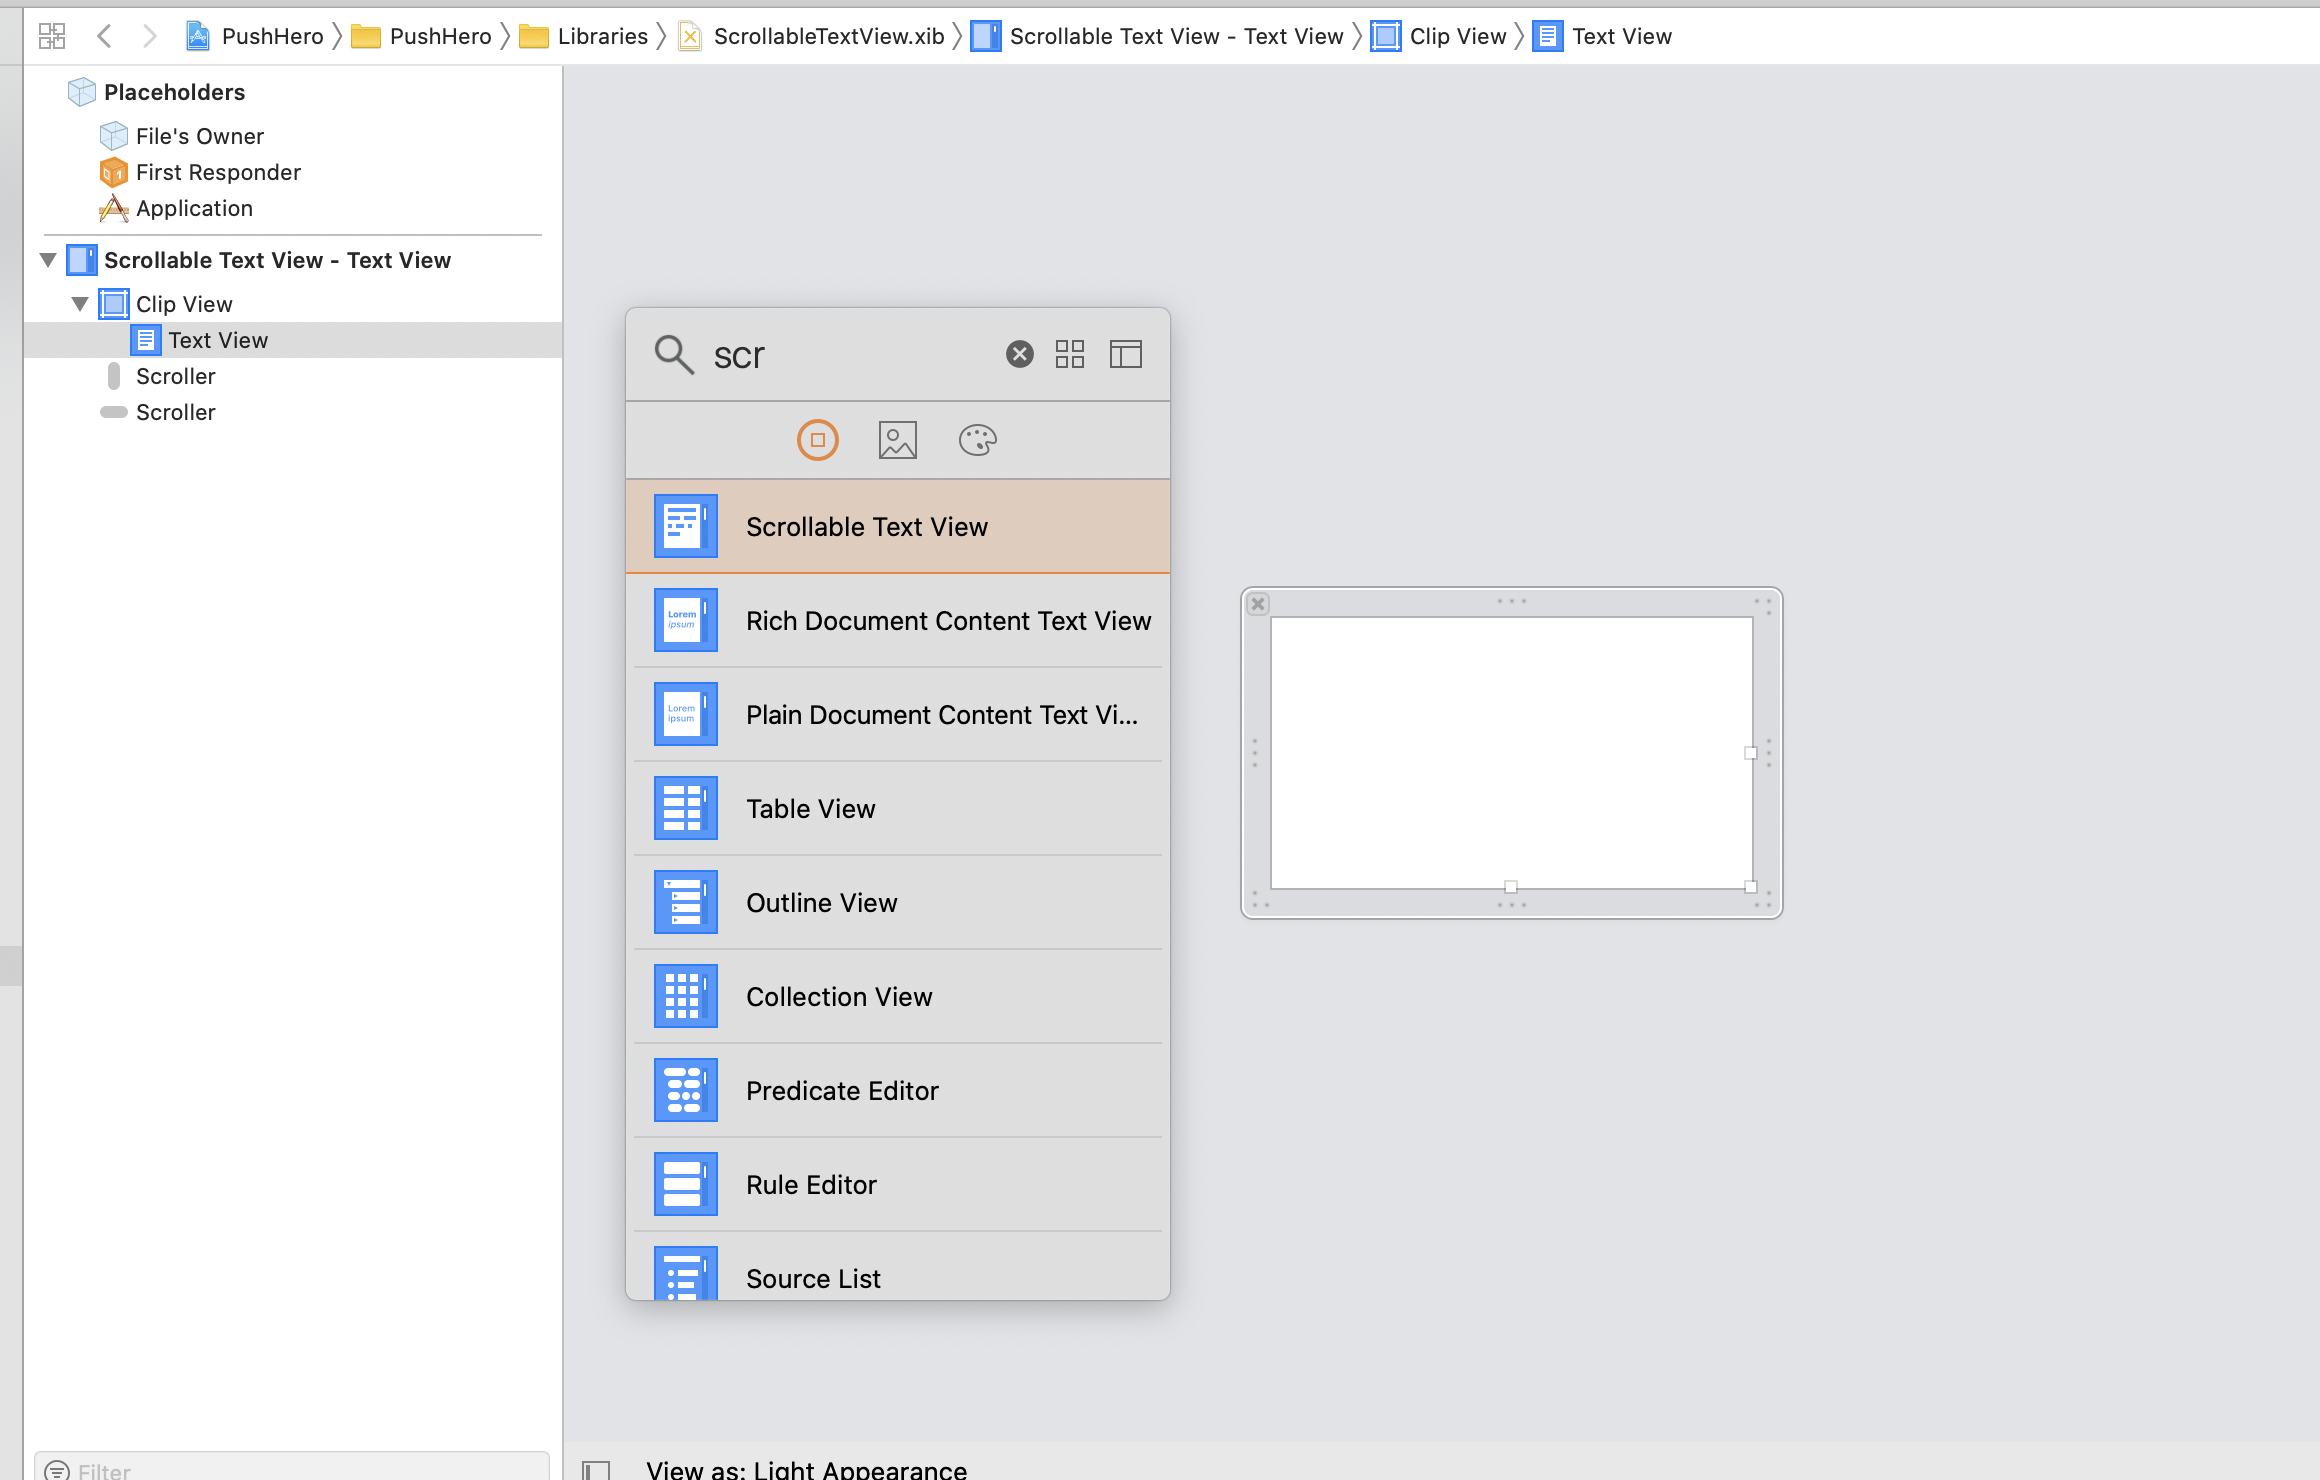
Create a xib called ScrollableTextView, and drag just Scrollable text view as top object

Screenshot 2020-01-29 at 06 49 55

Connect just the textView property

1
2
3
4
5
import AppKit

class ScrollableTextView: NSScrollView {
@IBOutlet var textView: NSTextView!
}

Conform to NSViewRepresentable

1
2
3
4
5
6
7
8
9
10
11
12
13
14
15
16
17
18
19
20
21
22
23
24
25
26
27
28
29
30
31
32
33
34
35
import SwiftUI

struct TextView: NSViewRepresentable {
@Binding var text: String

func makeCoordinator() -> Coordinator {
Coordinator(self)
}

func makeNSView(context: Context) -> ScrollableTextView {
var views: NSArray?
Bundle.main.loadNibNamed("ScrollableTextView", owner: nil, topLevelObjects: &views)
let scrollableTextView = views!.compactMap({ $0 as? ScrollableTextView }).first!
scrollableTextView.textView.delegate = context.coordinator
return scrollableTextView
}

func updateNSView(_ nsView: ScrollableTextView, context: Context) {
guard nsView.textView.string != text else { return }
nsView.textView.string = text
}

class Coordinator: NSObject, NSTextViewDelegate {
let parent: TextView

init(_ textView: TextView) {
self.parent = textView
}

func textDidChange(_ notification: Notification) {
guard let textView = notification.object as? NSTextView else { return }
self.parent.text = textView.string
}
}
}

There seems to be a bug that if we have open and close curly braces, any character typed into NSTextView will move the cursor to the end. This is easily fixed with a check in updateNSView

Updated at 2021-02-24 21:50:17

How to use Firebase Crashlytics in macOS app

Issue #585

New Firebase Crashlytics

Follow the new Firebase Crashlytics guide Get started with Firebase Crashlytics using the Firebase Crashlytics SDK

CocoaPods

Specify FirebaseCore for community managed macOS version of Firebase

1
2
3
4
5
6
7
8
9
10
platform :osx, '10.13'

target 'MyMacApp' do
# Comment the next line if you don't want to use dynamic frameworks
use_frameworks!

pod 'FirebaseCore'
pod 'Firebase/Crashlytics'

end

Signing and capabilities

Under Hardware runtime, check Disable library validation
Under App sandbox, enable Outgoing connections (Client)

Run script

Add a new run script build phrase to the last

1
"${PODS_ROOT}/FirebaseCrashlytics/run"

In that build phase, under Input Files, specify dsym and info plist file for dsym to be recognized

1
2
$(SRCROOT)/$(BUILT_PRODUCTS_DIR)/$(INFOPLIST_PATH)
${DWARF_DSYM_FOLDER_PATH}/${DWARF_DSYM_FILE_NAME}/Contents/Resources/DWARF/${TARGET_NAME}

AppDelegate

1
2
3
4
import FirebaseCore
import FirebaseCrashlytics

FirebaseApp.configure()

How to handle radio group for NSButton

Issue #579

Use same action, or we can roll our own implementation

An NSButton configured as a radio button (with the -buttonType set to NSRadioButton), will now operate in a radio button group for applications linked on 10.8 and later. To have the button work in a radio group, use the same -action for each NSButton instance, and have the same superview for each button. When these conditions are met, checking one button (by changing the -state to 1), will uncheck all other buttons (by setting their -state to 0).

1
2
3
4
5
6
7
import Omnia

@IBAction func onModeButtonTouch(_ sender: NSRadioButton) {
for button in [mode1Button, mode2Button] {
button?.isOn = button === sender
}
}

How to use Applications folder in macOS

Issue #573

There are 2 Applications folder

  • /System/Applications: contains Notes, Books, Calculator, …
  • /Applications: contains Safari, Xcode, Keynote, …

How to make Swift Package Manager package for multiple platforms

Issue #504

https://twitter.com/NeoNacho/status/1181245484867801088?s=20

There’s no way to have platform specific sources or targets today, so you’ll have to take a different approach. I would recommend wrapping all OS specific files in #if os and just having one target. For tests, you could do something similar, one test target, but conditional tests

Every files are in Sources folder, so we can use platform and version checks. For example Omnia is a Swift Package Manager that supports iOS, tvOS, watchOS, macOS and Catalyst.

For macOS only code, need to check for AppKit and Catalyst

https://github.com/onmyway133/Omnia/blob/master/Sources/macOS/ClickedCollectionView.swift

1
#if canImport(AppKit) && !targetEnvironment(macCatalyst)

For SwiftUI feature, need to check for iOS 13 and macOS 10.15

https://github.com/onmyway133/Omnia/blob/master/Sources/SwiftUI/Utils/ImageLoader.swift

1
@available(iOS 13.0, OSX 10.15, tvOS 13.0, watchOS 6.0, *)

How to use Firebase in macOS

Issue #501

  • Use Catalyst
  • Add to CocoaPods
1
2
3
4
5
6
7
8
9
platform :ios, '13.0'

target 'MyApp' do
use_frameworks!

pod 'FirebaseCore'
pod 'Firebase/Firestore'

end

Troubleshooting

Select a team for gRPC-C++-gRPCCertificates-Cpp

Screenshot 2019-11-12 at 14 53 03

FIRAnalyticsConnector: building for Mac Catalyst, but linking in object file built for iOS Simulator

https://stackoverflow.com/questions/57666155/firanalyticsconnector-building-for-mac-catalyst-but-linking-in-object-file-bui

The problem was related to the difference between Firebase/Core and FirebaseCore. The first is a subspec of the Firebase pod that depends on FirebaseAnalytics. The second is only the FirebaseCore pod. Only the latter should be used for macOS.

How to use Apple certificate in Xcode 11

Issue #458

For push notification, we can now use just Production Certificate for 2 environments (production and sandbox) instead of Development and Production certificates.

Now for code signing, with Xcode 11 https://developer.apple.com/documentation/xcode_release_notes/xcode_11_release_notes we can just use Apple Development and Apple Distribution certificate for multiple platforms

Signing and capabilities settings are now combined within a new Signing & Capabilities tab in the Project Editor. The new tab enables using different app capabilities across multiple build configurations. The new capabilities library makes it possible to search for available capabilities

Xcode 11 supports the new Apple Development and Apple Distribution certificate types. These certificates support building, running, and distributing apps on any Apple platform. Preexisting iOS and macOS development and distribution certificates continue to work, however, new certificates you create in Xcode 11 use the new types. Previous versions of Xcode don’t support these certificates

How to style NSTextView and NSTextField in macOS

Issue #443

1
2
let textField = NSTextField()
textField.focusRingType = .none
1
2
3
4
5
6
7
8
let textView = NSTextView()
textView.insertionPointColor = R.color.caret
textView.isRichText = false
textView.importsGraphics = false
textView.isEditable = true
textView.isSelectable = true
textView.drawsBackground = false
textView.allowsUndo = true

How to center NSWindow in screen

Issue #442

On macOS, coordinate origin is bottom left

1
2
3
4
5
let window = NSWindow(contentRect: rect, styleMask: .borderless, backing: .buffered, defer: false)

window.center()
let frame = window.frame
window.setFrameOrigin(CGPoint(x: frame.origin.x, y: 100))

How to log Error in Swift

Issue #439

Use localizedDescription

We need to provide NSLocalizedDescriptionKey inside user info dictionary, otherwise the outputt string may not be what we want.

NSError

https://developer.apple.com/documentation/foundation/nserror/1414418-localizeddescription

A string containing the localized description of the error.
The object in the user info dictionary for the key NSLocalizedDescriptionKey. If the user info dictionary doesn’t contain a value for NSLocalizedDescriptionKey, a default string is constructed from the domain and code.

1
2
3
4
5
6
7
let error = NSError(domain: "com.onmyway133.MyApp", code: 2, userInfo: [
"status_code": 2,
"status_message": "not enough power"
])

error.localizedDescription
// "The operation couldn’t be completed. (com.onmyway133.MyApp error 2.)"

Error

https://developer.apple.com/documentation/swift/error/2292912-localizeddescription

Retrieve the localized description for this error.

1
2
3
4
5
6
7
enum AppError: Error {
case request
case invalid
}

AppError.request.localizedDescription
// "The operation couldn’t be completed. (MyApp.AppError error 0.)"

Use describing String

To have better control, we can have toString which prints closly to what we expect

1
2
3
4
5
6
7
8
9
10
11
extension Error {
func toString() -> String {
return String(describing: self)
}
}

AppError.request.toString()
// request

nsError.toString()
// Error Domain=com.onmyway133.MyApp Code=2 "(null)" UserInfo={status_message=not enough power, status_code=SwiftGRPC.StatusCode.powerRequired}

How to handle NSTextField change in macOS

Issue #438

Storyboard

In Storyboard, NSTextField has an Action option that specify whether Send onSend on Enter only` should be the default behaviour.

textfield

Code

In code, NSTextFieldDelegate notifies whenever text field value changes, and target action notifies when Enter key is pressed

1
2
3
4
5
6
7
8
9
10
11
12
13
14
15
16
17
import Cocoa

class ViewController: NSViewController, NSTextFieldDelegate {

@IBOutlet weak var textField: NSTextField!

override func viewDidLoad() {
super.viewDidLoad()

textField.delegate = self
}

func controlTextDidChange(_ obj: Notification) {
let textField = obj.object as! NSTextField
print(textField.stringValue)
}
}

Use EasyClosure

If we use EasyClosure then this is easy

1
2
3
4
5
6
7
8
9
let textField: NSTextField = 

textField.on.action { string in
print("User has pressed enter \(string)"
}

textField.on.change { string in
print("Text field value has changed")
}

Updated at 2020-11-27 07:39:43

How to add section header to NSCollectionView in macOS

Issue #437

Normal

Use Omnia for itemId extension

HeaderCell.swift

1
2
3
4
5
6
7
8
9
10
11
12
13
14
15
16
17
18
19
20
21
22
23
final class HeaderCell: NSView, NSCollectionViewSectionHeaderView {
let label: NSTextField = withObject(NSTextField(labelWithString: "")) {
$0.textColor = R.color.header
$0.font = R.font.header
$0.alignment = .left
$0.lineBreakMode = .byTruncatingTail
}

override init(frame frameRect: NSRect) {
super.init(frame: frameRect)

addSubviews([label])

activate(
label.anchor.centerY,
label.anchor.left.constant(8)
)
}

required init?(coder: NSCoder) {
fatalError()
}
}

ViewController.swift

1
2
3
4
5
6
7
8
9
10
11
12
13
14
15
16
17
18
19
20
21
22
23
collectionView.register(
HeaderCell.self,
forSupplementaryViewOfKind: NSCollectionView.elementKindSectionHeader,
withIdentifier: HeaderCell.itemId
)

func collectionView(_ collectionView: NSCollectionView, viewForSupplementaryElementOfKind kind: NSCollectionView.SupplementaryElementKind, at indexPath: IndexPath) -> NSView {

if kind == NSCollectionView.elementKindSectionHeader {
let view = collectionView.makeSupplementaryView(
ofKind: kind,
withIdentifier: HeaderCell.itemId,
for: indexPath
) as! HeaderCell

let menu = app.menus[indexPath.section]
view.label.stringValue = menu.name

return view
} else {
return NSView()
}
}

In generic subclass

If use CollectionViewHandler from Omnia, then need to add @objc due to a bug in Swift compiler for subclassing generic class

1
@objc (collectionView:viewForSupplementaryElementOfKind:atIndexPath:)

MyHandler.swift

1
2
3
4
5
6
7
8
9
10
11
12
13
14
15
16
17
18
19
20
21
22
23
24
25
26
27
28
29
30
31
32
33
34
35
import AppKit
import Omnia

class MyHandler: CollectionViewHandler<App.Key, KeyCell> {
override init() {
super.init()

layout.headerReferenceSize = NSSize(width: 300, height: 30)

collectionView.register(
HeaderCell.self,
forSupplementaryViewOfKind: NSCollectionView.elementKindSectionHeader,
withIdentifier: HeaderCell.itemId
)
}

@objc (collectionView:viewForSupplementaryElementOfKind:atIndexPath:)
func collectionView(_ collectionView: NSCollectionView, viewForSupplementaryElementOfKind kind: NSCollectionView.SupplementaryElementKind, at indexPath: IndexPath) -> NSView {

if kind == NSCollectionView.elementKindSectionHeader {
let view = collectionView.makeSupplementaryView(
ofKind: kind,
withIdentifier: HeaderCell.itemId,
for: indexPath
) as! HeaderCell

let menu = app.menus[indexPath.section]
view.label.stringValue = menu.name

return view
} else {
return NSView()
}
}
}

Use Omnia

Use CollectionViewSectionHandler from Omnia

1
2
3
4
5
6
7
8
9
10
11
12
13
14
15
16
17
18
19
20
21
22
23
24
class SectionHandler: CollectionViewSectionHandler<App.Key, KeyCell, HeaderCell> {

}

sectionHandler.configureHeader = { section, view in
view.label.stringValue = section.name
}

sectionHandler.configure = { item, cell in
cell.shortcutLabel.stringValue = item.shortcut
cell.nameLabel.stringValue = item.name
}

sectionHandler.itemSize = { [weak self] in
guard let self = self else {
return .zero
}

let width = self.sectionHandler.collectionView.frame.size.width
- self.sectionHandler.layout.sectionInset.left
- self.sectionHandler.layout.sectionInset.right

return CGSize(width: width, height: 18)
}

Read more

How to show log in Apple Script

Issue #436

Open Script Editor, use log command and look for 4 tabs in bottom panel Result, Messages, Events and Replies

1
log "hello world"

How to show context menu from NSButton in macOS

Issue #435

Use NSMenu and popUp

1
2
3
4
5
6
7
8
9
10
11
12
13
14
15
16
17
18
19
20
21
22
23
24
25
26
func showQuitMenu() {
let menu = NSMenu()
let aboutItem = NSMenuItem(
title: "About",
action: #selector(onAboutTouched(_:)),
keyEquivalent: ""
)

let quitItem = NSMenuItem(
title: "Quit Hacker Pad",
action: #selector(onQuitTouched(_:)),
keyEquivalent: ""
)

aboutItem.target = self
quitItem.target = self

menu.addItem(aboutItem)
menu.addItem(quitItem)

menu.popUp(
positioning: aboutItem,
at: bottomView.quitButton.frame.origin,
in: bottomView
)
}

Use Omnia

1
2
3
4
5
6
7
8
9
10
let menuHandler = MenuHandler()
menuHandler.add(title: "About", action: {
NSWorkspace.shared.open(URL(string: "https://onmyway133.github.io/")!)
})

menuHandler.add(title: "Quit Hacker Pad", action: {
NSApp.terminate(nil)
})

menuHandler.show(from: self.bottomView.gearButton, in: self.bottomView)

How to make checked NSButton in AppKit

Issue #433

  • Use Omnia for convenient style and isOn property
1
2
3
let checkButton = NSButton(checkboxWithTitle: "", target: nil, action: nil)
checkButton.stylePlain(title: "Autosave", color: R.color.text, font: R.font.text)
checkButton.isOn = true

How to save files in sandboxed macOS app

Issue #432

Read Container Directories and File System Access

When you adopt App Sandbox, your application has access to the following locations:

The app container directory. Upon first launch, the operating system creates a special directory for use by your app—and only by your app—called a container. Each user on a system gets an individual container for your app, within their home directory; your app has unfettered read/write access to the container for the user who ran it.

Use EasyStash

1
2
3
var options = Options()
options.searchPathDirectory = .documentDirectory
storage = try! Storage(options: options)

How to use marked in WKWebView in AppKit

Issue #429

Use https://github.com/markedjs/marked

1
2
3
4
5
6
7
8
9
10
11
12
13
14
15
<!doctype html>
<html>
<head>
<meta charset="utf-8"/>
<title>Marked in the browser</title>
</head>
<body>
<div id="content"></div>
<script src="https://cdn.jsdelivr.net/npm/marked/marked.min.js"></script>
<script>
document.getElementById('content').innerHTML =
marked(`# Marked in the browser\n\nRendered by **marked**.`);
</script>
</body>
</html>

Should use back tick instead of ' to deal with multiline string, and escape back tick

1
2
3
4
let markdown = markdown.replacingOccurrences(of: "`", with: "\\`")
marked(`\(markdown)`);

webView.loadHTMLString(string, baseURL: nil)

For WKWebView to load even local content, need to enable Outgoing connections, and maybe Incoming connections in Sandbox

How to enable NSMenuItem in AppKit

Issue #428

Need to set target

1
2
3
4
5
6
7
let item = NSMenuItem(
title: title,
action: #selector(onMenuItemClicked(_:)),
keyEquivalent: ""
)

item.target = self

Sometimes, need to check autoenablesItems

Indicates whether the menu automatically enables and disables its menu items.

This property contains a Boolean value, indicating whether the menu automatically enables and disables its menu items. If set to true, menu items of the menu are automatically enabled and disabled according to rules computed by the NSMenuValidation informal protocol. By default, NSMenu objects autoenable their menu items.

How to use generic NSCollectionView in macOS

Issue #427

See CollectionViewHandler

Use ClickedCollectionView to detect clicked index for context menu.
Embed NSCollectionView inside NSScrollView to enable scrolling

1
2
3
4
5
6
7
8
9
10
11
12
13
14
15
16
17
18
19
20
21
22
23
24
25
26
27
28
29
30
31
32
33
34
35
36
37
38
39
40
41
42
43
44
45
46
47
48
49
50
51
52
53
54
55
56
57
58
59
60
61
62
63
64
65
66
67
68
69
70
71
72
73
74
75
76
77
78
import AppKit

public class CollectionViewHandler<Item: Equatable, Cell: NSCollectionViewItem>
: NSObject, NSCollectionViewDataSource, NSCollectionViewDelegateFlowLayout {

public let layout = NSCollectionViewFlowLayout()
public let scrollView = NSScrollView()
public let collectionView = ClickedCollectionView()

public var items = [Item]()
public var itemSize: () -> CGSize = { .zero }
public var configure: (Item, Cell) -> Void = { _, _ in }

override init() {
super.init()

layout.minimumLineSpacing = 4
layout.sectionInset = NSEdgeInsets(top: 4, left: 4, bottom: 4, right: 4)

collectionView.dataSource = self
collectionView.delegate = self
collectionView.collectionViewLayout = layout
collectionView.allowsMultipleSelection = false
collectionView.backgroundColors = [.clear]
collectionView.isSelectable = true

collectionView.register(Cell.self, forItemWithIdentifier: Cell.itemId)

scrollView.documentView = collectionView
}

// MARK: - Items

public func add(item: Item) {
items.insert(item, at: 0)
let indexPath = IndexPath(item: 0, section: 0)
collectionView.animator().insertItems(at: Set(arrayLiteral: indexPath))
}

public func remove(item: Item) {
guard let index = items.firstIndex(where: { $0 == item }) else {
return
}

remove(index: index)
}

public func remove(index: Int) {
items.remove(at: index)
let indexPath = IndexPath(item: index, section: 0)
collectionView.animator().deleteItems(at: Set(arrayLiteral: indexPath))
}

// MARK: - NSCollectionViewDataSource

public func numberOfSections(in collectionView: NSCollectionView) -> Int {
return 1
}

public func collectionView(_ collectionView: NSCollectionView, numberOfItemsInSection section: Int) -> Int {
return items.count
}

public func collectionView(_ collectionView: NSCollectionView, itemForRepresentedObjectAt indexPath: IndexPath) -> NSCollectionViewItem {

let cell = collectionView.makeItem(withIdentifier: Cell.itemId, for: indexPath) as! Cell
let item = items[indexPath.item]
configure(item, cell)
return cell
}

// MARK: - NSCollectionViewDelegateFlowLayout

public func collectionView(_ collectionView: NSCollectionView, layout collectionViewLayout: NSCollectionViewLayout, sizeForItemAt indexPath: IndexPath) -> NSSize {

return itemSize()
}
}

How to easily parse deep json in Swift

Issue #414

Codable is awesome, but sometimes we just need to quickly get value in a deepy nested JSON. In the same way I did for Dart How to resolve deep json object in Dart, let’s make that in Swift.

See https://github.com/onmyway133/Omnia/blob/master/Sources/Shared/JSON.swift

1
2
3
4
5
6
7
8
9
10
11
12
13
public func resolve<T>(_ jsonDictionary: [String: Any], keyPath: String) -> T? {
var current: Any? = jsonDictionary

keyPath.split(separator: ".").forEach { component in
if let maybeInt = Int(component), let array = current as? Array<Any> {
current = array[maybeInt]
} else if let dictionary = current as? JSONDictionary {
current = dictionary[String(component)]
}
}

return current as? T
}

So we can just resolve via key path

1
2
3
4
5
6
7
8
9
10
11
12
13
14
15
16
17
18
19
20
21
22
23
24
25
26
27
28
29
30
31
32
33
34
35
class JSONTests: XCTestCase {
func test() {
let json: [String: Any] = [
"outside": [
"object": [
"number": 1,
"text": "hello"
],
"arrayOfObjects": [
[
"number": 2,
"text": "two"
],
[
"number": 3,
"text": "three"
]
],
"arrayOfArrays": [
[
"one", "two", "three", "four"
],
[
"five", "six", "seven"
]
]
]
]

XCTAssertEqual(resolve(json, keyPath: "outside.object.number"), 1)
XCTAssertEqual(resolve(json, keyPath: "outside.object.text"), "hello")
XCTAssertEqual(resolve(json, keyPath: "outside.arrayOfObjects.1.number"), 3)
XCTAssertEqual(resolve(json, keyPath: "outside.arrayOfArrays.1.1"), "six")
}
}

How to support drag and drop in NSView

Issue #410

1
2
3
4
5
6
7
8
9
10
11
12
13
14
15
16
17
18
19
20
21
22
23
24
25
26
27
28
29
30
31
32
33
34
35
36
37
38
39
40
41
42
43
44
45
46
47
48
49
import AppKit
import Anchors

class DraggingView: NSView {
var didDrag: ((FileInfo) -> Void)?
let highlightView = NSView()

override init(frame frameRect: NSRect) {
super.init(frame: frameRect)

registerForDraggedTypes([
.fileURL
])

highlightView.isHidden = true
addSubview(highlightView)
activate(highlightView.anchor.edges)
highlightView.wantsLayer = true
highlightView.layer?.borderColor = NSColor(hex: "#FF6CA8").cgColor
highlightView.layer?.borderWidth = 6
}

required init?(coder decoder: NSCoder) {
fatalError()
}

override func draggingEntered(_ sender: NSDraggingInfo) -> NSDragOperation {
highlightView.isHidden = false
return NSDragOperation()
}

override func draggingEnded(_ sender: NSDraggingInfo) {
guard let pathAlias = sender.draggingPasteboard.propertyList(forType: .fileURL) as? String else {
return
}

let url = URL(fileURLWithPath: pathAlias).standardized
let fileInfo = FileInfo(url: url)
didDrag?(fileInfo)
}

override func draggingExited(_ sender: NSDraggingInfo?) {
highlightView.isHidden = true
}

override func draggingUpdated(_ sender: NSDraggingInfo) -> NSDragOperation {
return NSDragOperation()
}
}

To get information about multiple files

1
2
3
4
5
6
7
8
9
10
11
12
13
14
15
16
override func draggingEnded(_ sender: NSDraggingInfo) {
guard let pasteBoardItems = sender.draggingPasteboard.pasteboardItems else {
return
}

let fileInfos: [FileInfo] = pasteBoardItems
.compactMap({
return $0.propertyList(forType: .fileURL) as? String
})
.map({
let url = URL(fileURLWithPath: $0).standardized
return FileInfo(url: url)
})

didDrag(fileInfos)
}

How to use NSStepper in Appkit

Issue #409

1
2
3
4
5
6
7
8
9
10
11
12
13
14
15
let stepper = NSStepper()
let textField = NSTextField(wrappingLabelWithString: "\(myLocalCount)")

stepper.integerValue = myLocalCount
stepper.minValue = 5
stepper.maxValue = 24
stepper.valueWraps = false

stepper.target = self
stepper.action = #selector(onStepperChange(_:))

@objc func onStepperChange(_ sender: NSStepper) {
myLocalCount = sender.integerValue
textField.stringValue = "\(sender.integerValue)"
}

How to handle shortcut in AppKit

Issue #408

Podfile

1
pod 'MASShortcut'
1
2
3
4
5
let shortcut = MASShortcut(keyCode: kVK_ANSI_K, modifierFlags: [.command, .shift])

MASShortcutMonitor.shared()?.register(shortcut, withAction: {
self.showPopover(sender: self.statusItem.button)
})

How to select file in its directory in AppKit

Issue #407

https://developer.apple.com/documentation/appkit/nsworkspace/1524399-selectfile

In macOS 10.5 and later, this method does not follow symlinks when selecting the file. If the fullPath parameter contains any symlinks, this method selects the symlink instead of the file it targets. If you want to select the target file, use the resolvingSymlinksInPath method to resolve any symlinks before calling this method.

It is safe to call this method from any thread of your app.

1
2
3
NSWorkspace.shared.selectFile(
url.path,
inFileViewerRootedAtPath: url.deletingLastPathComponent().path)

How to use NSProgressIndicator in AppKit

Issue #406

1
2
3
4
let progressIndicator = NSProgressIndicator()
progressIndicator.isIndeterminate = true
progressIndicator.style = .spinning
progressIndicator.startAnimation(nil)