How to use SurveyMonkey in React Native
Issue #521
1 |
|
1 |
|
1 | // @flow |
Issue #521
1 |
|
1 |
|
1 | // @flow |
Issue #476
React Native comes with a default React library, and most CocoaPods libraries for React Native has React as a dependency pod, which causes the conflict
Issue #279
Original post https://medium.com/fantageek/what-is-create-react-native-app-9f3bc5a6c2a3
As someone who comes to React Native from iOS and Android background, I like React and Javascript as much as I like Swift and Kotlin. React Native is a cool concept, but things that sound good in theory may not work well in practice.
Up until now, I still don’t get why big companies choose React Native over native ones, as in the end what we do is to deliver good experience to the end user, not the easy development for developers. I have seen companies saying goodbye to React Native and people saying that React Native is just React philosophy learn once, write anywhere, that they choose React Native mainly for the React style, not for cross platform development. But the fact can’t be denied that people choose React Native mostly for cross platform development. Write once, deploy many places is so compelling. We still of course need to tweak a bit for each platform, but most of the code is reuse.
I have to confess that I myself spend less time developing than digging into compiling and bundling issues. Nothing comes for free. To be successful with React Native, not only we need strong understanding on both iOS and Android, but also ready to step into solving issues. We can’t just open issues, pray and wait and hope someone solves it. We can’t just use other dependencies blindly and call it a day. A trivial bug can be super hard to fix in React Native, and our projects can’t wait. Big companies have, of course, enough resource to solve issues, but for small teams, React Native is a trade off decision to consider.
Enough about that. Let’s go to official React Native getting started guide. It recommend create-react-native-app. As someone who made electron.js apps and used create-react-app, I choose create-react-native-app right away, as I think it is the equivalent in terms of creating React Native apps. I know there is react-native init and though that it must have some problems, otherwise people don’t introduce create-react-native-app.
After playing with create-react-native-app and eject, and after that read carefully through its caveats, I know it’s time to use just react-native init . In the end I just need a quick way to bootstrap React Native app with enough tooling (Babel, JSX, Hot reloading), however create-react-native-app is just a limited experience in Expo with opinionated services like Expo push notification docs.expo.io/versions/latest/guides/push-notifications.html and connectivity to Google Cloud Platform and AWS. I know every thing has its use case, but in this case it’s not the tool for me. Dependencies are the root of all evils, and React Native already has a lot, I don’t want more unnecessary things.
The concept of Expo is actually nice, in that it allows newbie to step into React Native fast with recommended tooling already set up, and the ability to reject later. It also useful in sharing Snack to help reproduce issues. But the name of the repo create-react-native-app is a bit misleading.
Maybe it’s just me, or …
dev.to/kylessg/ive-released-over-100-apps-in-react-native-since-2015-ask-me-anything-1m9g
No, I would never use Expo for a serious project. I imagine what ends up happening in most projects is they reach a point where they have to ultimately eject the app (e.g. needing a native module) which sounds very painful.
dev.to/gaserd/why-i-do-not-use-expo-for-react-native-dont-panic-1bp
If you use EXPO, you use wrapper-wrapper.
hackernoon.com/understanding-expo-for-react-native-7bf23054bbcd
Expo is a great tool for getting started quickly with React Native. However, it’s not always something that can get you to the finish line. From what I’ve seen, the Expo team is making a lot of great decisions with their product roadmap. But their rapid pace of development has often led to bugs in new features.
docs.expo.io/versions/latest/introduction/why-not-expo
JS and assets managed by Expo require connectivity to Google Cloud Platform and AWS
http://www.albertgao.xyz/2018/05/30/24-tips-for-react-native-you-probably-want-to-know
If you are coming from web world, you need to know that create-react-native-app is not the create-react-app equivalent
But if you want more control over your project, something like tweaking your react native Android and iOS project, I highly suggest you use the official react-native-cli. Still, one simple command, react-native init ProjectName, and you are good to go.
medium.com/@paulsc/react-native-first-impressions-expo-vs-native-9565cce44c92
I wish I would have used “Native” from the get go, instead I wasted quite a bit of time with Expo
Maybe the biggest one for me is that the whole thing feels like adding another layer of indirection and complexity to an already complicated stack
I wish Expo would get removed from the react-native Getting Started guide to avoid confusing new arrivals
levelup.gitconnected.com/how-i-ditched-expo-for-pure-react-native-fc0375361307
The Expo dev team did a lot of good stuff there, and they are all doing it for free, so I definitely want to thank all of them for providing a smoother entrance to this world. If they ever manage to solve this issue of custom native code somehow, it may become my platform of choice again.
https://medium.com/@aswinmohanme/how-i-reduced-the-size-of-my-react-native-app-by-86-27be72bba640
I love everything about Expo except the size of the binaries. Each binary weighs around 25 MB regardless of your app.
So the first thing I did was to migrate my existing Expo app to React Native.
If you are new to React Native and you think this is the “must” way to go. Check if it meets your needs first.
If you are planning to use third party RN packages that have custom native modules. Expo does not support this functionality and in that case, you will have to eject Expo-Kit. In my opinion, if you are going to eject any kit, don’t use it in the first place. It will probably make things harder than if you hadn’t used the kit at all.
Issue #277
Original post https://codeburst.io/using-bitrise-ci-for-react-native-apps-b9e7b2722fe5
After trying Travis, CircleCI and BuddyBuild, I now choose Bitrise for my mobile applications. The many cool steps and workflows make Bitrise an ideal CI to try. Like any other CIs, the learning steps and configurations can be intimidating at first. Things that work locally can fail on CI, and how to send things that are marked as git ignore to be used in CI builds are popular issues.
In this post I will show how to deploy React Native apps for both iOS and Android. The key thing to remember is to have the same setup on CI as you have locally. They are to ensure exact same versions for packages and tools, to be aware of file patterns in gitignore as those changes won’t be there on CI, and how to property use environment variables and secured files.
This post tried to be intuitive with lots of screenshots. Hope you learn something and avoid the wasted hours that I have been too.
In its simplest sense, React Native is just Javascript code with native iOS and Android projects, and Bitrise has a very good support for React Native. It scans ios and android folder, and give suggestion about scheme and build variants to build.
Another good thing about Bitrise is its various useful steps and workflows. Unlike other CIs where we have to spend days on how to property edit the configuration file, Bitrise has a pretty good UI to add and edit steps. Steps are just custom scripts, and we can write pretty much what we like. Most of the predefined steps are open source. Here are a few
Unless you use the step Build with Simulator , you will need provisioning profile and certificates with private keys in order to build for devices.
React Native moves fast and break things. If you don’t have same version of React Native, you will have hard time figuring out why the builds constantly fail on CI.
Currently I use React Native 0.57.0, so I enter install react-native@0.57.0 to let Bitrise install the same version. But normally you just need to npm install as versions should be explicitly defined in package.json file.
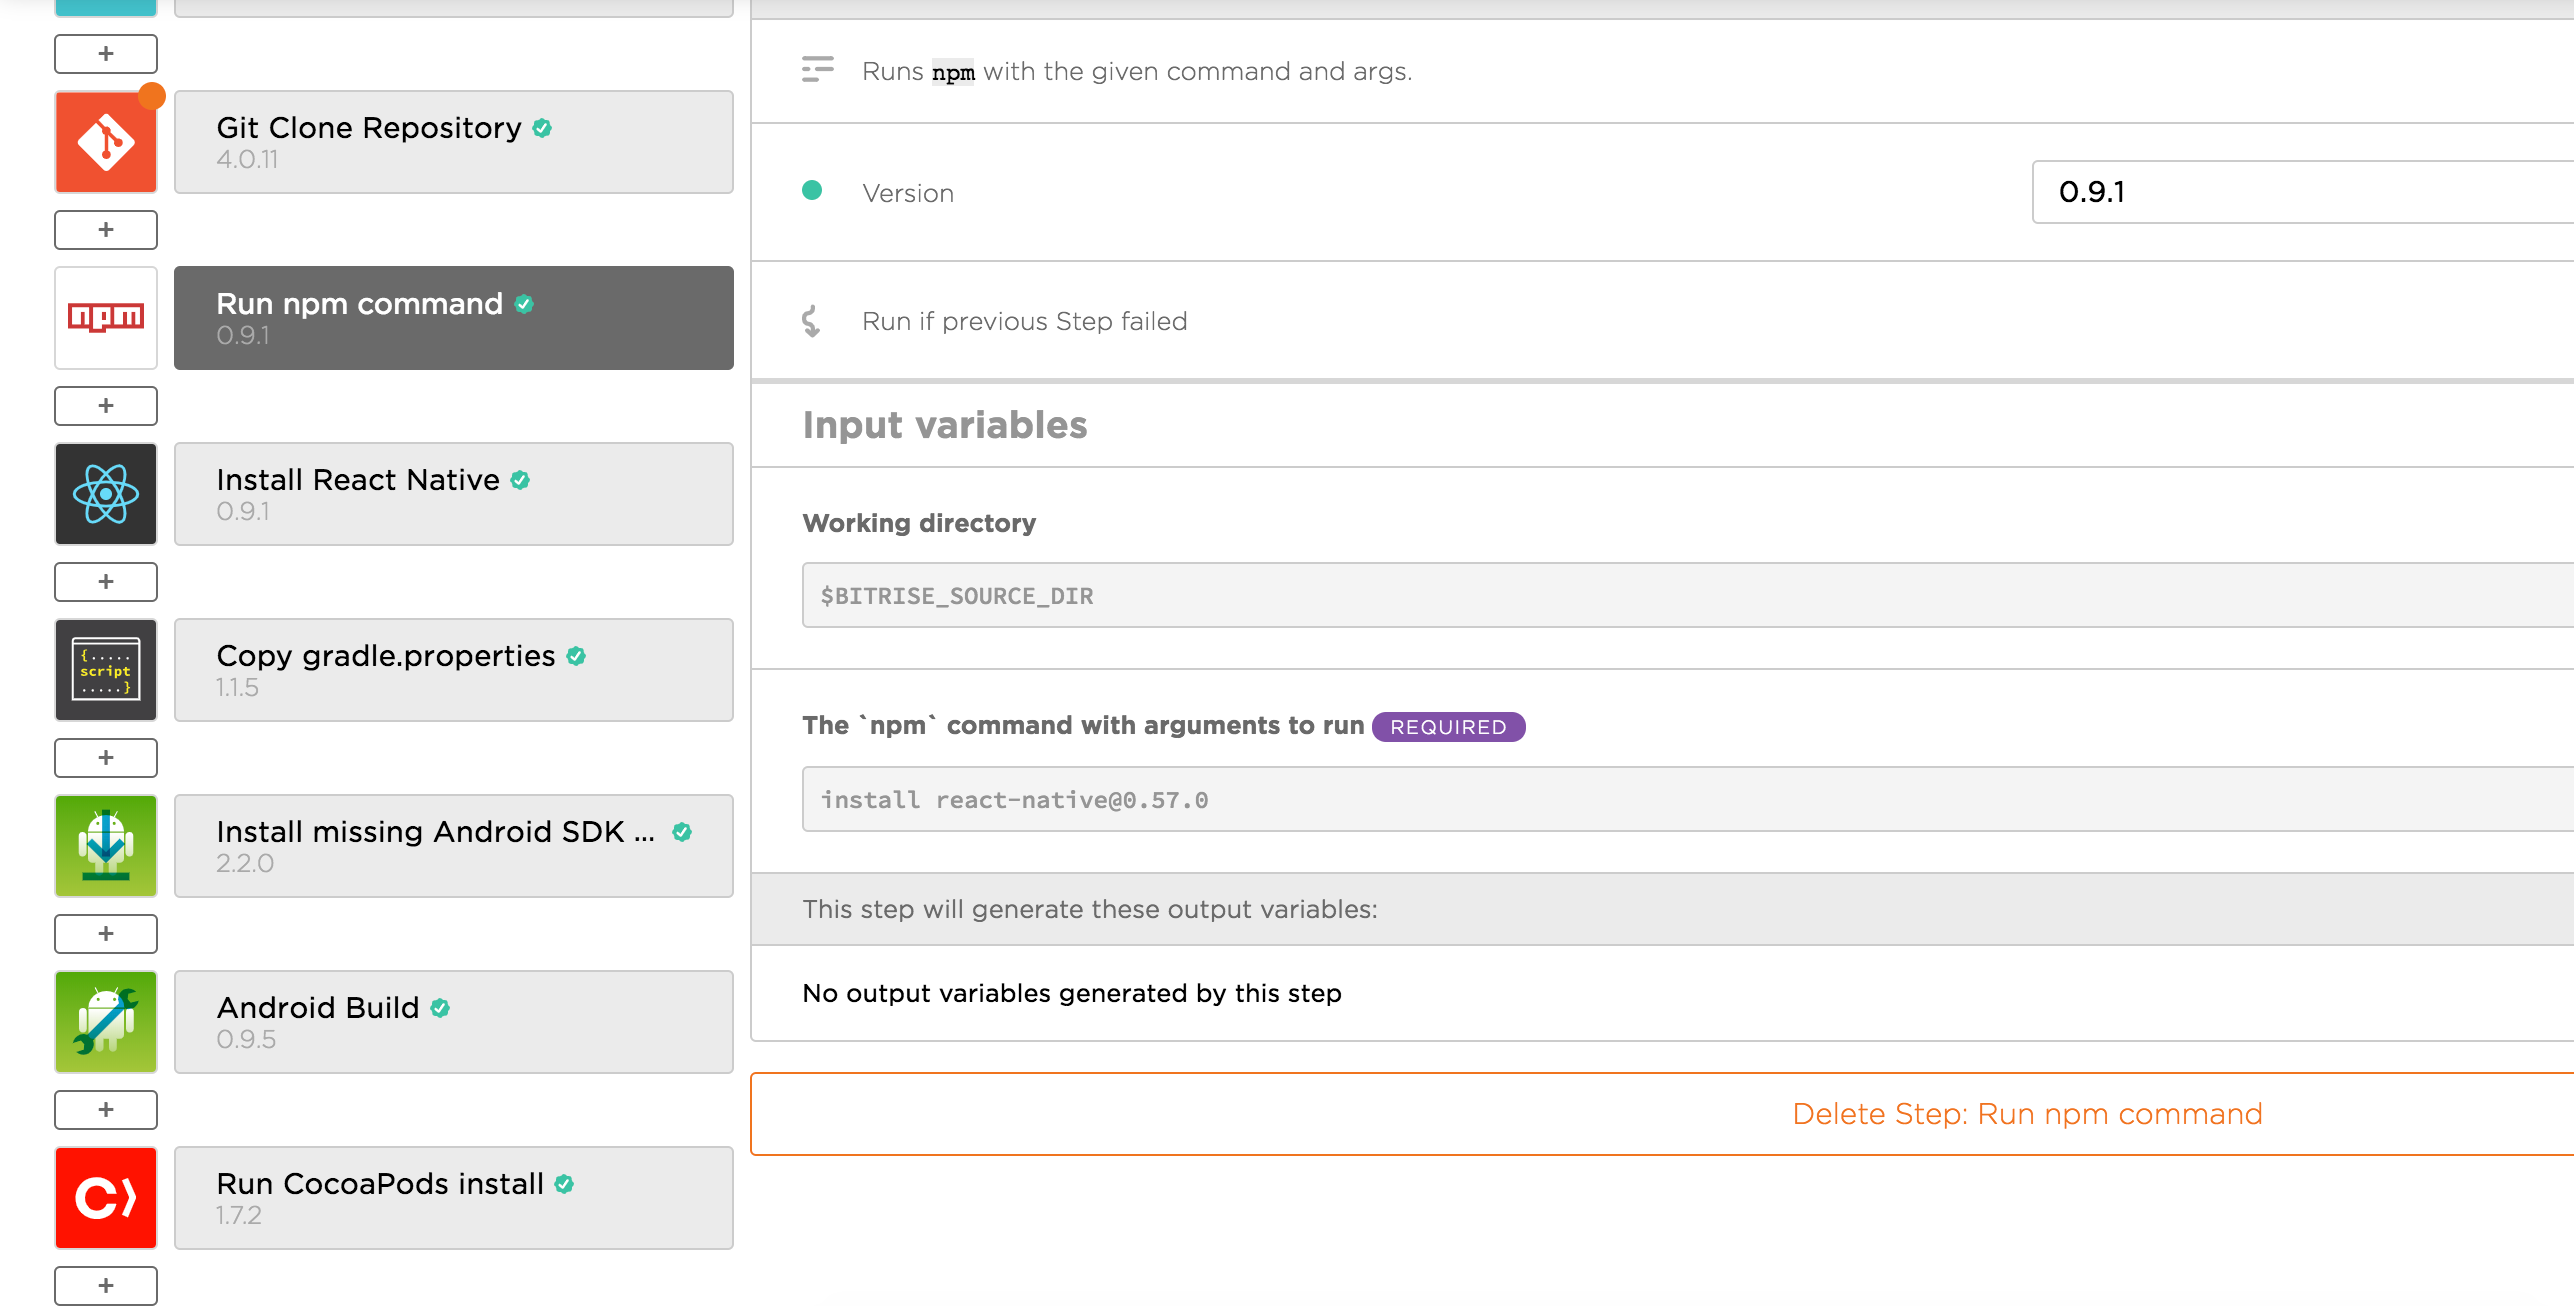
Also, we need to make sure we have the same version of react-native-cli with Install React Native step

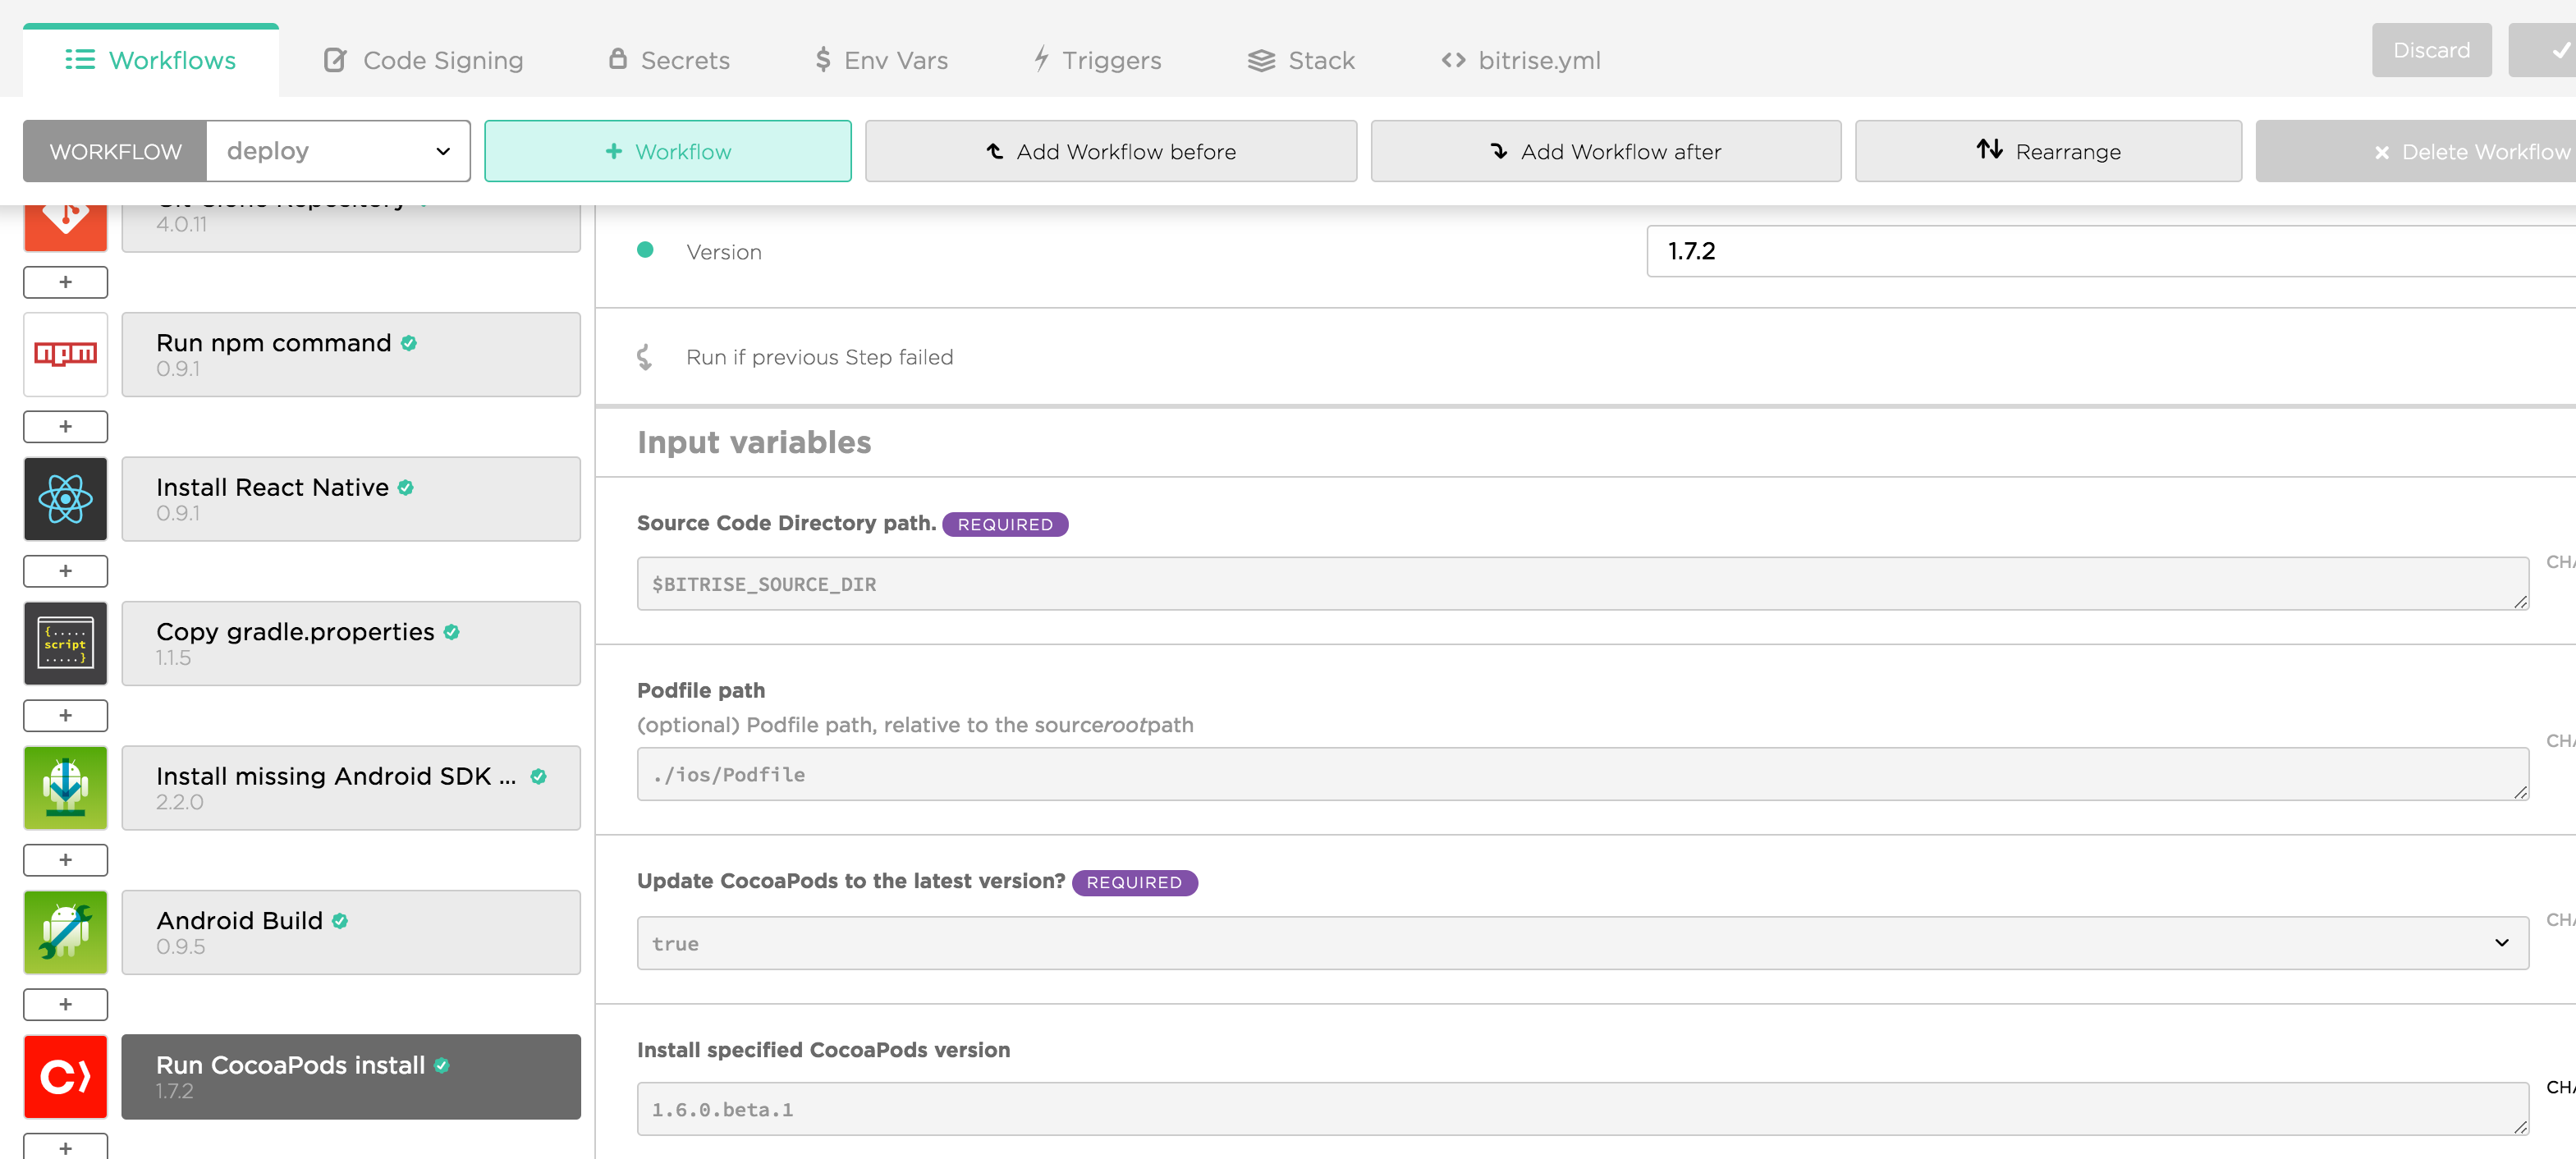
It’s safe to have the same CocoaPods version. For Xcode 10, we need at least CocoaPods 1.6.0.beta-1 to avoid the bug Skipping code signing because the target does not have an Info.plist file. Note that our Xcode project is inside ios folder, so we specify ./ios/Podfile for Podfile path
Under Workflow -> Code Signing we can upload provisioning profiles and certificates.
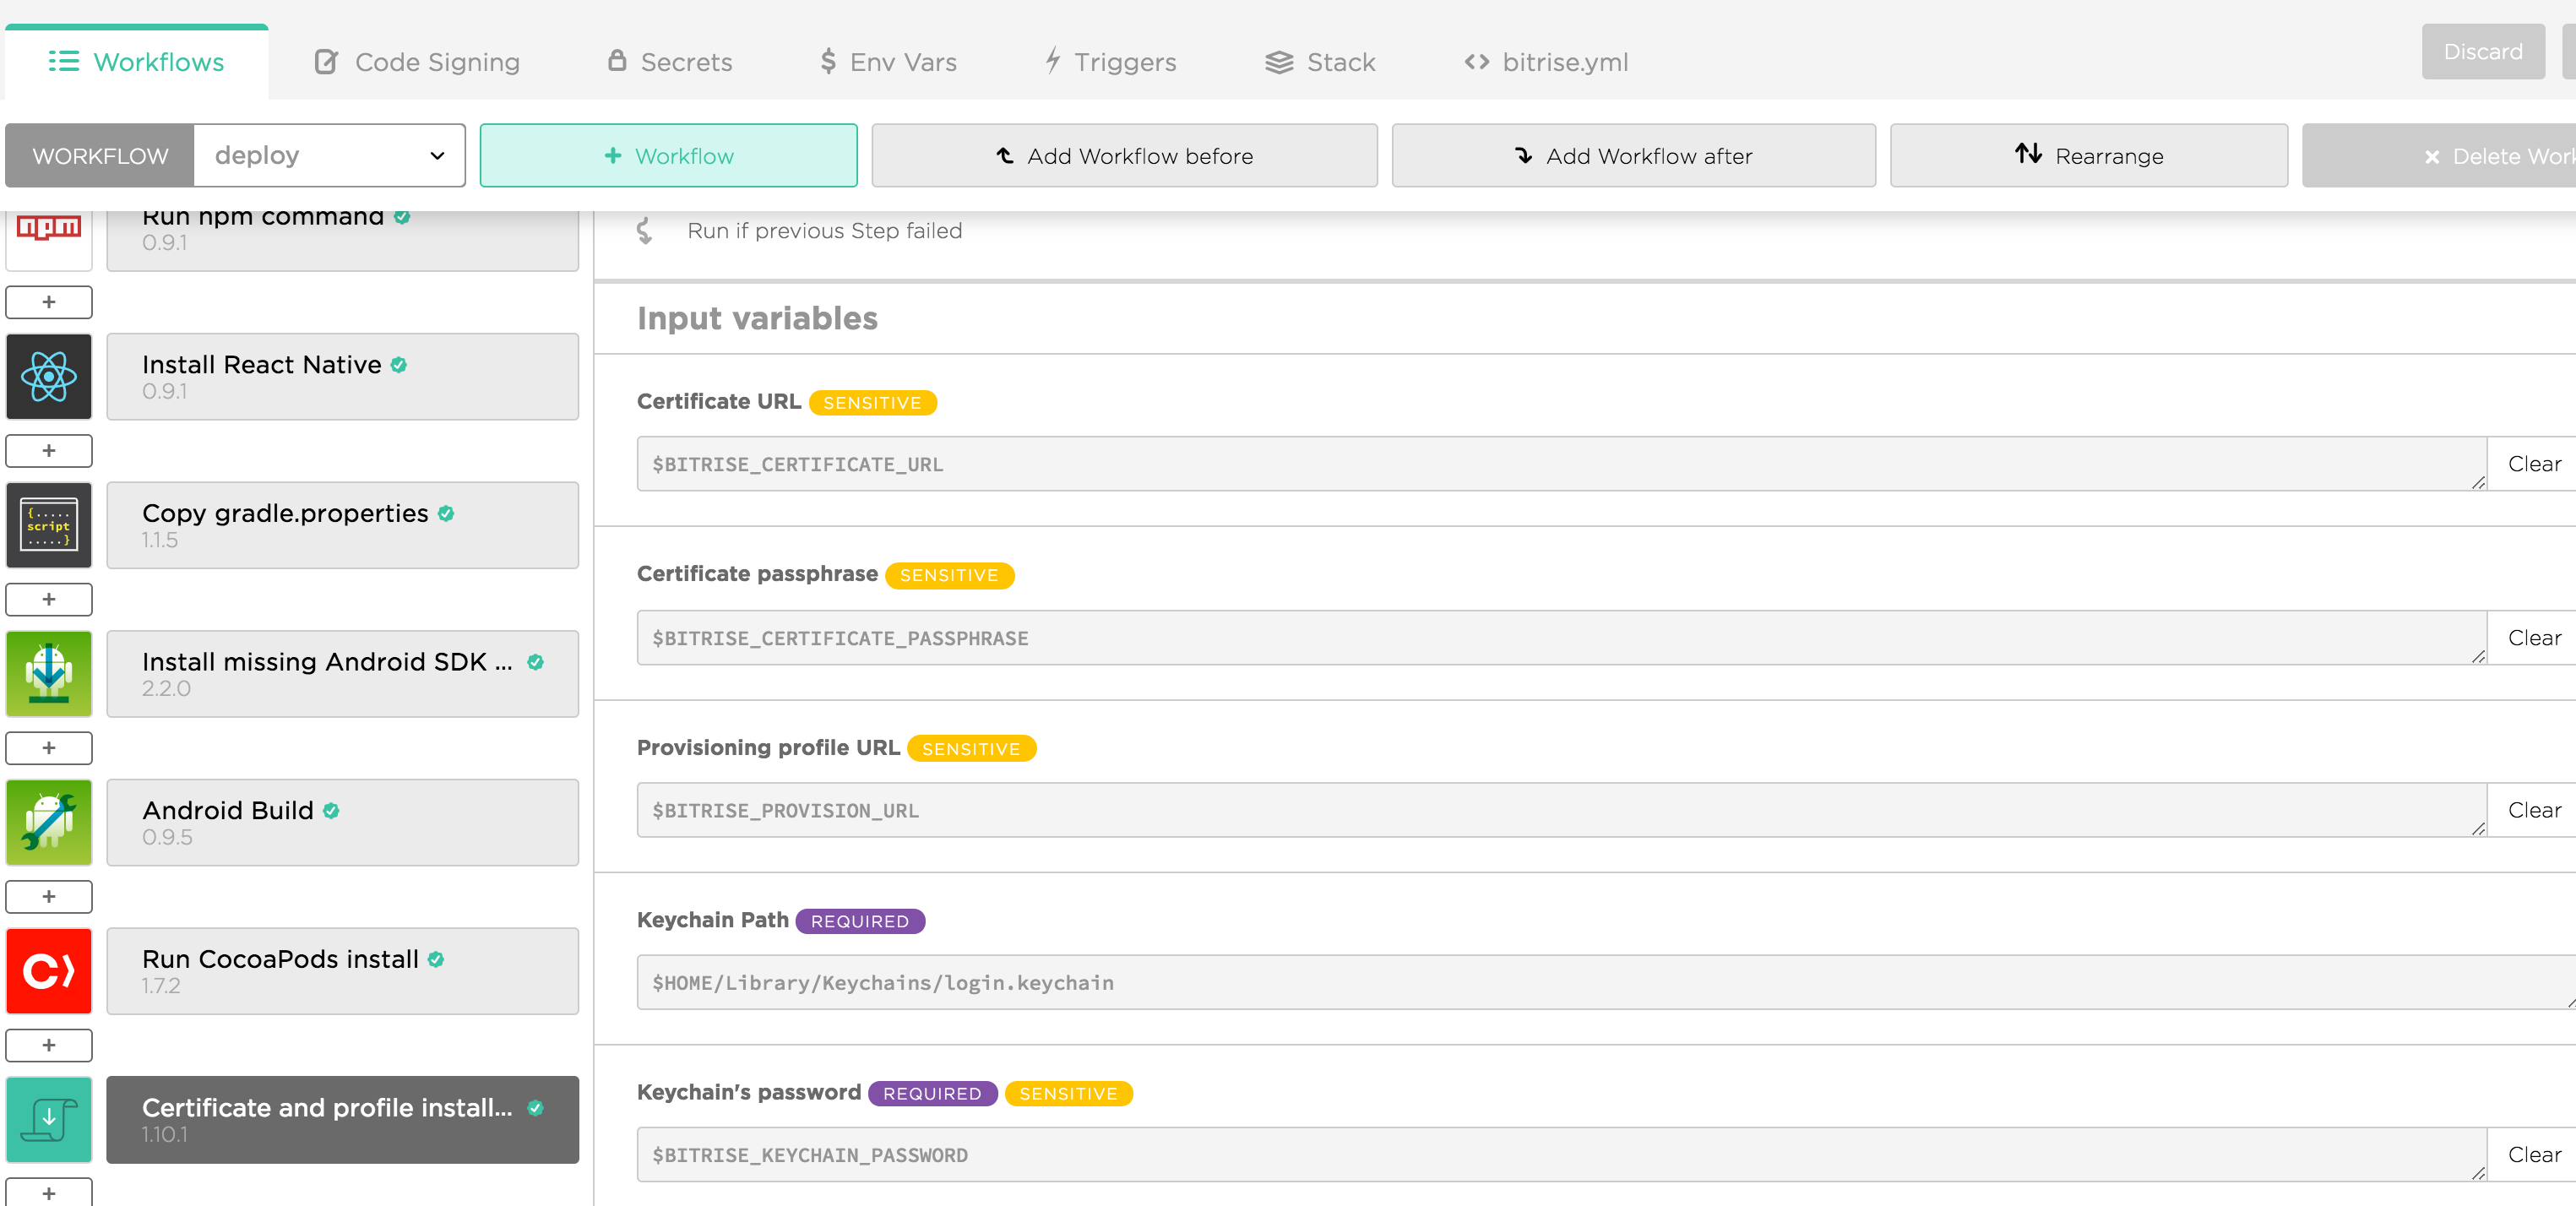
Then we need to use Certificate and profile install step to make use of the profiles and certificates we uploaded.
Another option is to use the iOS Auto Provision step, but it requires that we need to have an account in team that has connected Apple Developer Account. This way Bitrise can autogenerate profiles for us.
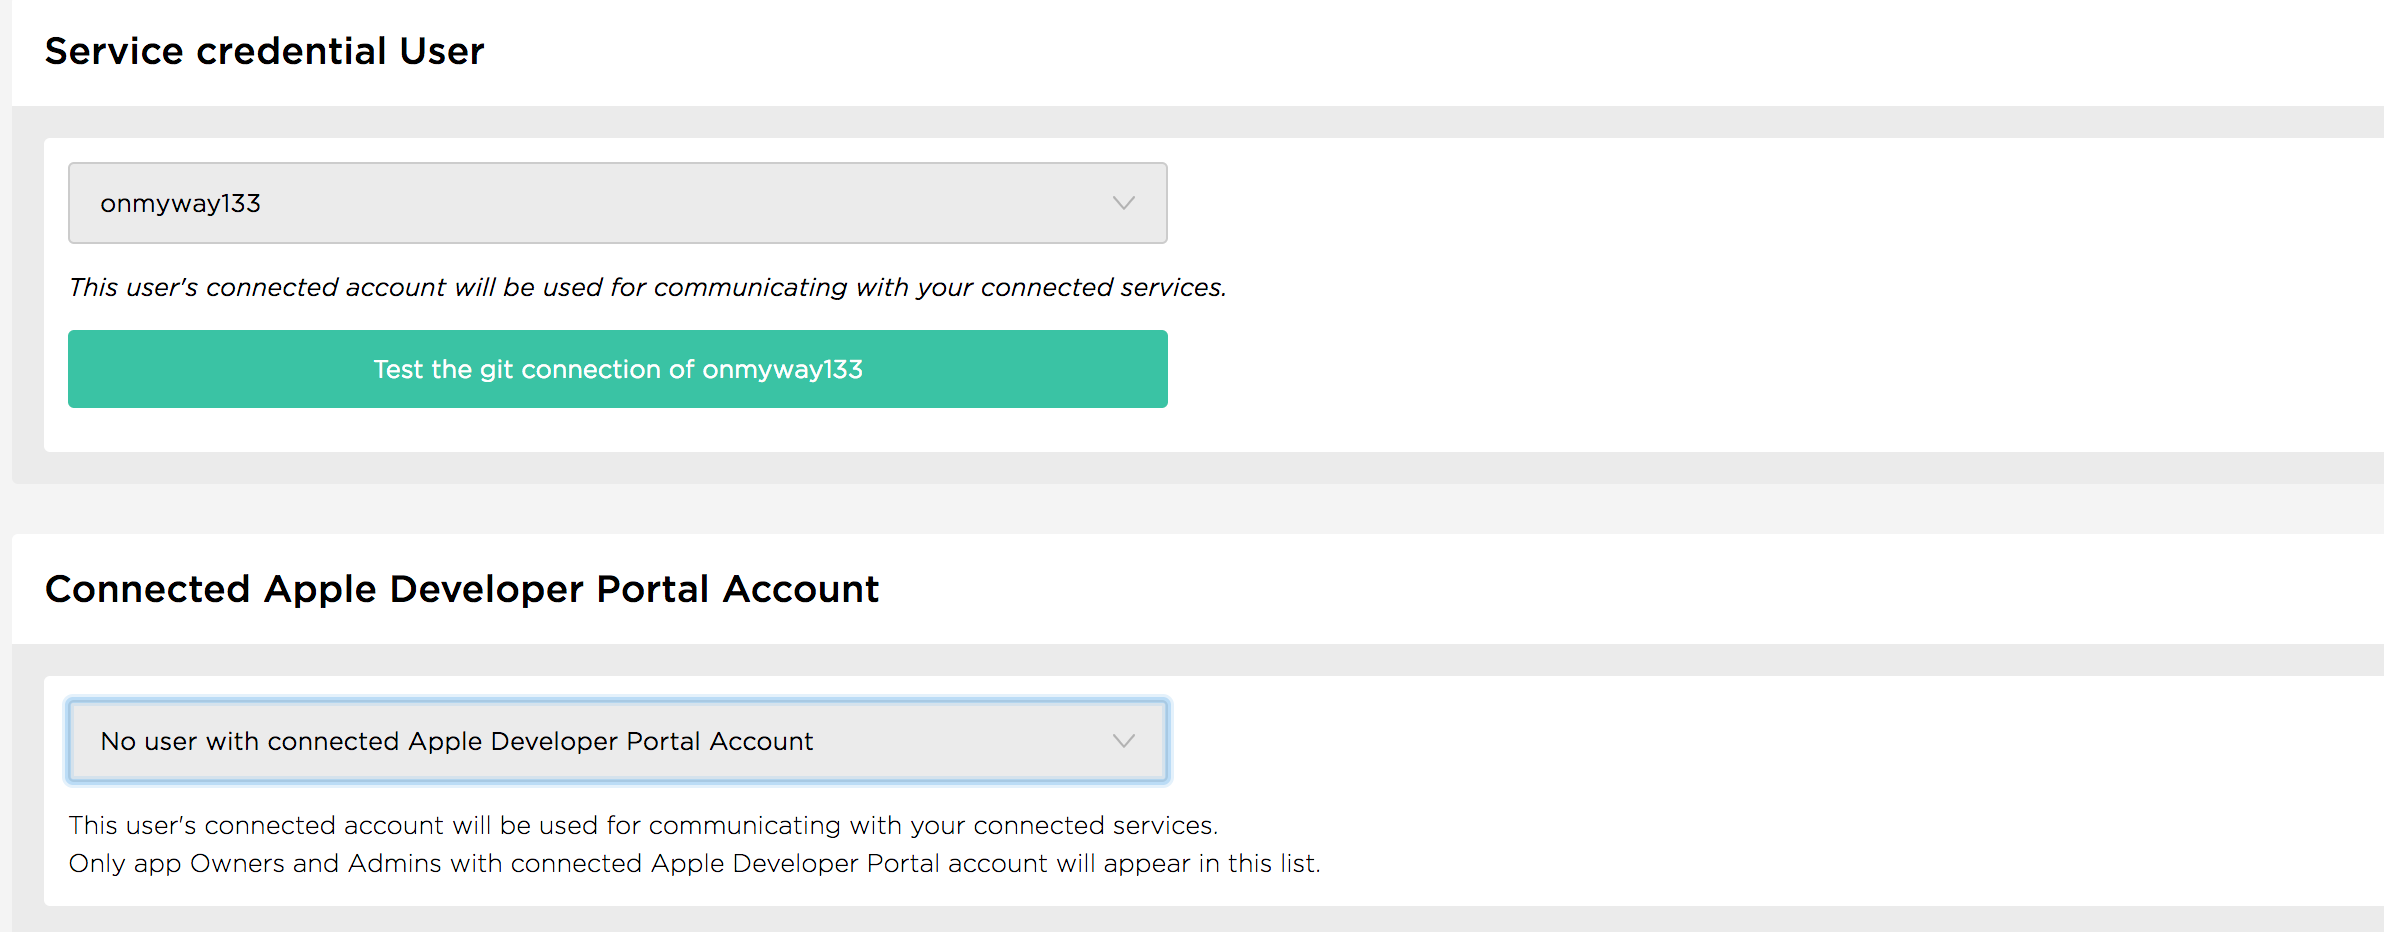
Sometimes you need to set Should the step try to generate Provisioning Profiles even if Xcode managed signing is enabled in the Xcode project? to yes
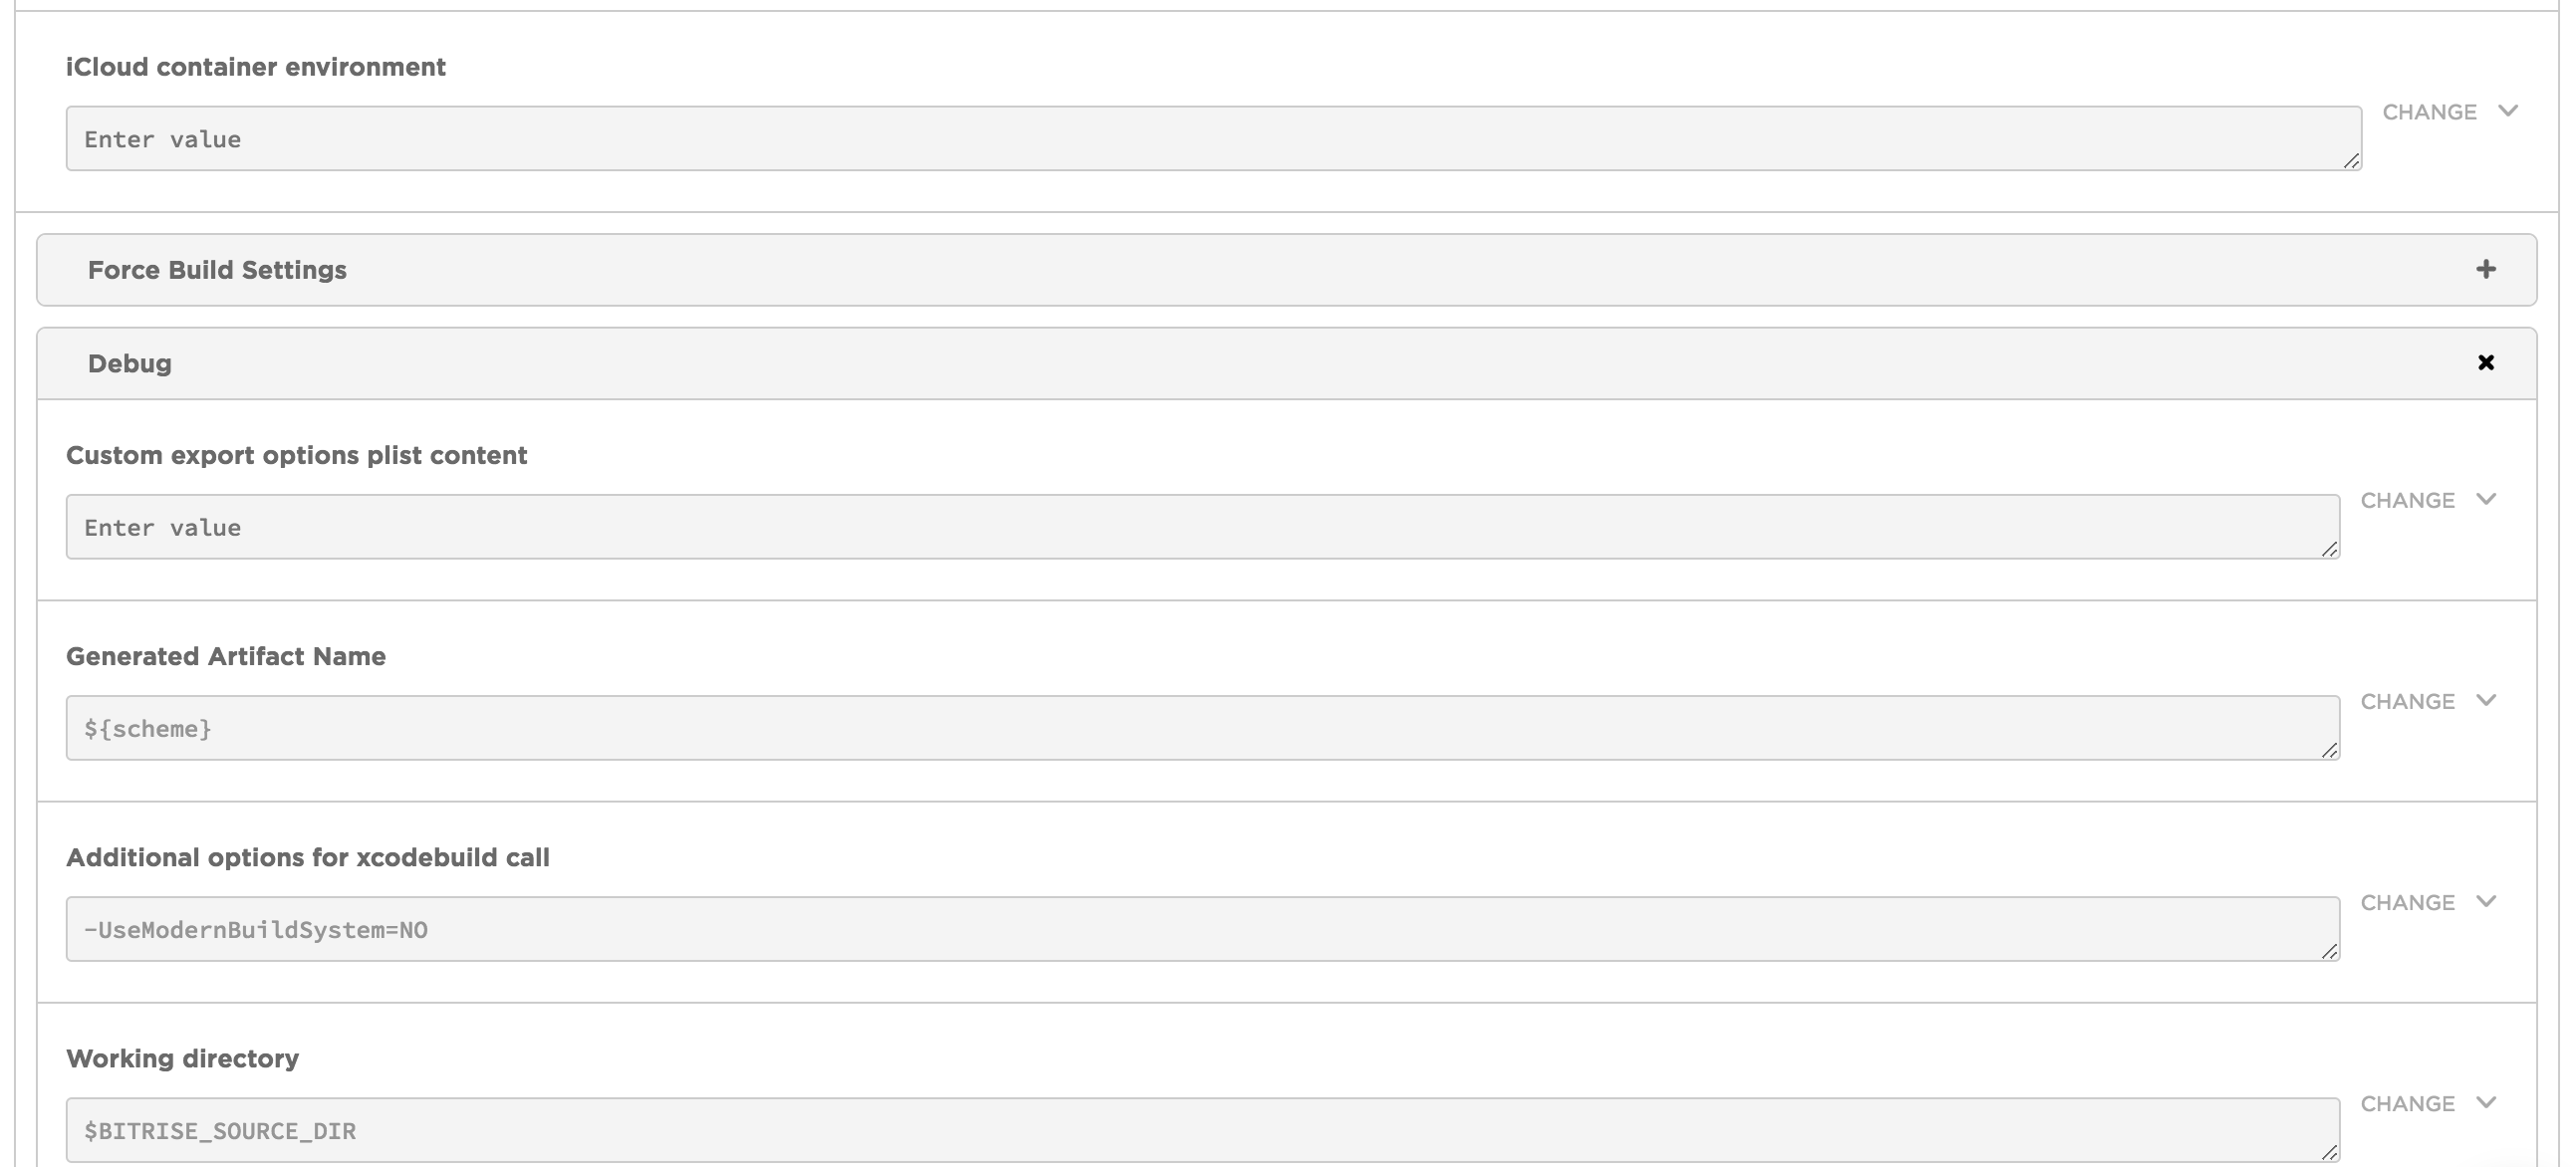
Under Xcode Archive & Export for iOS -> Debug -> Additional options for xcodebuild call We need to pass -allowProvisioningUpdates to make auto provisioning profile update happen.
Bitrise can autogenerate schemes with the Recreate user scheme step, but it’s good to mark our scheme as Shared in Xcode. This ensures consistence between local and CI builds.
To archive project, we need to add Xcode Archive & Export . For React Native, iOS project is inside ios folder, so we need to specify ./ios/MyApp.xcworkspace for Project path. Note that I use xcworkspace because I have CocoaPods
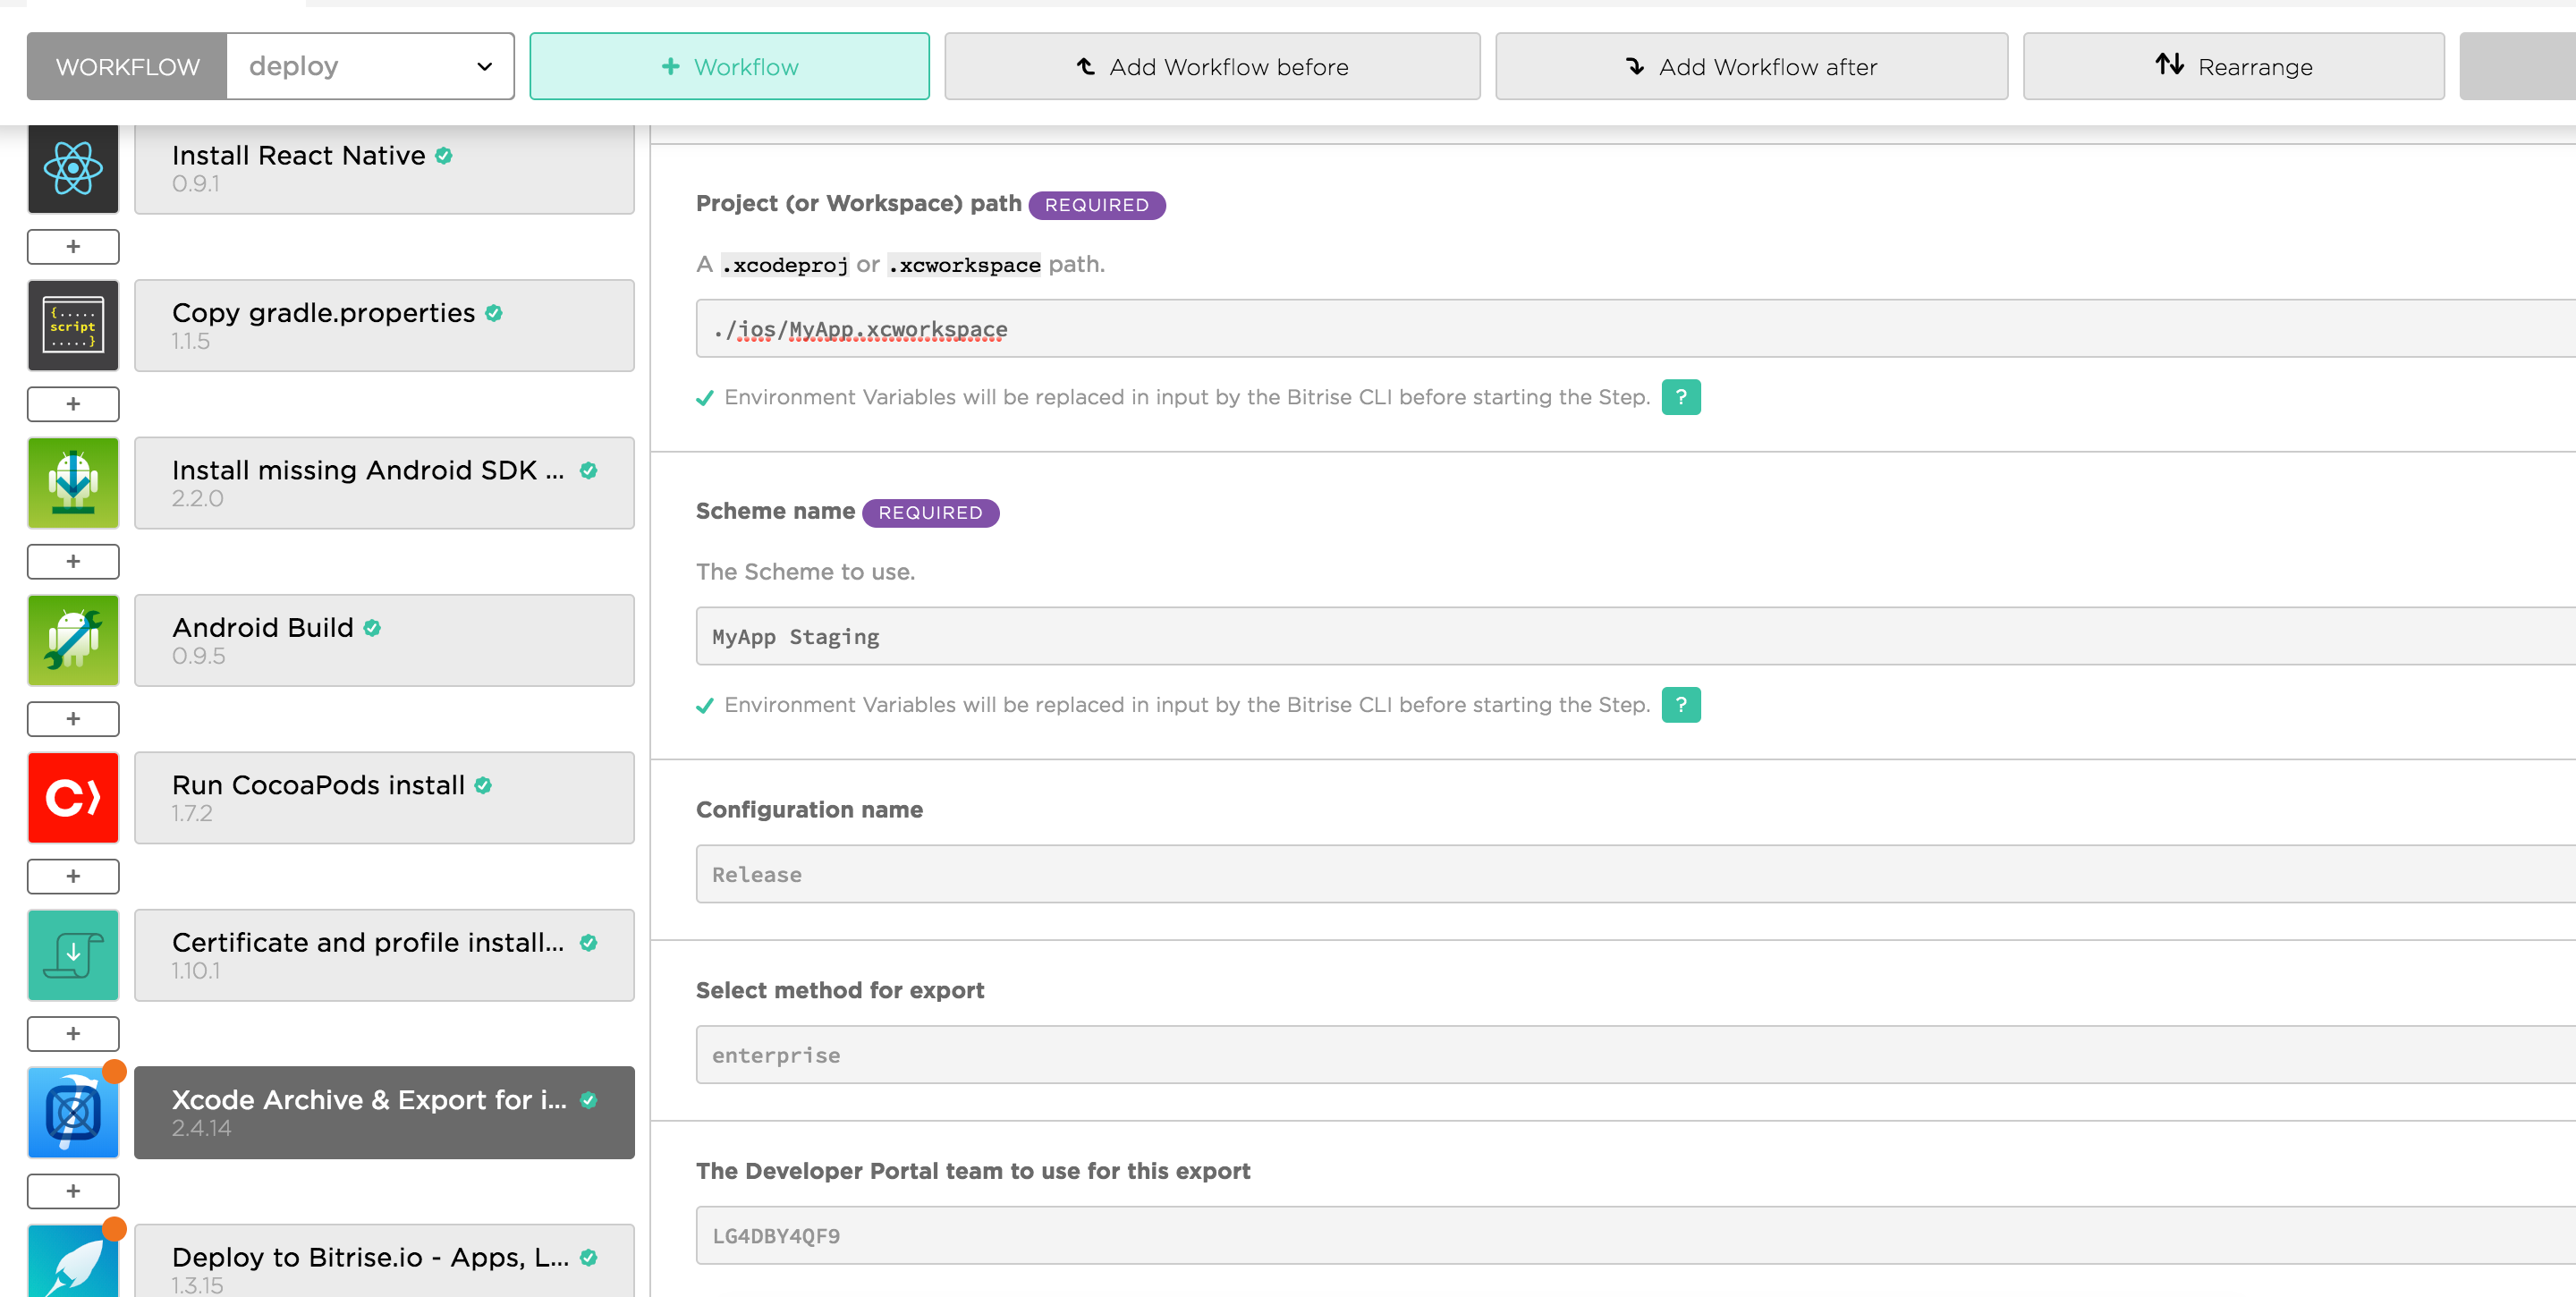
Right now, as of React Native 0.57.0, it has problem running with the new build system in Xcode 10, so the quick fix is to use legacy build system. Under Xcode Archive & Export step there are fields to add additional options for xcodebuild call. Enter -UseModernBuildSystem=NO
You can read more Build System Release Notes for Xcode 10
Xcode 10 uses a new build system. The new build system provides improved reliability and build performance, and it catches project configuration problems that the legacy build system does not.
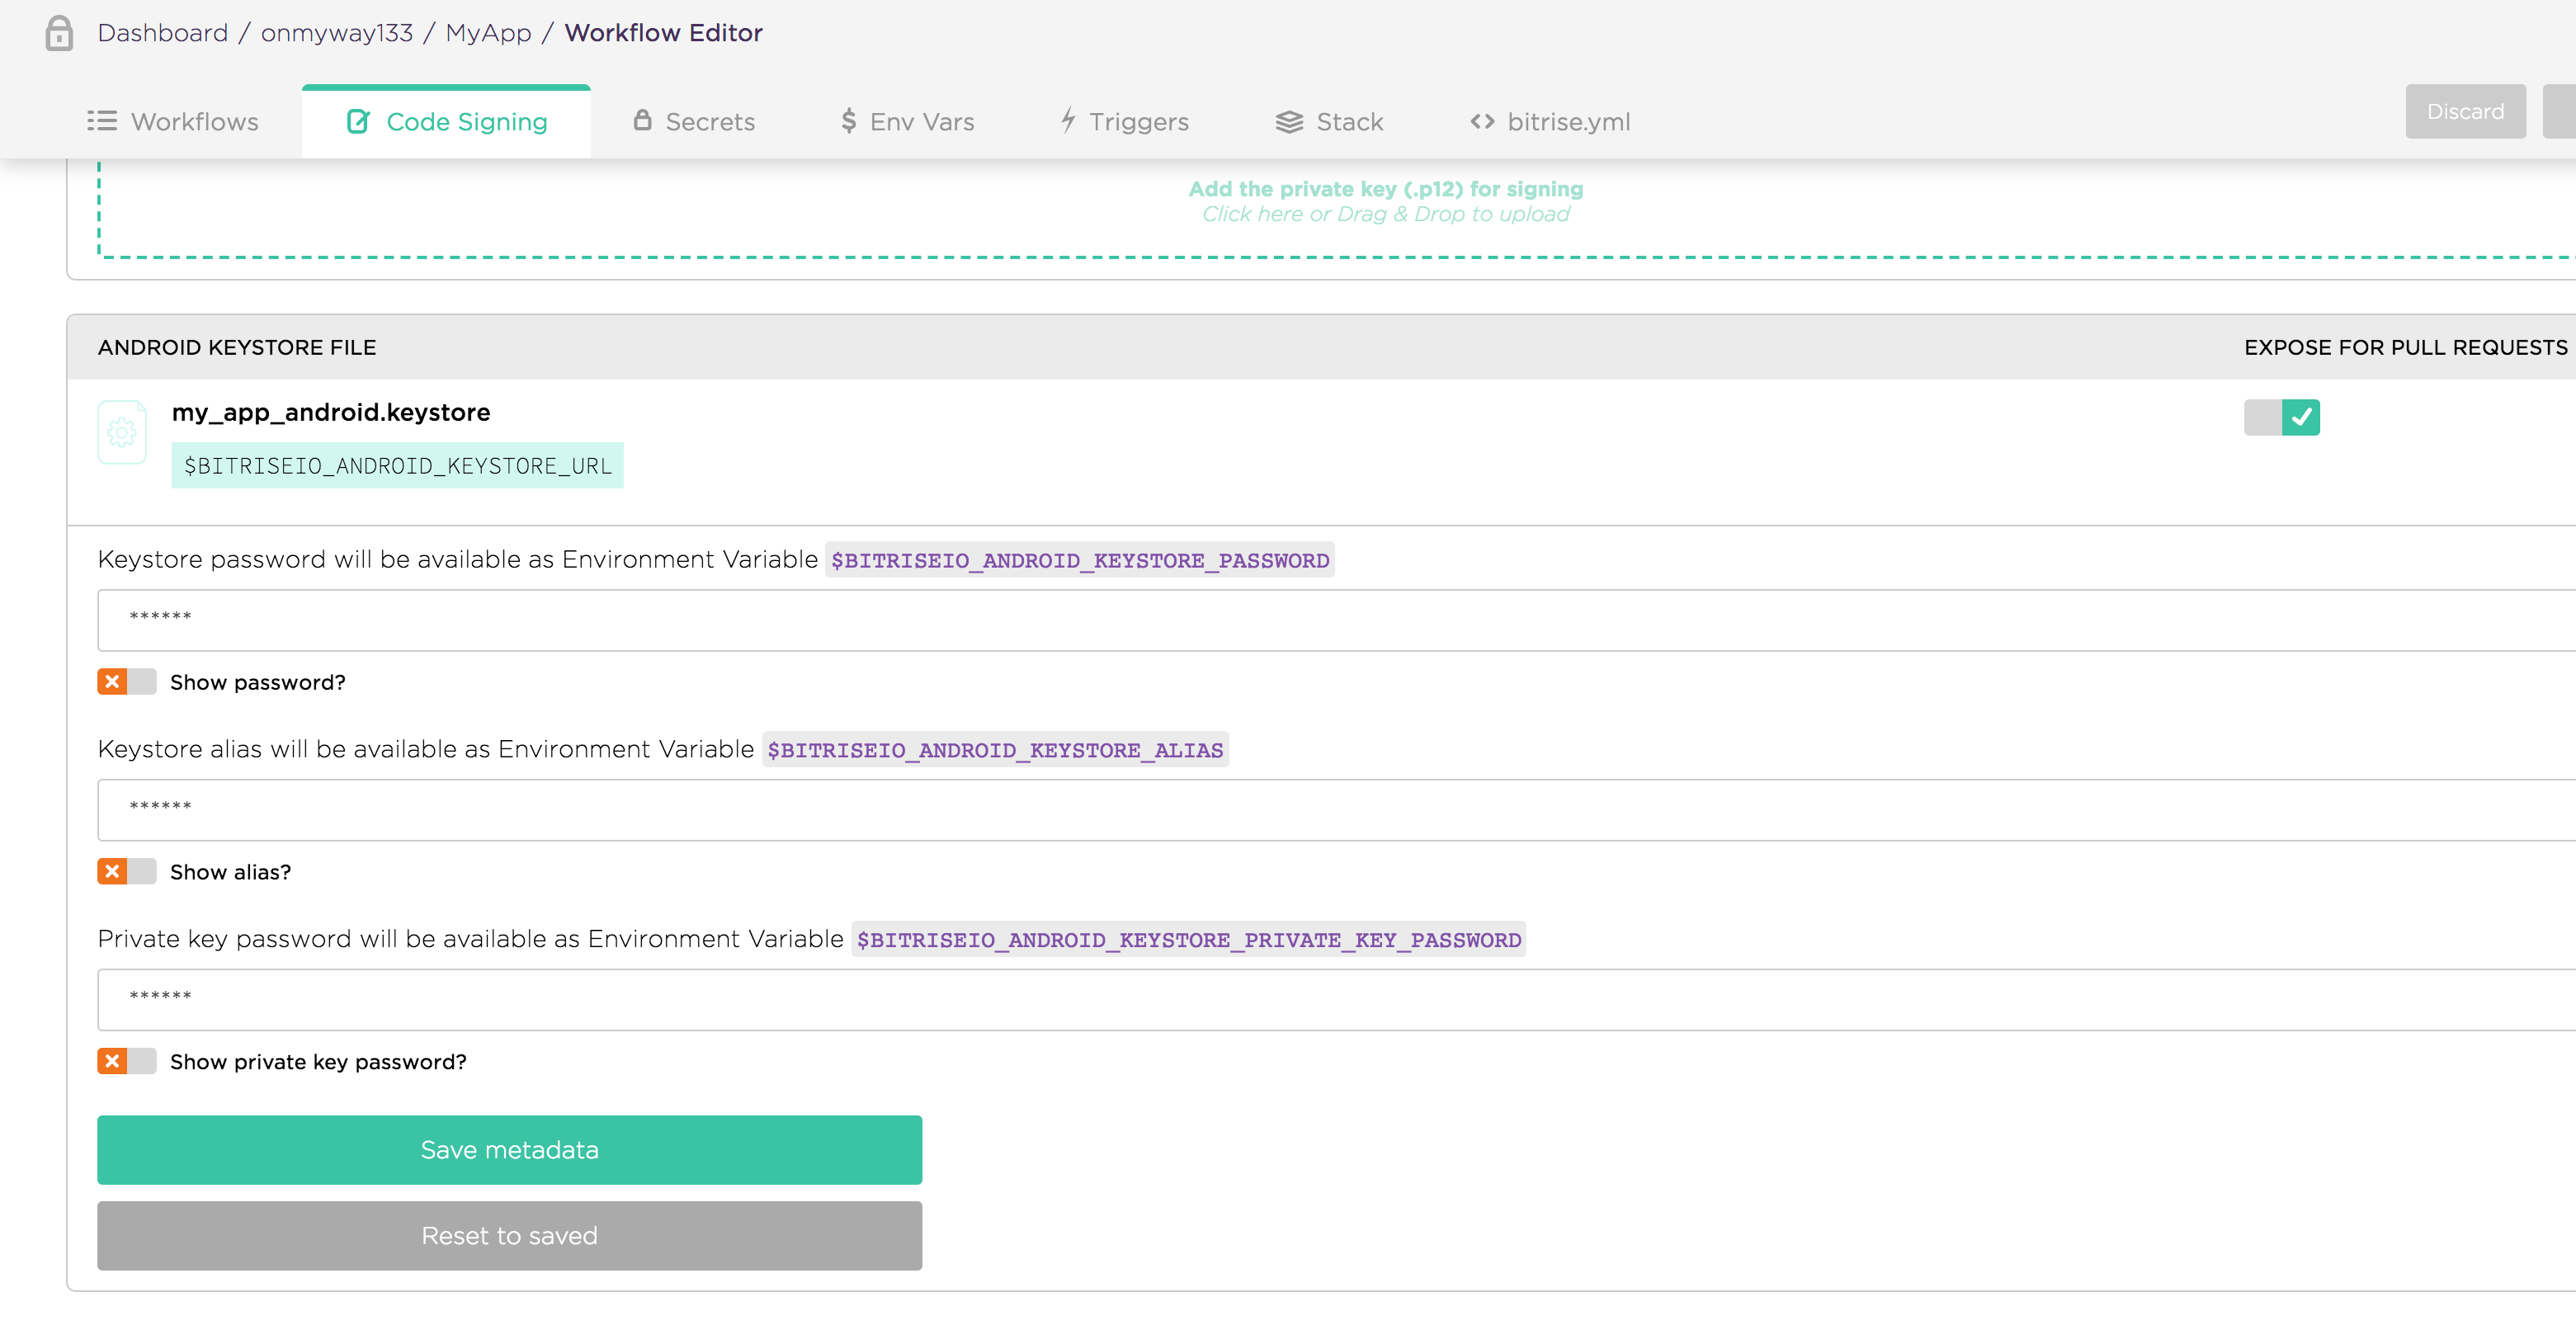
For Android, the most troublesome task is to give keystore files to Bitrise as it is something we would keep privately from GitHub. Bitrise allows us to upload keystore file, but we also need to specify key alias and key password. One solution is to use Secrets and Environment variables
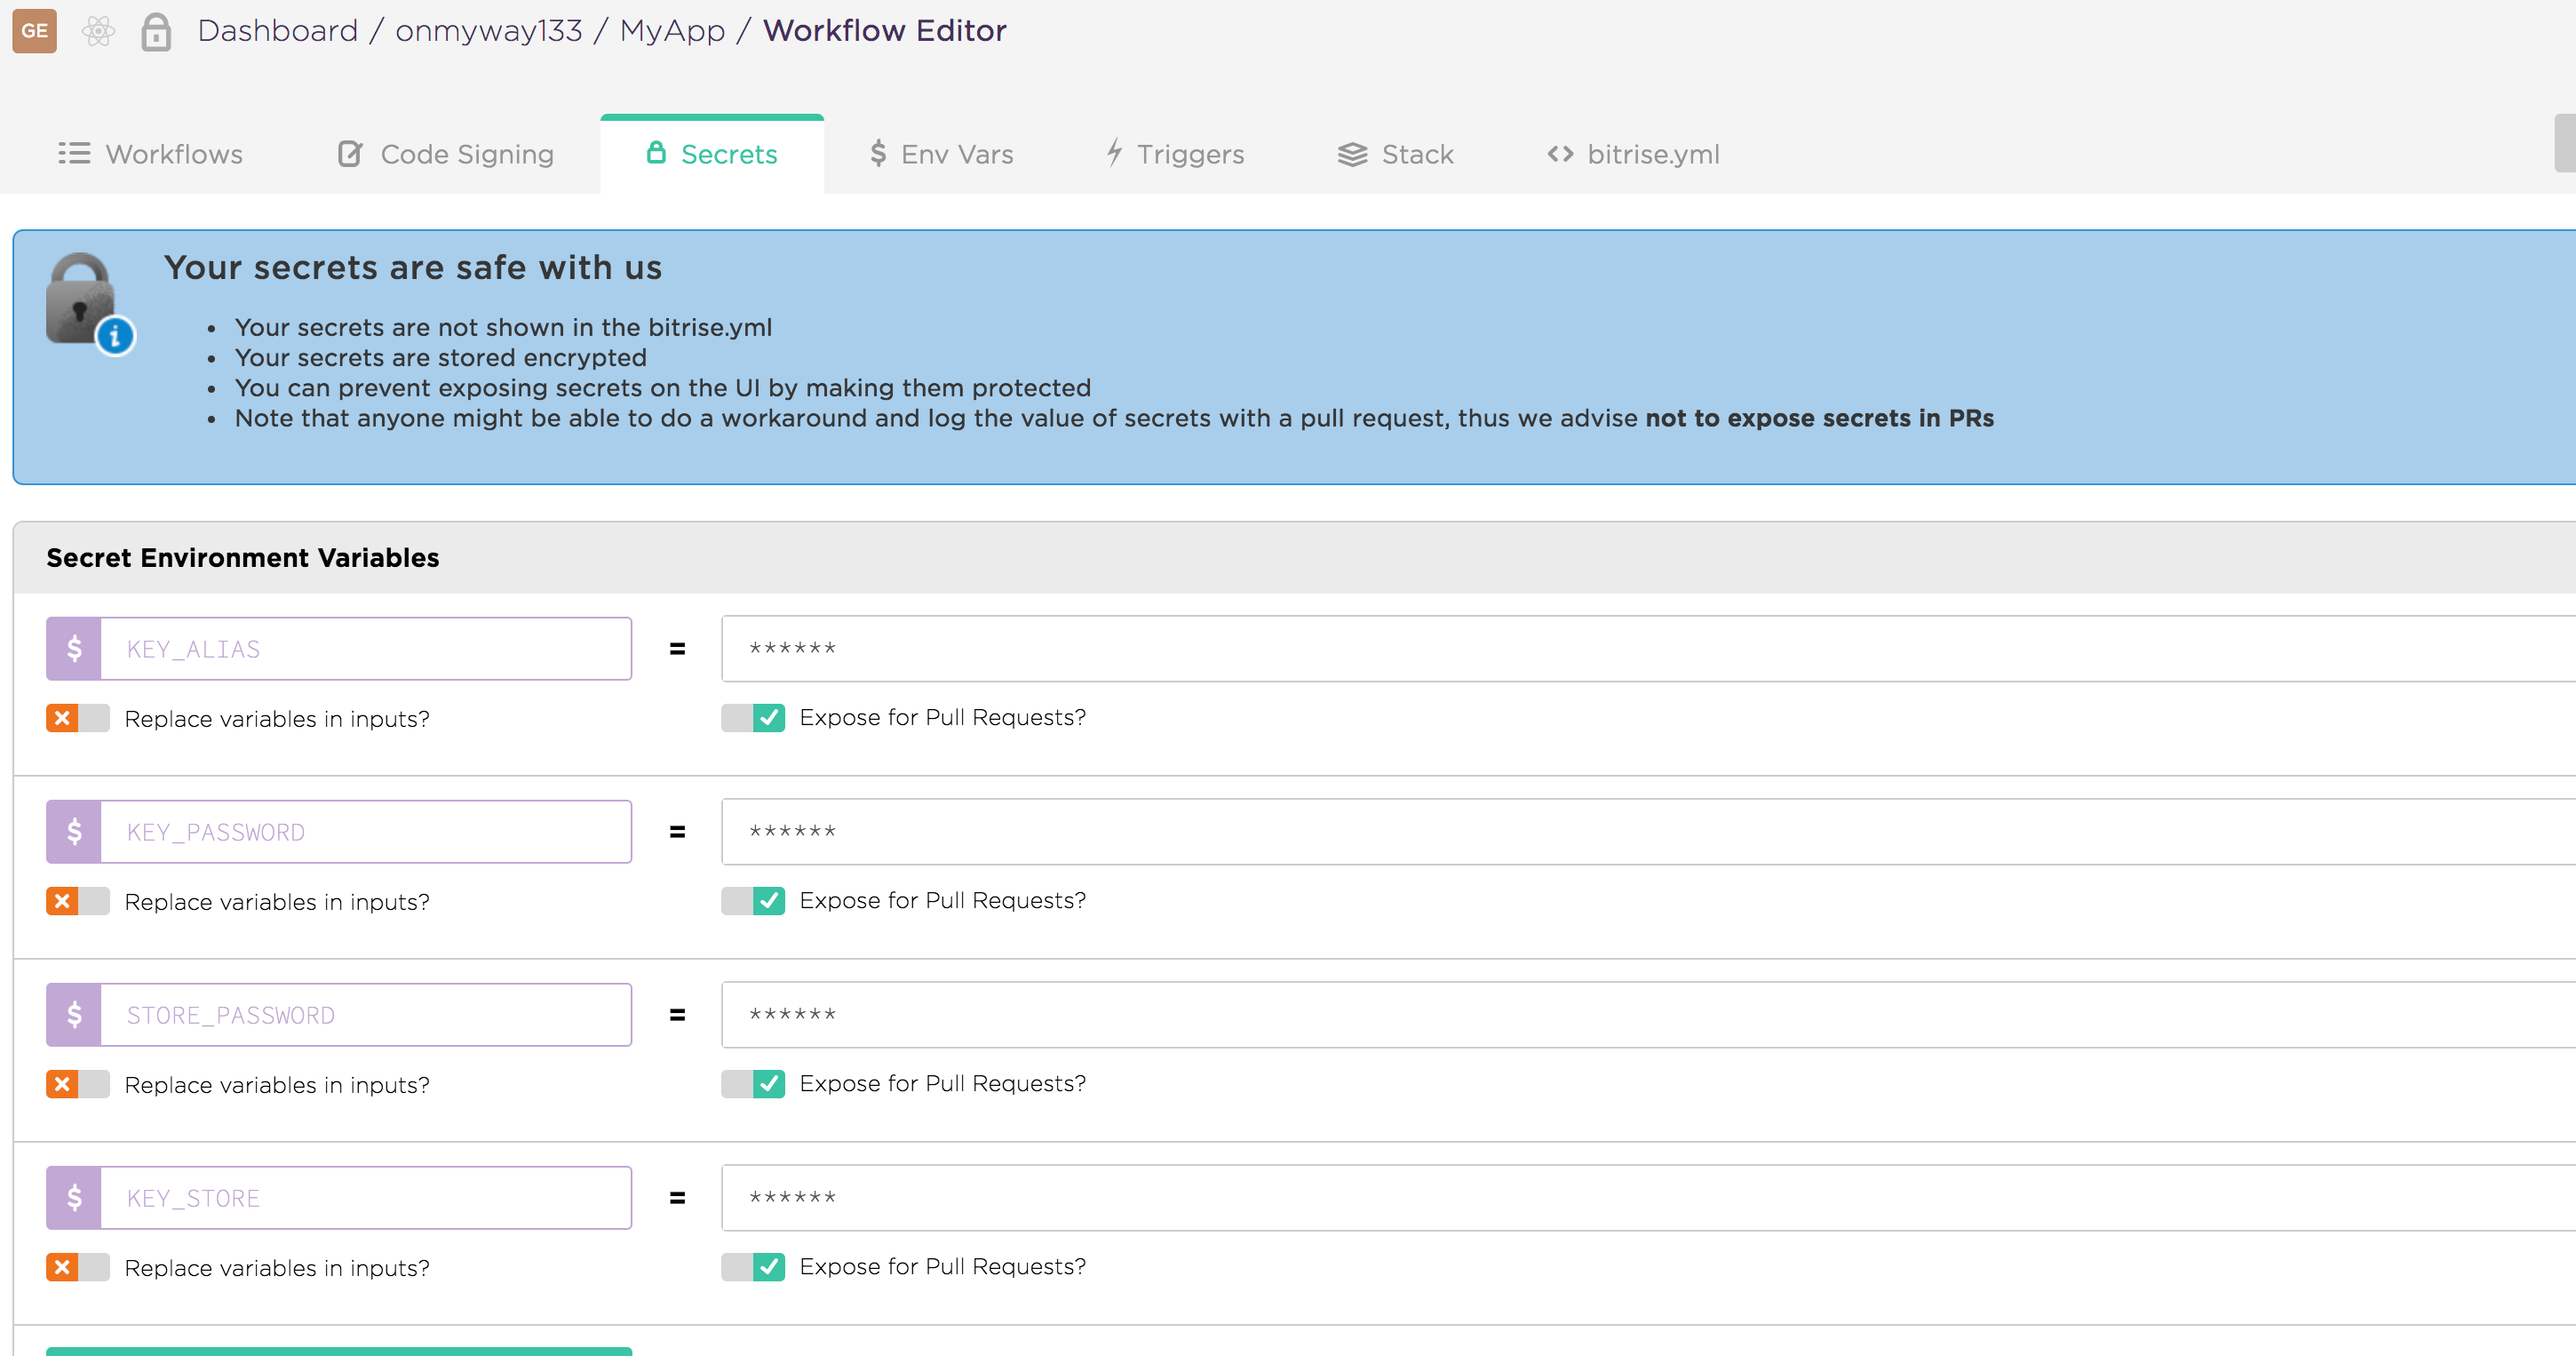
But as we often use gradle.properties to specify custom variables for Gradle, it’s convenient to upload this file. Under Workflow -> Code Signing is where we can upload keystore, as well as secured files
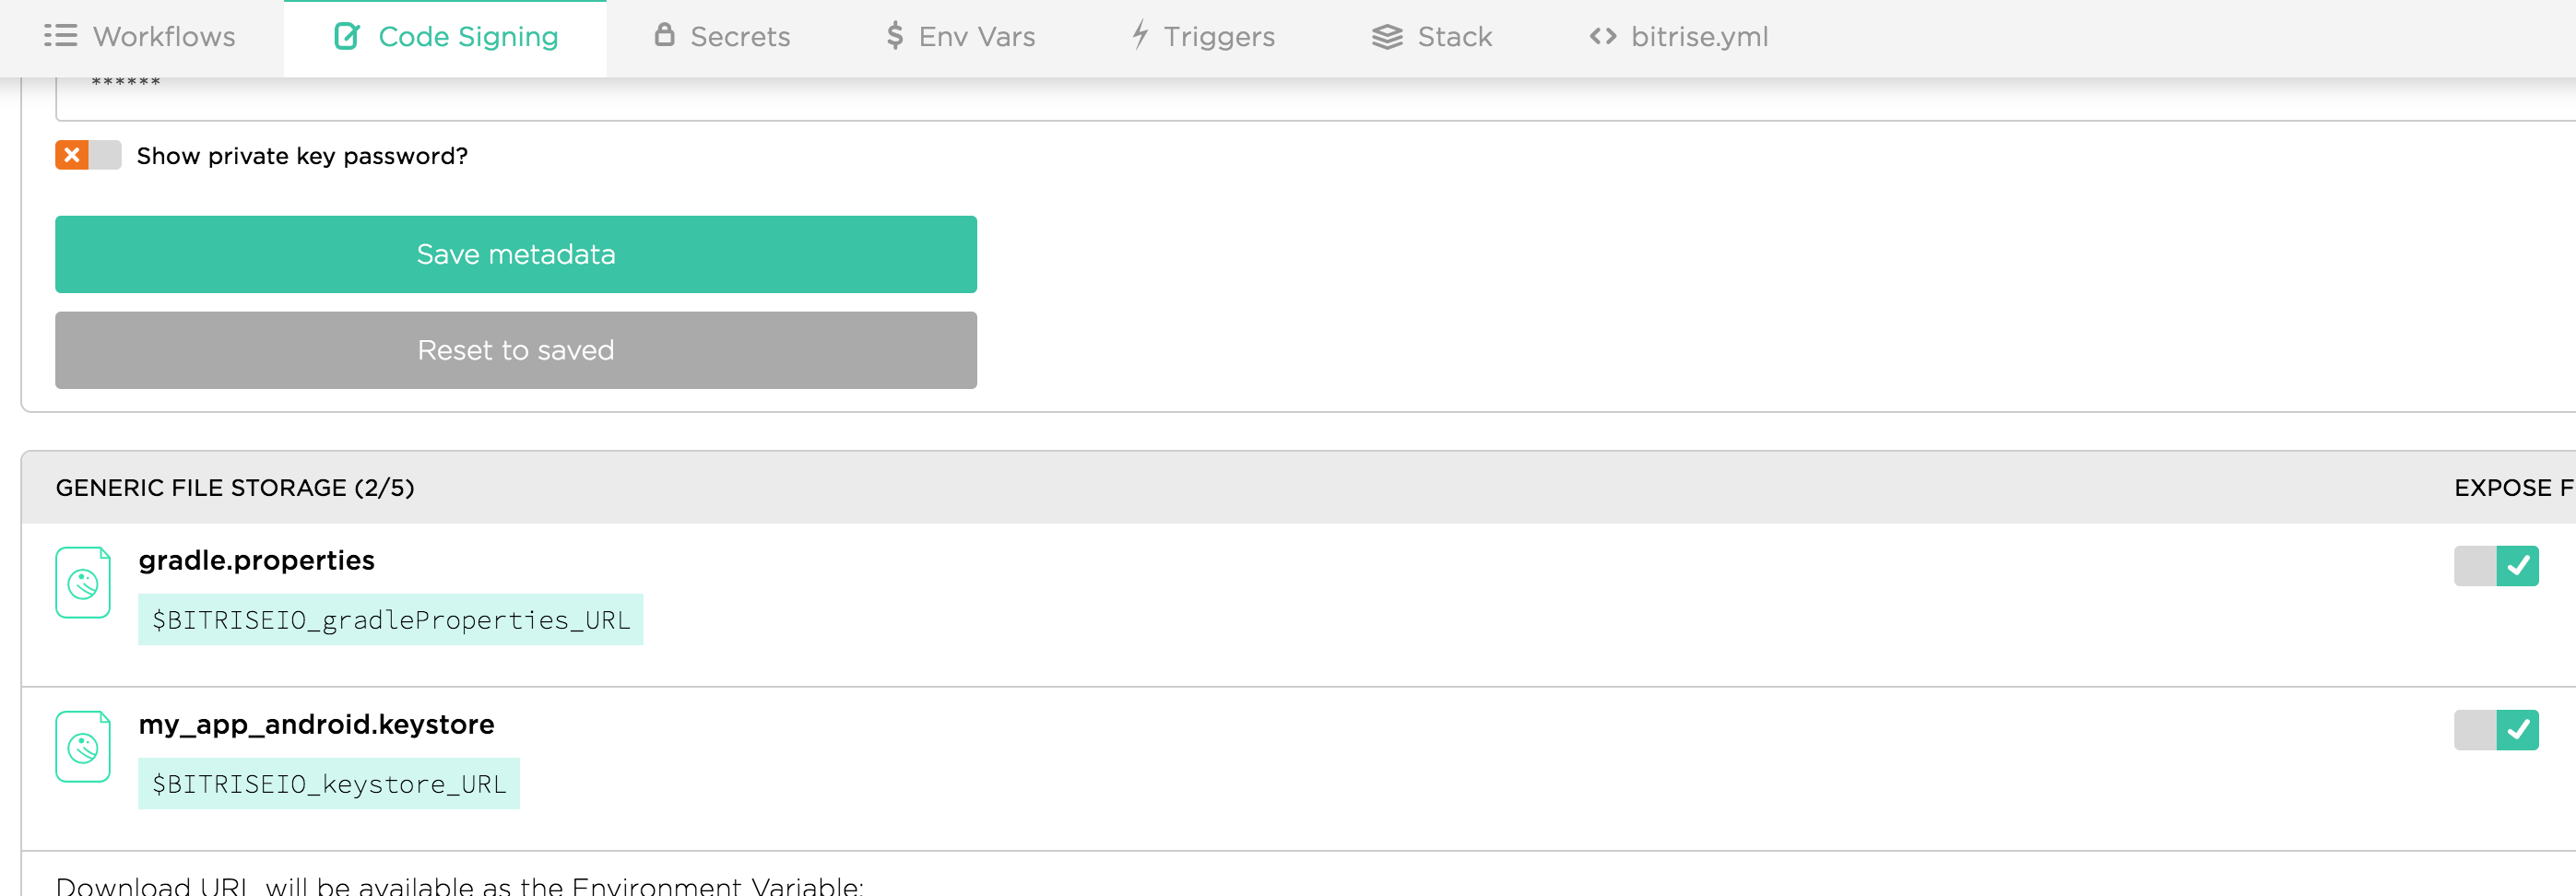
The generated URL variables are path to our uploaded files. We can use curl to download them. Bitrise has also Generic File Storage step to download all secured files.
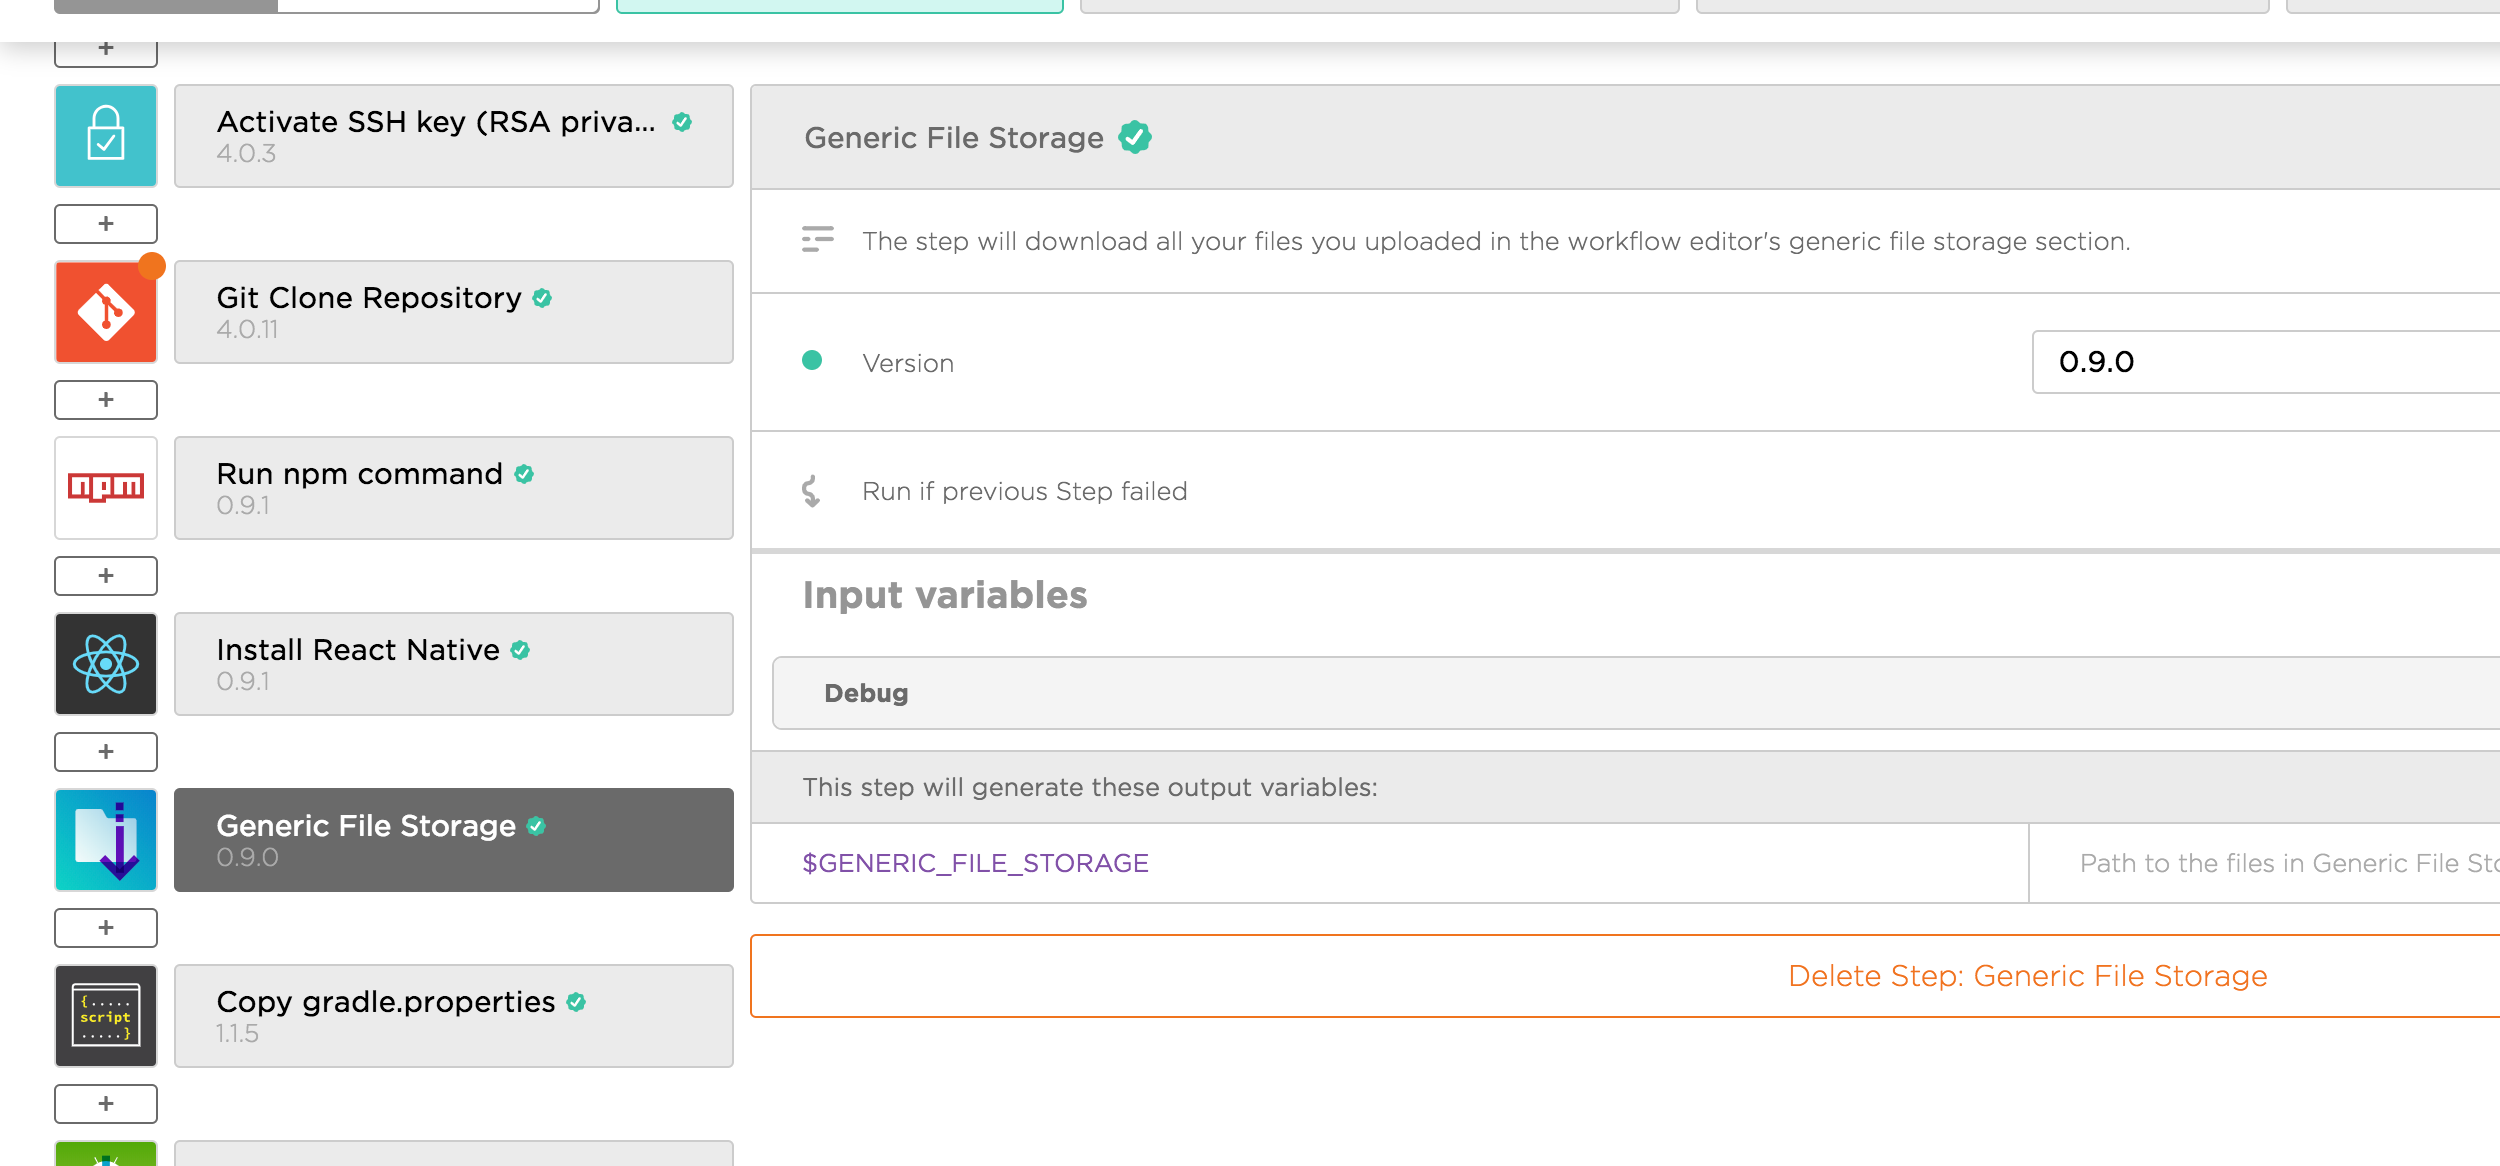
The downloaded files is located at GENERIC_FILE_STORAGE , so we add another Custom Script step to copy those files into ./android folder

#!/usr/bin/env bash

cp $GENERIC_FILE_STORAGE/gradle.properties ./android/gradle.properties
cp $GENERIC_FILE_STORAGE/my_app_android.keystore ./android/my_app_android.keystore
Note that the name of the files are the same of when we uploaded, and we use cp command to copy to folders.
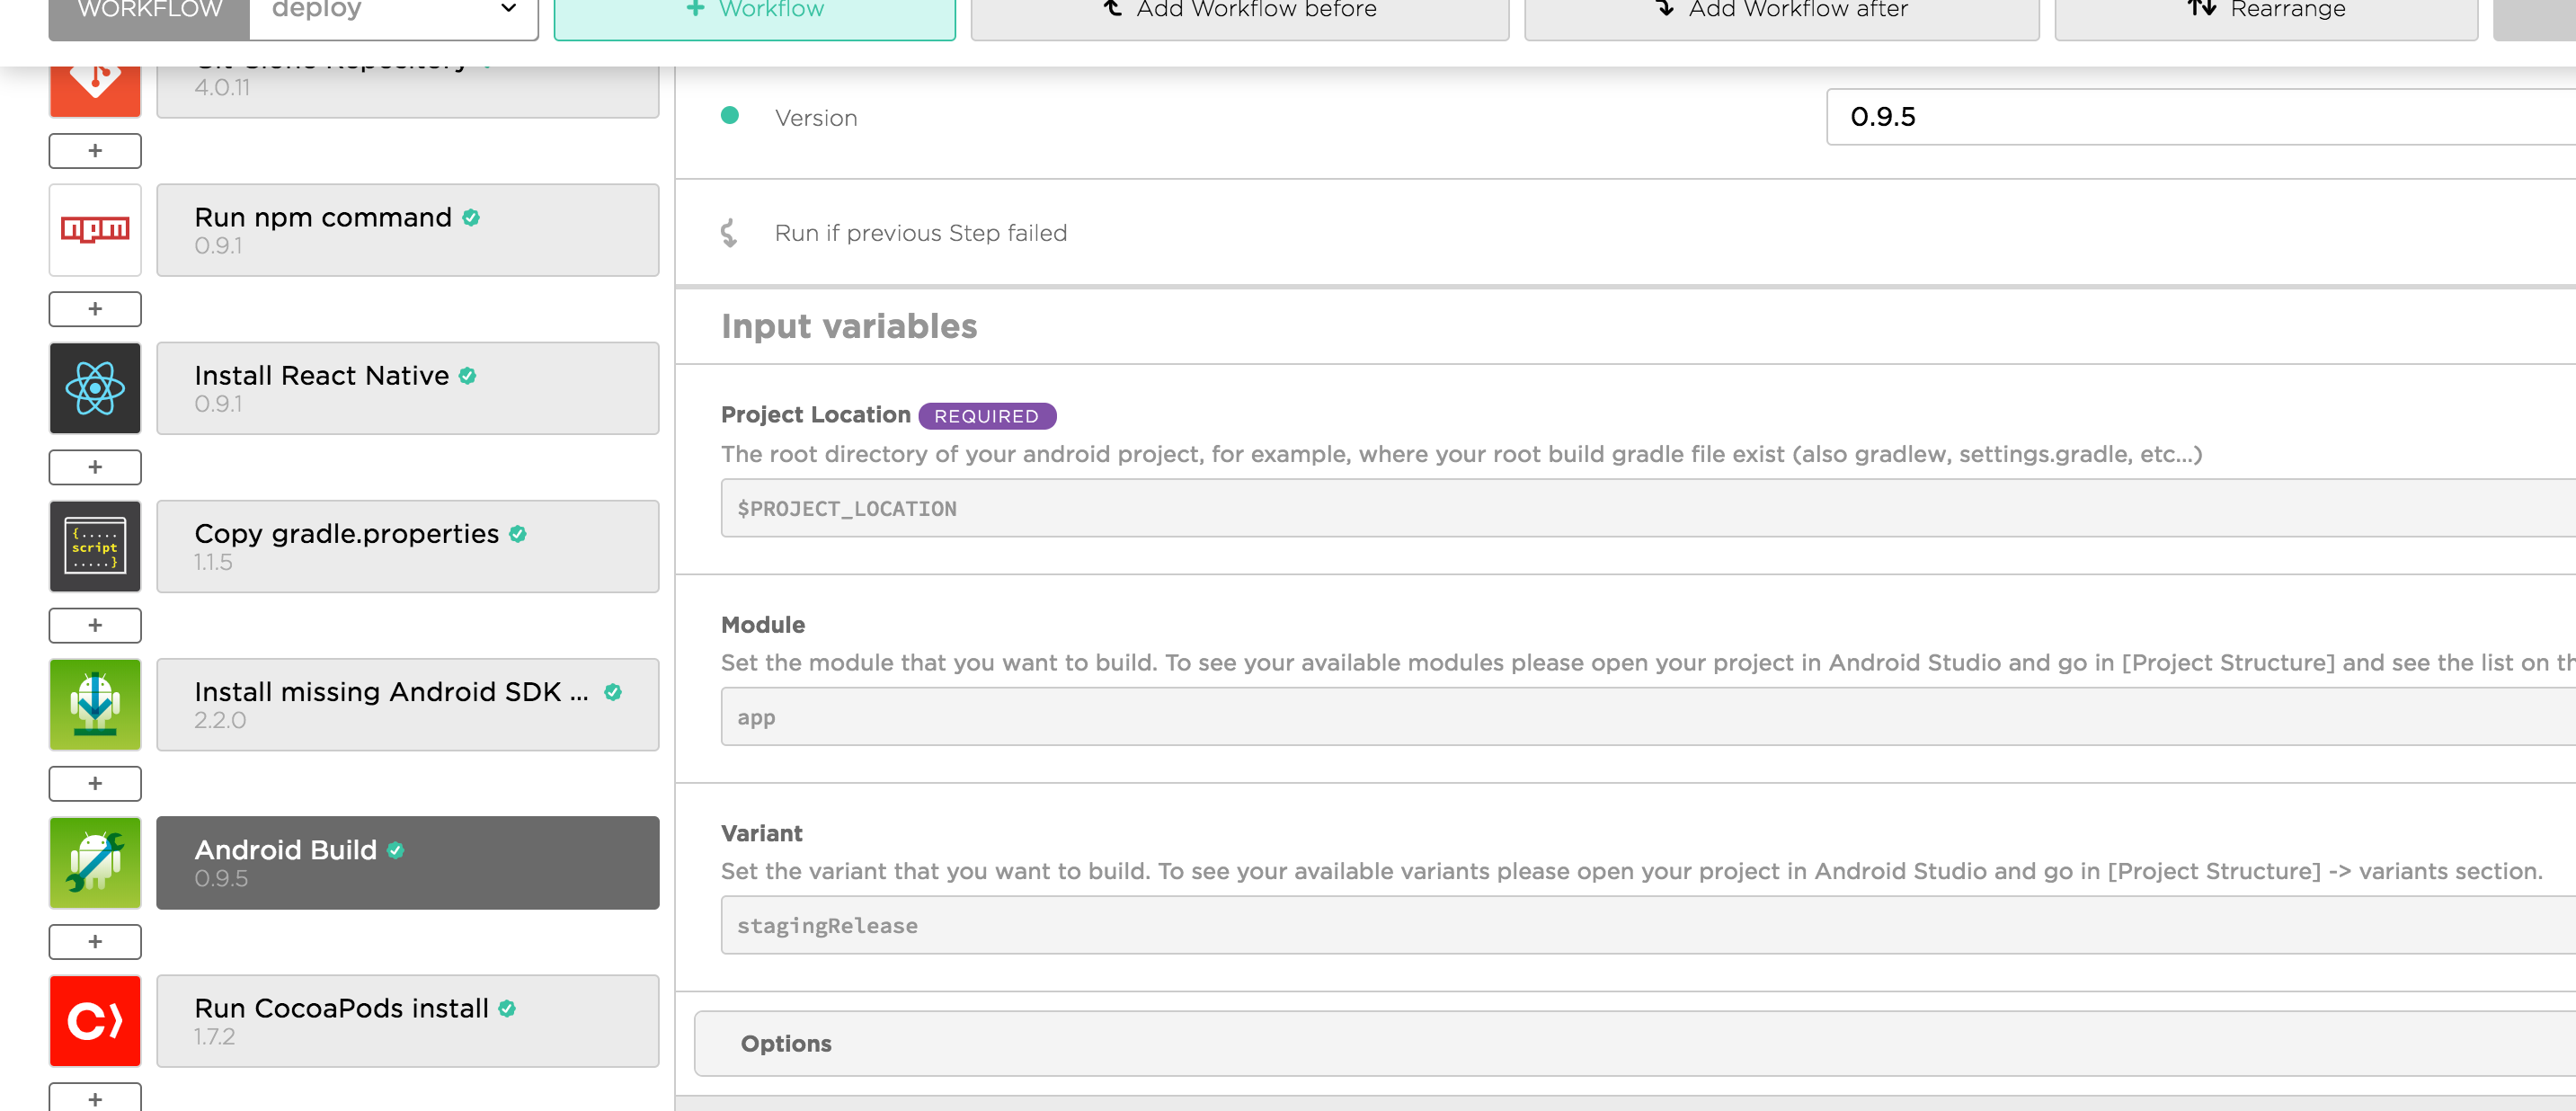
By default, Bitrise has 2 workflows: primary for quick start, and deploy for archiving and deploying. In the deploy workflow there is Android Build step. We can overwrite module and build variant here.
In Bitrise we can mark a step to continue regardless of the previous step. I use this to make sure iOS build independently from Android

If both iOS and Android build are successful, we should see the below summary
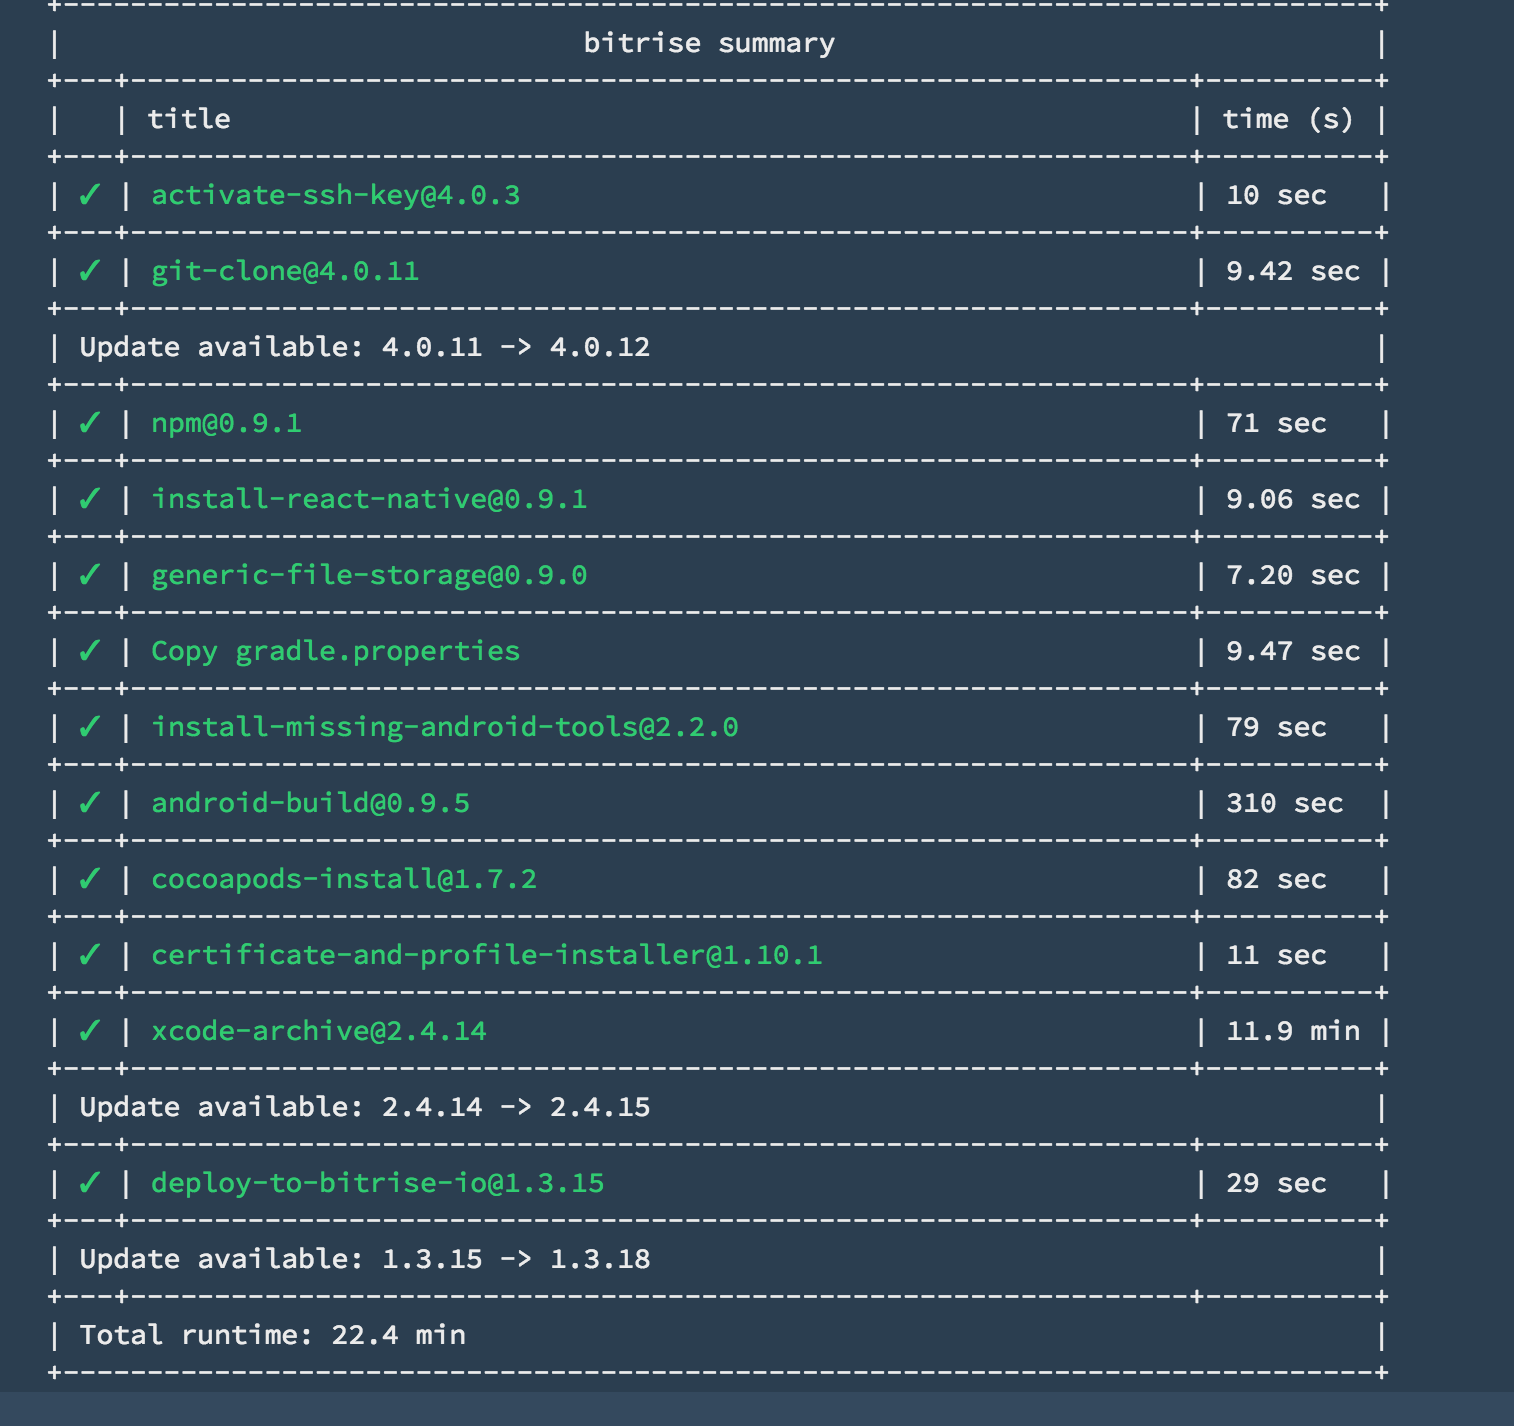
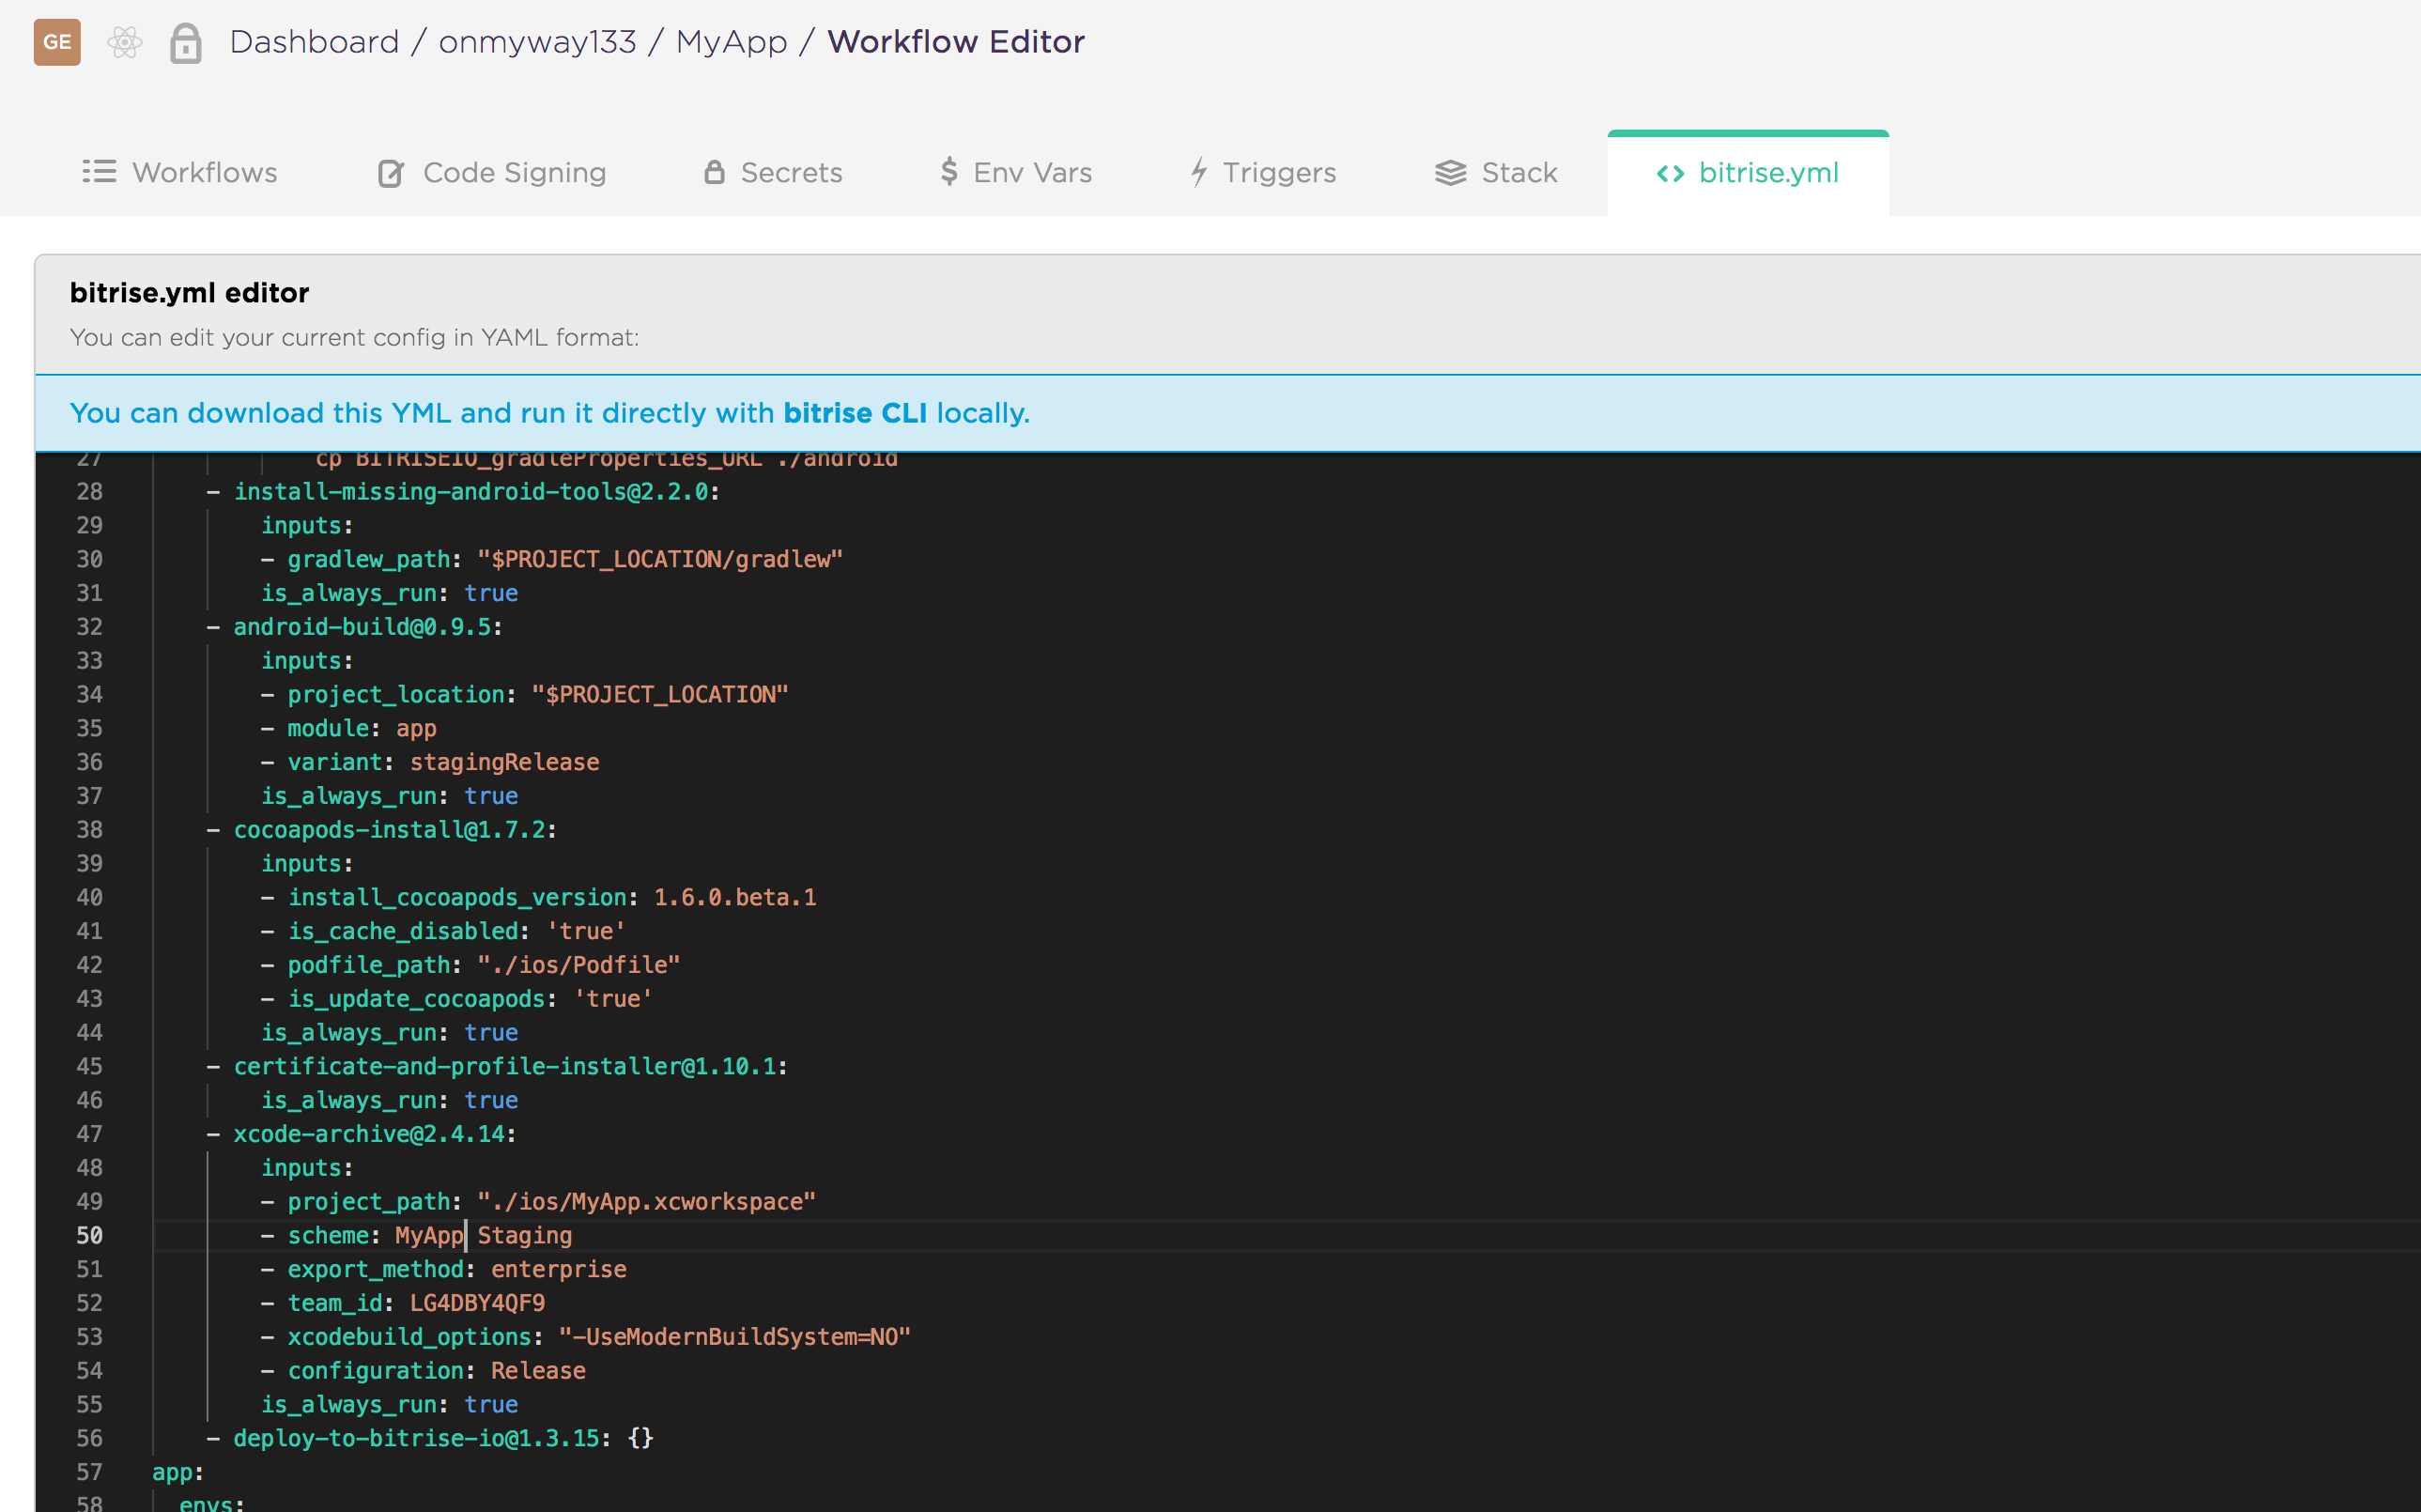
Although Bitrise has a good UI to configure workflows and steps, we have fine grained control every parameters in the bitrise.yml file. It’s good to reason here as we get familiar with all the steps.
I hope you learn something and have a happy deploy. Since you are here, below articles may be of your interest
Issue #271
Original post https://hackernoon.com/how-to-make-tag-selection-view-in-react-native-b6f8b0adc891
Besides React style programming, Yoga is another cool feature of React Native. It is a cross-platform layout engine which implements Flexbox so we use the same layout code for both platforms.
As someone who uses Auto Layout in iOS and Constraint Layout in Android, I find Flexbox bit hard to use at first, but there are many tasks that Flexbox does very well, they are distribute elements in space and flow layout. In this post we will use Flexbox to build a tag selection view using just Javascript code. This is very easy to do so we don’t need to install extra dependencies.
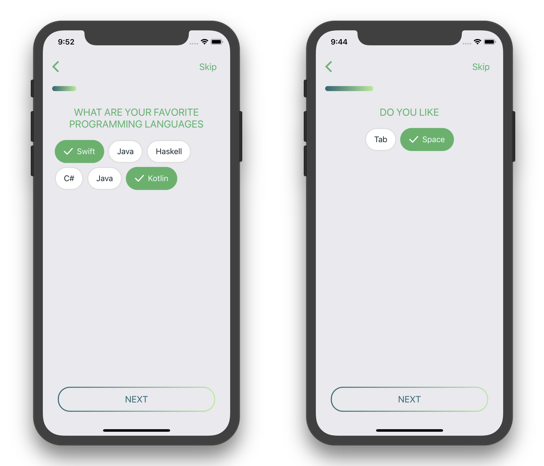
Our tag view will support both multiple selection and exclusive selection. First, we need a custom Button .
Button is of the basic elements in React Native, but it is somewhat limited if we want to have custom content inside the button, for example texts, images and background
import { Button } from 'react-native'
...

<Button
  onPress={onPressLearnMore}
  title="Learn More"
  color="#841584"
  accessibilityLabel="Learn more about this purple button"
/>Luckily we have TouchableOpacity, which is a wrapper for making views respond properly to touches. On press down, the opacity of the wrapped view is decreased, dimming it.
To implement button in our tag view, we need to a button with background a check image. Create a file called BackgroundButton.js
import React from 'react'
import { TouchableOpacity, View, Text, StyleSheet, Image } from 'react-native'
import R from 'res/R'

export default class BackgroundButton extends React.Component {
  render() {
    const styles = this.makeStyles()
    return (
      <TouchableOpacity style={styles.touchable} onPress={this.props.onPress}>
        <View style={styles.view}>
          {this.makeImageIfAny(styles)}
          <Text style={styles.text}>{this.props.title}</Text>
        </View>
      </TouchableOpacity>
    )
  }

makeImageIfAny(styles) {
    if (this.props.showImage) {
      return <Image style={styles.image} source={R.images.check} />
    }
  }

makeStyles() {
    return StyleSheet.create({
      view: {
        flexDirection: 'row',
        borderRadius: 23,
        borderColor: this.props.borderColor,
        borderWidth: 2,
        backgroundColor: this.props.backgroundColor,
        height: 46,
        alignItems: 'center',
        justifyContent: 'center',
        paddingLeft: 16,
        paddingRight: 16
      },
      touchable: {
        marginLeft: 4,
        marginRight: 4,
        marginBottom: 8
      },
      image: {
        marginRight: 8
      },
      text: {
        fontSize: 18,
        textAlign: 'center',
        color: this.props.textColor,
        fontSize: 16
      }
    })
  }
}Normally we use const styles = StyleSheet.create({}) but since we want our button to be configurable, we make styles into a function, so on every render we get a new styles with proper configurations. The properties we support are borderColor, textColor, backgroundColor and showImage
In the makeImageIfAny we only need to return Image if the view is selected. We don’t have the else case, so in if showImage is false, this returns undefined and React won’t render any element
makeImageIfAny(styles) {
  if (this.props.showImage) {
    return <Image style={styles.image} source={R.images.check} />
  }
}To understand padding and margin, visit CSS Box Model. Basically padding means clearing an area around the content and padding is transparent, while margin means clearing an area outside the border and the margin also is transparent.
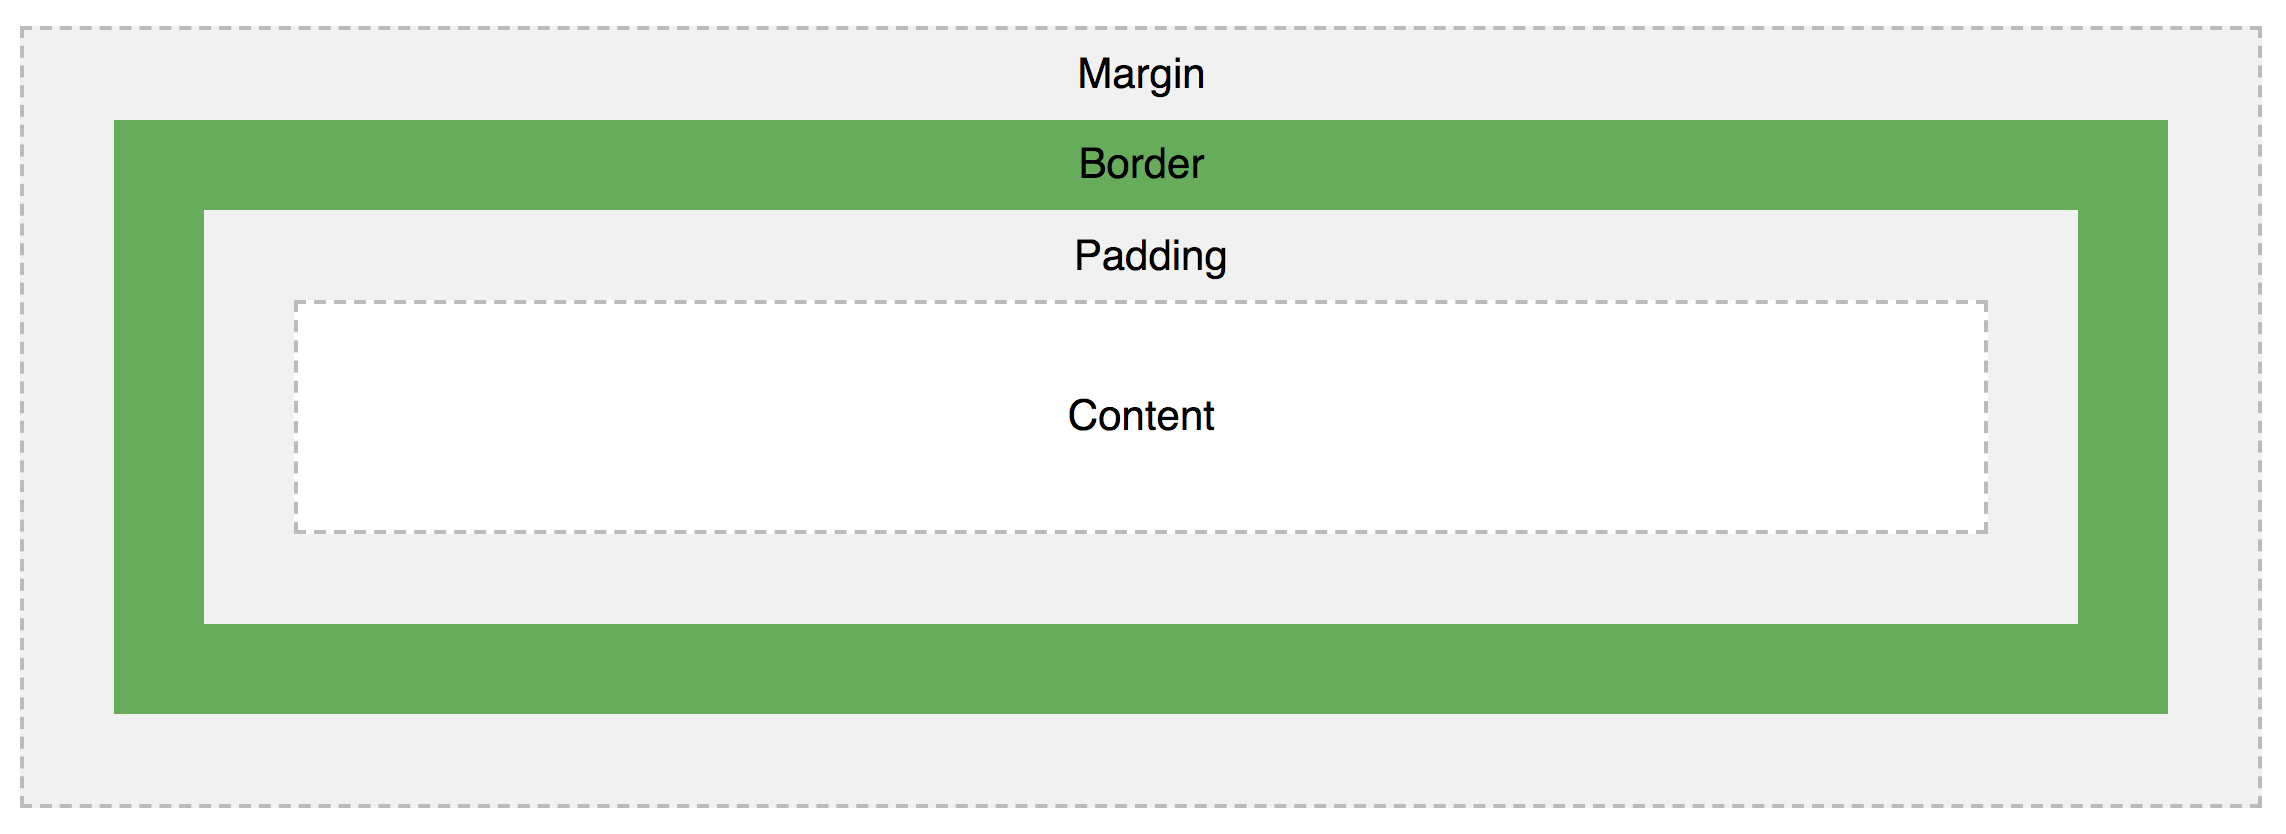
Pay attention to styles . We have margin for touchable so that each tag button have a little margin outside each other.
touchable: {
  marginLeft: 4,
  marginRight: 4,
  marginBottom: 8
}
In the view we need flexDirection as row because React Native has flexDirection as column by default. And a row means we have Image and Text side by side horizontally inside the button. We also use alignItems and justifyContent to align elements centeredly on both main and cross axises. The padding is used to have some spaces between the inner text and the view.
view: {
  flexDirection: 'row',
  height: 46,
  alignItems: 'center',
  justifyContent: 'center',
  paddingLeft: 16,
  paddingRight: 16
}Create a file called TagsView.js This is where we parse tags and show a bunch of BackgroundButton
import React from 'react'
import { View, StyleSheet, Button } from 'react-native'
import R from 'res/R'
import BackgroundButton from 'library/components/BackgroundButton'
import addOrRemove from 'library/utils/addOrRemove'

export default class TagsView extends React.Component {
  constructor(props) {
    super(props)
    this.state = {
      selected: props.selected
    }
  }

render() {
    return (
      <View style={styles.container}>
        {this.makeButtons()}
      </View>
    )
  }

onPress = (tag) => {
    let selected
    if (this.props.isExclusive) {
      selected = [tag]
    } else {
      selected = addOrRemove(this.state.selected, tag)
    }

this.setState({
      selected
    })
  }

makeButtons() {
    return this.props.all.map((tag, i) => {
      const on = this.state.selected.includes(tag)
      const backgroundColor = on ? R.colors.on.backgroundColor : R.colors.off.backgroundColor
      const textColor = on ? R.colors.on.text : R.colors.off.text
      const borderColor = on ? R.colors.on.border : R.colors.off.border

return (
        <BackgroundButton
          backgroundColor={backgroundColor}
          textColor={textColor}
          borderColor={borderColor}
          onPress={() => {
            this.onPress(tag)
          }}
          key={i}
          showImage={on}
          title={tag} />
      )
    })
  }
}

const styles = StyleSheet.create({
  container: {
    flex: 1,
    flexDirection: 'row',
    flexWrap: 'wrap',
    padding: 20
  }
})
We parse an array of tags to build BackgroundButton . We keep the selected array in state because this is mutated inside the TagsView component. If it is isExclusive then the new selected contains just the new selected tag. If it is multiple selection, then we add the new selected tag into the selected array.
The addOrRemove is a our homegrown utility function to add an item into an array if it does not exists, or remove if it exists, using the high orderfilter function.
const addOrRemove = (array, item) => {
  const exists = array.includes(item)

if (exists) {
    return array.filter((c) => { return c !== item })
  } else {
    const result = array
    result.push(item)
    return result
  }
}Pay attention to styles
const styles = StyleSheet.create({
  container: {
    flex: 1,
    flexDirection: 'row',
    flexWrap: 'wrap',
    padding: 20
  }
})
The hero here is flexWrap which specifies whether the flexible items should wrap or not. Take a look at CSS flex-wrap property for other options. Since we have main axis as row , element will be wrapped to the next row if there are not enough space. That’s how we can achieve a beautiful tag view.
Then consuming TagsView is as easy as declare it inside render
const selected = ['Swift', Kotlin]
const tags = ['Swift', 'Kotlin', 'C#', 'Haskell', 'Java']

return (
  <TagsView
    all={tags}
    selected={selected}
    isExclusive={false}
  />
)
Learning Flebox is crucial in using React and React Native effectively. The best places to learn it are w3school CSS Flexbox and Basic concepts of flexbox by Mozzila.
Basic concepts of flexbox
The Flexible Box Module, usually referred to as flexbox, was designed as a one-dimensional layout model, and as a…developer.mozilla.org
There is a showcase of all possible Flexbox properties
The Full React Native Layout Cheat Sheet
A simple visual guide with live examples for all major React Native layout propertiesmedium.com
Yoga has its own YogaKit published on CocoaPods, you can learn it with native code in iOS
Yoga Tutorial: Using a Cross-Platform Layout Engine
Learn about Yoga, Facebook’s cross-platform layout engine that helps developers write more layout code in style akin to…www.raywenderlich.com
And when we use flexbox, we should compose element instead of hardcoding values, for example we can use another View with justifyContent: flex-end to move a button down the screen. This follows flexbox style and prevent rigid code.
Position element at the bottom of the screen using Flexbox in React Native
React Native uses Yoga to achieve Flexbox style layout, which helps us set up layout in a declarative and easy way.medium.com
I hope you learn something useful in this post. For more information please consult the official guide Layout with Flexbox and layout-props for all the possible Flexbox properties.
Issue #268
React Native was designed to be “learn once, write anywhere,” and it is usually used to build cross platform apps for iOS and Android. And for each app that we build, there are times we need to reuse the same code, build and tweak it a bit to make it work for different environments. For example, we might need multiple skins, themes, a free and paid version, or more often different staging and production environments.
And the task that we can’t avoid is adding app icons and splash screens to our apps.
In fact, to add a staging and production environment, and to add app icons, requires us to use Xcode and Android Studio, and we do it the same way we do with native iOS or Android projects.
Let’s call our app MyApp and bootstrap it with react-native init MyApp . There will of course, be tons of libraries to help us with managing different environments.
In this post, we will do just like we did with native apps, so that we know the basic steps.
There are some terminologies we needed to remember. In iOS, debug and releases are called build configurations, and staging and production are called targets.
A build configuration specifies a set of build settings used to build a target’s product in a particular way. For example, it is common to have separate build configurations for debug and release builds of a product.
A target specifies a product to build and contains the instructions for building the product from a set of files in a project or work-space. A target defines a single product; it organizes the inputs into the build system — the source files and instructions for processing those source files — required to build that product. Projects can contain one or more targets, each of which produces one product
In Android, debug and releases are called build types, and staging and production are called product flavors. Together they form build variants.
For example, a “demo” product flavor can specify different features and device requirements, such as custom source code, resources, and minimum API levels, while the “debug” build type applies different build and packaging settings, such as debug options and signing keys. The resulting build variant is the “demoDebug” version of your app, and it includes a combination of the configurations and resources included in the “demo” product flavor, “debug” build type, and main/ source set.
Open MyApp.xcodeproj inside ios using Xcode. Here is what we get after bootstrapping:
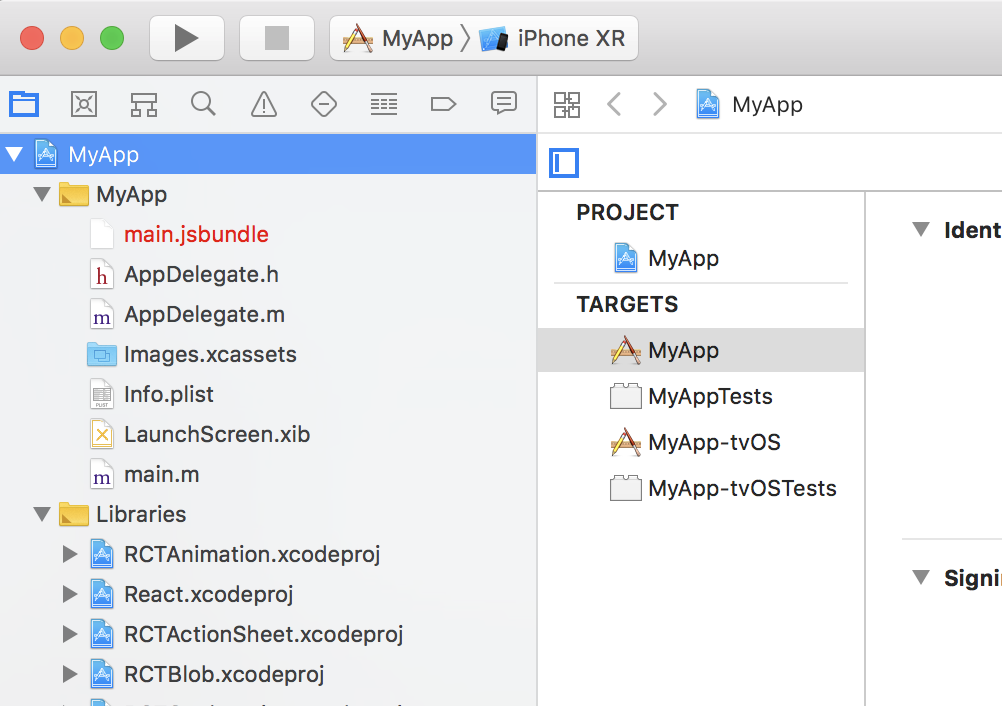
React Native creates iOS and tvOS apps, and two test targets. In Xcode, a project can contain many targets, and each target means a unique product with its own build settings — Info.plist and app icons.
If we don’t need the tvOS app, we can delete the MyApp-tvOS and MyApp-tvOSTests . Let’s use MyApp target as our production environment, and right click -> Duplicate to make another target. Let’s call it MyApp Staging.
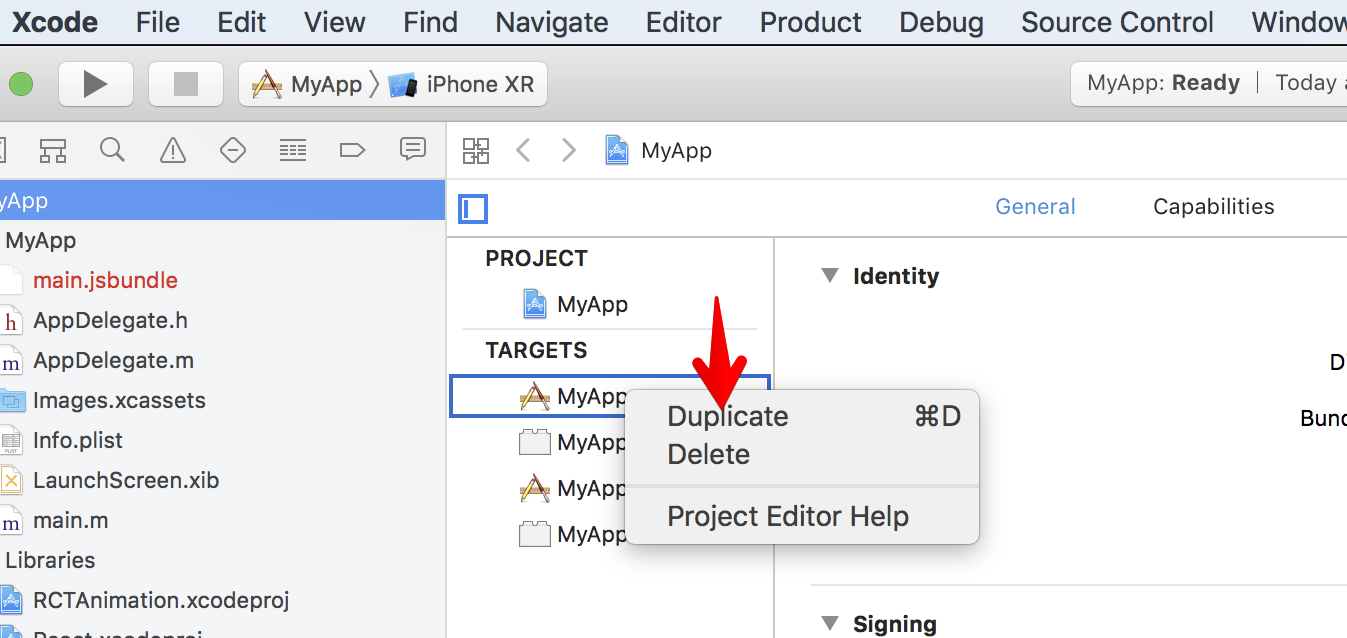
Each target must have unique bundle id. Change the bundle id of MyApp to com.onmyway133.MyApp and MyApp Staging to com.onmyway133.MyApp.Staging.

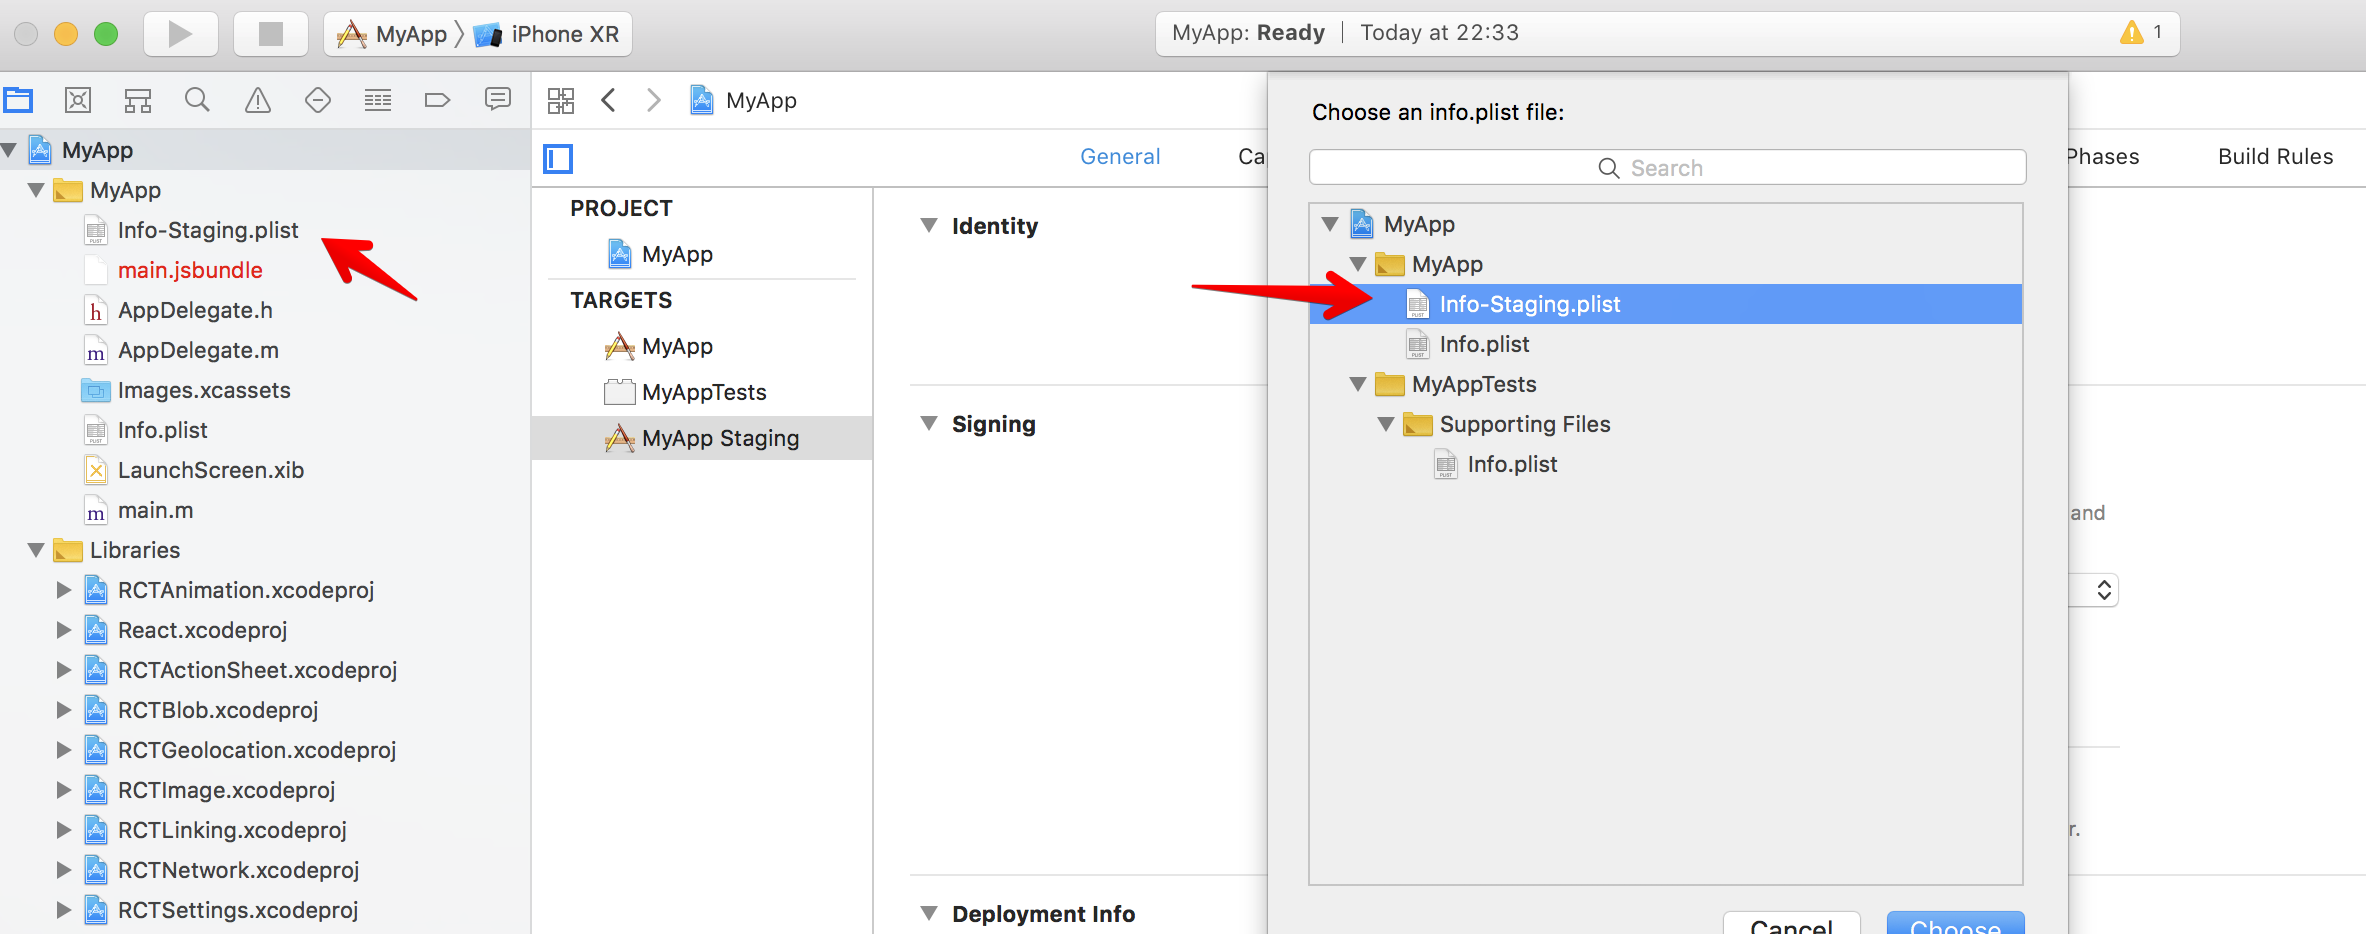
When we duplicate MyApp target , Xcode also duplicates Info.plist into MyApp copy-Info.plist for the staging target. Change it to a more meaningful name Info-Staging.plist and drag it to the MyApp group in Xcode to stay organised. After dragging, MyApp Staging target can’t find the plist, so click Choose Info.plist File and point to the Info-Staging.plist.
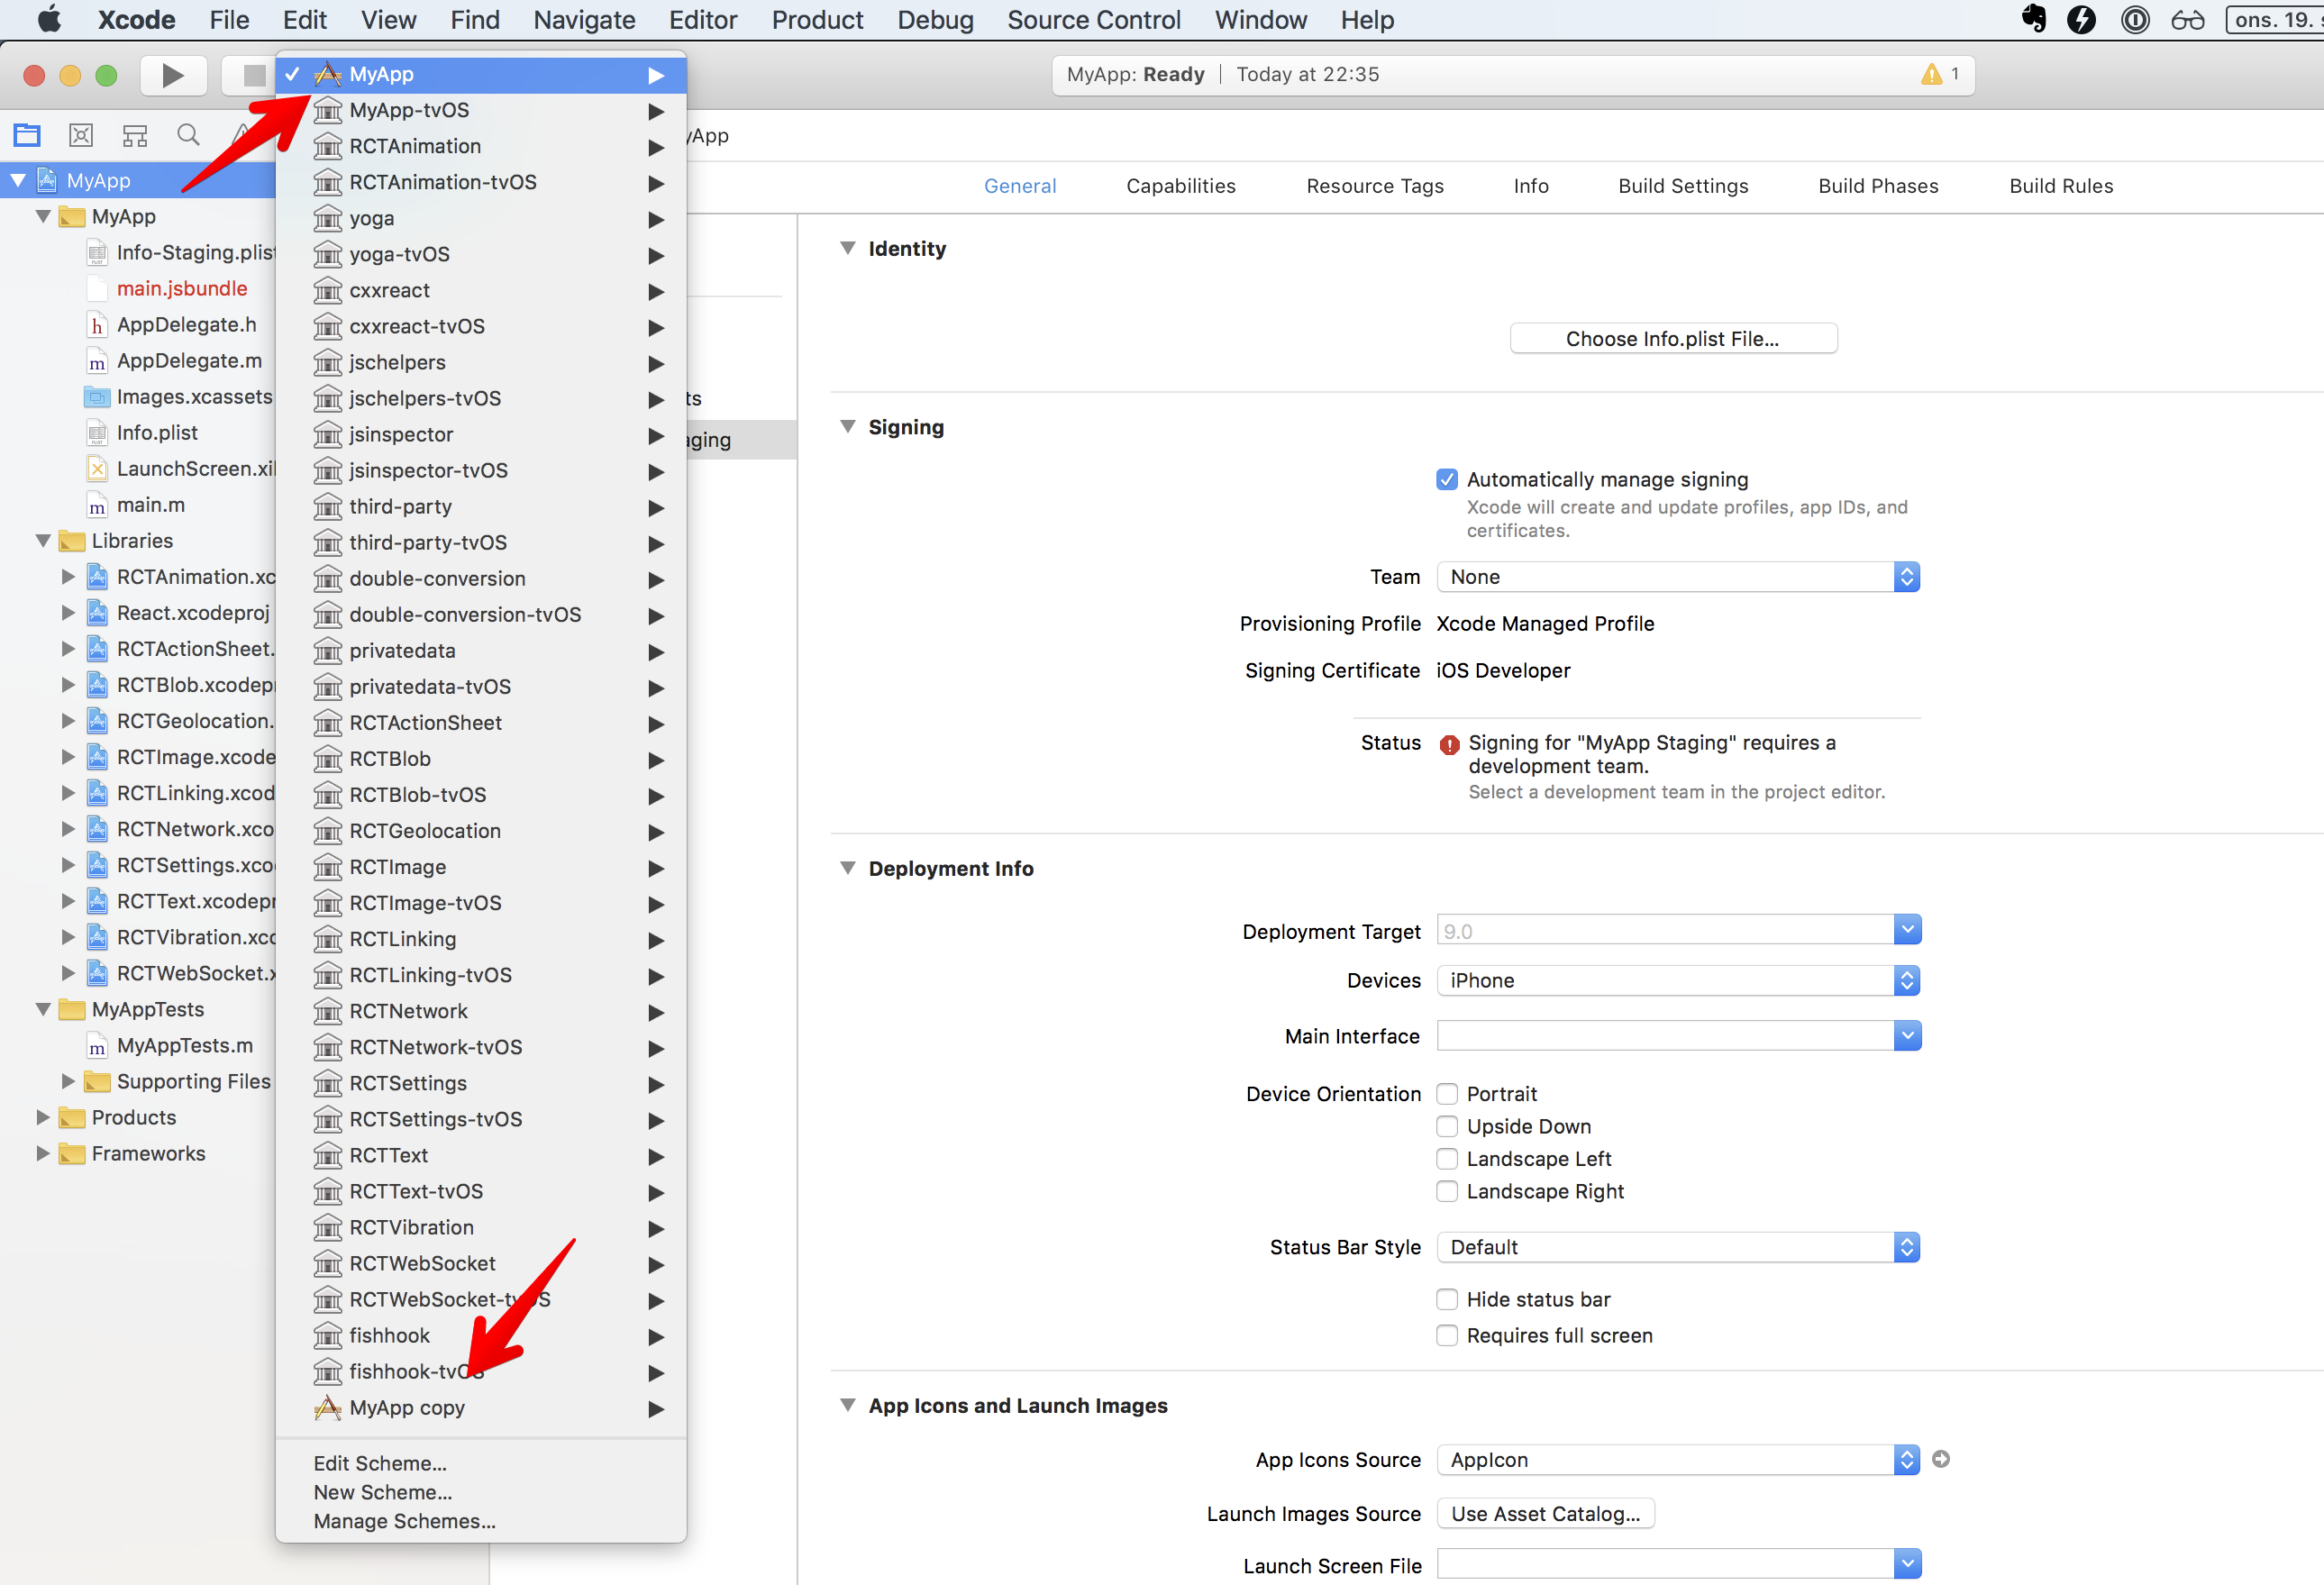
Xcode also duplicates the scheme when we duplicate the target, so we get MyApp copy:
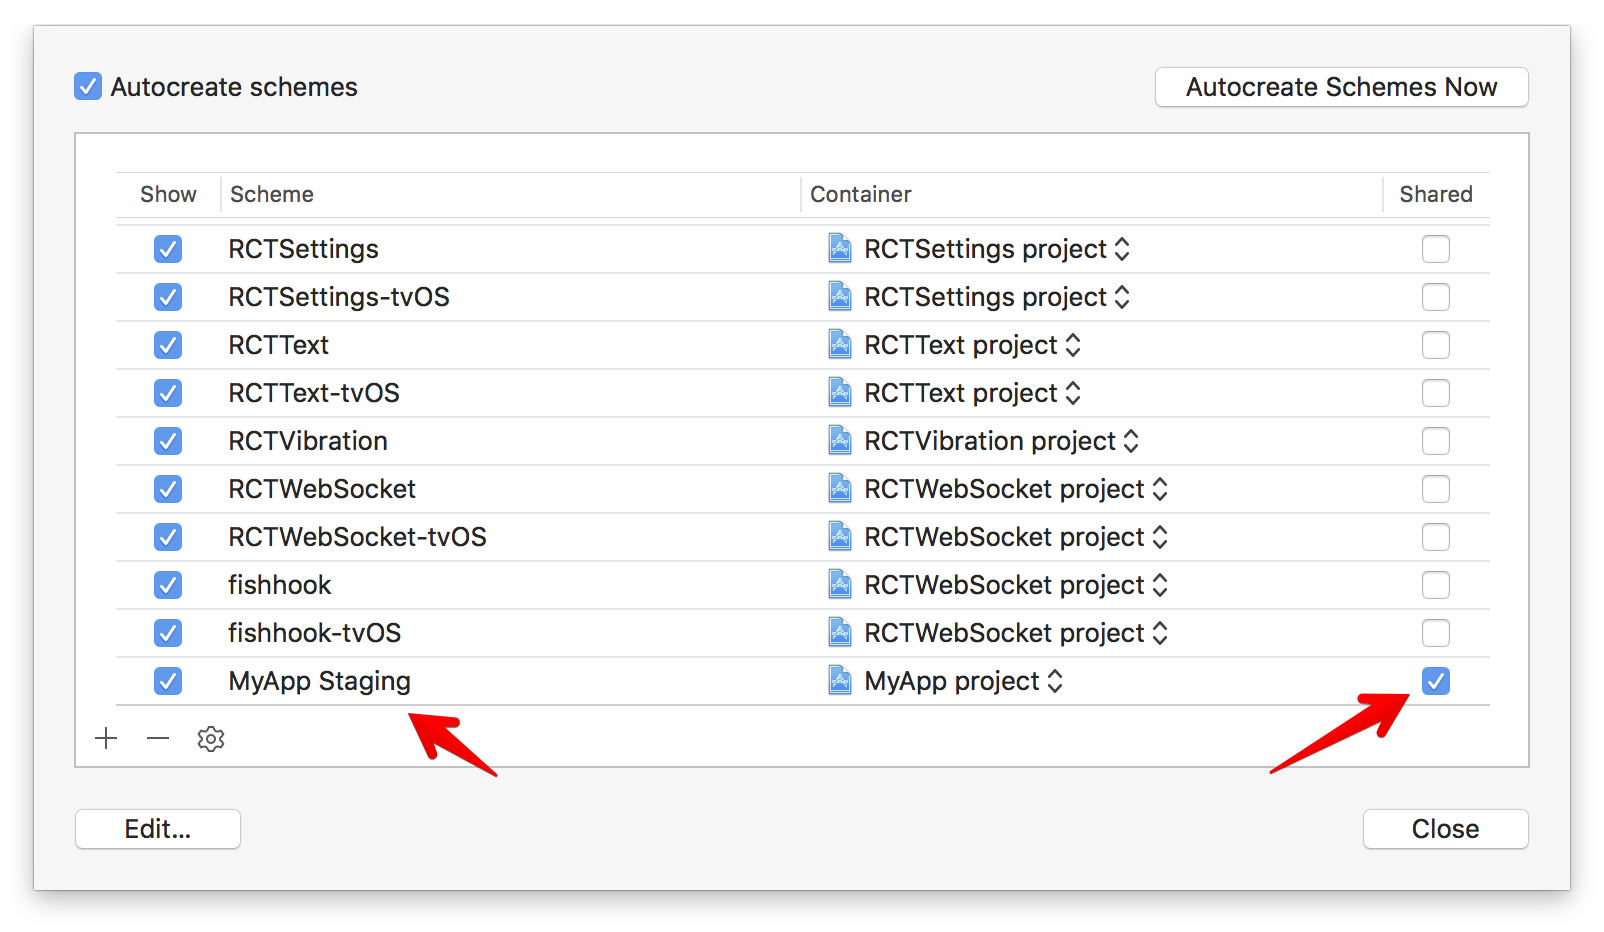
Click Manage Schemes in the scheme drop-down to open Scheme manager:
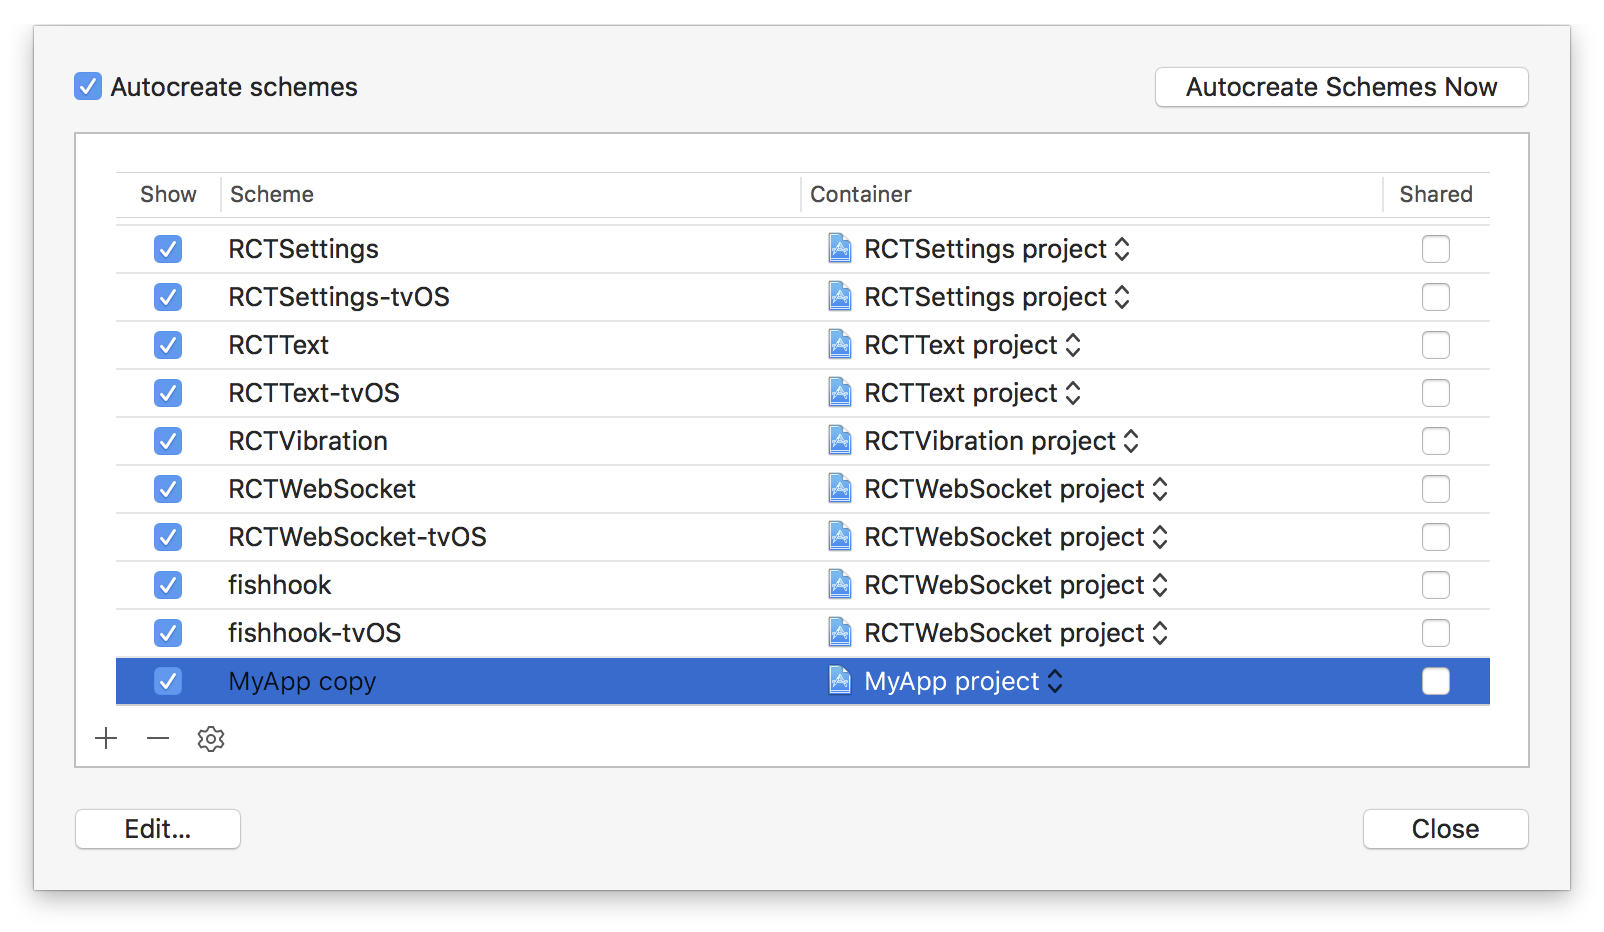
I usually delete the generated MyApp copy scheme, then I create a new scheme again for the MyApp Staging target. You need to make sure that the scheme is marked as Shared so that it is tracked into git.
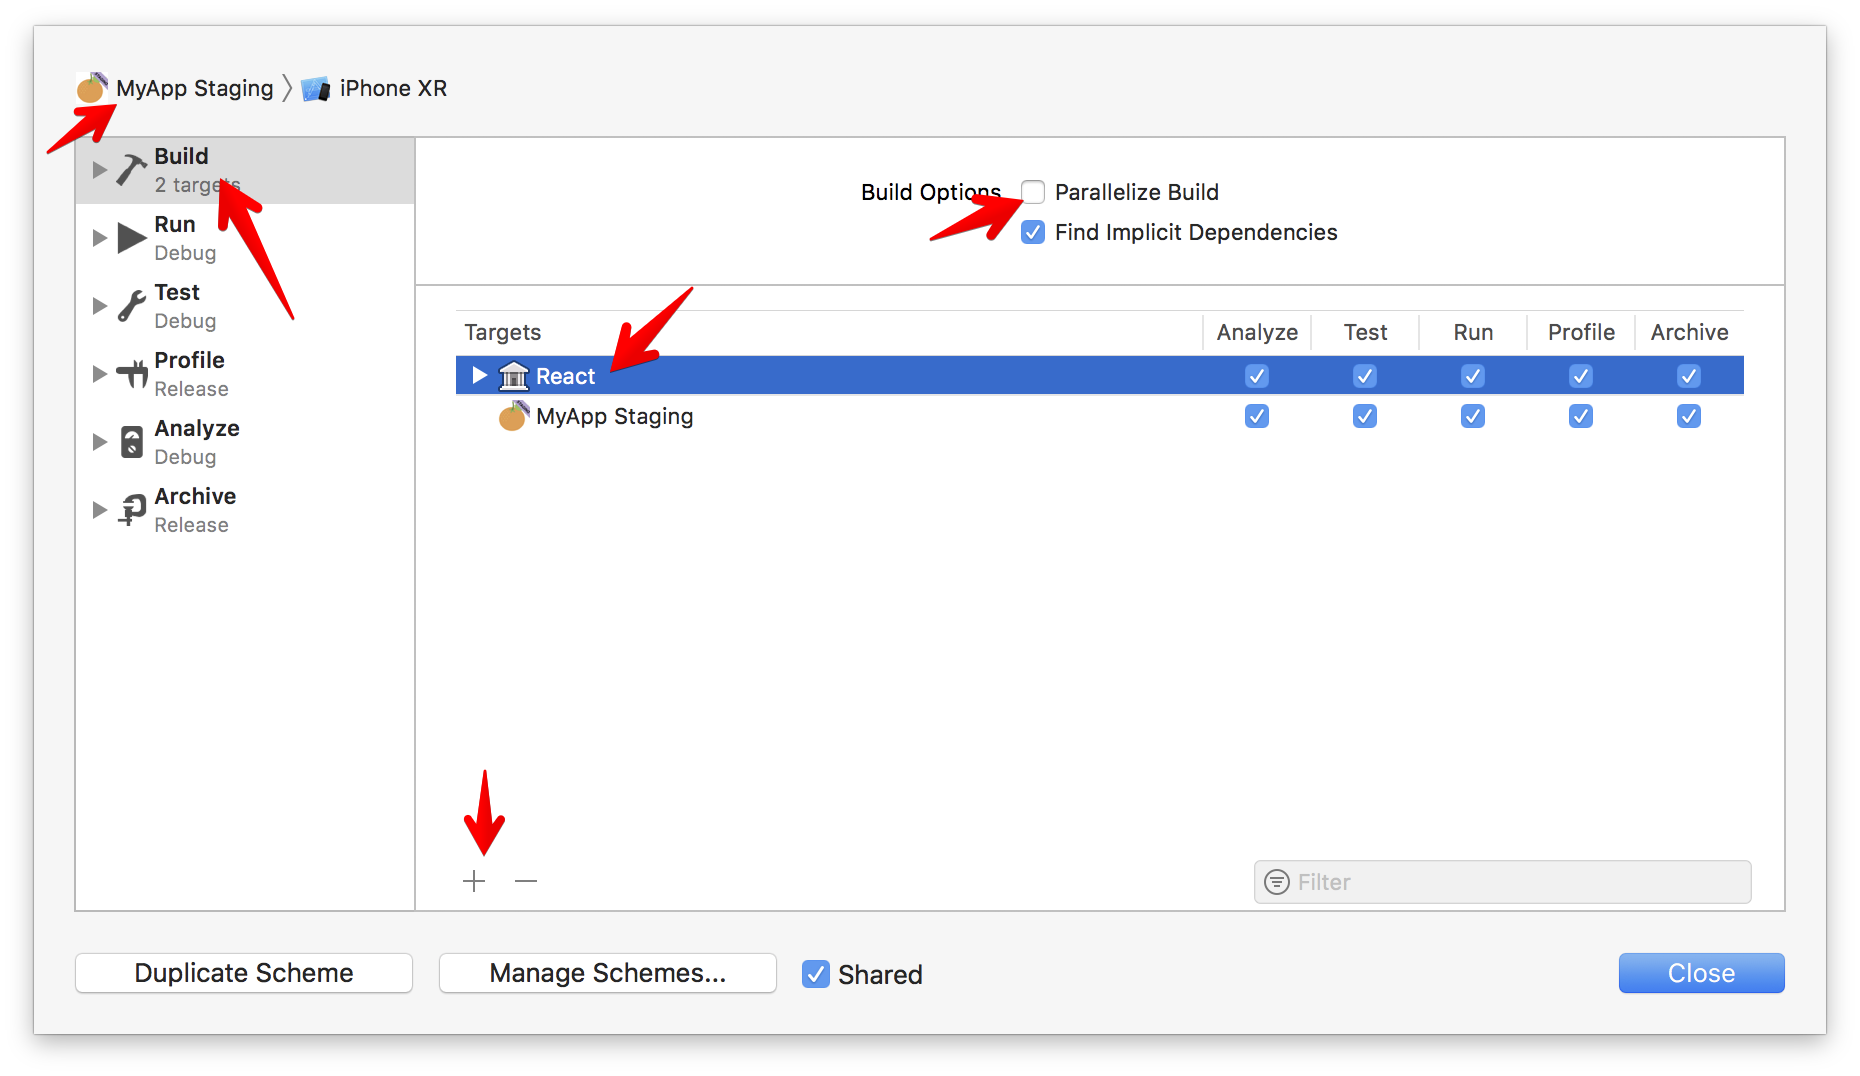
For some reason, the staging scheme does not have all the things set up like the production scheme. You can run into issues like ‘React/RCTBundleURLProvider.h’ file not found or RN: ‘React/RCTBridgeModule.h’ file not found . It is because React target is not linked yet.
To solve it, we must disable Parallelise Build and add React target and move it above MyApp Staging.
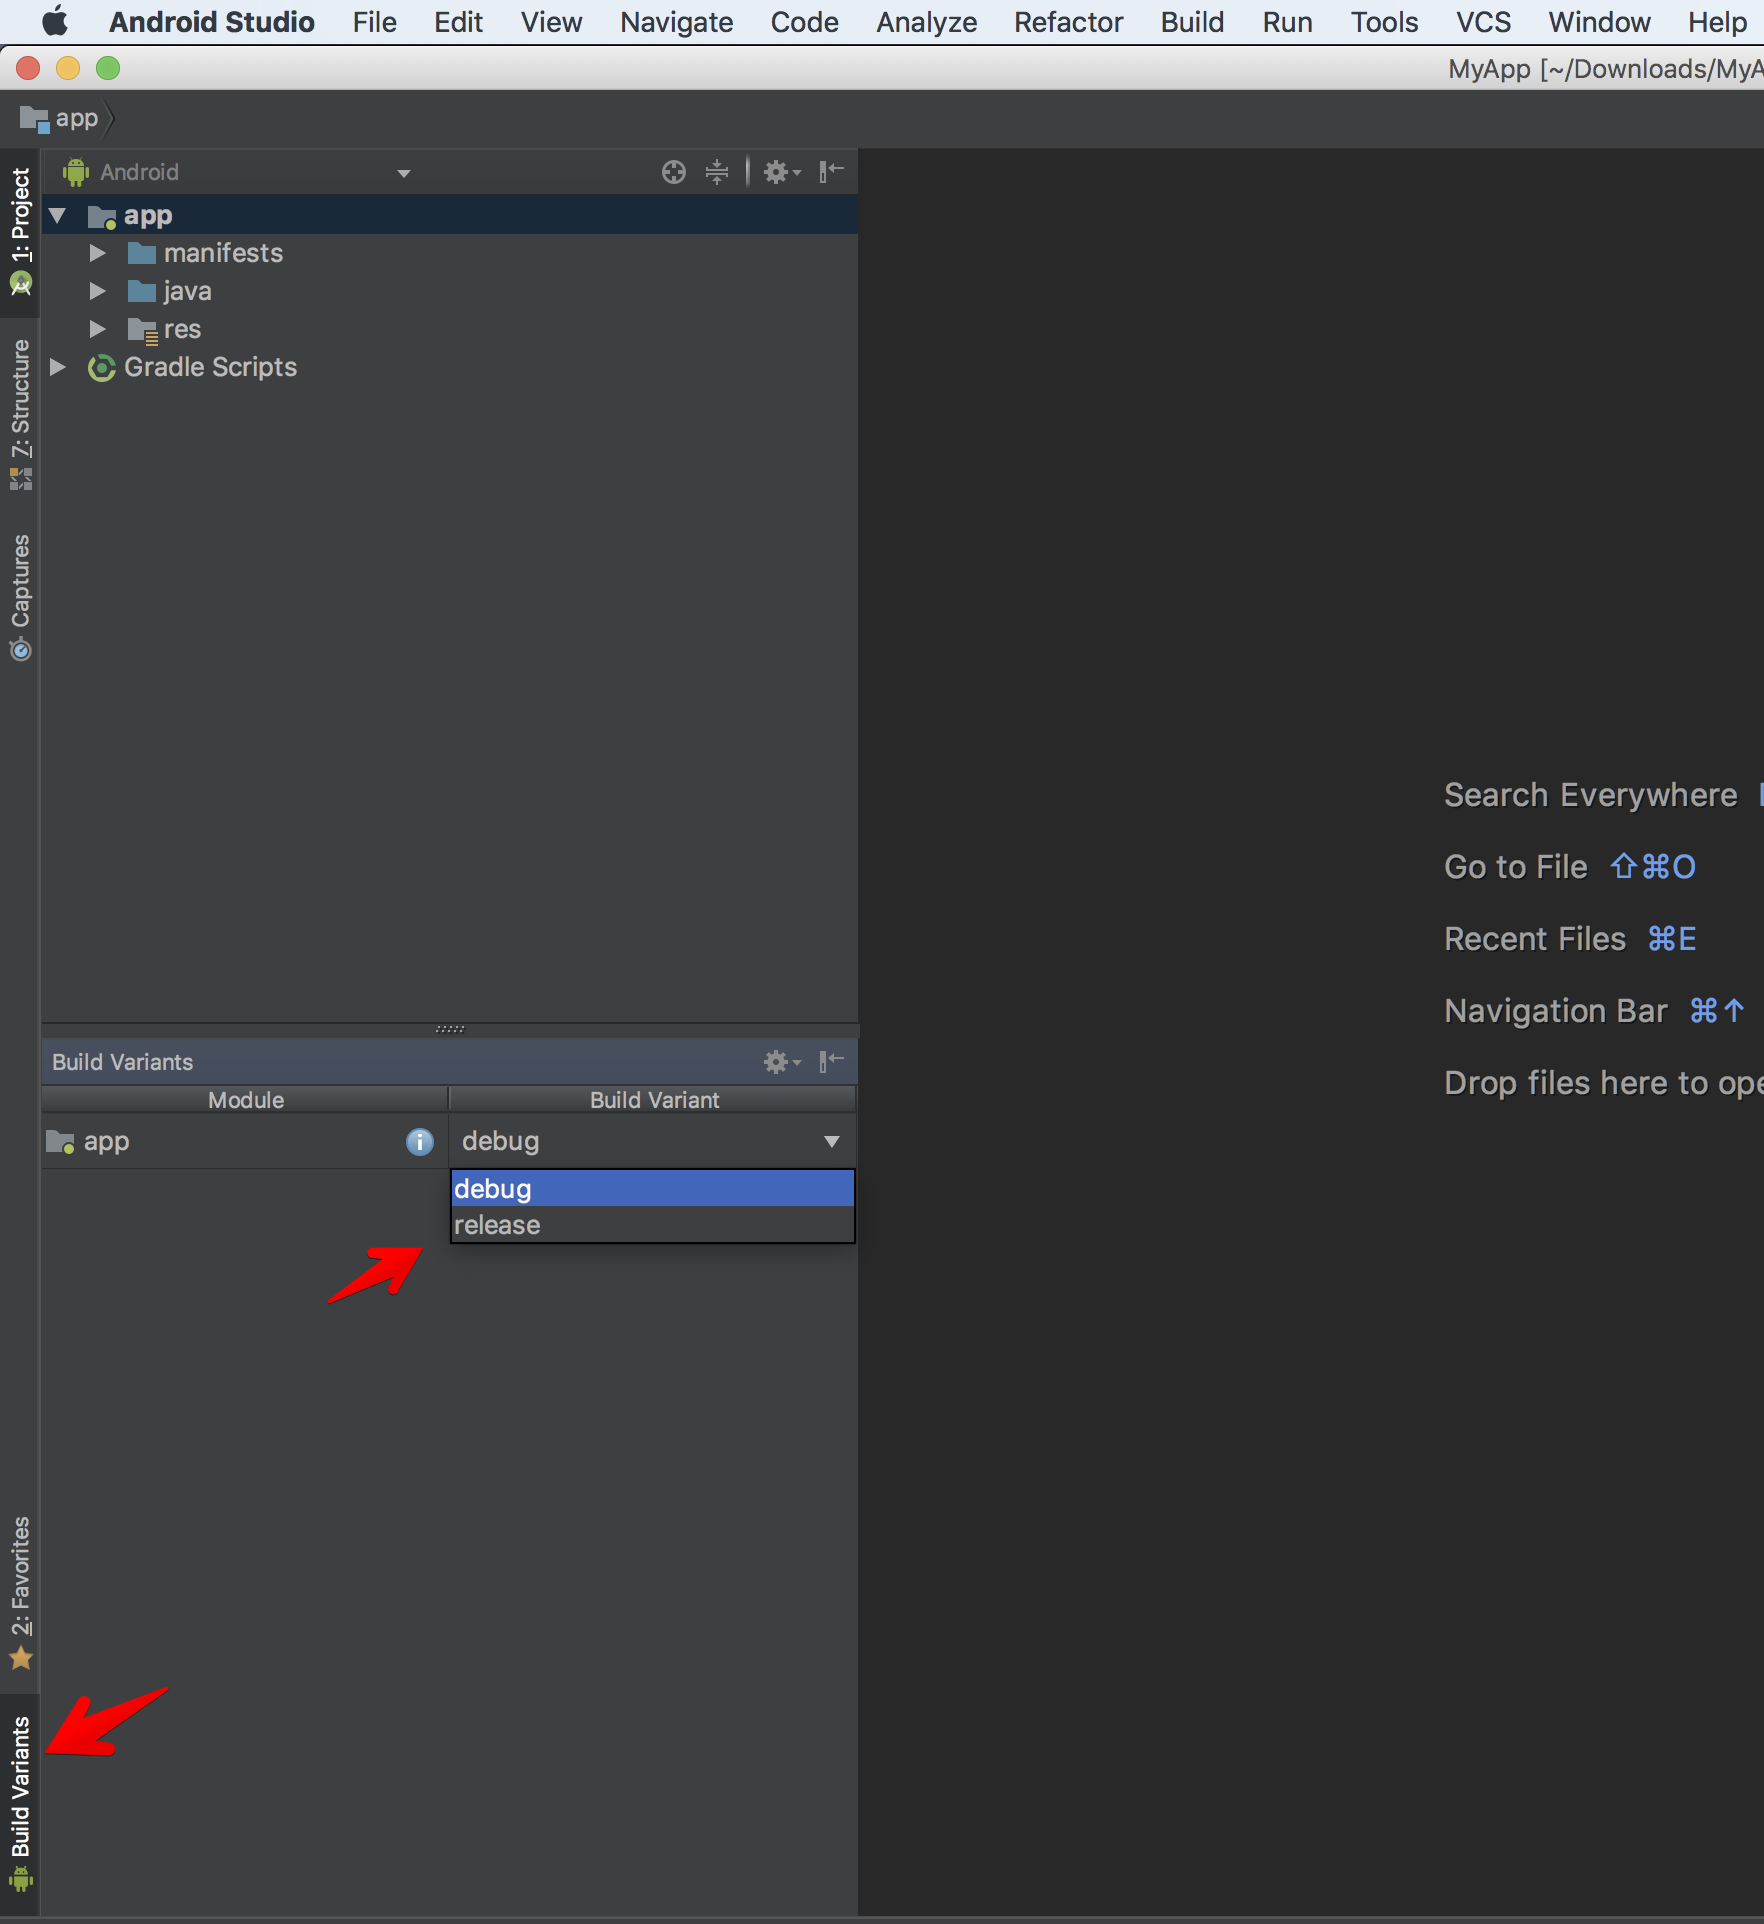
Open the android folder in Android Studio. By default there are only debug and release build types:
They are configured in the app module build.gradle:
buildTypes {
    release {
        minifyEnabled enableProguardInReleaseBuilds
        proguardFiles getDefaultProguardFile("proguard-android.txt"), "proguard-rules.pro"
    }
}
First, let’s change application id to com.onmyway133.MyApp to match iOS. It is not required but I think it’s good to stay organised. Then create two product flavors for staging and production. For staging, let’s add .Staging to the application id.
From Android Studio 3, “all flavors must now belong to a named flavor dimension” — normally we just need default dimensions. Here is how it looks in build.gradle for our app module:
android {
    compileSdkVersion rootProject.ext.compileSdkVersion
    buildToolsVersion rootProject.ext.buildToolsVersion
    flavorDimensions "default"

defaultConfig {
        applicationId "com.onmyway133.MyApp"
        minSdkVersion rootProject.ext.minSdkVersion
        targetSdkVersion rootProject.ext.targetSdkVersion
        versionCode 1
        versionName "1.0"
        ndk {
            abiFilters "armeabi-v7a", "x86"
        }
    }
    splits {
        abi {
            reset()
            enable enableSeparateBuildPerCPUArchitecture
            universalApk false  // If true, also generate a universal APK
            include "armeabi-v7a", "x86"
        }
    }
    buildTypes {
        release {
            minifyEnabled enableProguardInReleaseBuilds
            proguardFiles getDefaultProguardFile("proguard-android.txt"), "proguard-rules.pro"
        }
    }

productFlavors {
        staging {
            applicationIdSuffix ".Staging"
        }

        production {

        }
    }
}
Click Sync Now to let gradle do the syncing job. After that, we can see that we have four build variants:
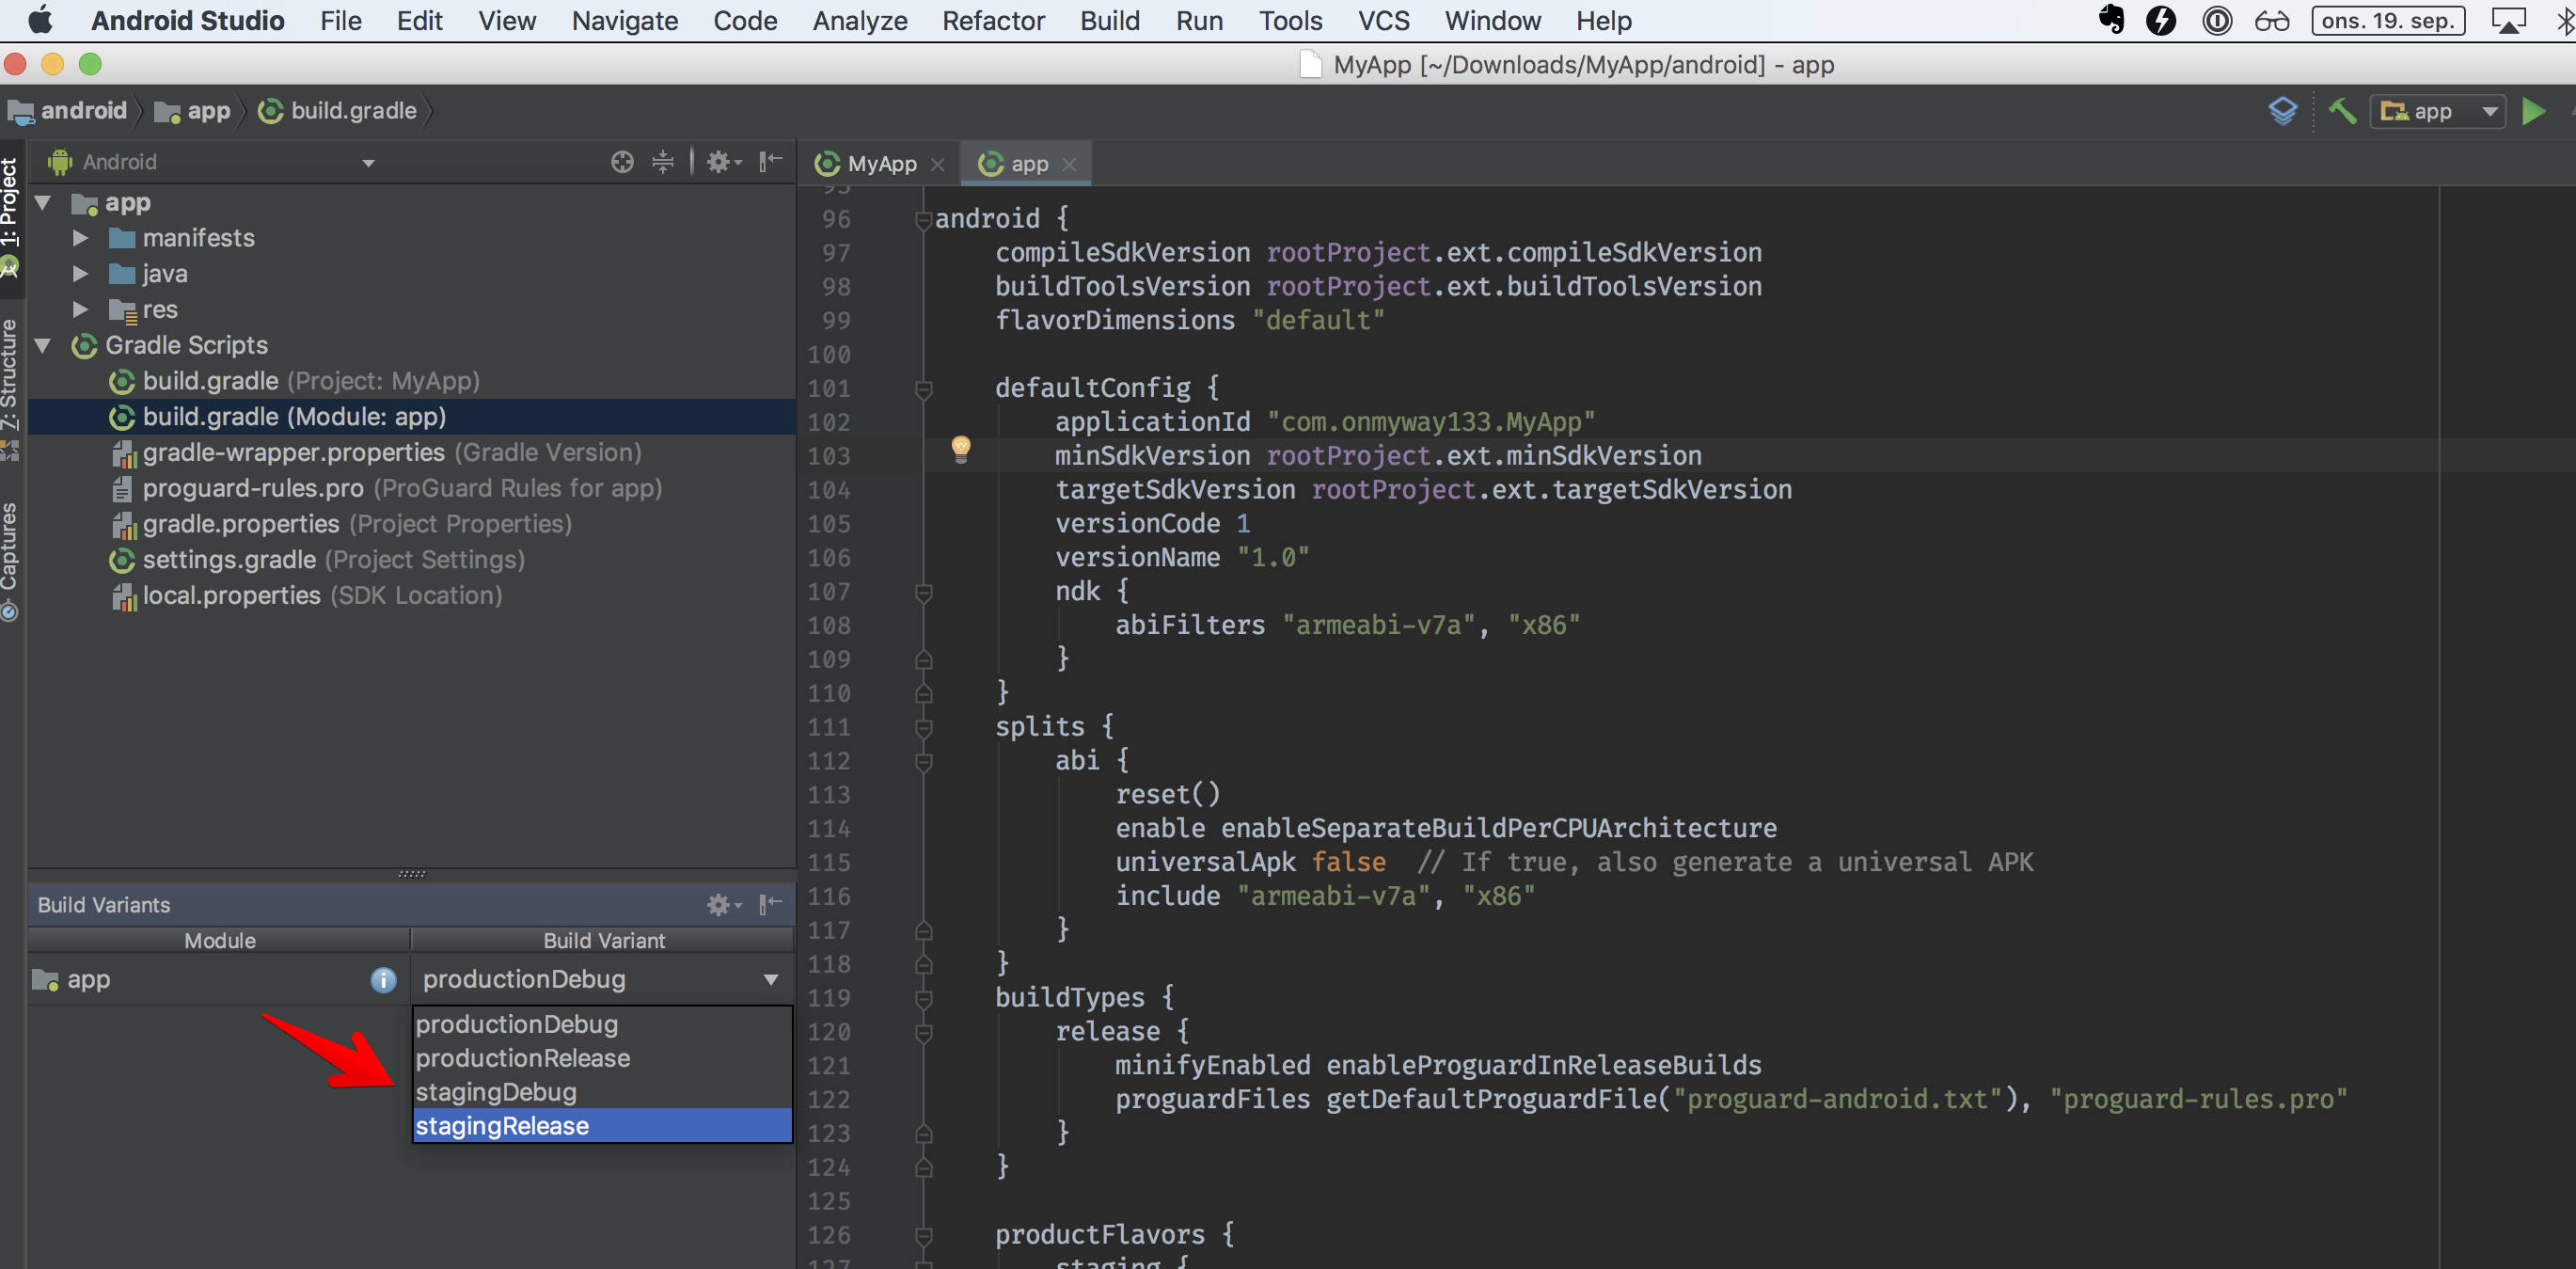
To run the Android app, we can specify a variant like react-native run-android — variant=productionDebug, but I prefer to go to Android Studio, select the variant, and run.
To run iOS app, we can specify the scheme like react-native run-ios — simulator=’iPhone X’ — scheme=”MyApp Staging” . As of react-native 0.57.0 this does not work. But it does not matter as I usually go to Xcode, select the scheme, and run.
According to the Human Interface Guideline, we need app icons of different sizes for different iOS versions, device resolutions, and situations (notification, settings, Spring Board). I’ve crafted a tool called IconGenerator, which was previously mentioned in Best Open Source Tools For Developers. Drag the icon that you want — I prefer those with 1024x1024 pixels for high resolution app icons — to the Icon Generator MacOS app.
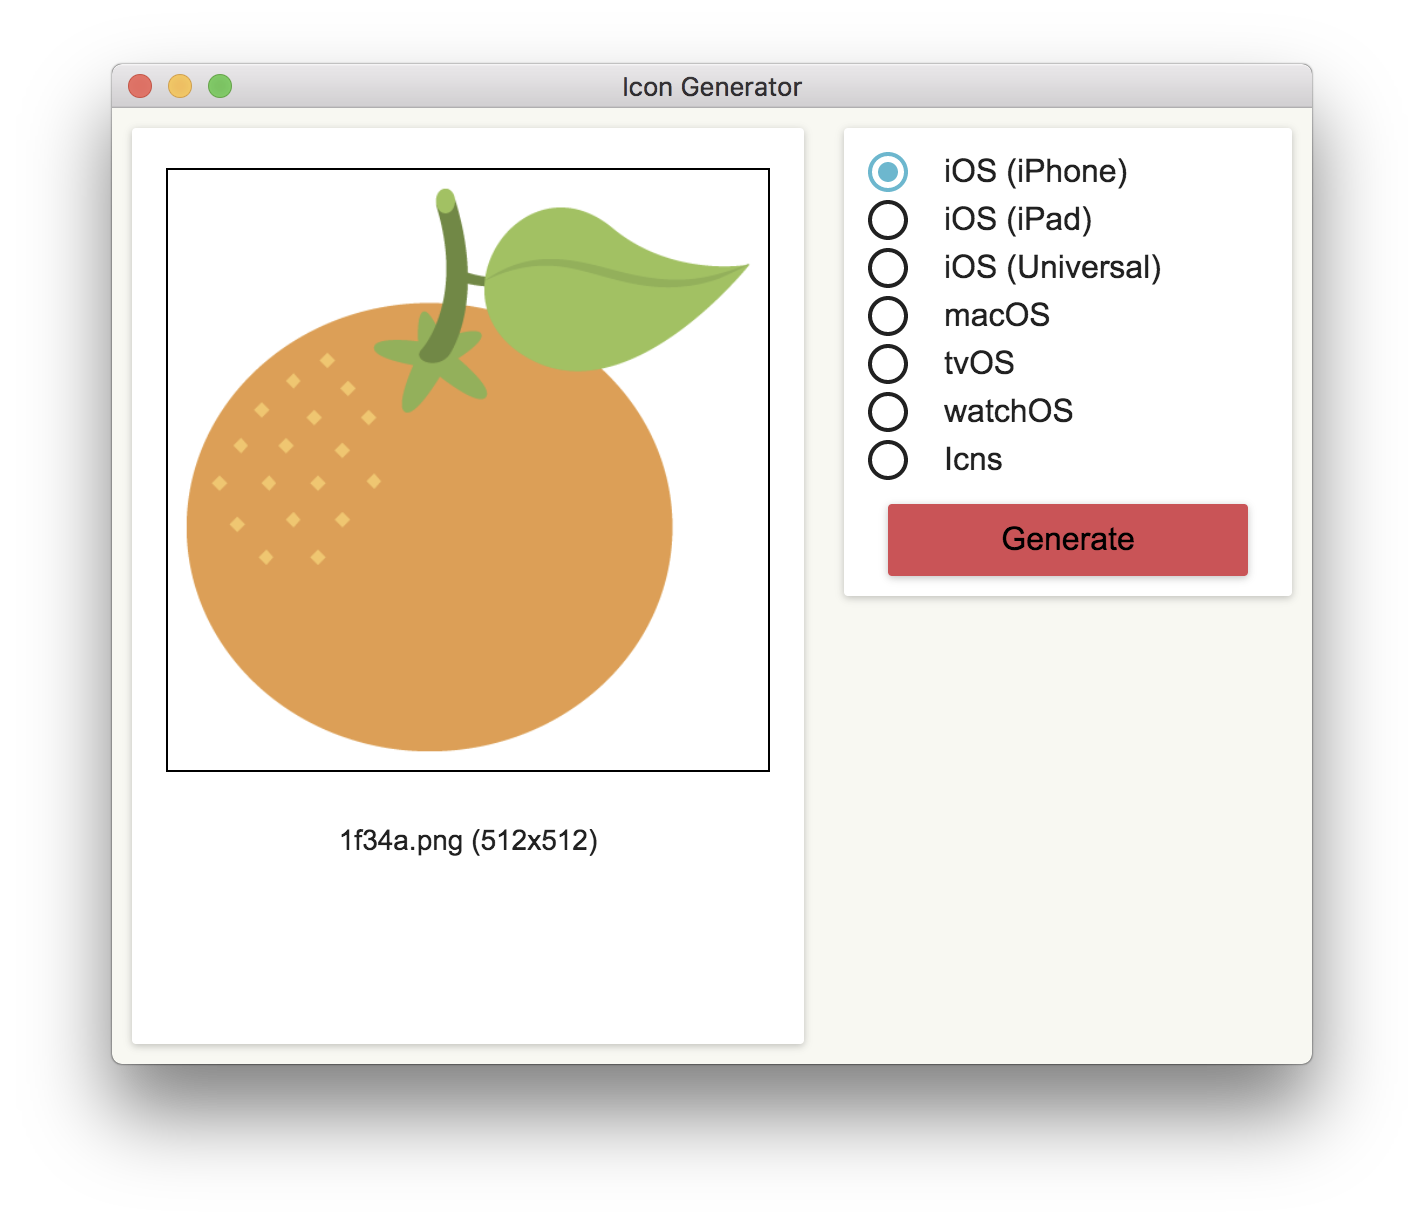
Click Generate and we get AppIcon.appiconset . This contains app icons of the required sizes that are ready to be used in Asset Catalog. Drag this to Asset Catalog in Xcode. That is for production.
For staging, it’s good practice to add a “Staging” banner so that testers know which is staging, and which is production. We can easily do this in Sketch.
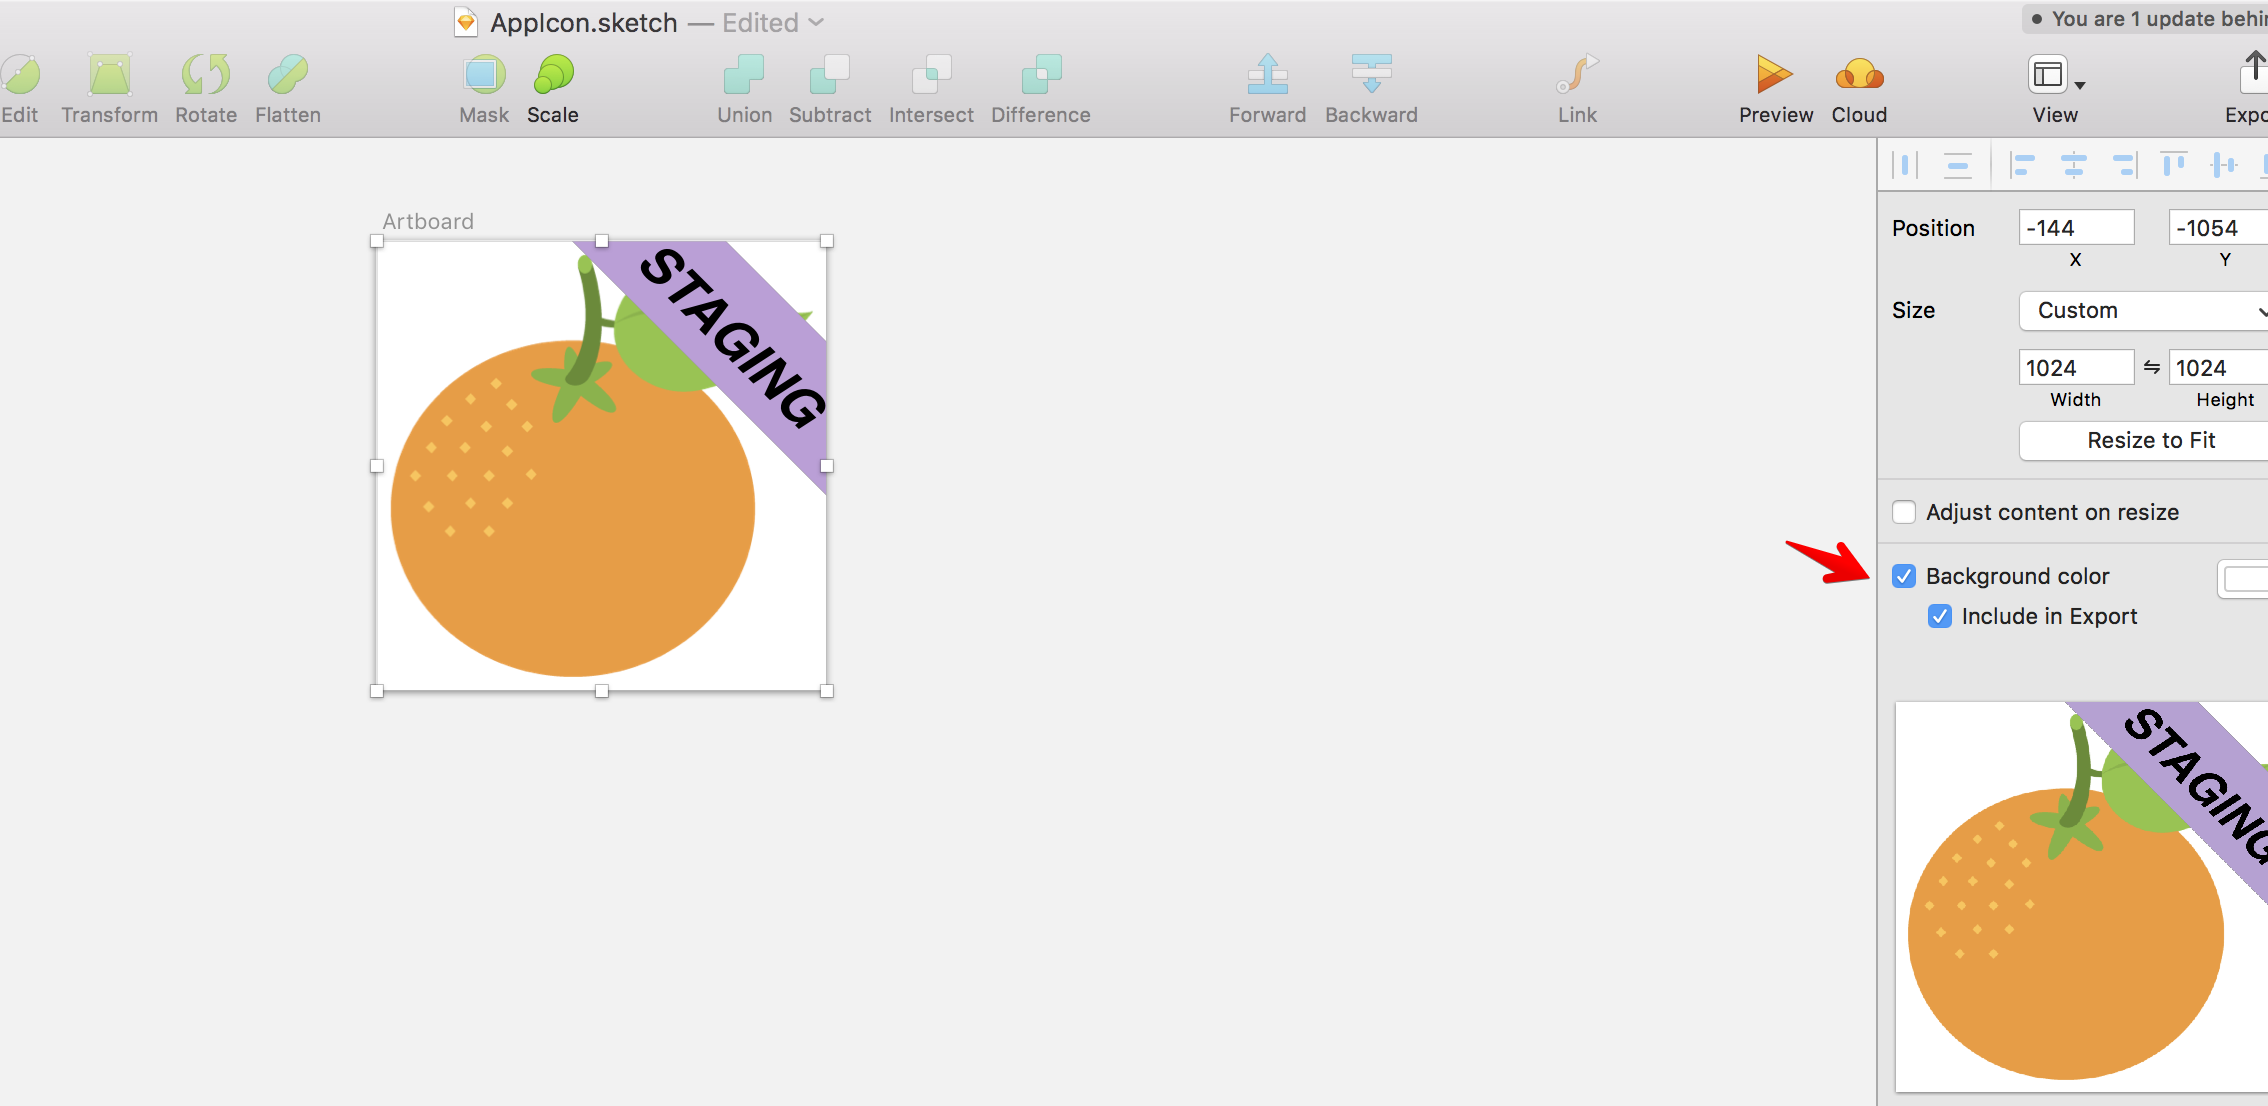
Remember to set a background, so we don’t get a transparent background. For an app icon with transparent background, iOS shows the background as black which looks horrible.
After exporting the image, drag the staging icon to the IconGenerator the same way we did earlier. But this time, rename the generated appiconset to AppIcon-Staging.appiconset. Then drag this to Asset Catalog in Xcode.
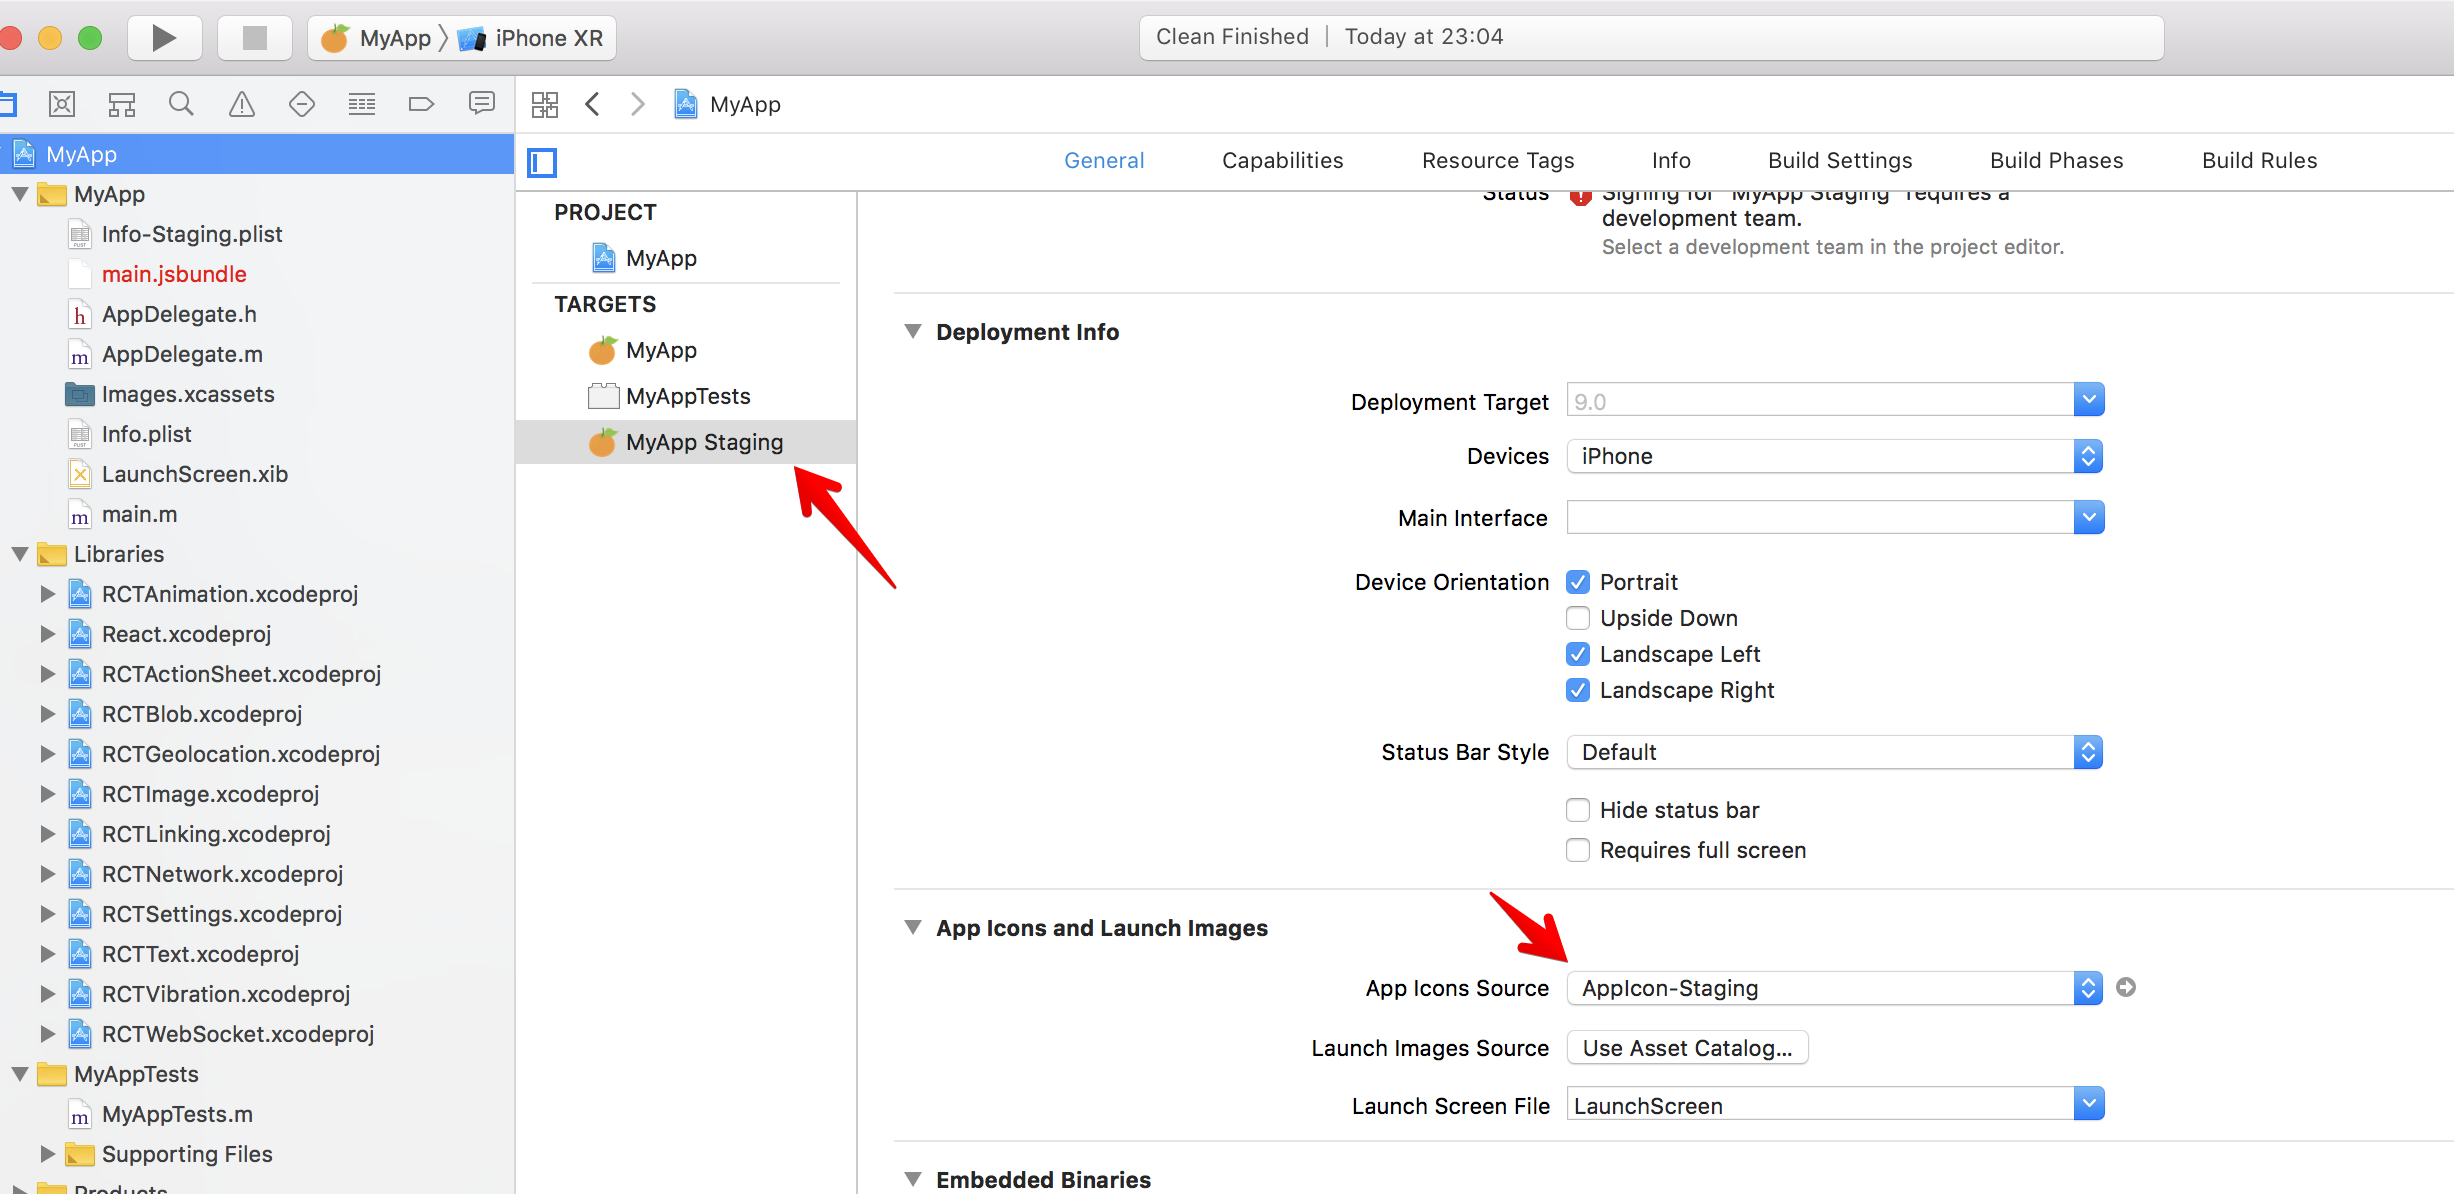
For the staging target to use staging app icons, open MyApp Staging target and choose AppIcon-Staging as App Icon Source.
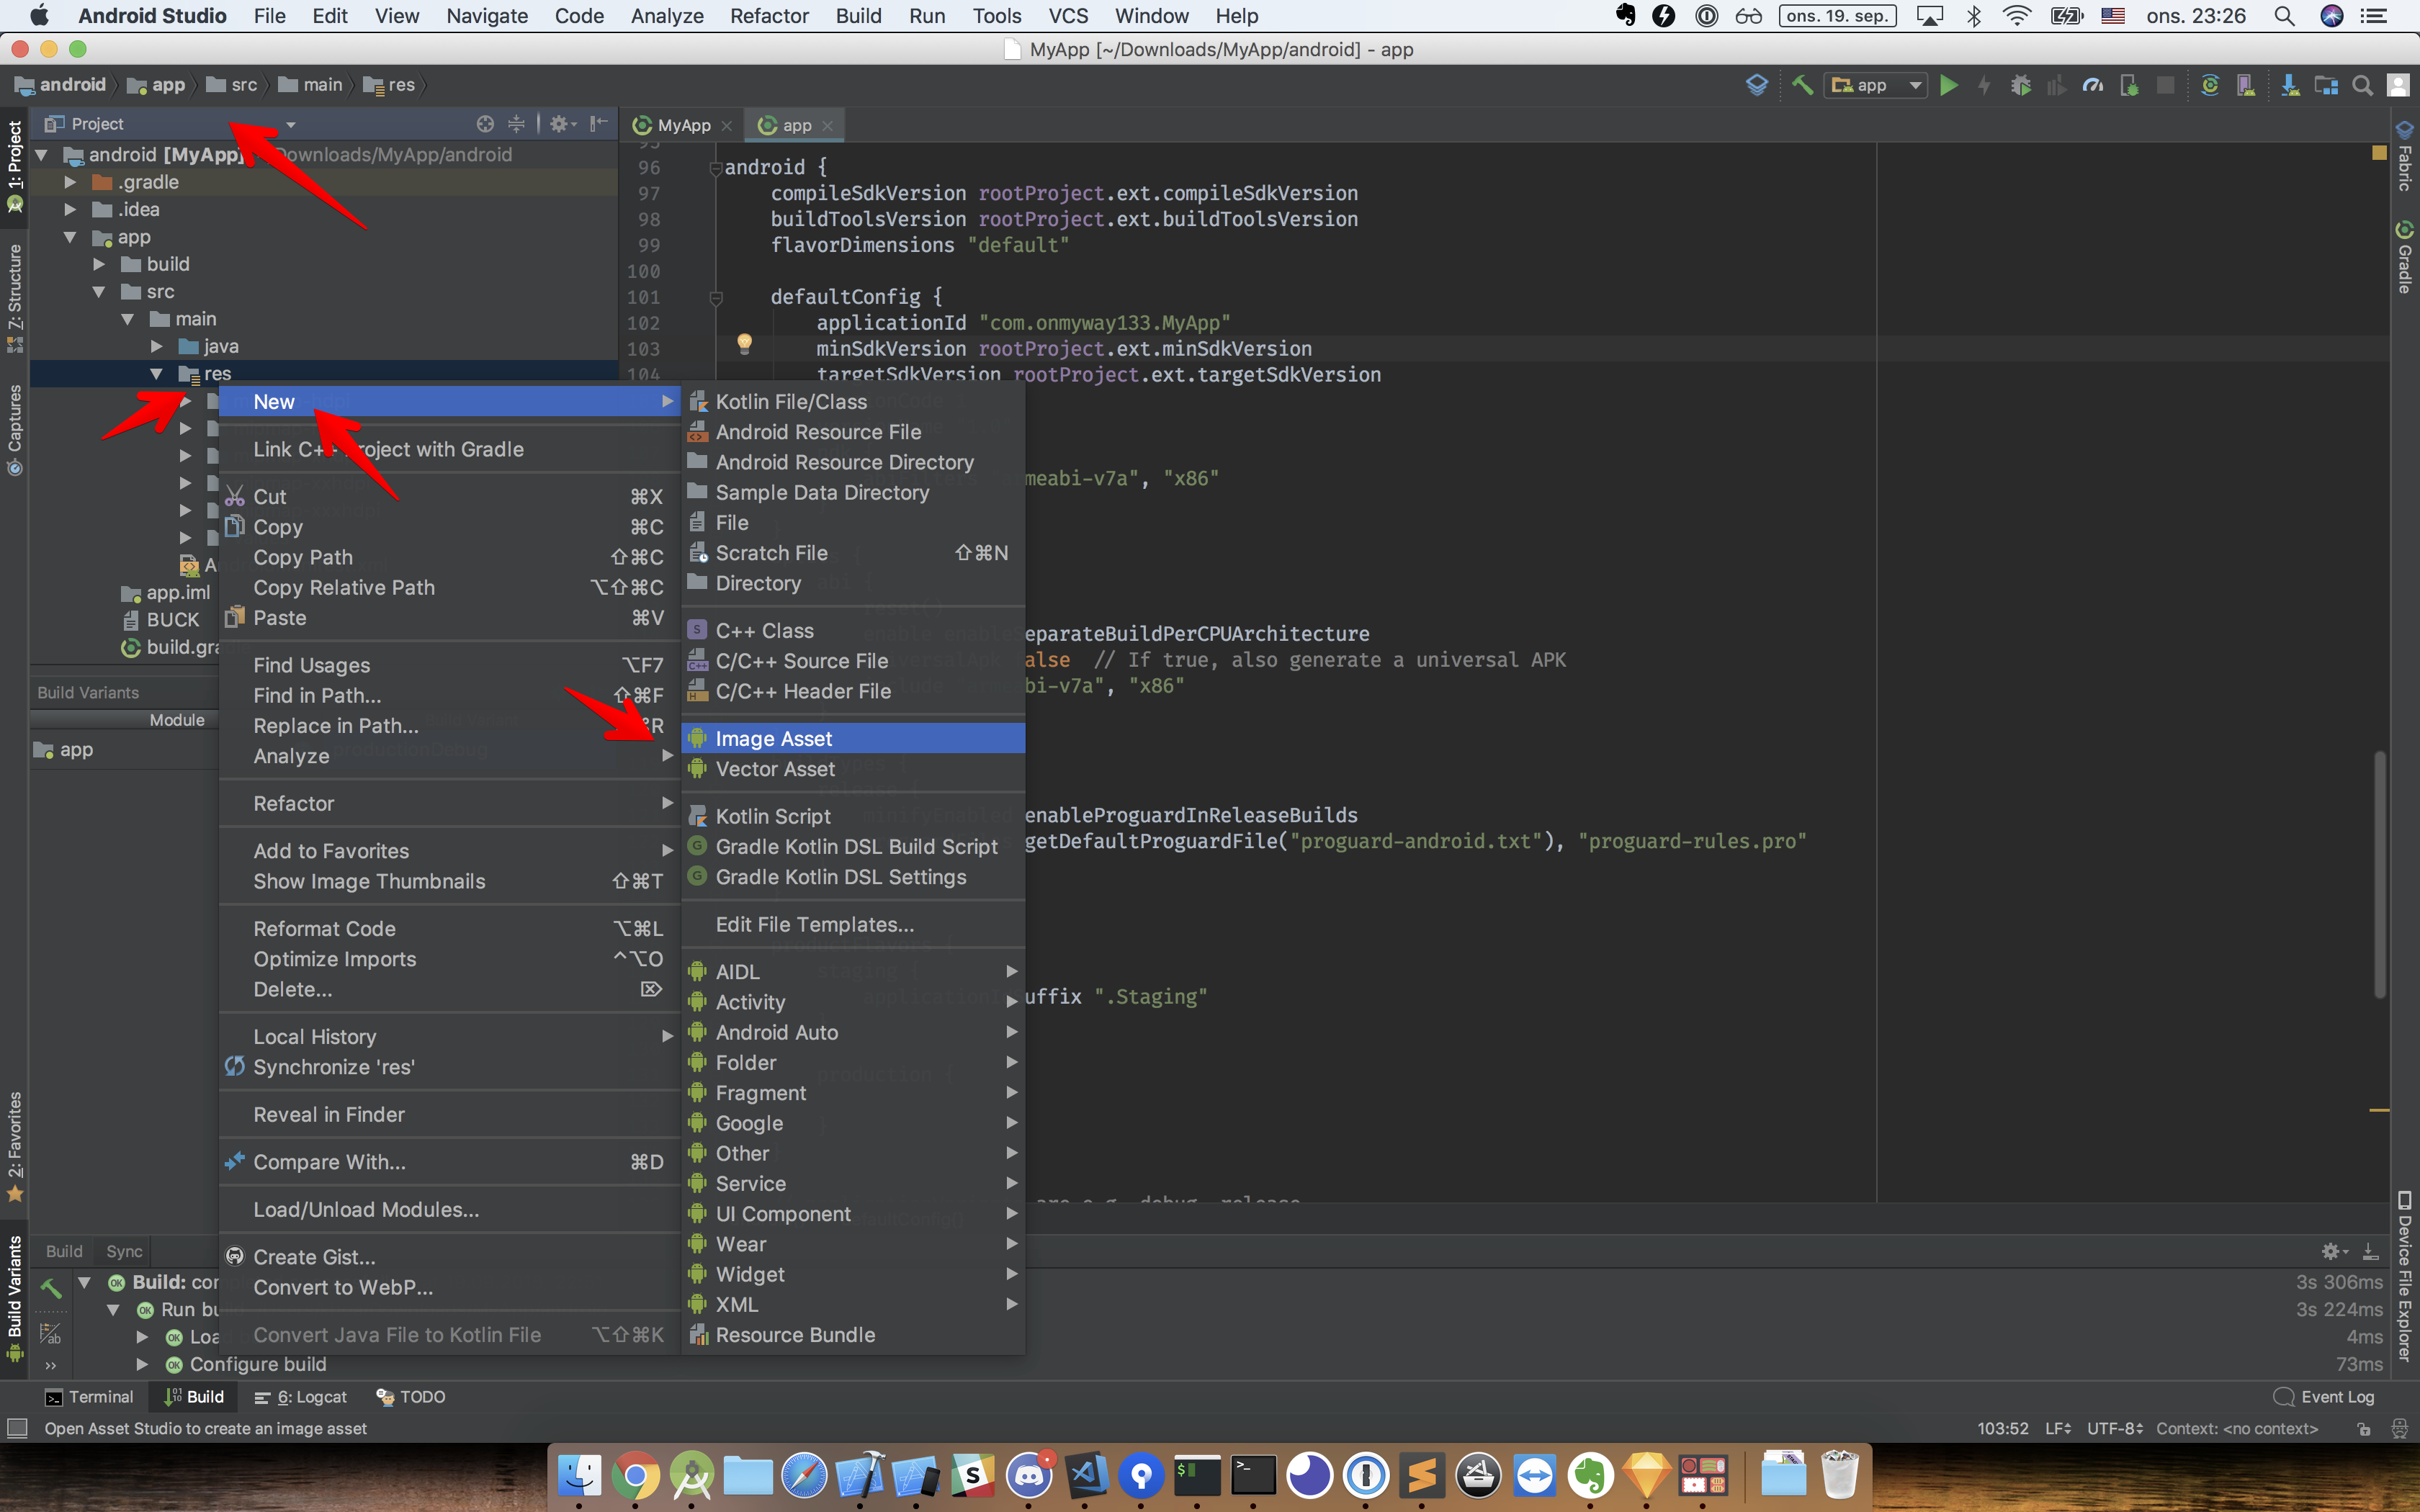
I like to switch to Project view, as it is easier to change app icons. Click res -> New -> Image Asset to open Asset Studio. We can use the same app icons that we used in iOS:
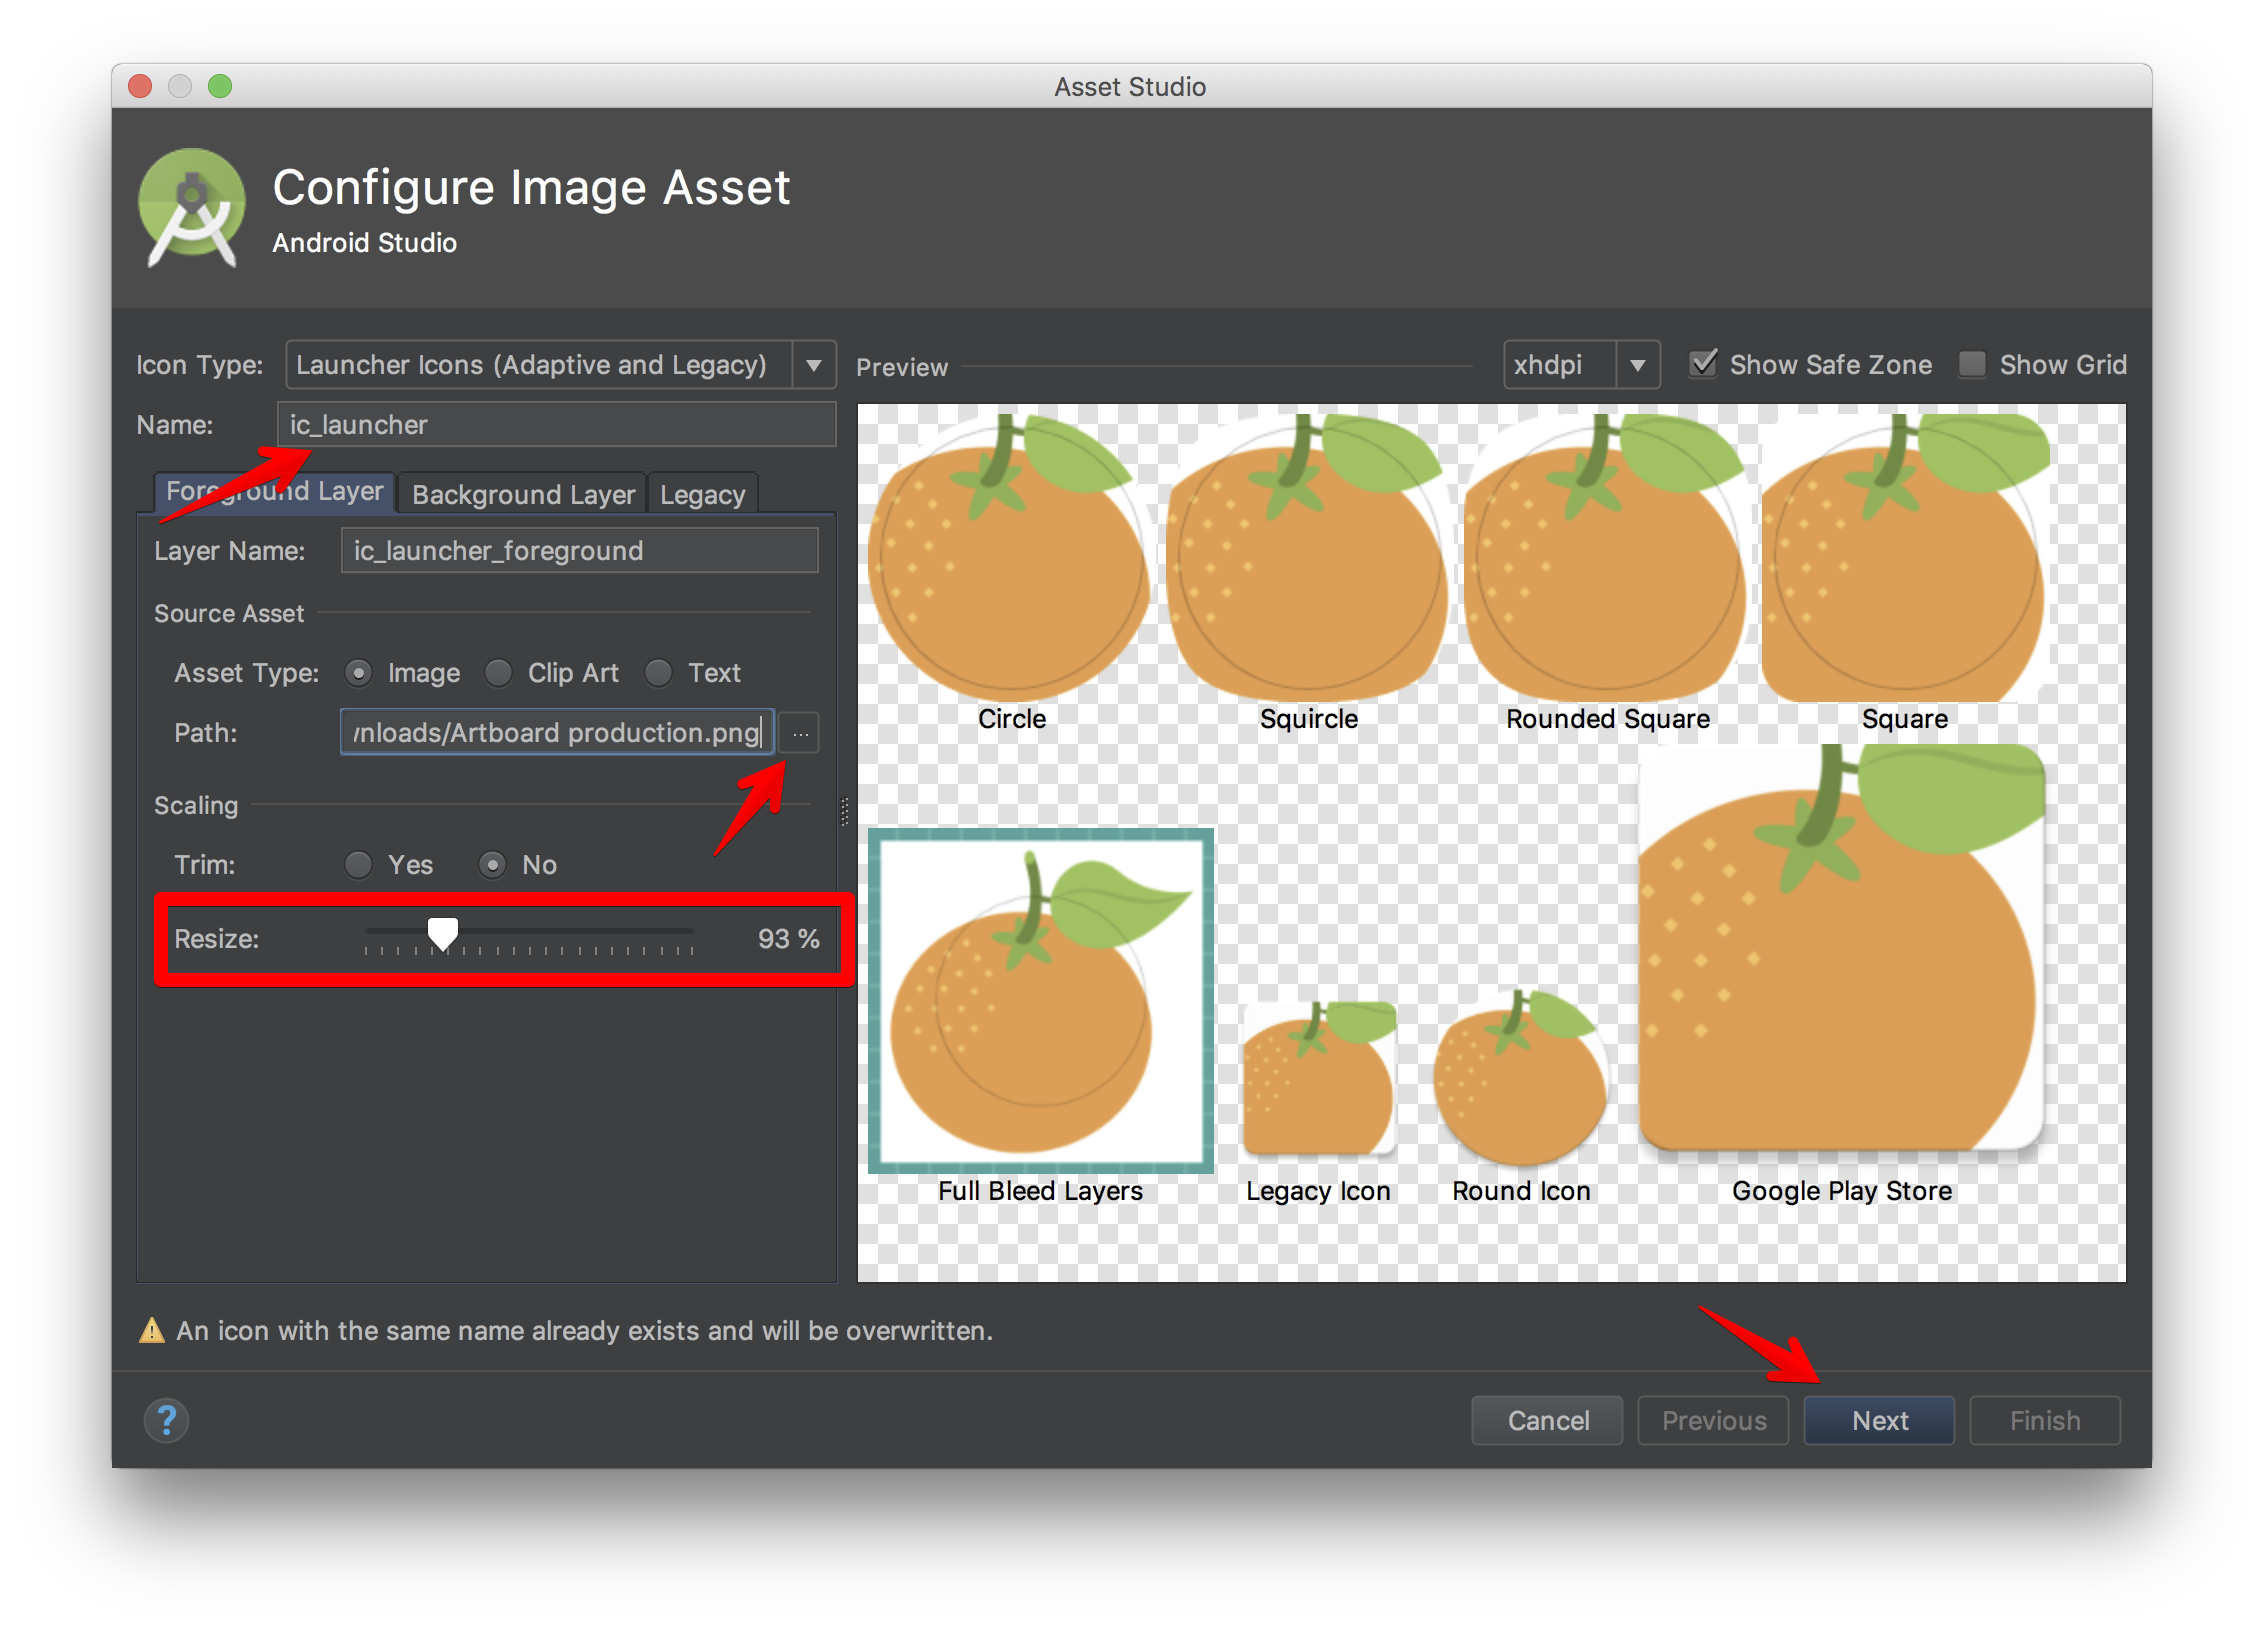
Android 8.0 (API level 26) introduced Adaptive Icons so we need to tweak the Resize slider to make sure our app icons look as nice as possible.
Android 8.0 (API level 26) introduces adaptive launcher icons, which can display a variety of shapes across different device models. For example, an adaptive launcher icon can display a circular shape on one OEM device, and display a squircle on another device. Each device OEM provides a mask, which the system then uses to render all adaptive icons with the same shape. Adaptive launcher icons are also used in shortcuts, the Settings app, sharing dialogs, and the overview screen. — Android developers
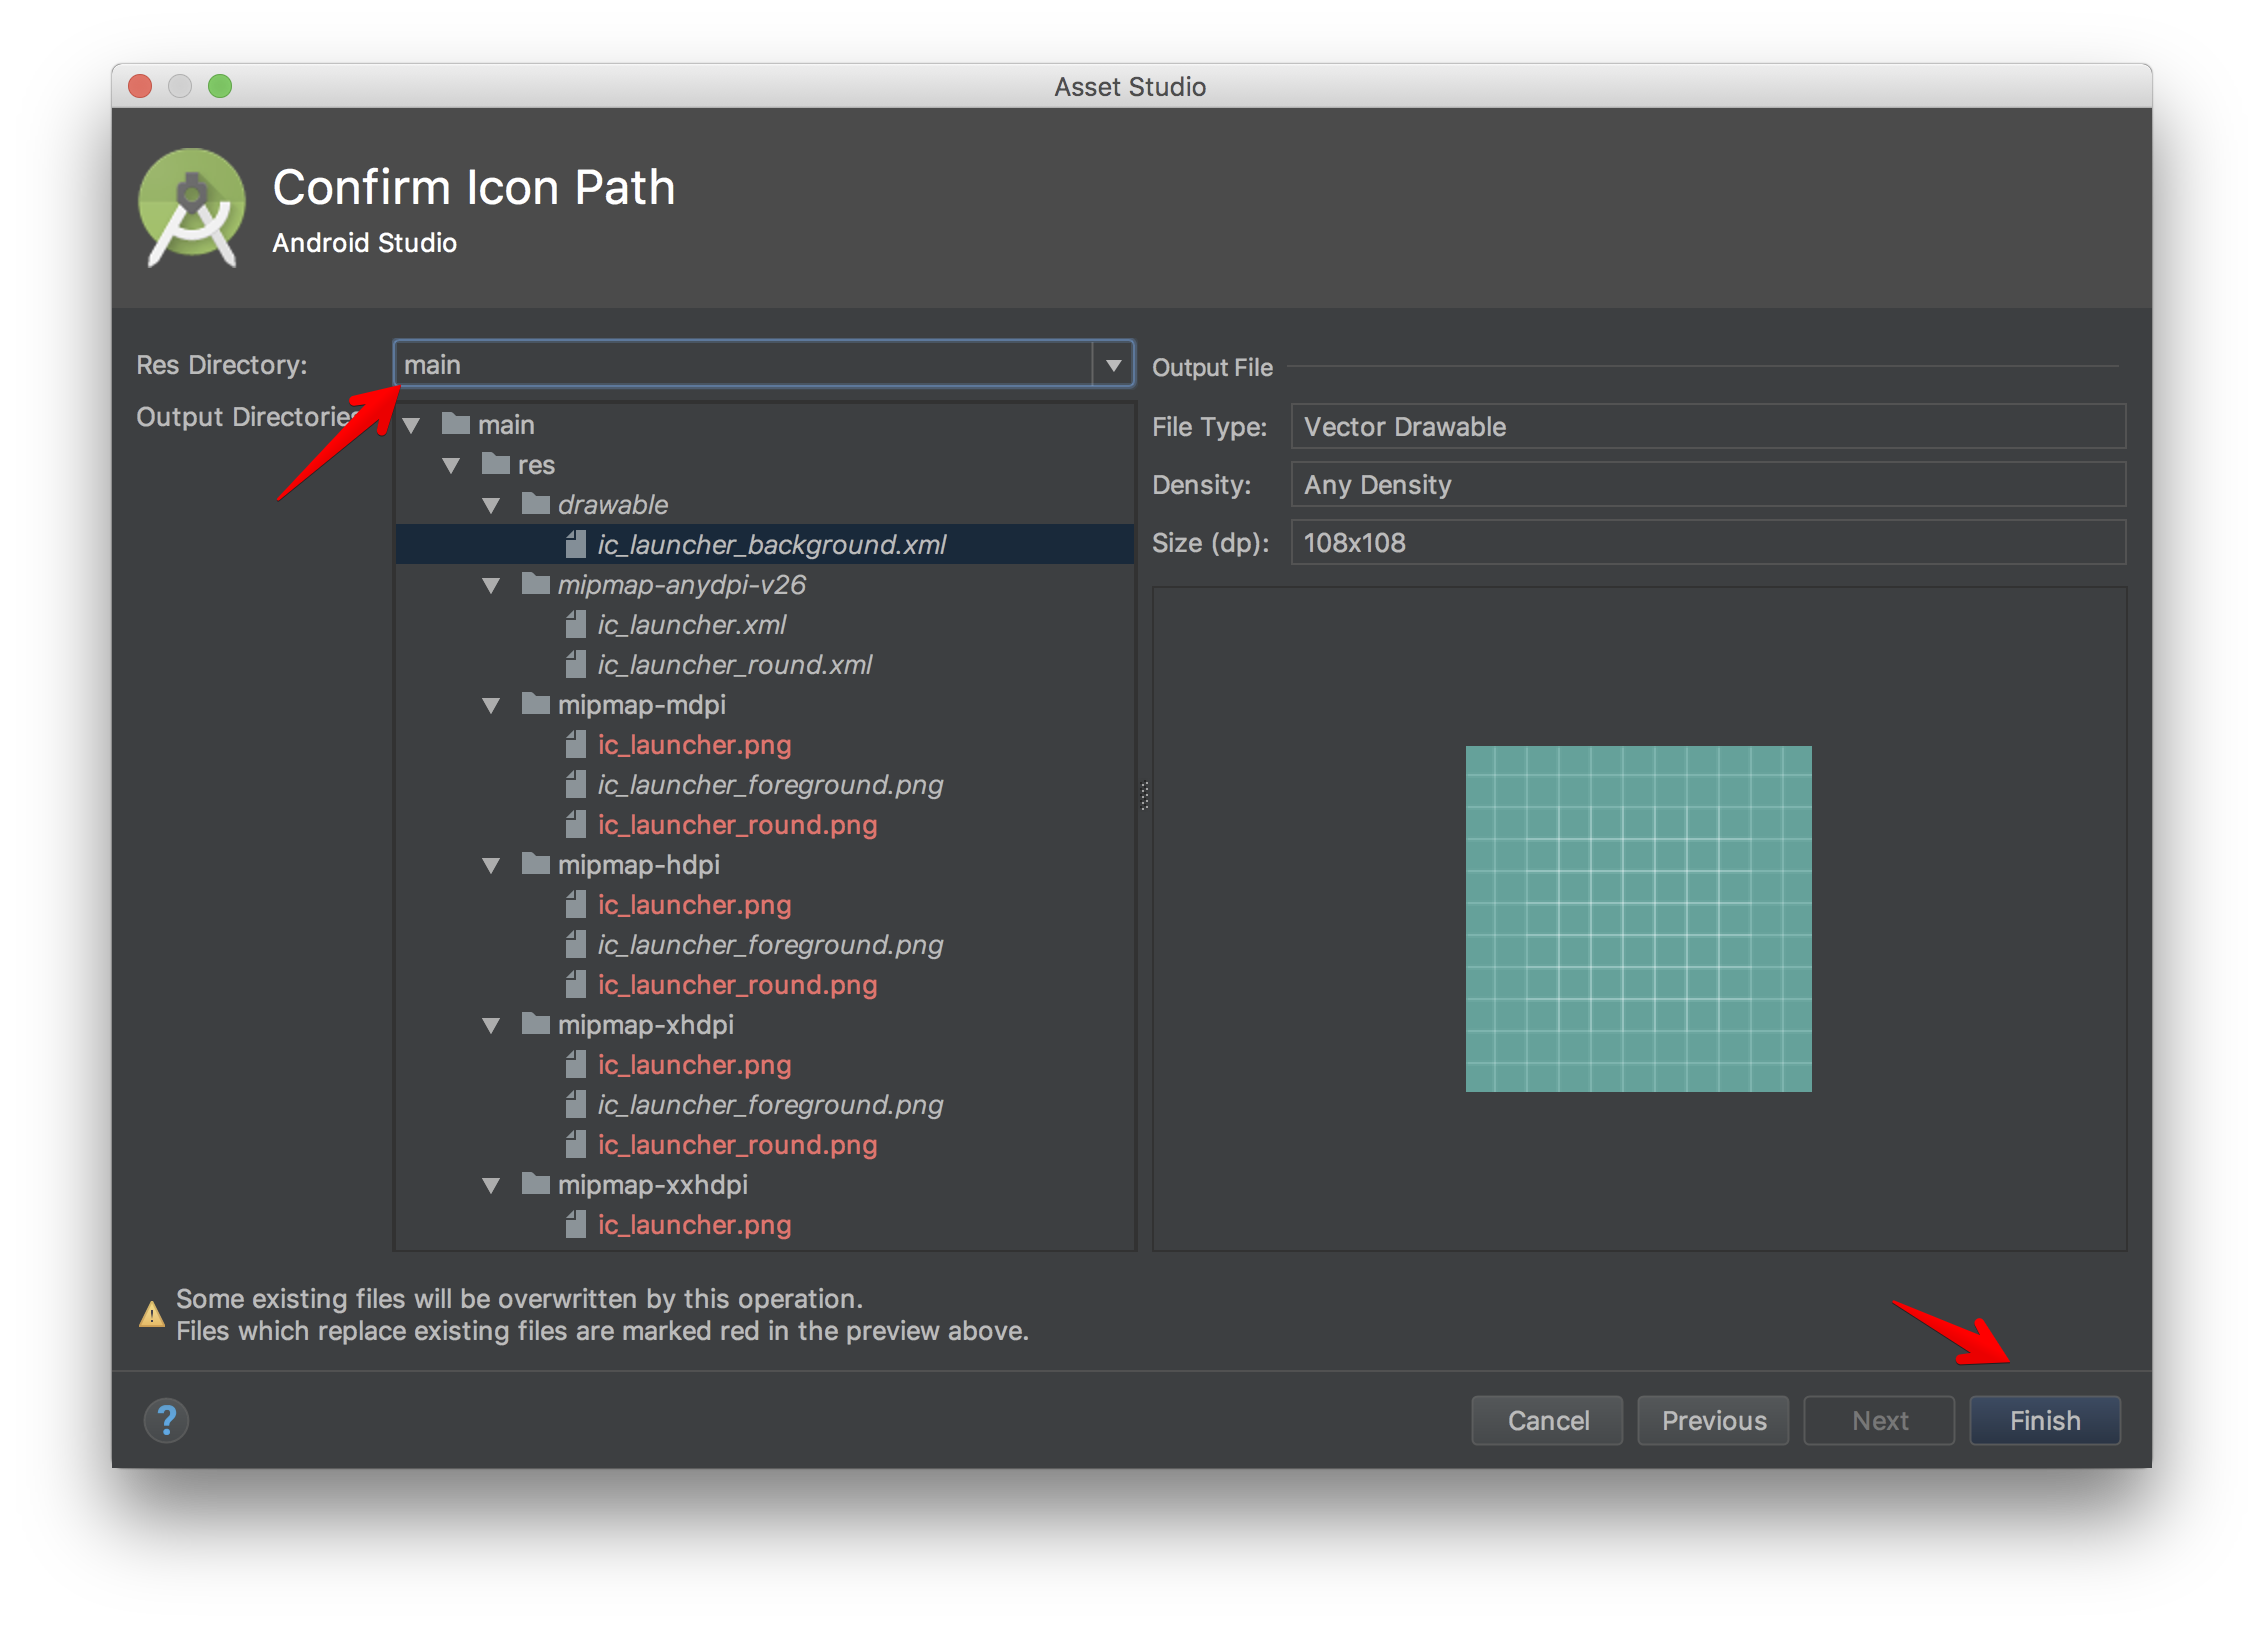
We are doing for production first, which means the main Res Directory. This step will replace the existing placeholder app icons generated by Android Studio when we bootstrapped React Native projects.
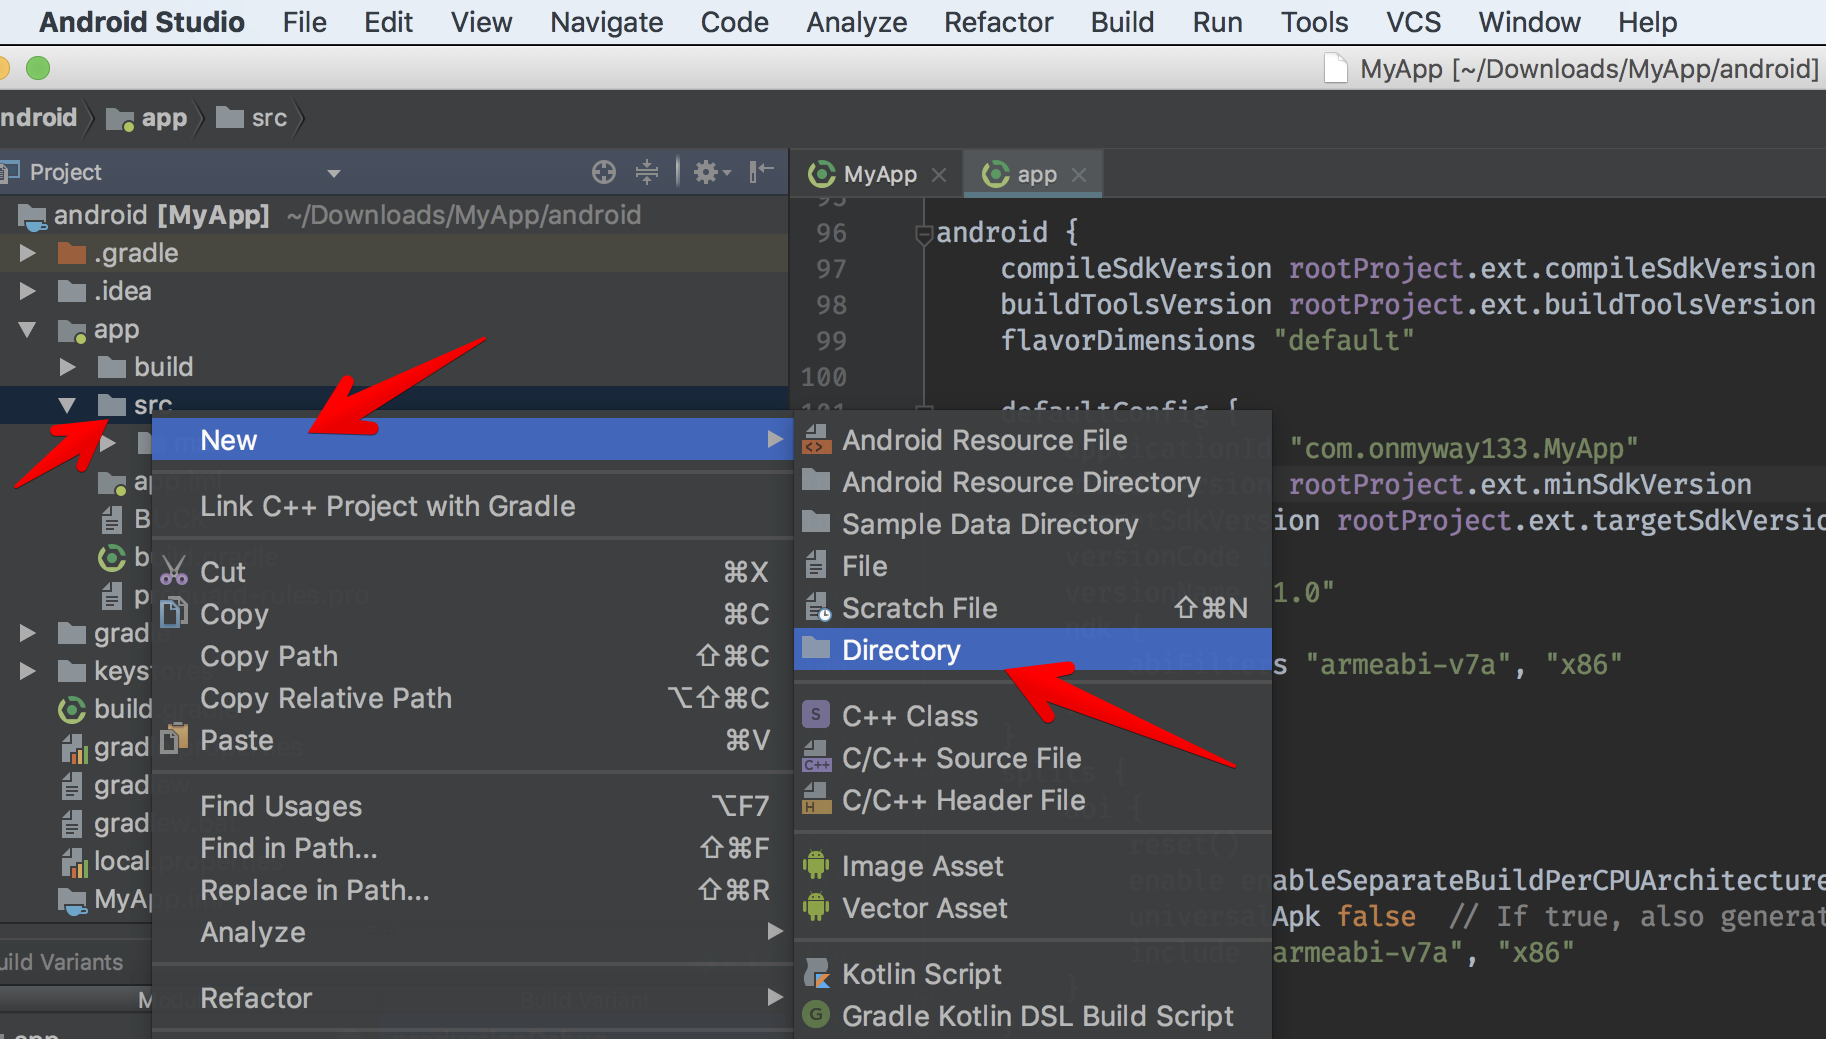
Now that we have production app icons, let’s make staging app icons. Android manages code and assets via convention. Click on src -> New -> Directory and create a staging folder. Inside staging, create a folder called res . Anything we place in staging will replace the ones in main — this is called source sets.
You can read more here: Build with source sets.
You can use source set directories to contain the code and resources you want packaged only with certain configurations. For example, if you are building the “demoDebug” build variant, which is the crossproduct of a “demo” product flavor and “debug” build type, Gradle looks at these directories, and gives them the following priority:
src/demoDebug/ (build variant source set)
src/debug/ (build type source set)
src/demo/ (product flavor source set)
src/main/ (main source set)
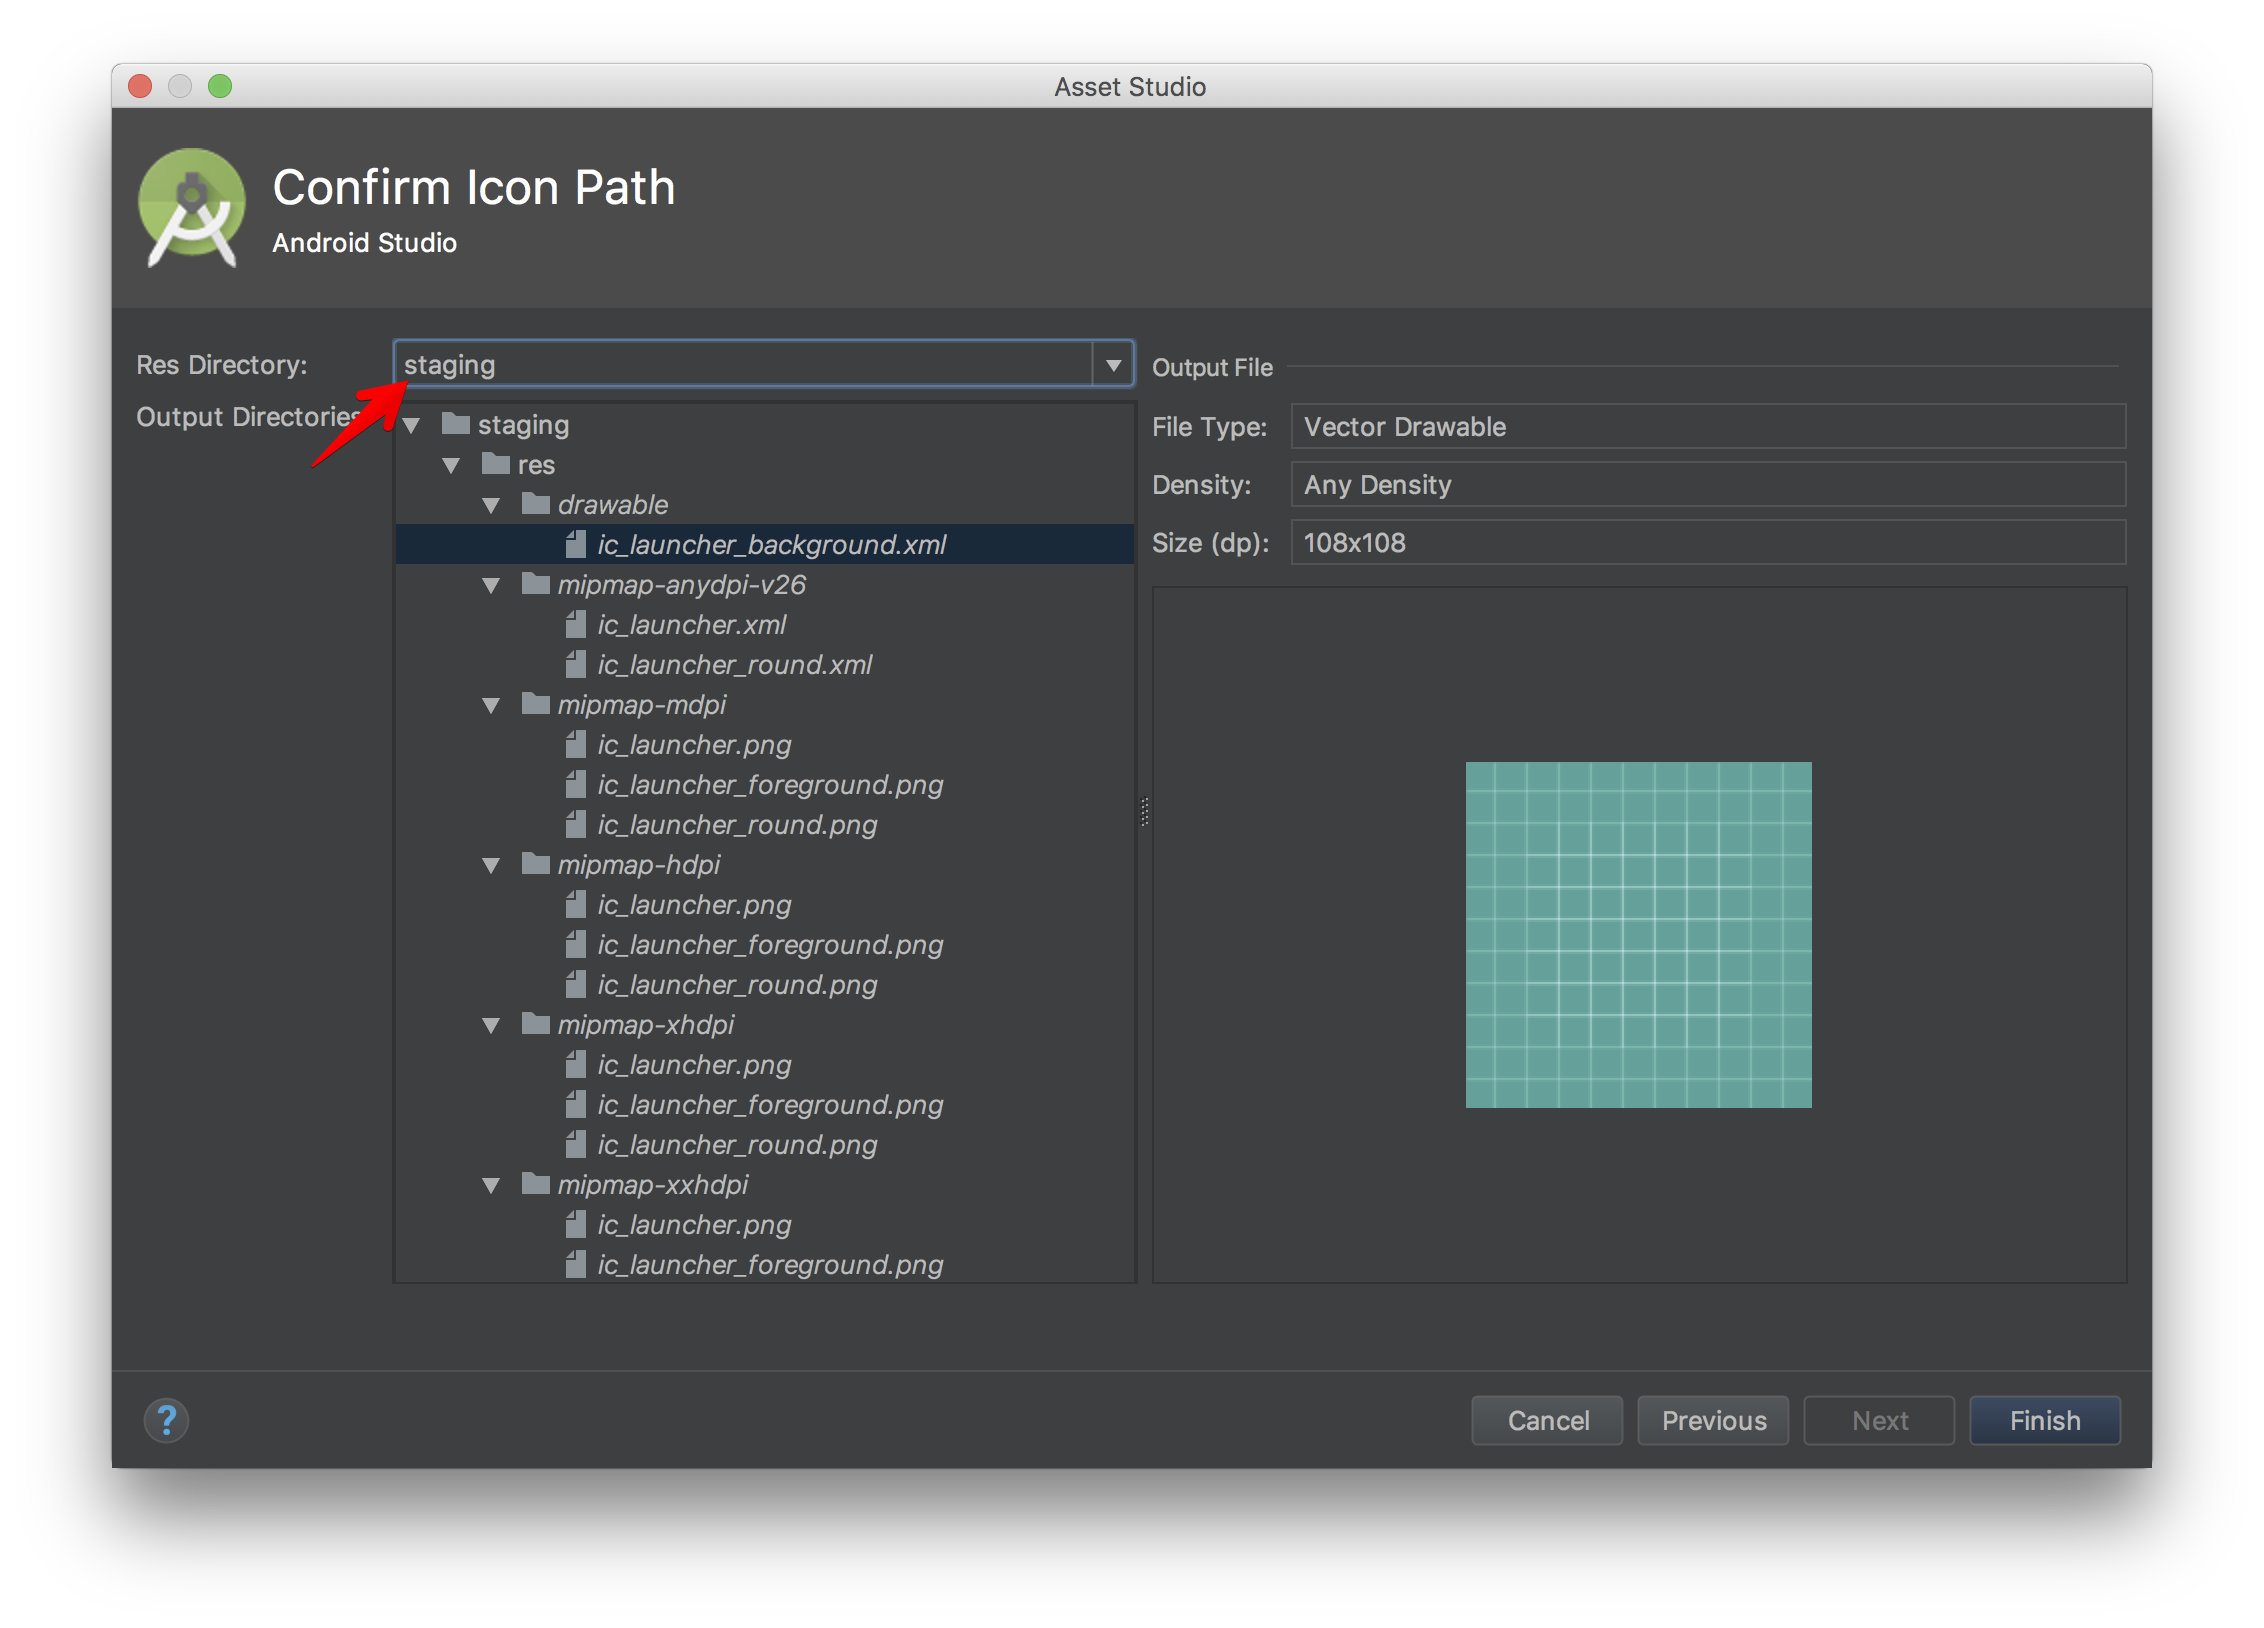
Right click on staging/res -> New -> Image Asset to make app icons for staging. We also use the same staging app icons like in iOS, but this time we choose staging as Res Directory. This way Android Studio knows how to generate different ic_launcher and put them into staging.
The splash screen is called a [Launch Screen](http://Launch Screen) in iOS, and it is important.
A launch screen appears instantly when your app starts up. The launch screen is quickly replaced with the first screen of your app, giving the impression that your app is fast and responsive
In the old days, we needed to use static launch images with different sizes for each device and orientation.
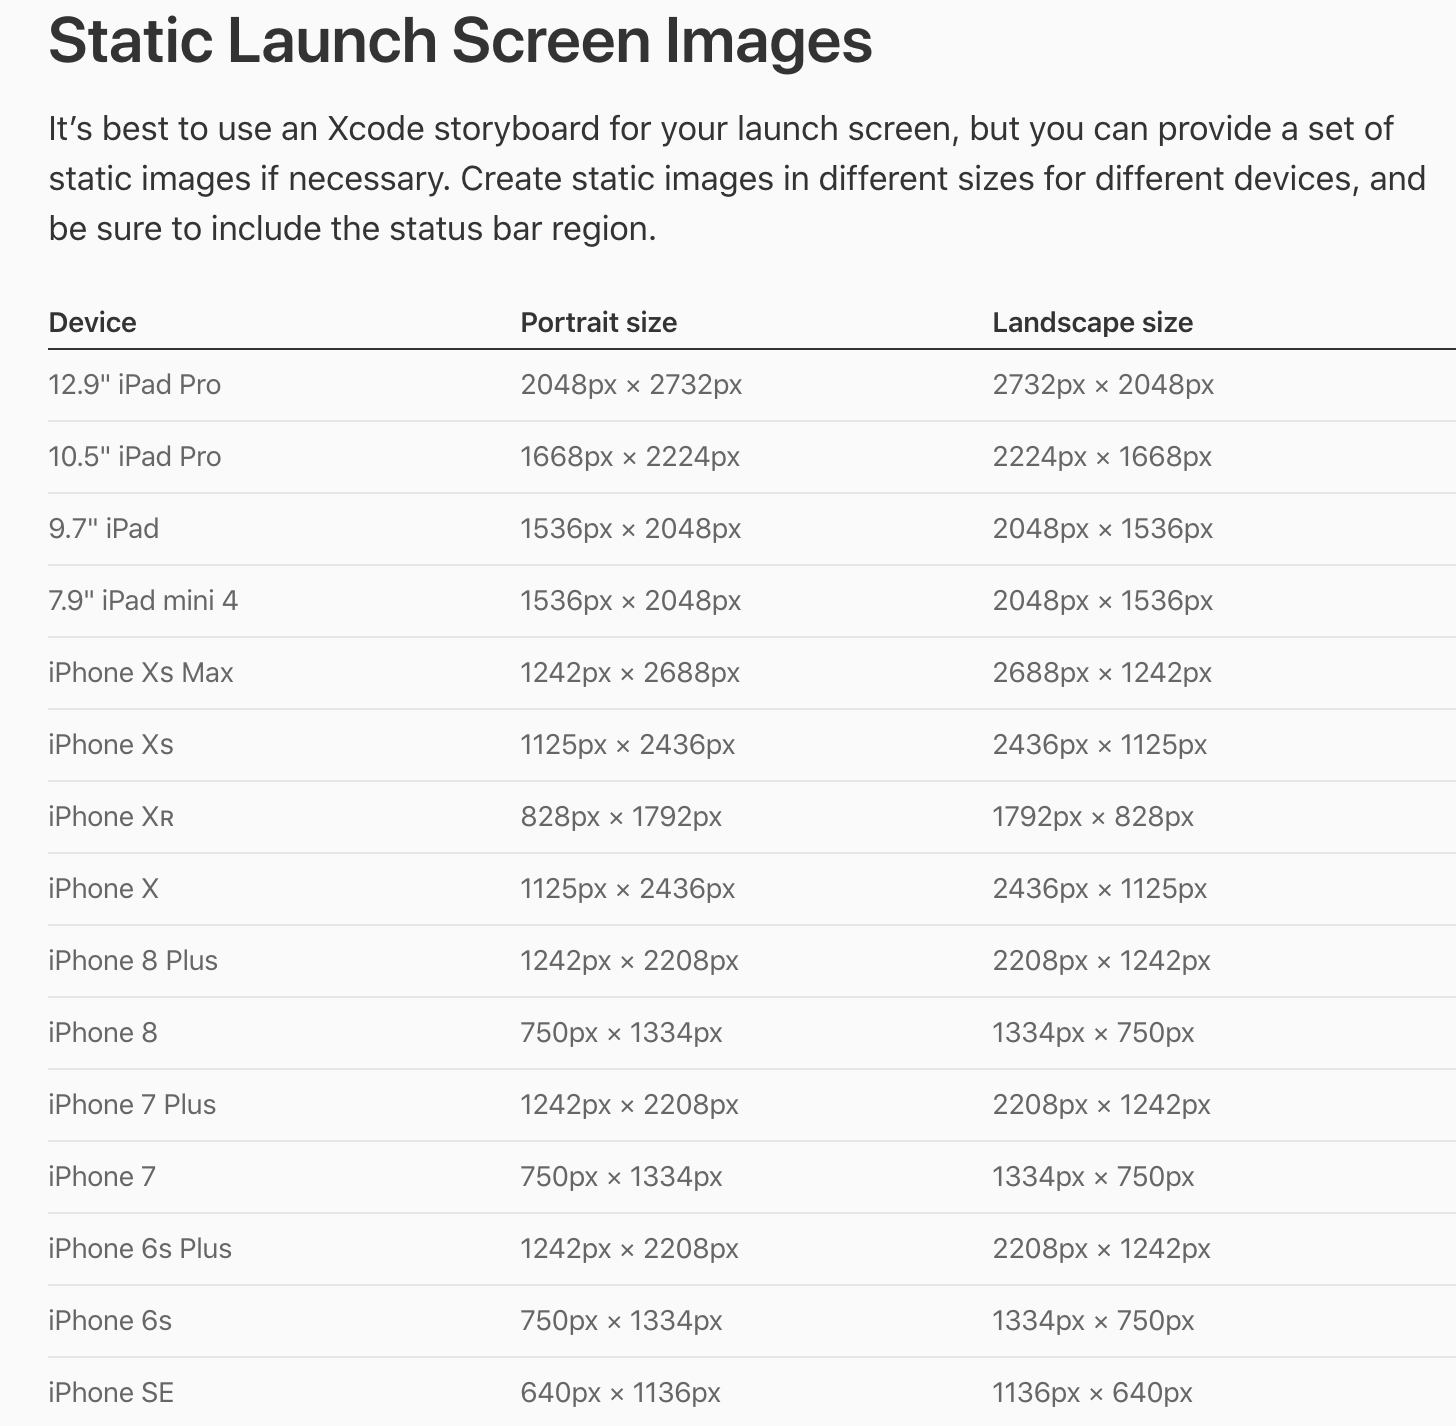
For now the recommended way is to use Launch Screen storyboard . The iOS project from React Native comes with LaunchScreen.xib but xib is a thing of the past. Let’s delete it and create a file called Launch Screen.storyboard .
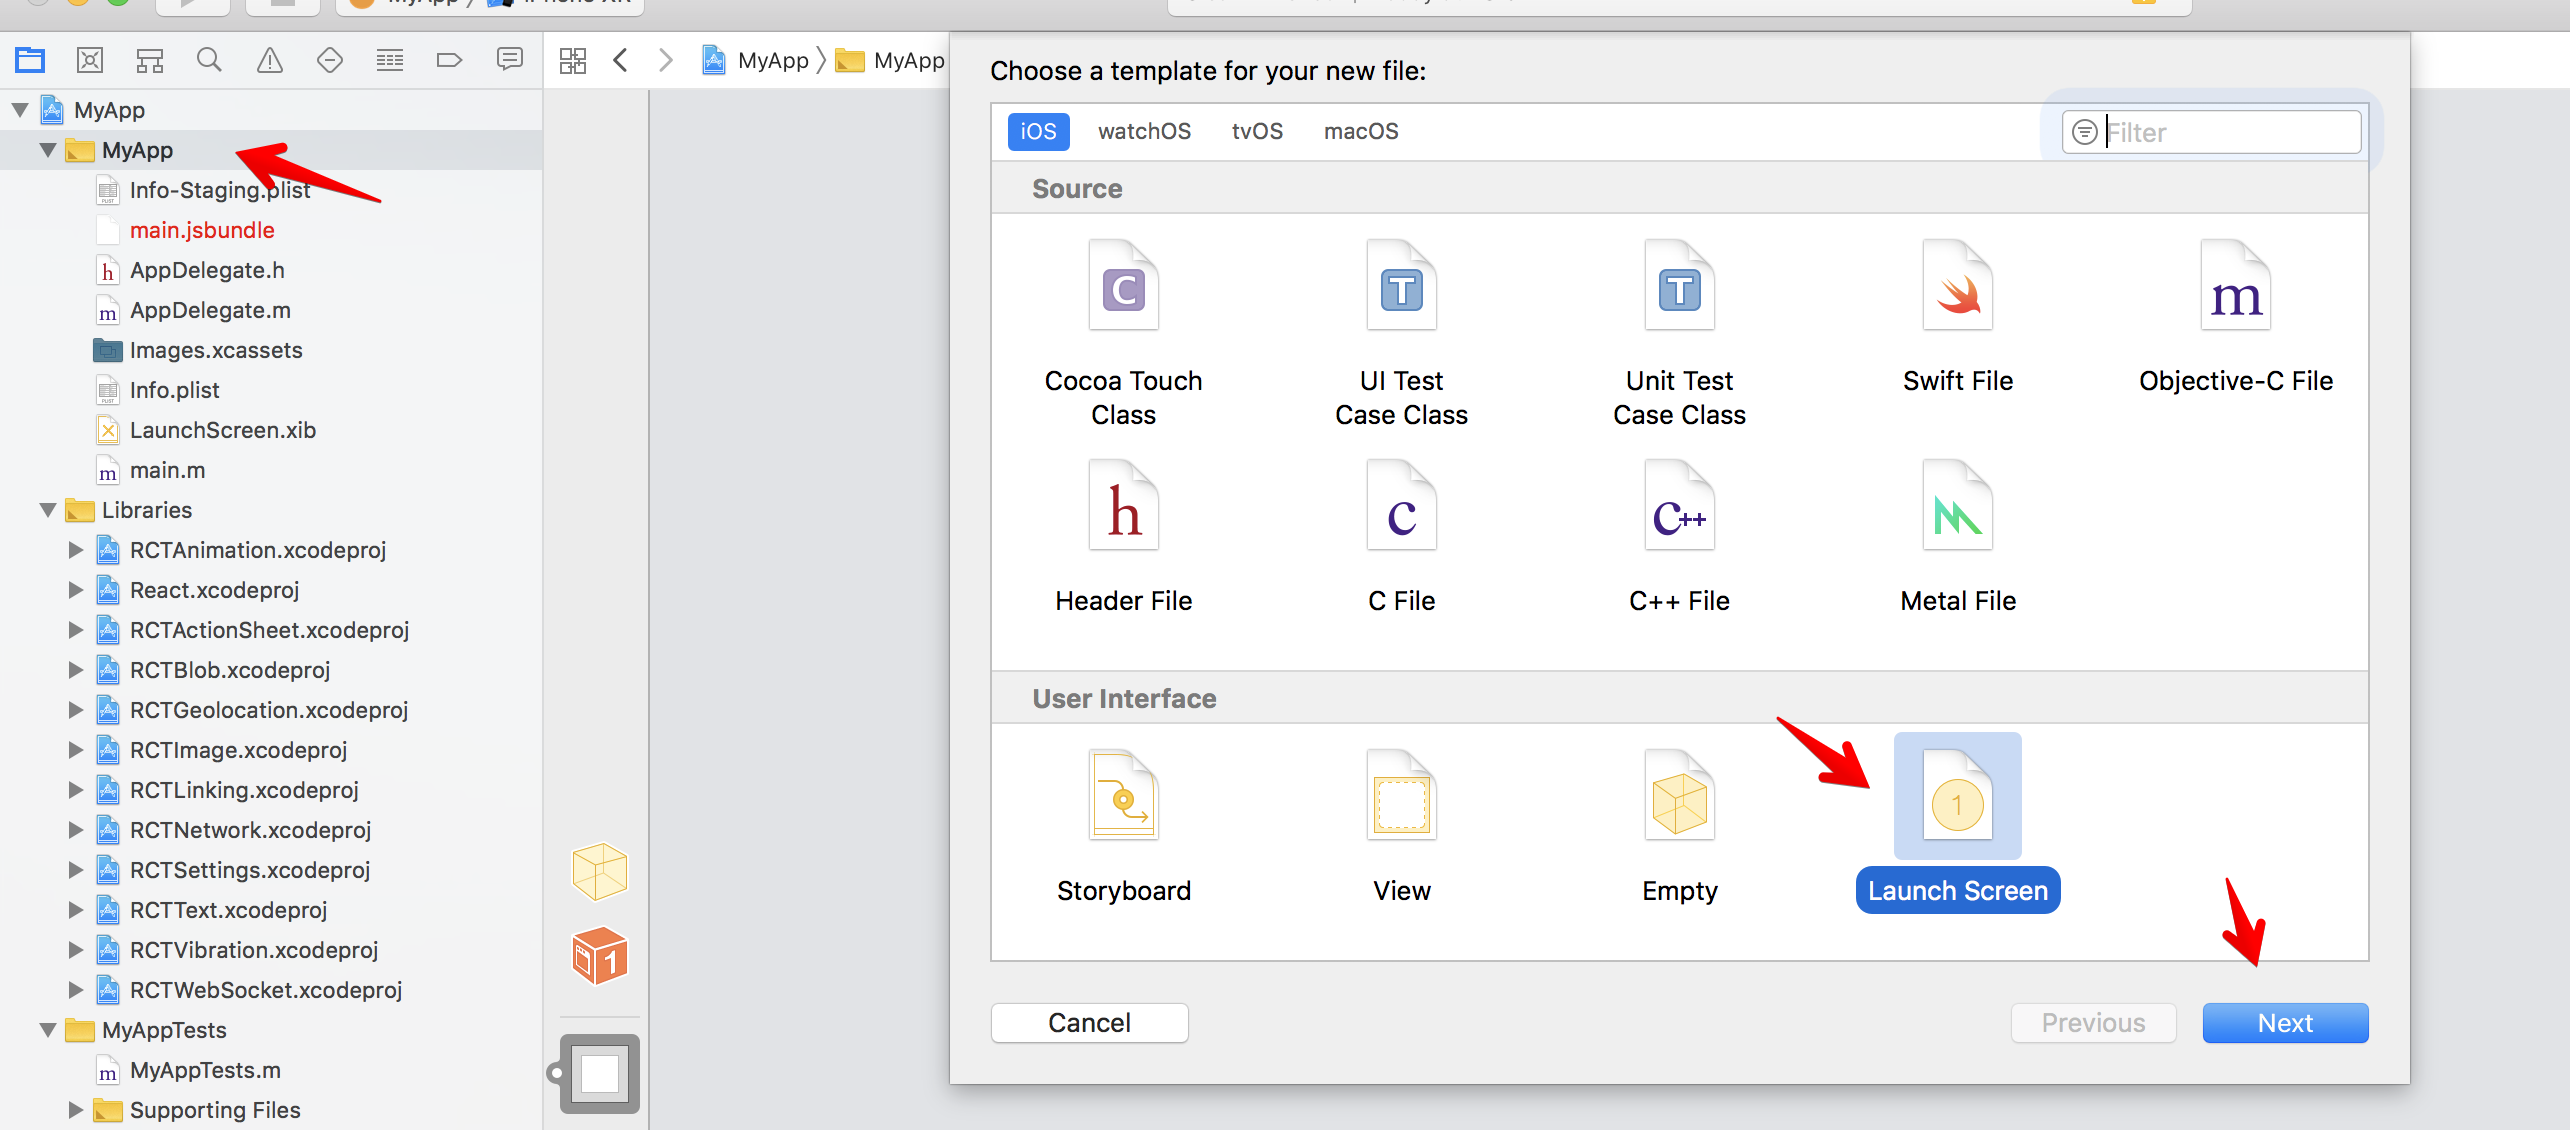
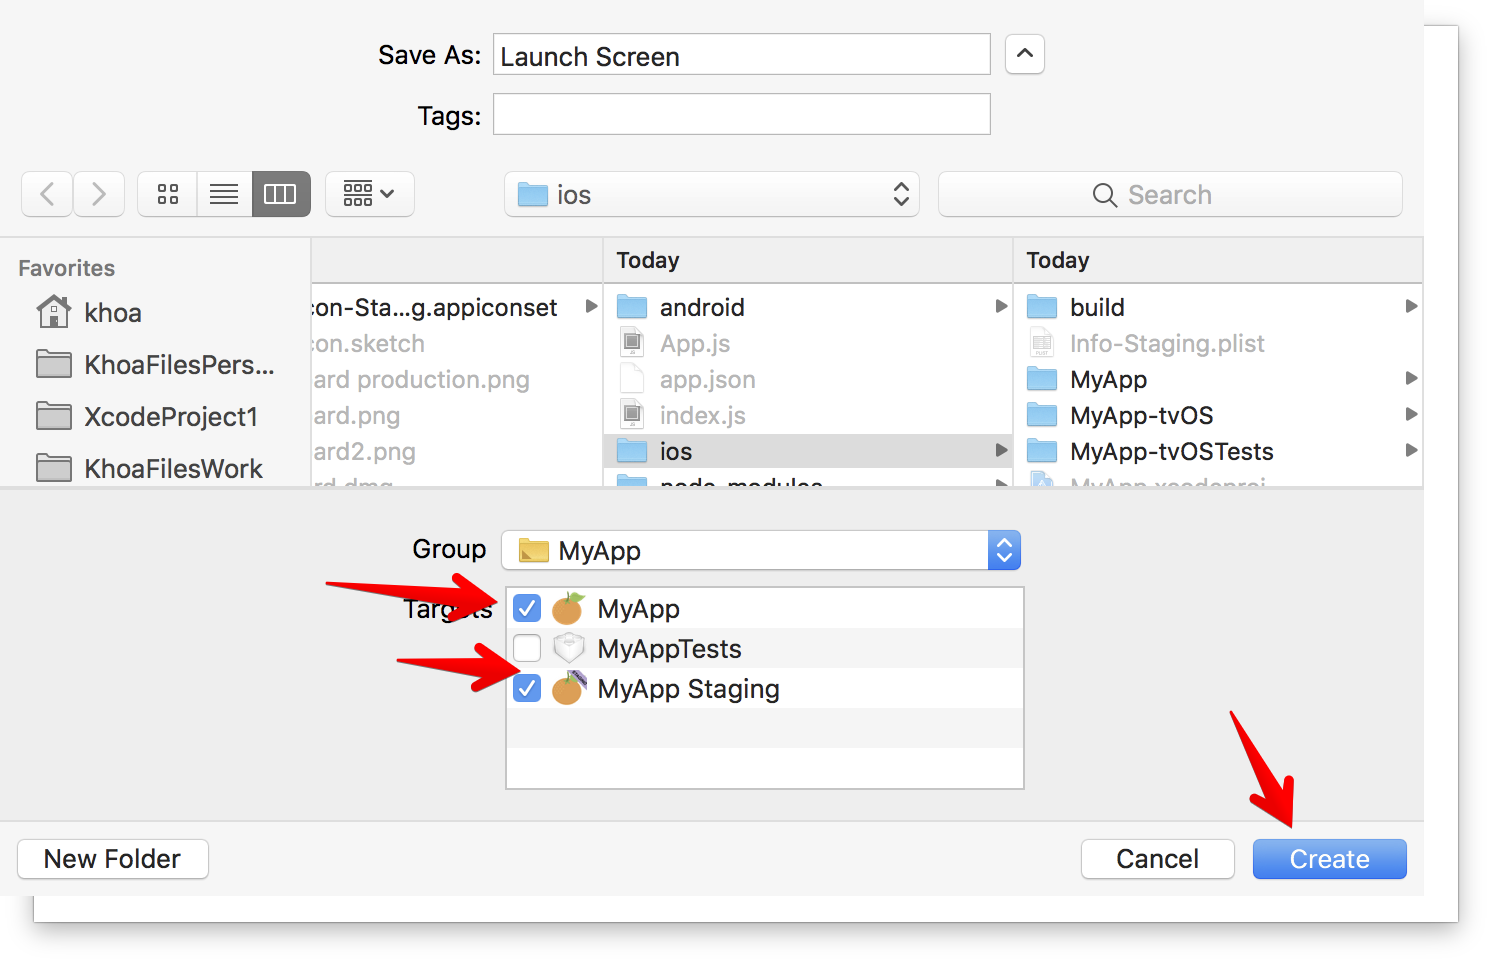
Right click on MyApp folder -> New and chose Launch Screen, add it to both targets as usually we show the same splash screen for both staging and production.
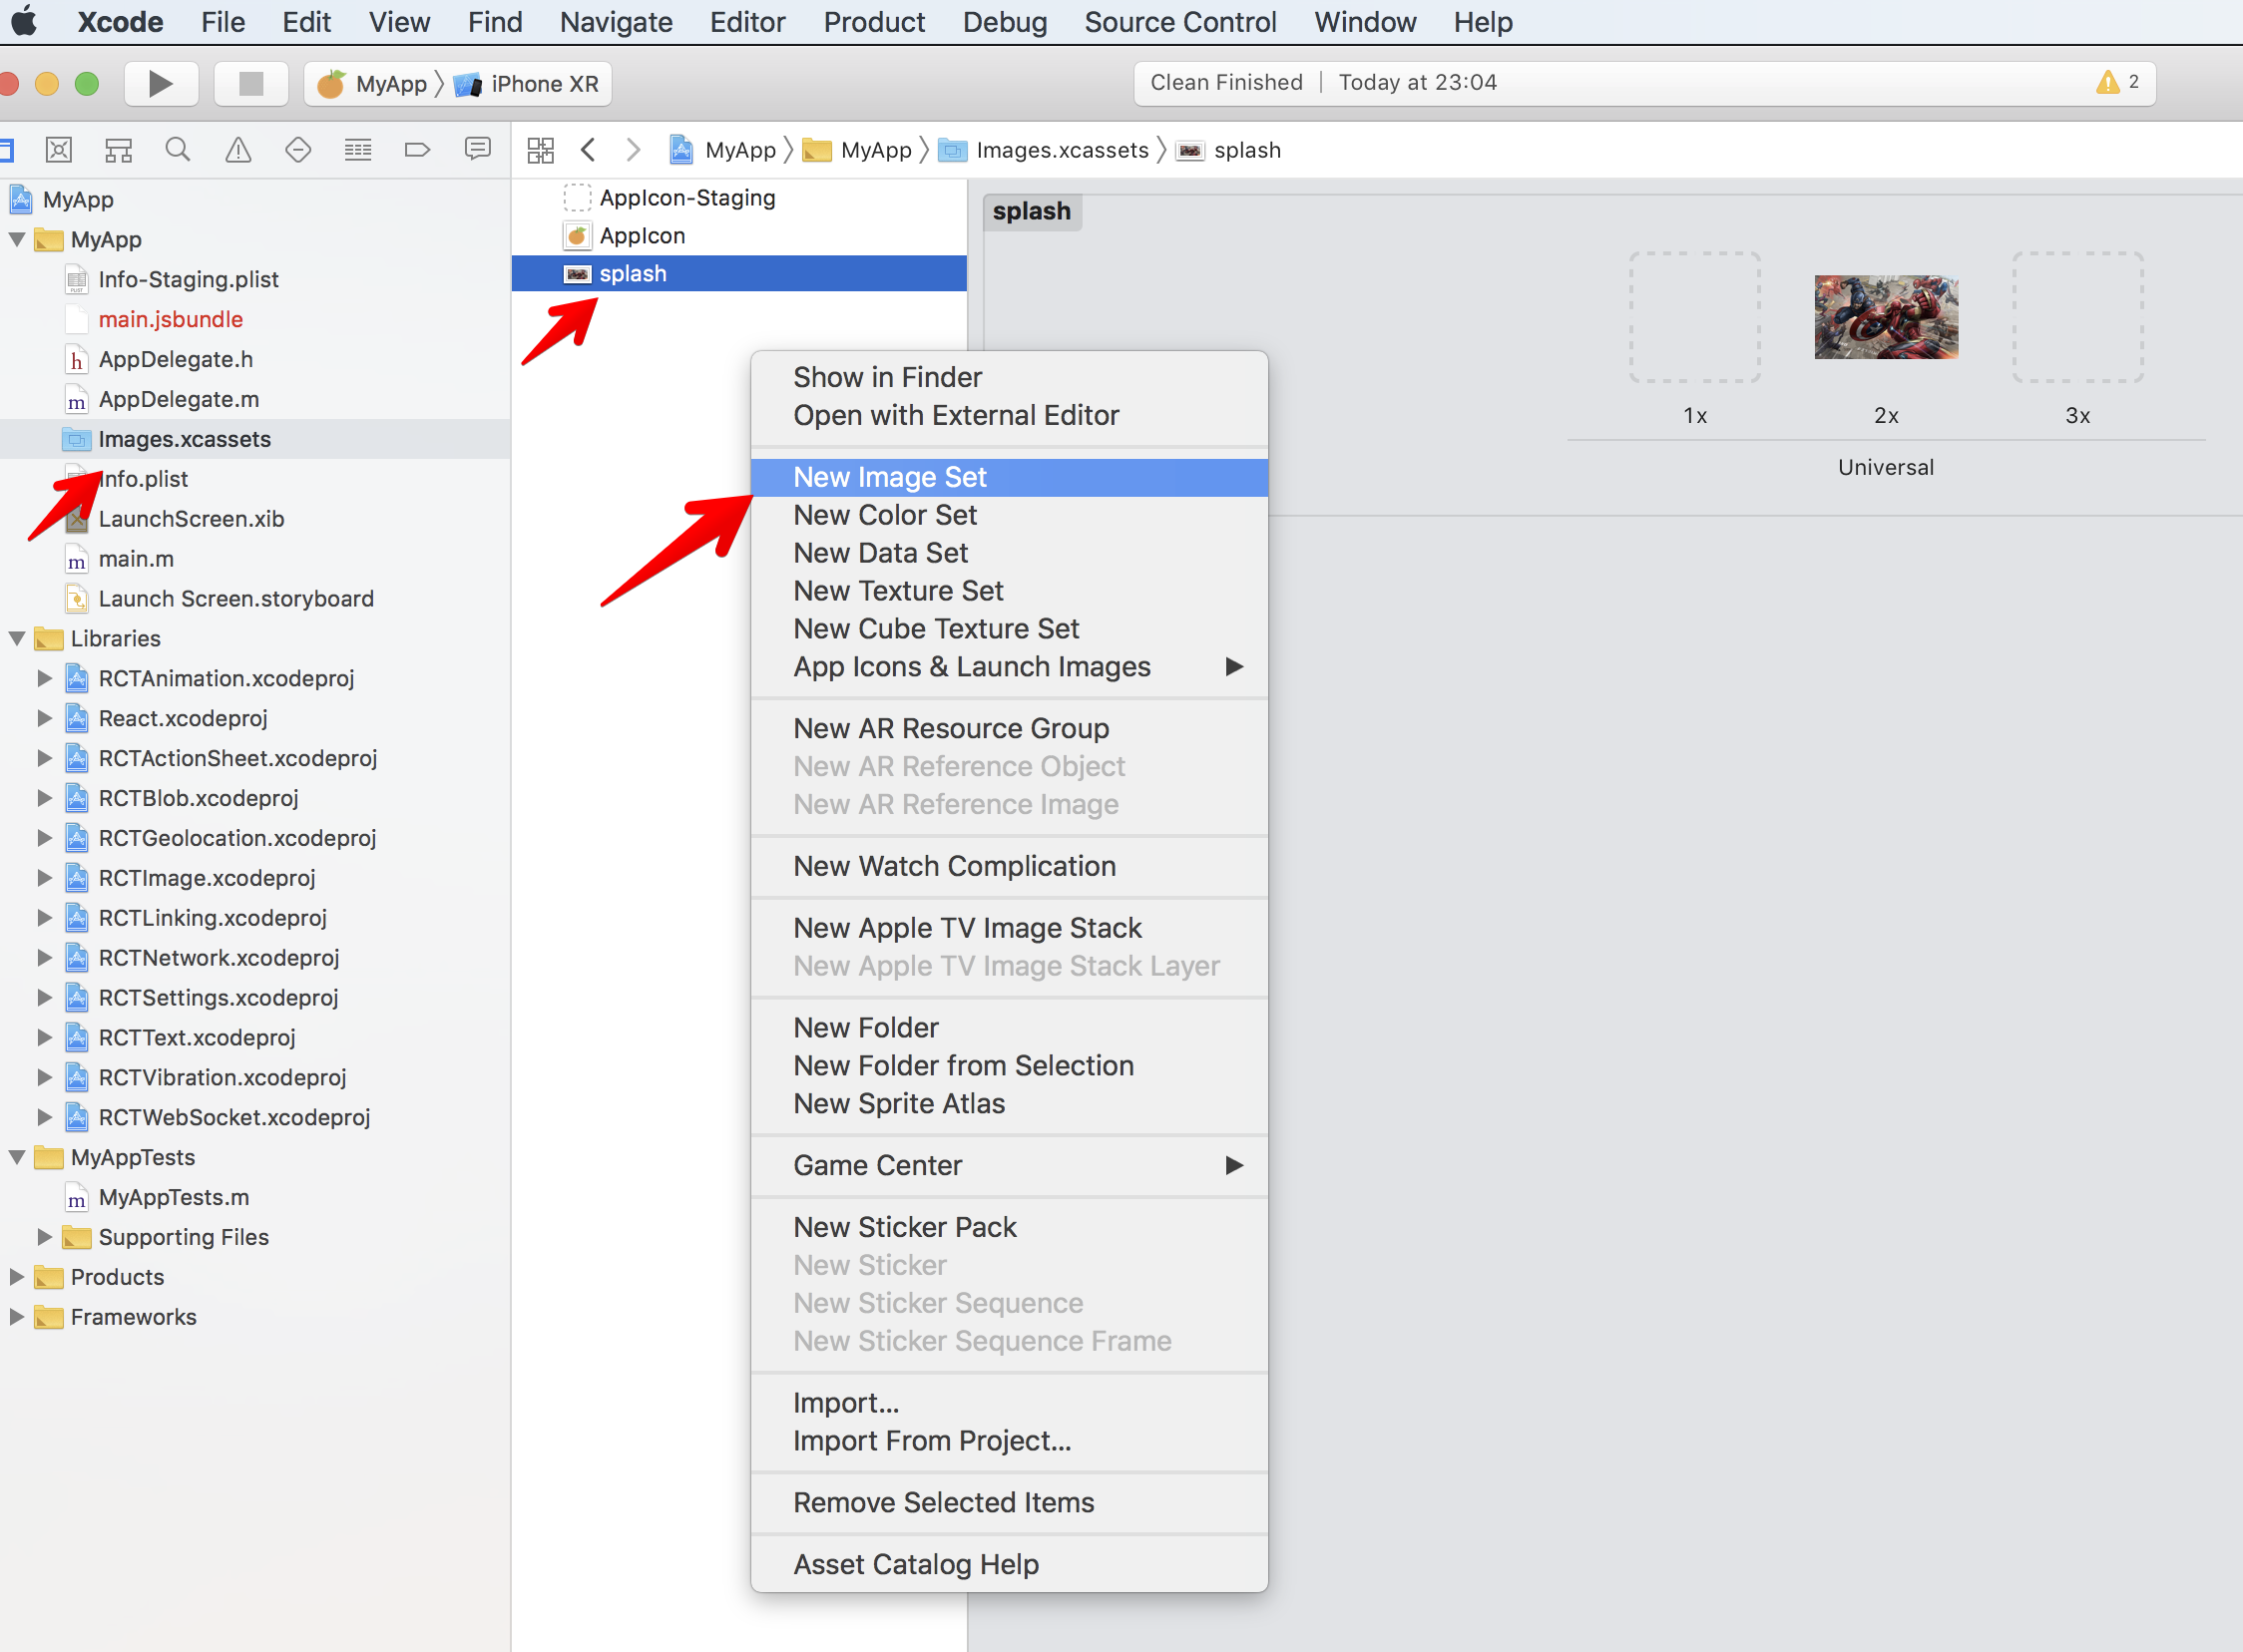
Open asset catalog, right click and select New Image Set . We can name it anything. This will be used in the Launch Screen.storyboard.
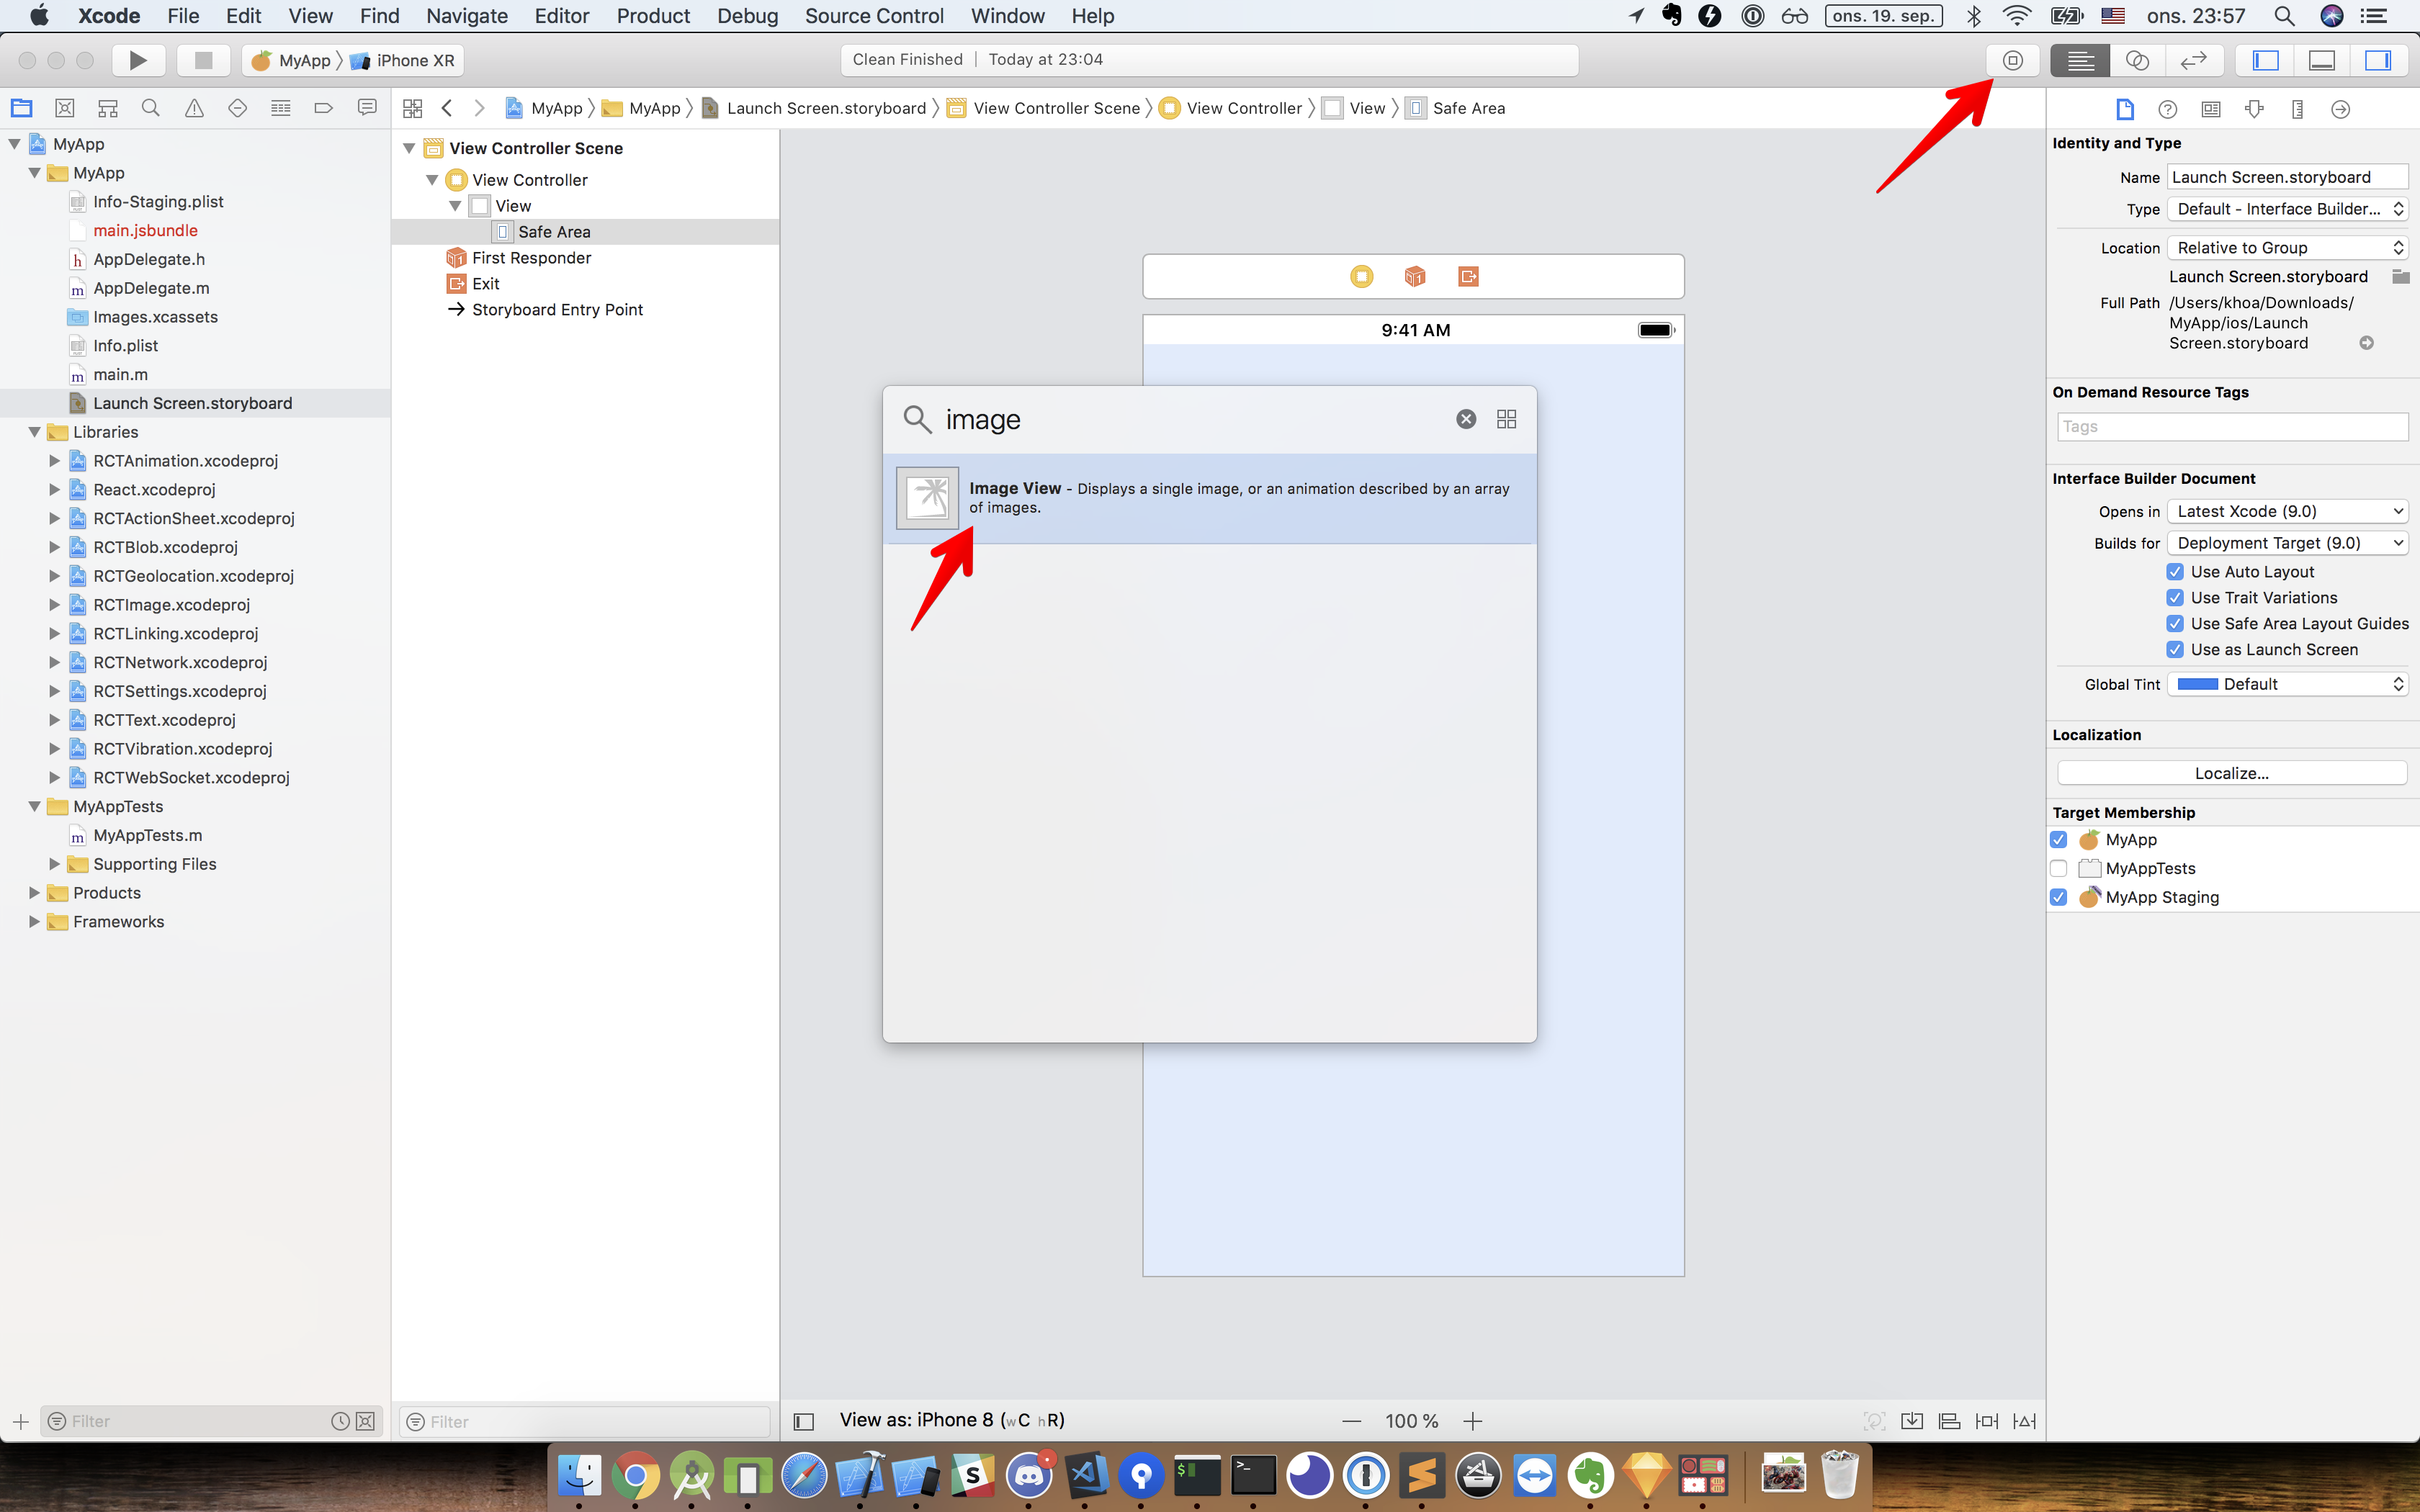
Open Launch Screen.storyboard and add an UIImageView . If you are using Xcode 10, click the Library button in the upper right corner and choose Show Objects Library.
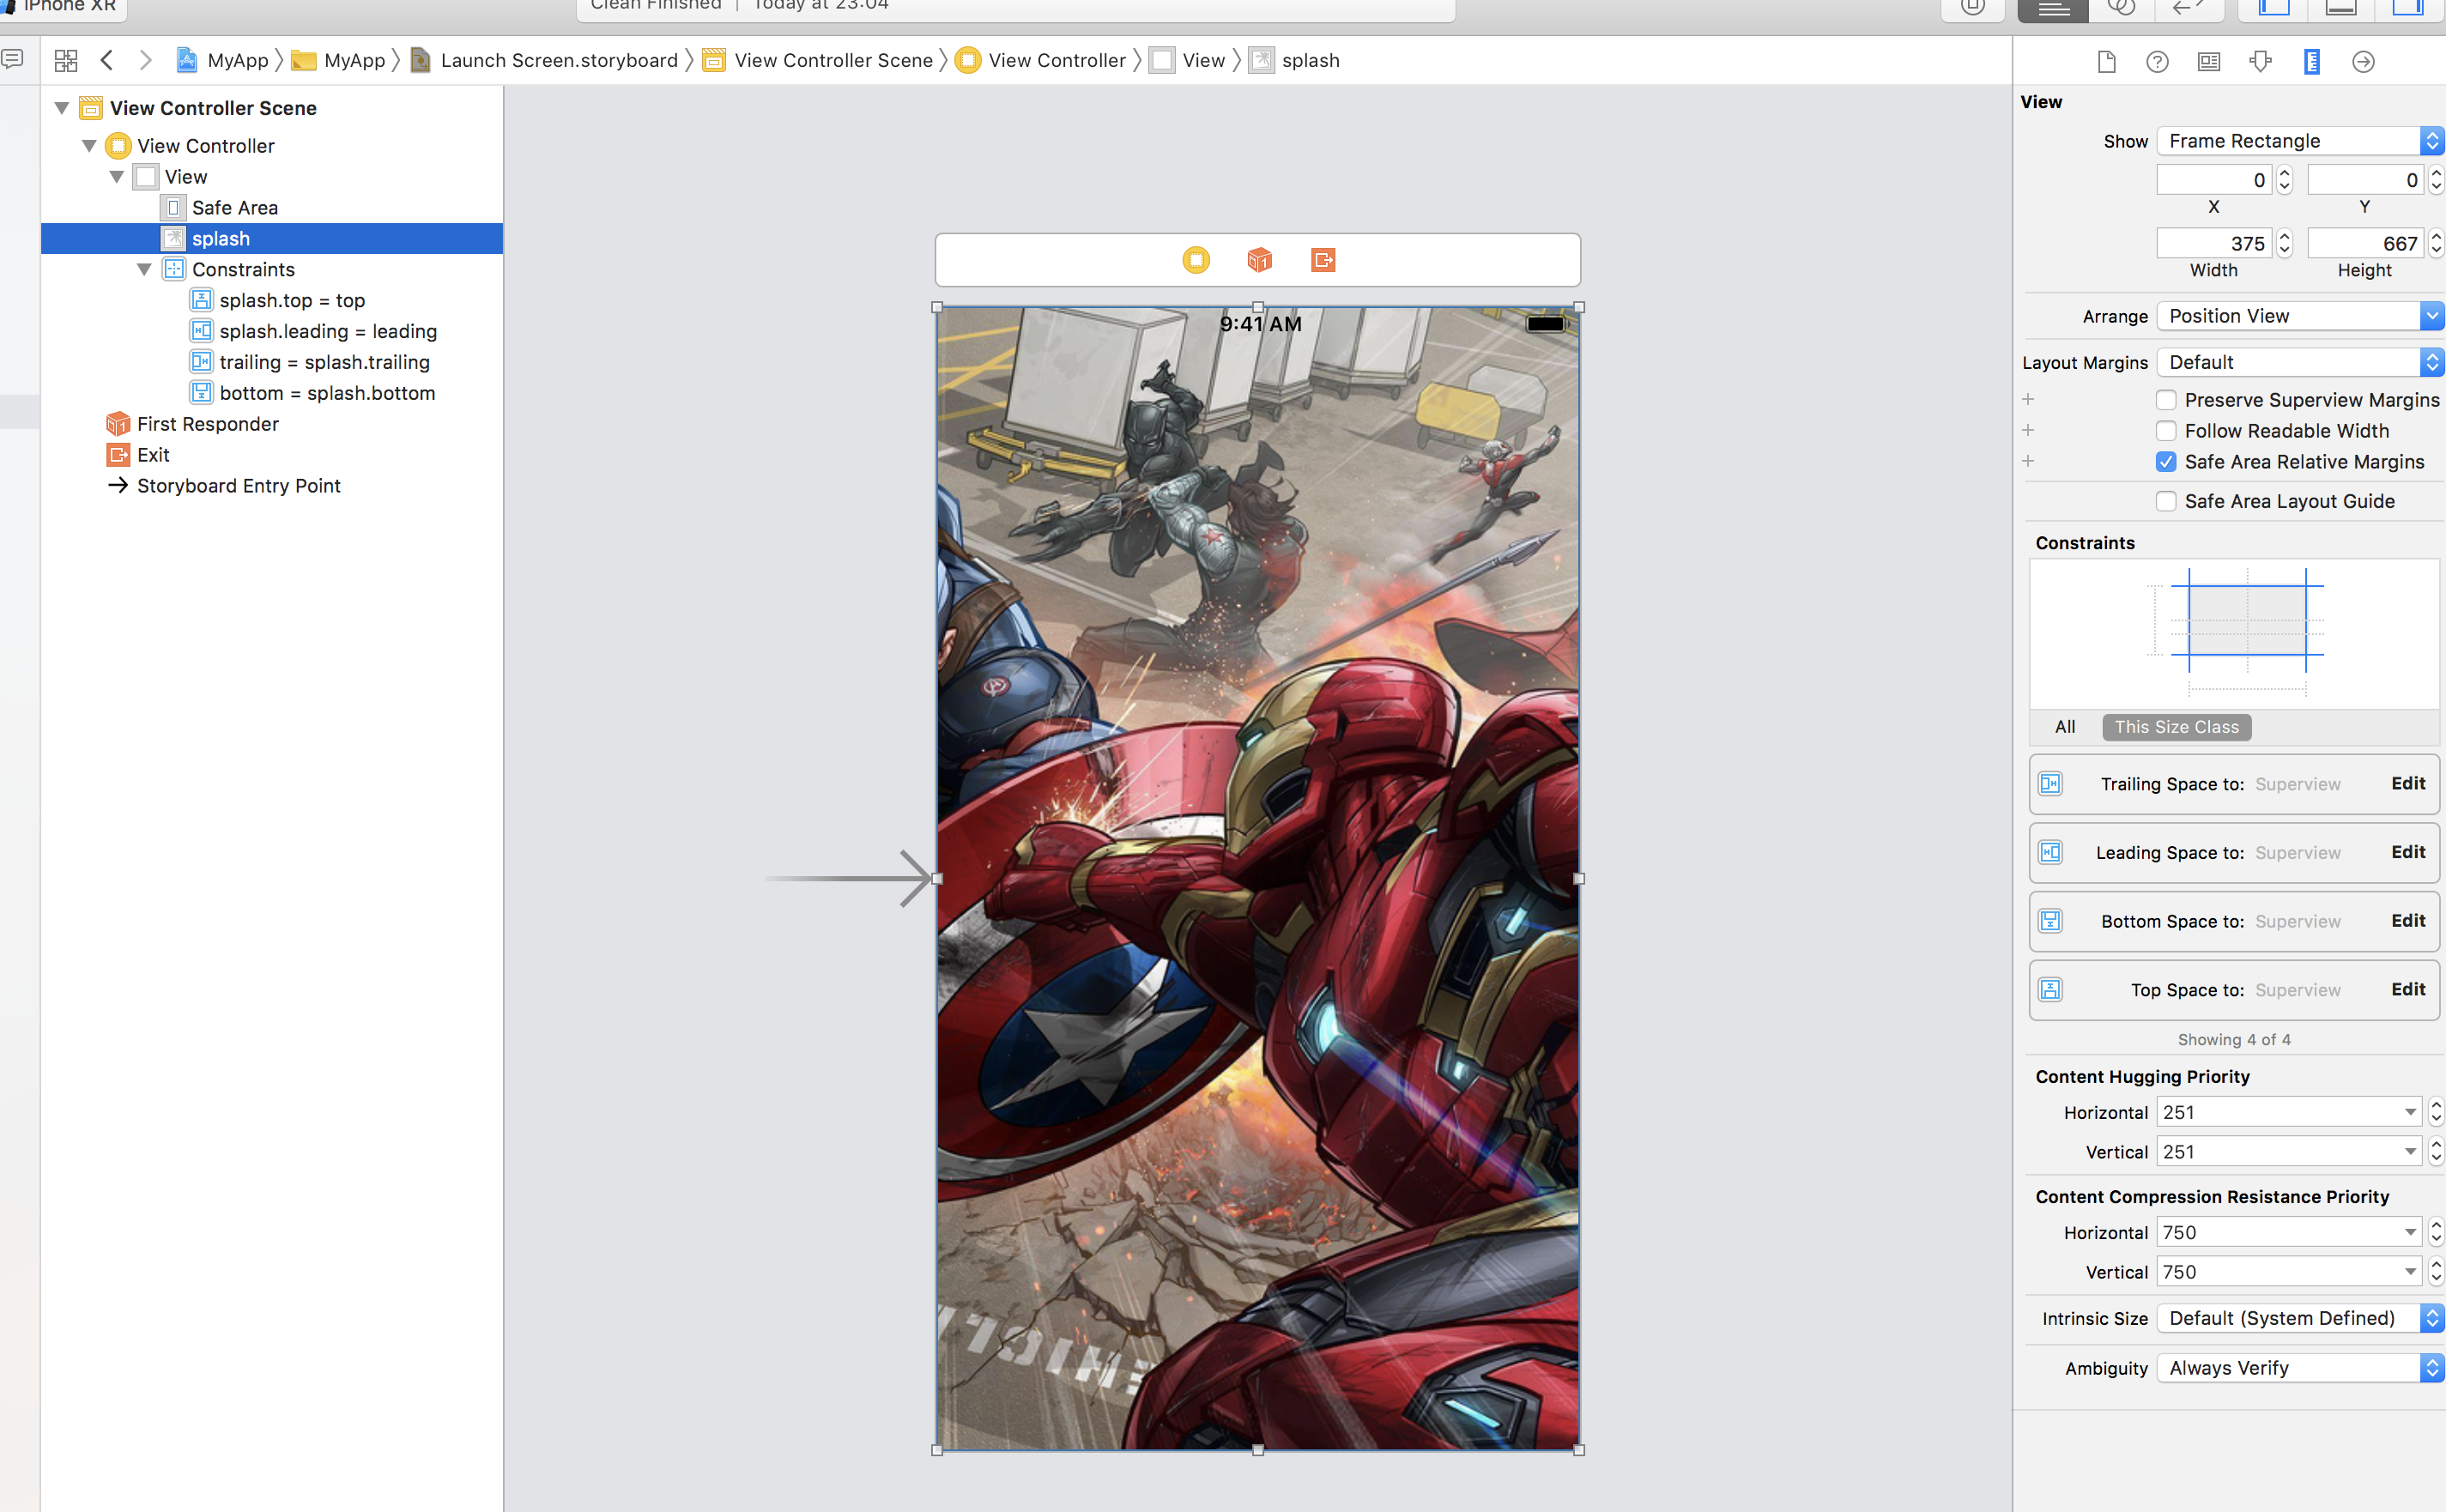
Set image for Image View, and make sure Content Mode is set to Aspect Filled, as this ensures that the image always covers the full screen (although it may be cropped). Then connect ImageView using constraints to the View, not the Safe Area. You do this by Control+drag from the Image View (splash) to the View.
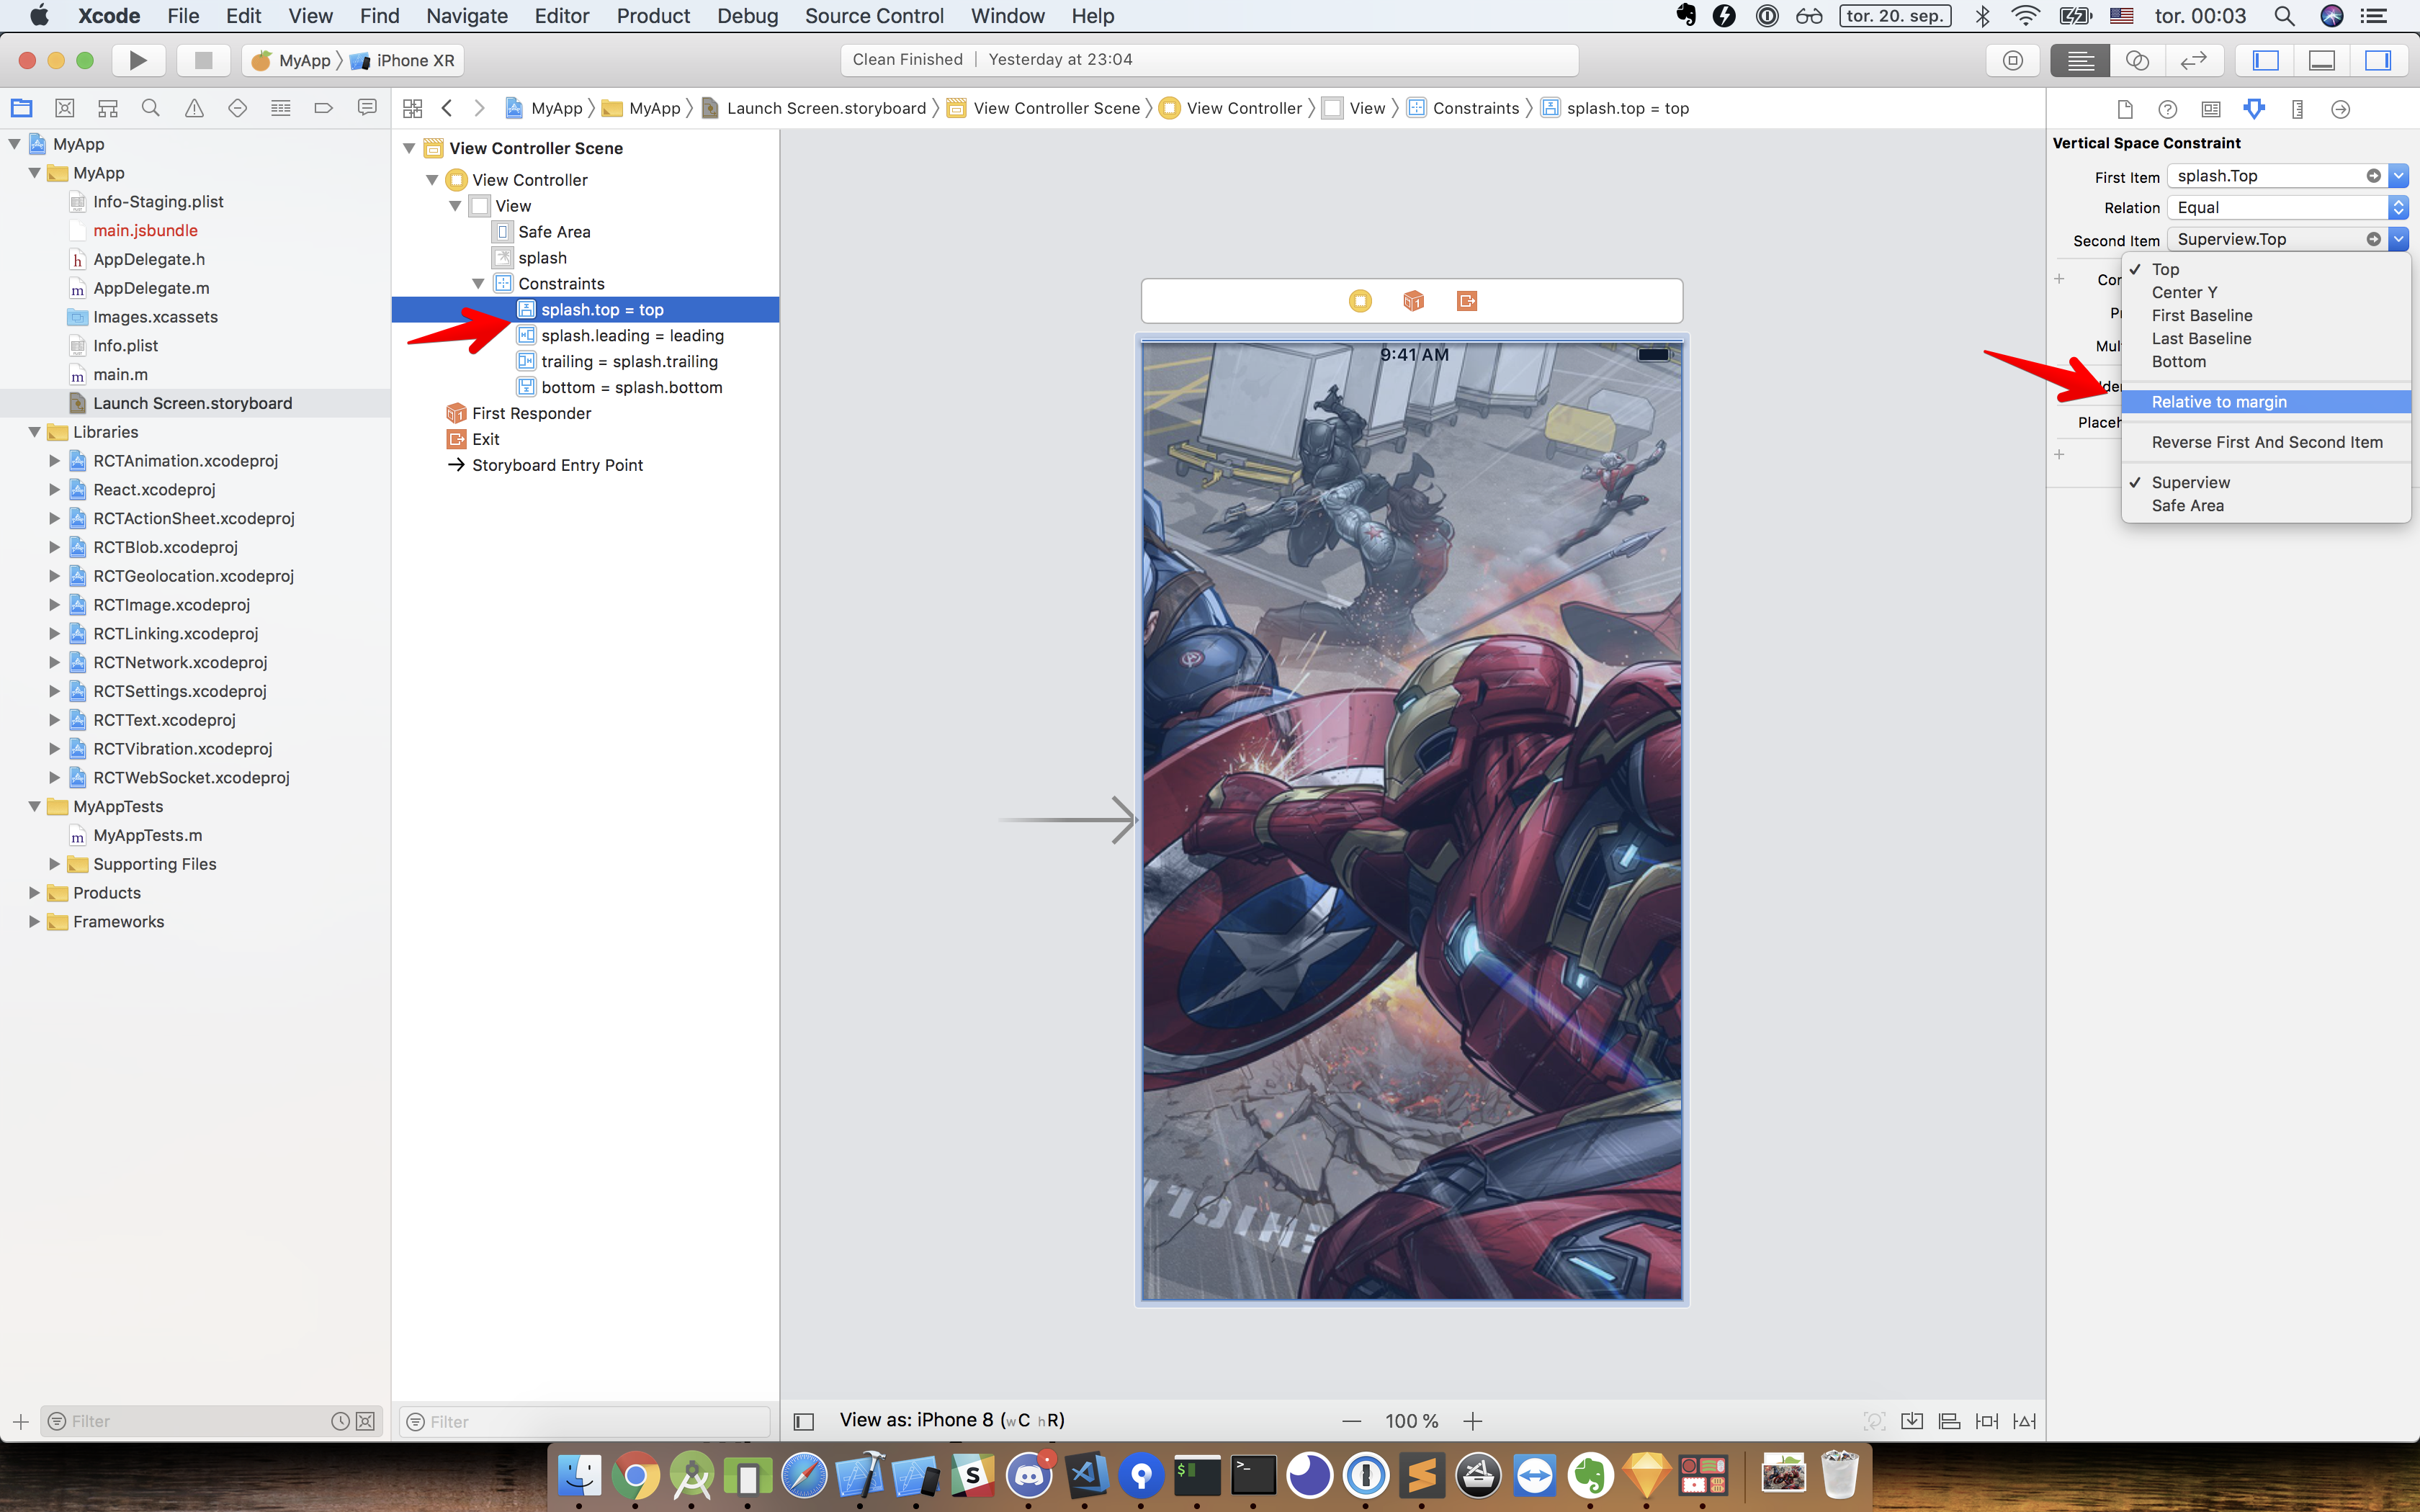
Click into each constraint and uncheck Relative to Margin. This makes our ImageView pin to the very edges of the view and with no margin at all.
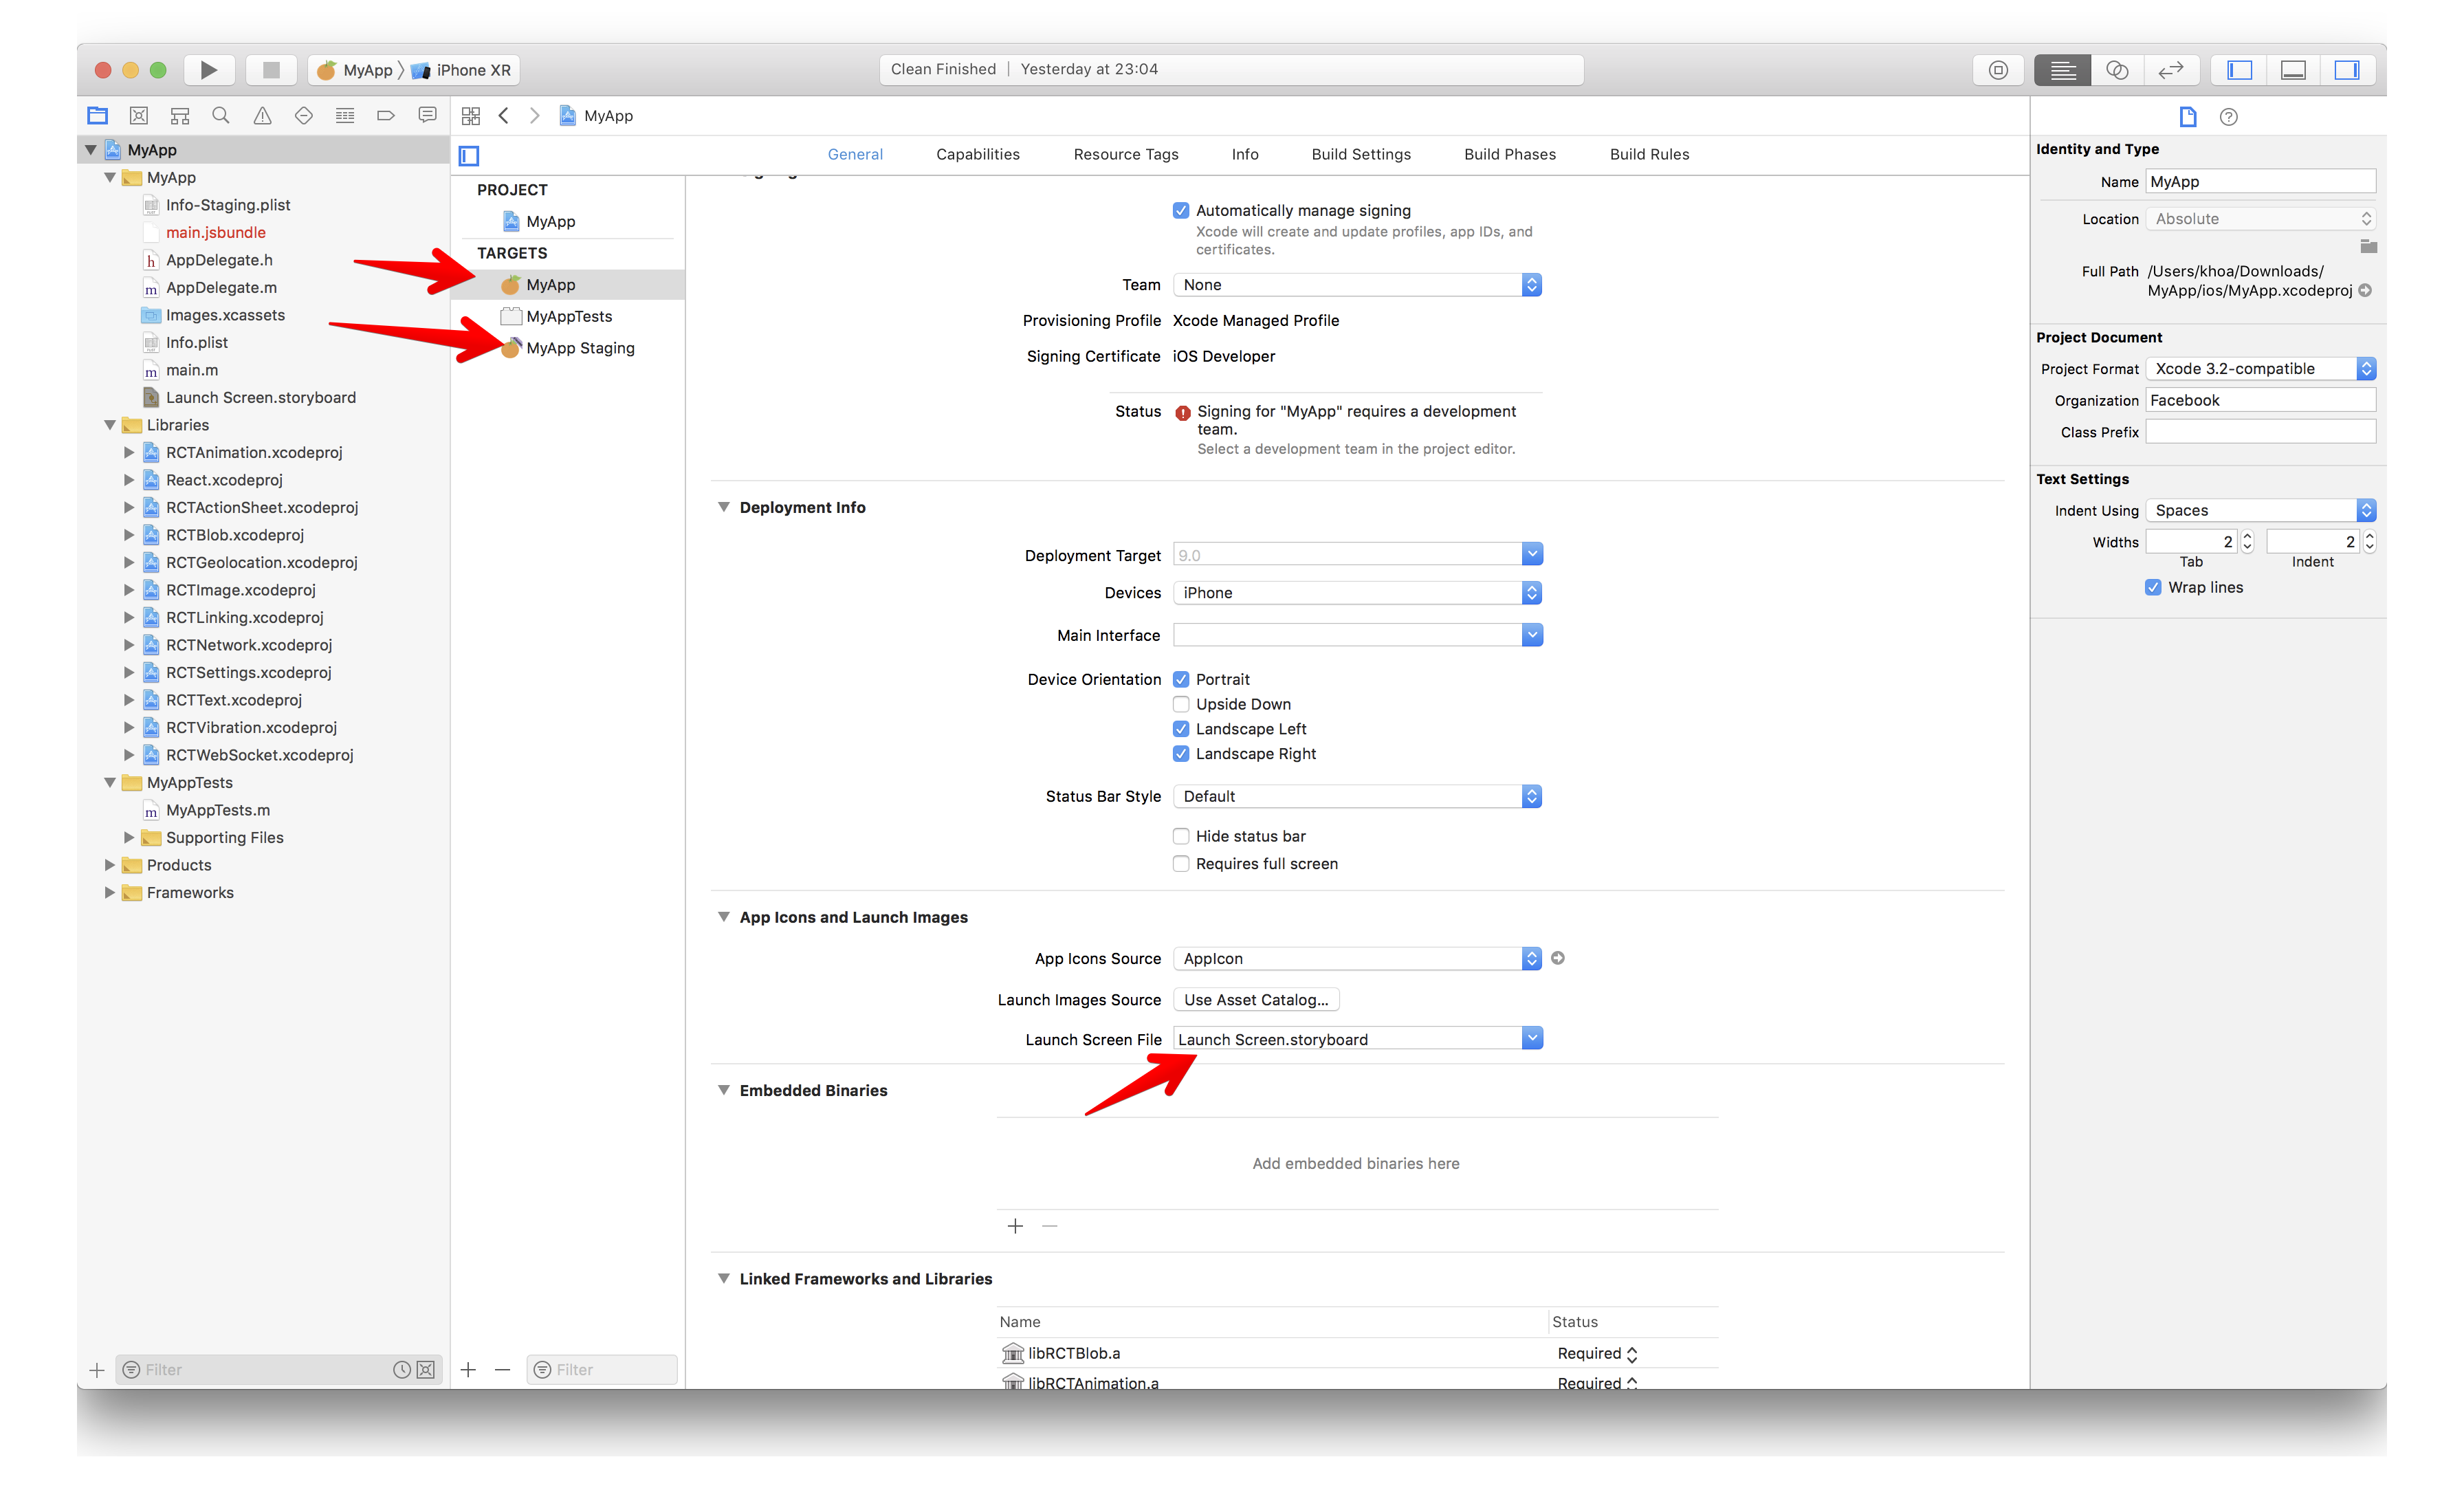
Now go to both targets and select Launch Screen.storyboard as Launch Screen File:
On iOS, the launch screen is often cached, so you probably won’t see the changes. One way to avoid that is to delete the app and run it again.
There are several ways to add splash screen for Android, from using launcher themes, Splash Activity, and a timer. For me, a reasonable splash screen for Android should be a very minimal image.
As there are many Android devices with different ratios and resolutions, if you want to show a full screen splash image, it will probably not scale correctly for each device. This is just about UX.
For the splash screen, let’s use the launcher theme with splash_background.xml .
There is no single splash image that suits all Android devices. A more logical approach is to create multiple splash images for all common resolutions in portrait and landscape. Or we can design a minimal splash image that works. You can find more info here: Device Metric.
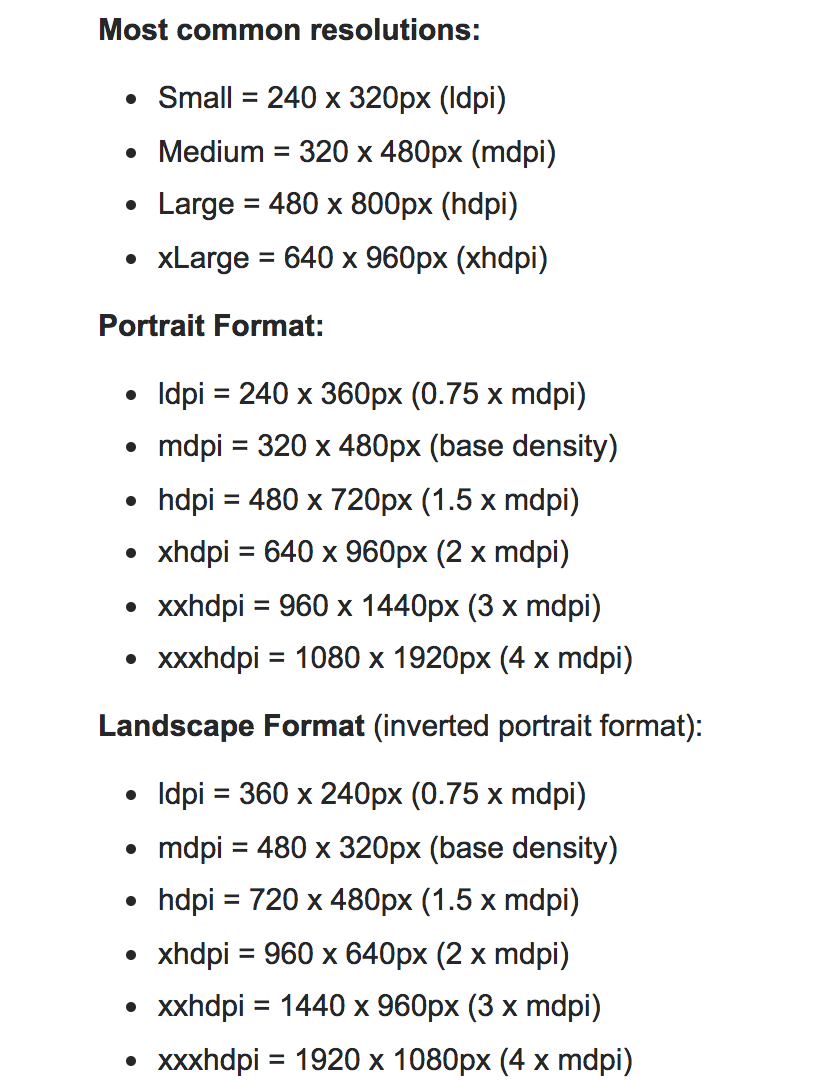
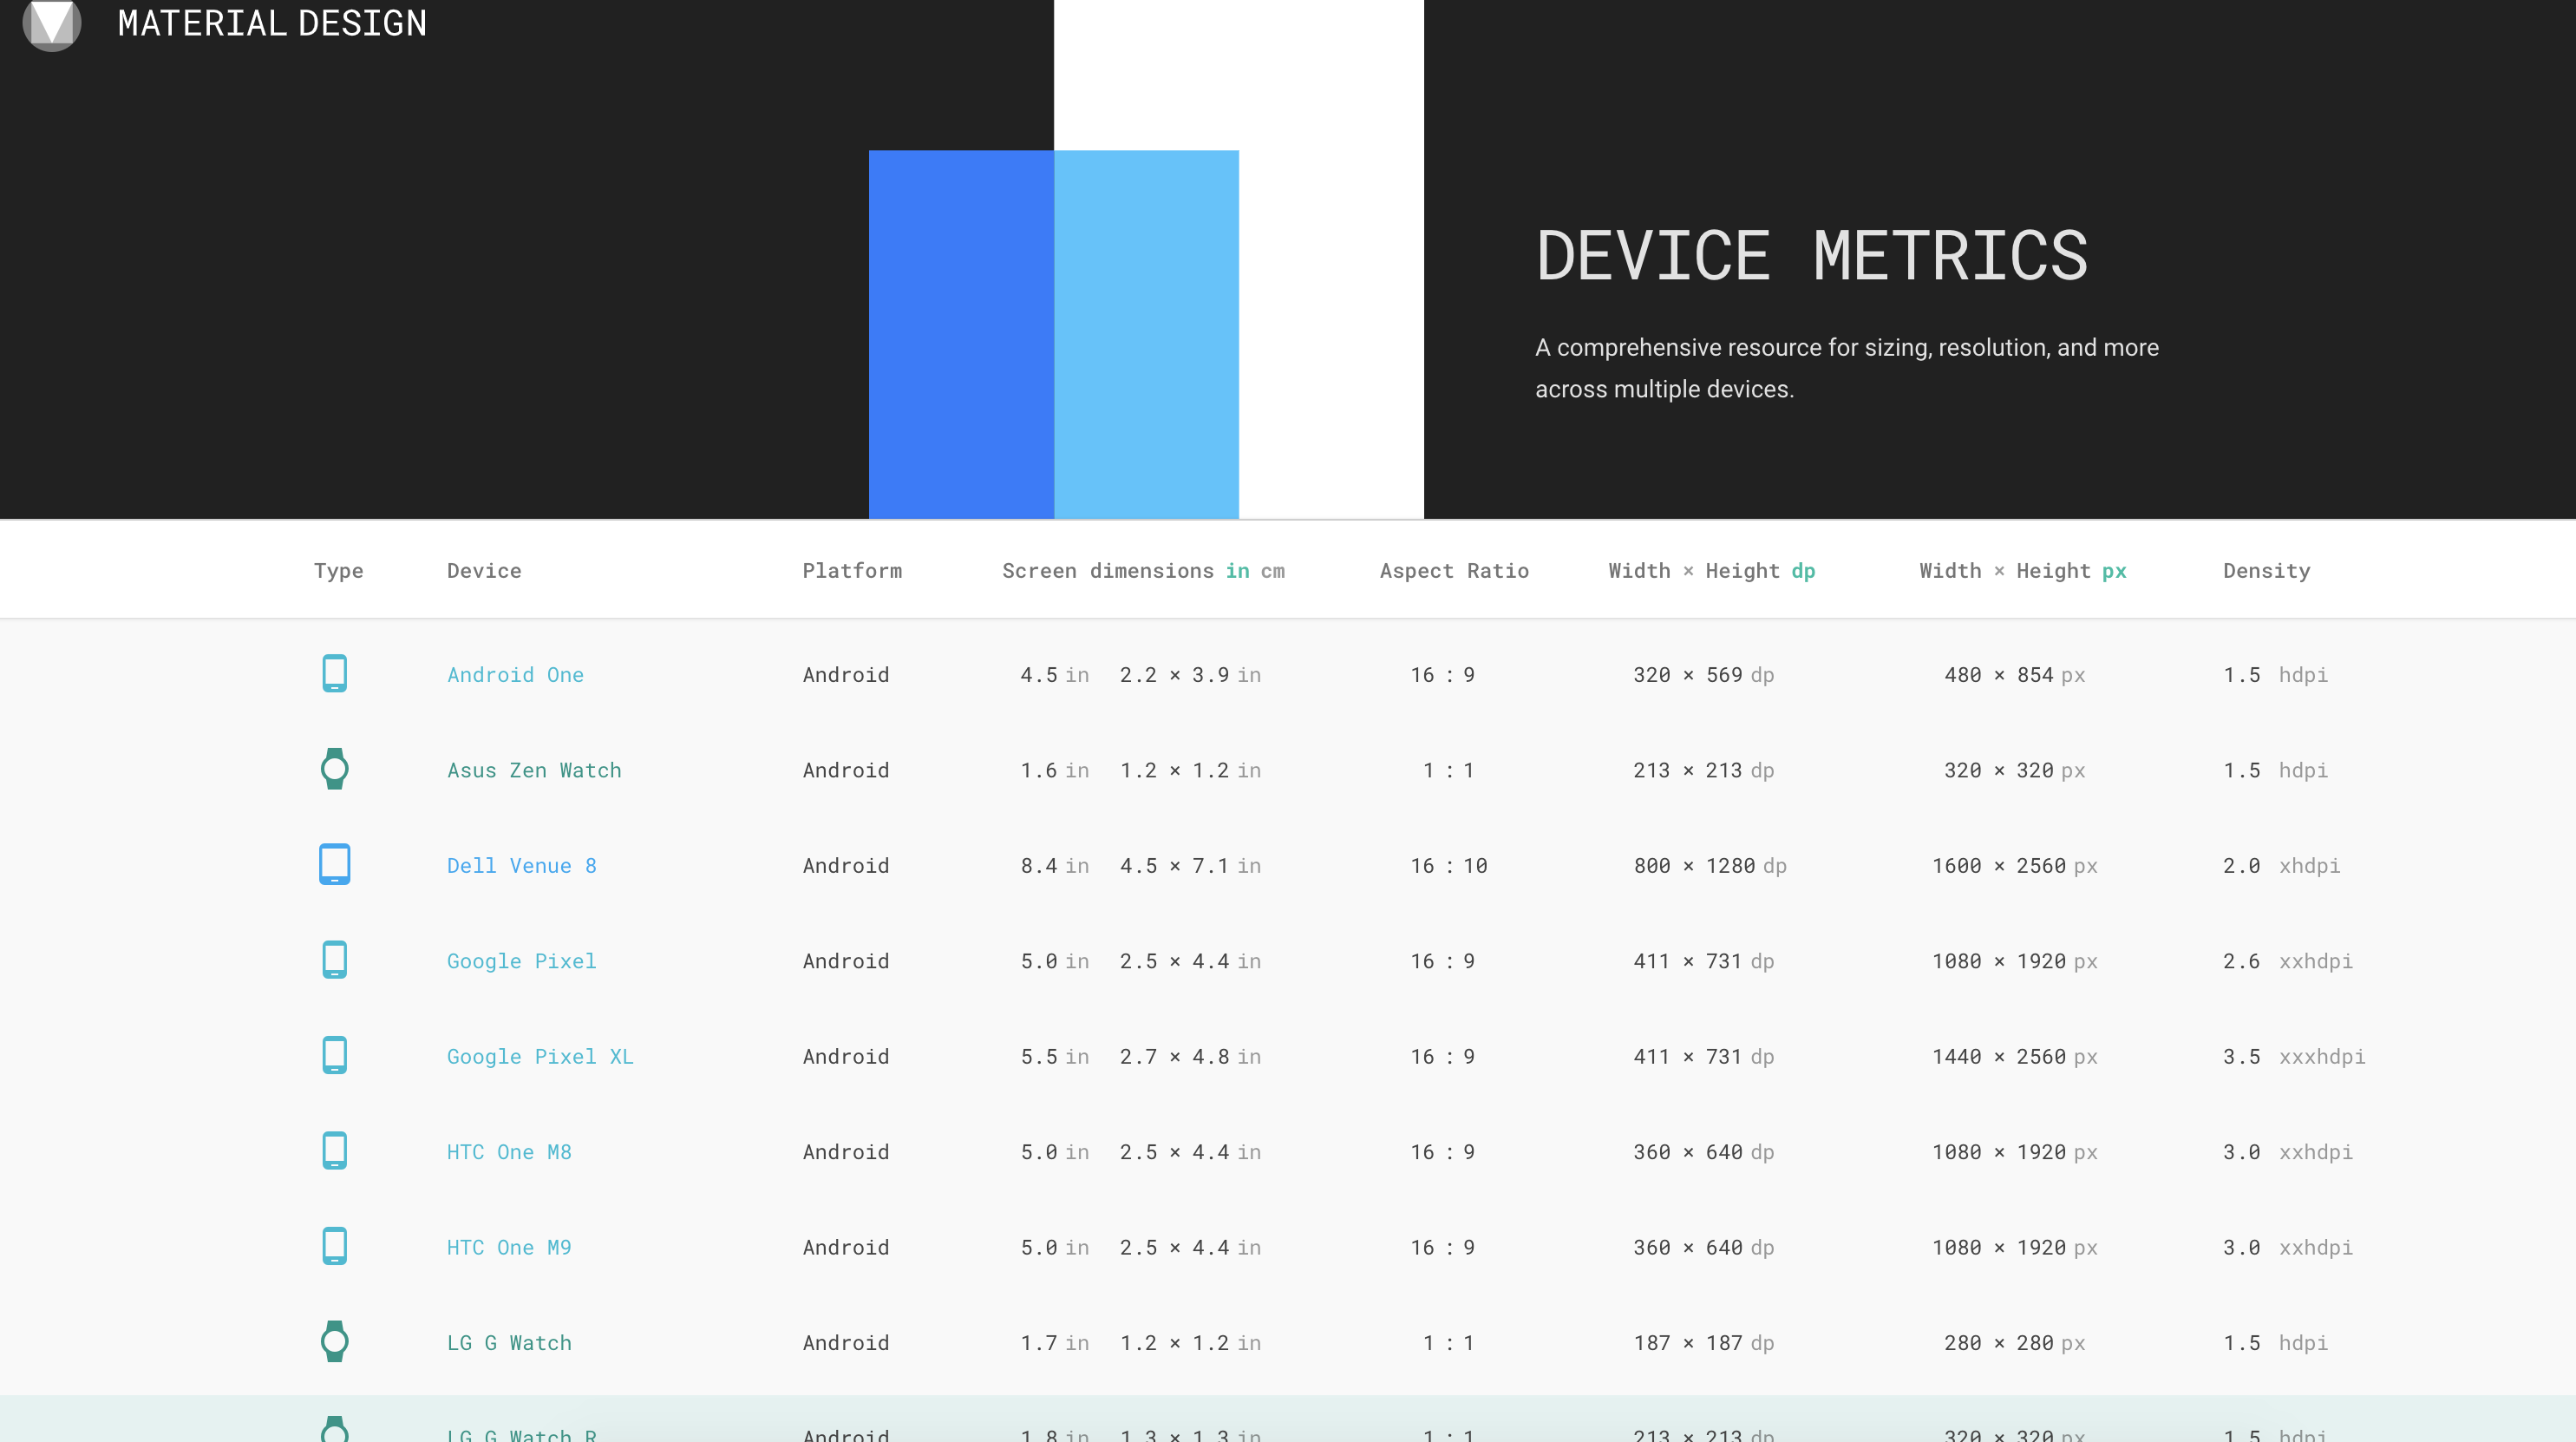
Here is how to add splash screen in 4 easy steps:
We usually need a common splash screen for both staging and production. Drag an image into main/res/drawble . Android Studio seems to have a problem with recognising some jpg images for the splash screen, so it’s best to choose png images.
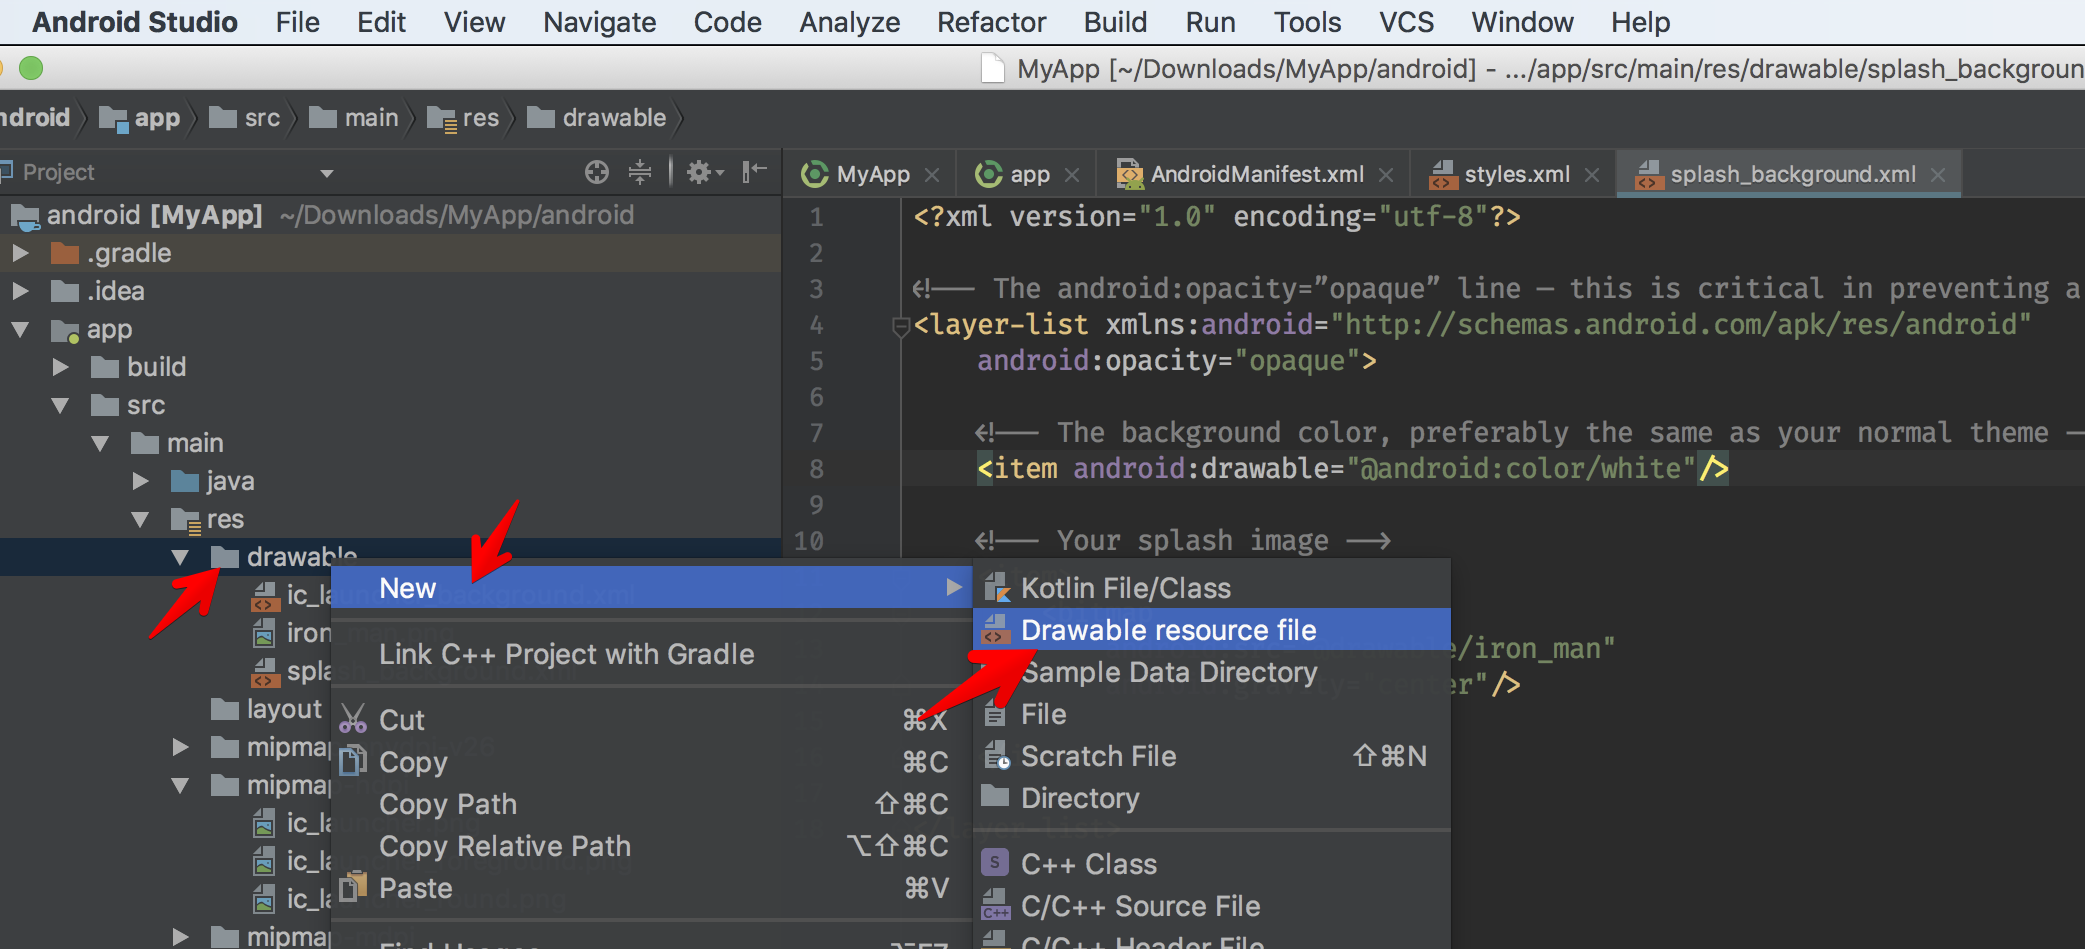
Right click on drawable -> New -> Drawable resource file . Name it whatever you want — I choose splash_background.xml . Choose the root element as layer-list:
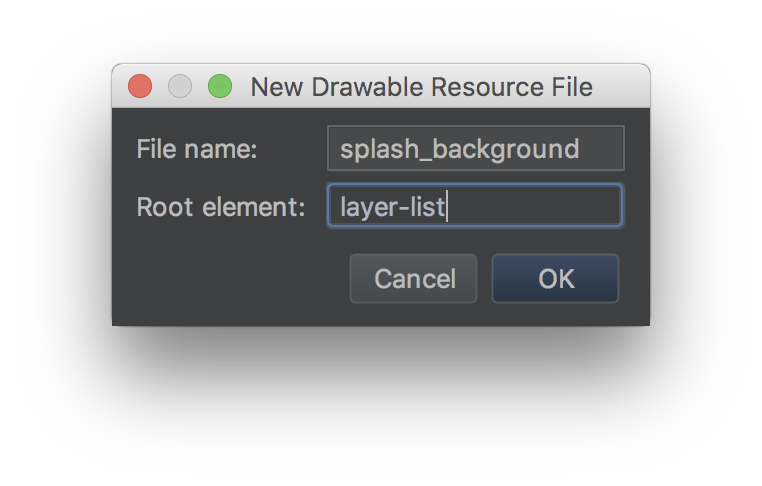
A [Layer List](http://Layer List) means “a Drawable that manages an array of other Drawables. These are drawn in array order, so the element with the largest index is drawn on top”. Here is how splash_background.xml looks like:
<?xml version="1.0" encoding="utf-8"?>

<!-- The android:opacity=”opaque” line — this is critical in preventing a flash of black as your theme transitions. -->
<layer-list xmlns:android="http://schemas.android.com/apk/res/android"
    android:opacity="opaque">

    <!-- The background color, preferably the same as your normal theme -->
    <item android:drawable="@android:color/white"/>

    <!-- Your splash image -->
    <item>
        <bitmap
            android:src="@drawable/iron_man"
            android:gravity="center"/>

    </item>

</layer-list>
Note that we point to our splash image we added earlier with android:src=”@drawable/iron_man”.
Open styles.xml and add SplashTheme:
<style name="SplashTheme" parent="Theme.AppCompat.NoActionBar">
    <item name="android:windowBackground">@drawable/splash_background</item>
</style>Go to Manifest.xml and change the theme of the the launcher activity, which has category android:name=”android.intent.category.LAUNCHER” . Change it to android:theme=”@style/SplashTheme” . For React Native, the launcher activity is usually MainActivity . Here is how Manifest.xml looks:
<manifest xmlns:android="http://schemas.android.com/apk/res/android"
    package="com.myapp">

    <uses-permission android:name="android.permission.INTERNET" />
    <uses-permission android:name="android.permission.SYSTEM_ALERT_WINDOW"/>

    <application
      android:name=".MainApplication"
      android:label="@string/app_name"
      android:icon="@mipmap/ic_launcher"
      android:allowBackup="false"
      android:theme="@style/AppTheme">
      <activity
        android:name=".MainActivity"
        android:label="@string/app_name"
        android:configChanges="keyboard|keyboardHidden|orientation|screenSize"
        android:theme="@style/SplashTheme"
        android:windowSoftInputMode="adjustResize">
        <intent-filter>
            <action android:name="android.intent.action.MAIN" />
            <category android:name="android.intent.category.LAUNCHER" />
        </intent-filter>
      </activity>
      <activity android:name="com.facebook.react.devsupport.DevSettingsActivity" />
    </application>

</manifest>
Run the app now and you should see the splash screen showing when the app starts.
The differences between staging and production are just about app names, application ids, and app icons. We probably use different API keys, and backend URL for staging and production.
Right now the most popular library to handle these scenarios is react-native-config, which is said to “bring some 12 factor love to your mobile apps”. It requires lots of steps to get started, and I hope there is a less verbose solution.
In this post, we touched Xcode and Android Studio more than Visual Studio Code, but this was inevitable. I hope this post was useful to you. Here are some more links to read more about this topic:
Updated at 2021-01-13 09:14:18
Issue #266
Original post https://medium.freecodecamp.org/get-to-know-different-javascript-environments-in-react-native-4951c15d61f5
React Native can be very easy to get started with, and then at some point problems occur and we need to dive deep into it.
The other day we had a strange bug that was only occurring in production build, and in iOS only. A long backtrace in the app revealed that it was due to Date constructor failure.
const date = new Date("2019-01-18 12:00:00")This returns the correct Date object in debug mode, but yields Invalid Date in release. What’s special about Date constructor? Here I’m using react native 0.57.5 and no Date libraries.
The best resource for learning Javascript is via Mozilla web docs, and entering Date:
Creates a JavaScript Date instance that represents a single moment in time. Date objects use a Unix Time Stamp, an integer value that is the number of milliseconds since 1 January 1970 UTC.
Pay attention to how Date can be constructed by dateString:
dateStringString value representing a date. The string should be in a format recognized by the Date.parse() method (IETF-compliant RFC 2822 timestamps and also a version of ISO8601).
So Date constructor uses static method Date.parse under the hood. This has very specific requirement about the format of date string that it supports
The standard string representation of a date time string is a simplification of the ISO 8601 calendar date extended format (see Date Time String Format section in the ECMAScript specification for more details). For example, “2011-10-10” (date-only form), “2011-10-10T14:48:00” (date-time form), or “2011-10-10T14:48:00.000+09:00” (date-time form with milliseconds and time zone) can be passed and will be parsed. When the time zone offset is absent, date-only forms are interpreted as a UTC time and date-time forms are interpreted as local time.
The ECMAScript specification states: If the String does not conform to the standard format the function may fall back to any implementation–specific heuristics or implementation–specific parsing algorithm. Unrecognizable strings or dates containing illegal element values in ISO formatted strings shall cause Date.parse() to return NaN.
The reason that we get Invalid Date in iOS must be because the code was run in two different JavaScript environments and they somehow have different implementation of the Date parsing function.
React Native guide has a dedicated section about JavaScript environments.
When using React Native, you’re going to be running your JavaScript code in two environments:
In most cases, React Native will use JavaScriptCore, the JavaScript engine that powers Safari. Note that on iOS, JavaScriptCore does not use JIT due to the absence of writable executable memory in iOS apps.
When using Chrome debugging, all JavaScript code runs within Chrome itself, communicating with native code via WebSockets. Chrome uses V8 as its JavaScript engine.
While both environments are very similar, you may end up hitting some inconsistencies. We’re likely going to experiment with other JavaScript engines in the future, so it’s best to avoid relying on specifics of any runtime.
React Native also uses Babel and some polyfills to have some nice syntax transformers, so some of the code that we write may not be necessarily supported natively by JavascriptCore.
Now it is clear that while we debug our app via Chrome debugger, it works because V8 engine handles that. Now try turning off Remote JS Debugging: we can see that the above Date constructor fails, which means it is using JavascriptCore.
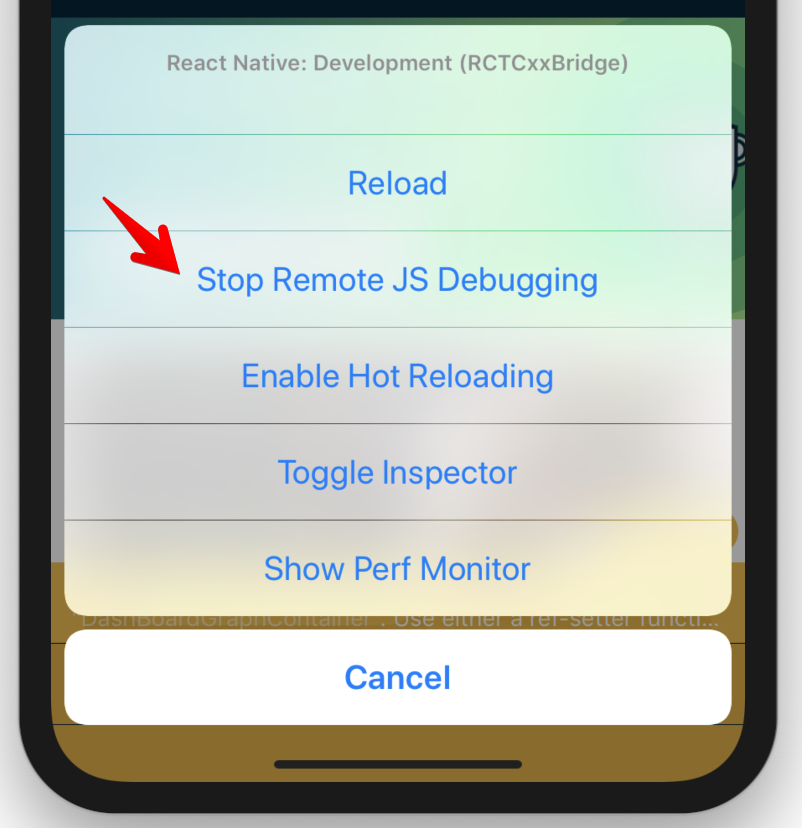
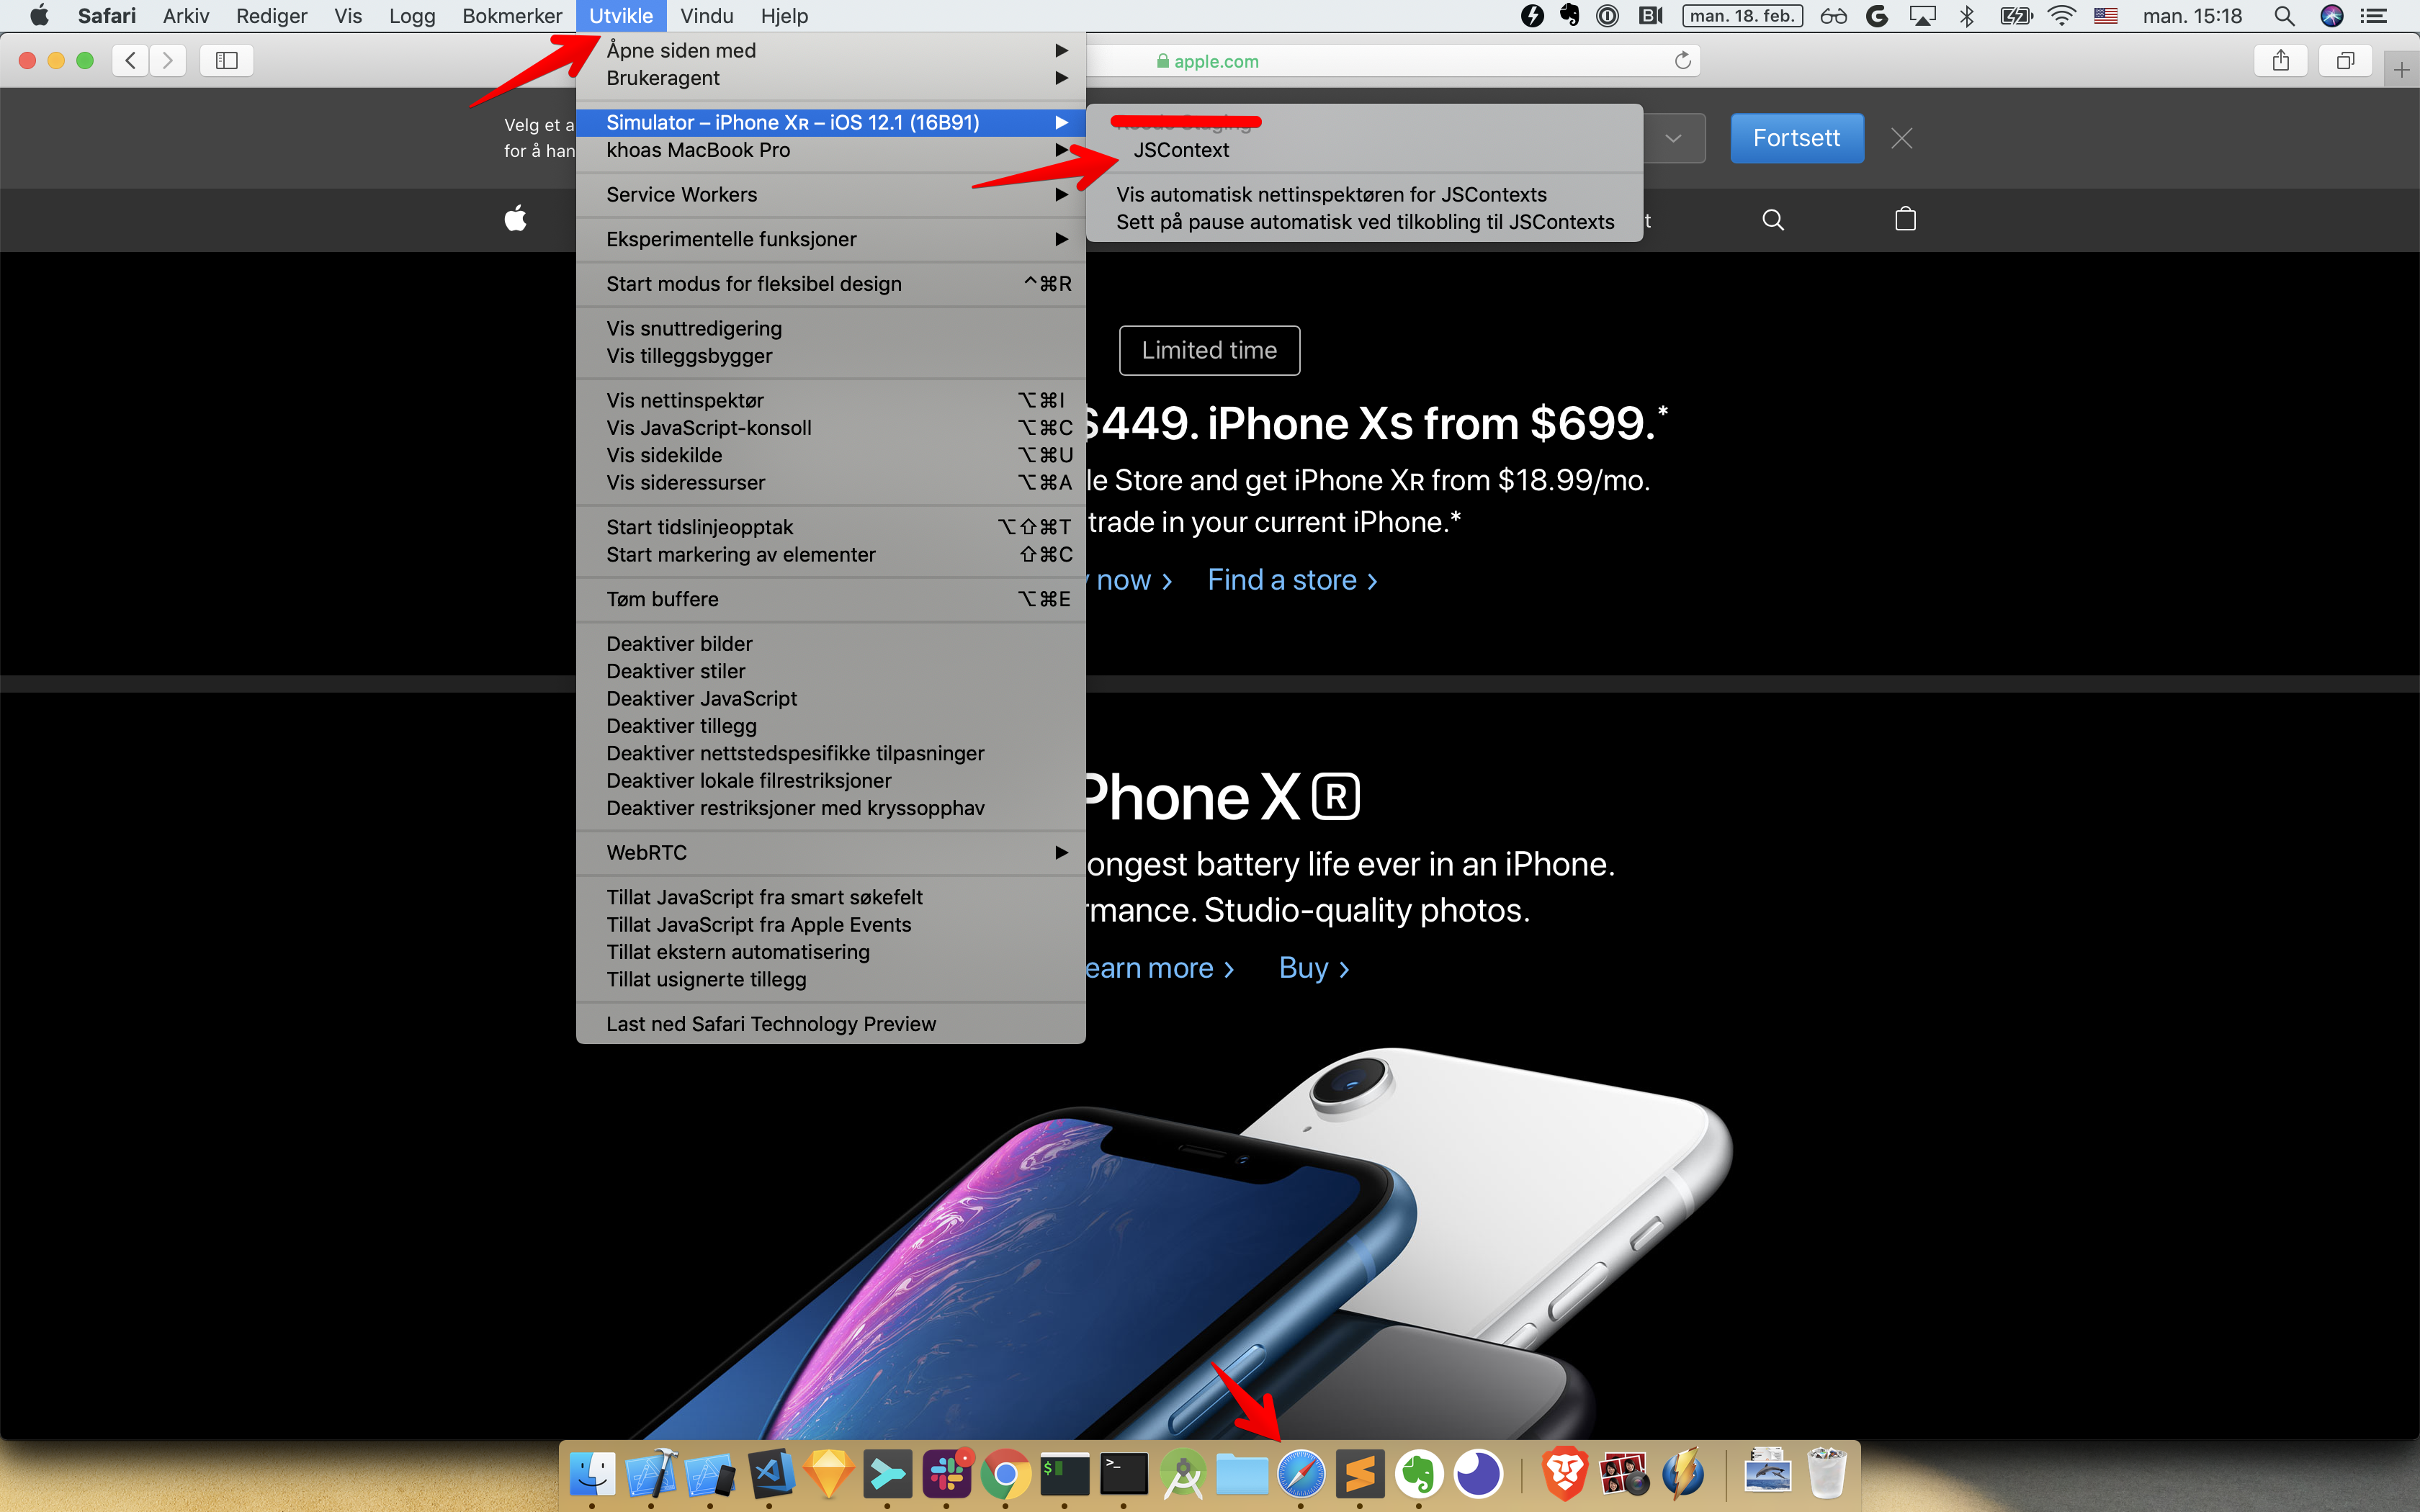
To confirm this issue, let’s run our app in Xcode and go to the Safari app on MacOS to enter Development menu. Select the active Simulator and choose JSContext on the current iOS app. Remember to turn off Remote JS Debugging so that the app uses JavascriptCore:
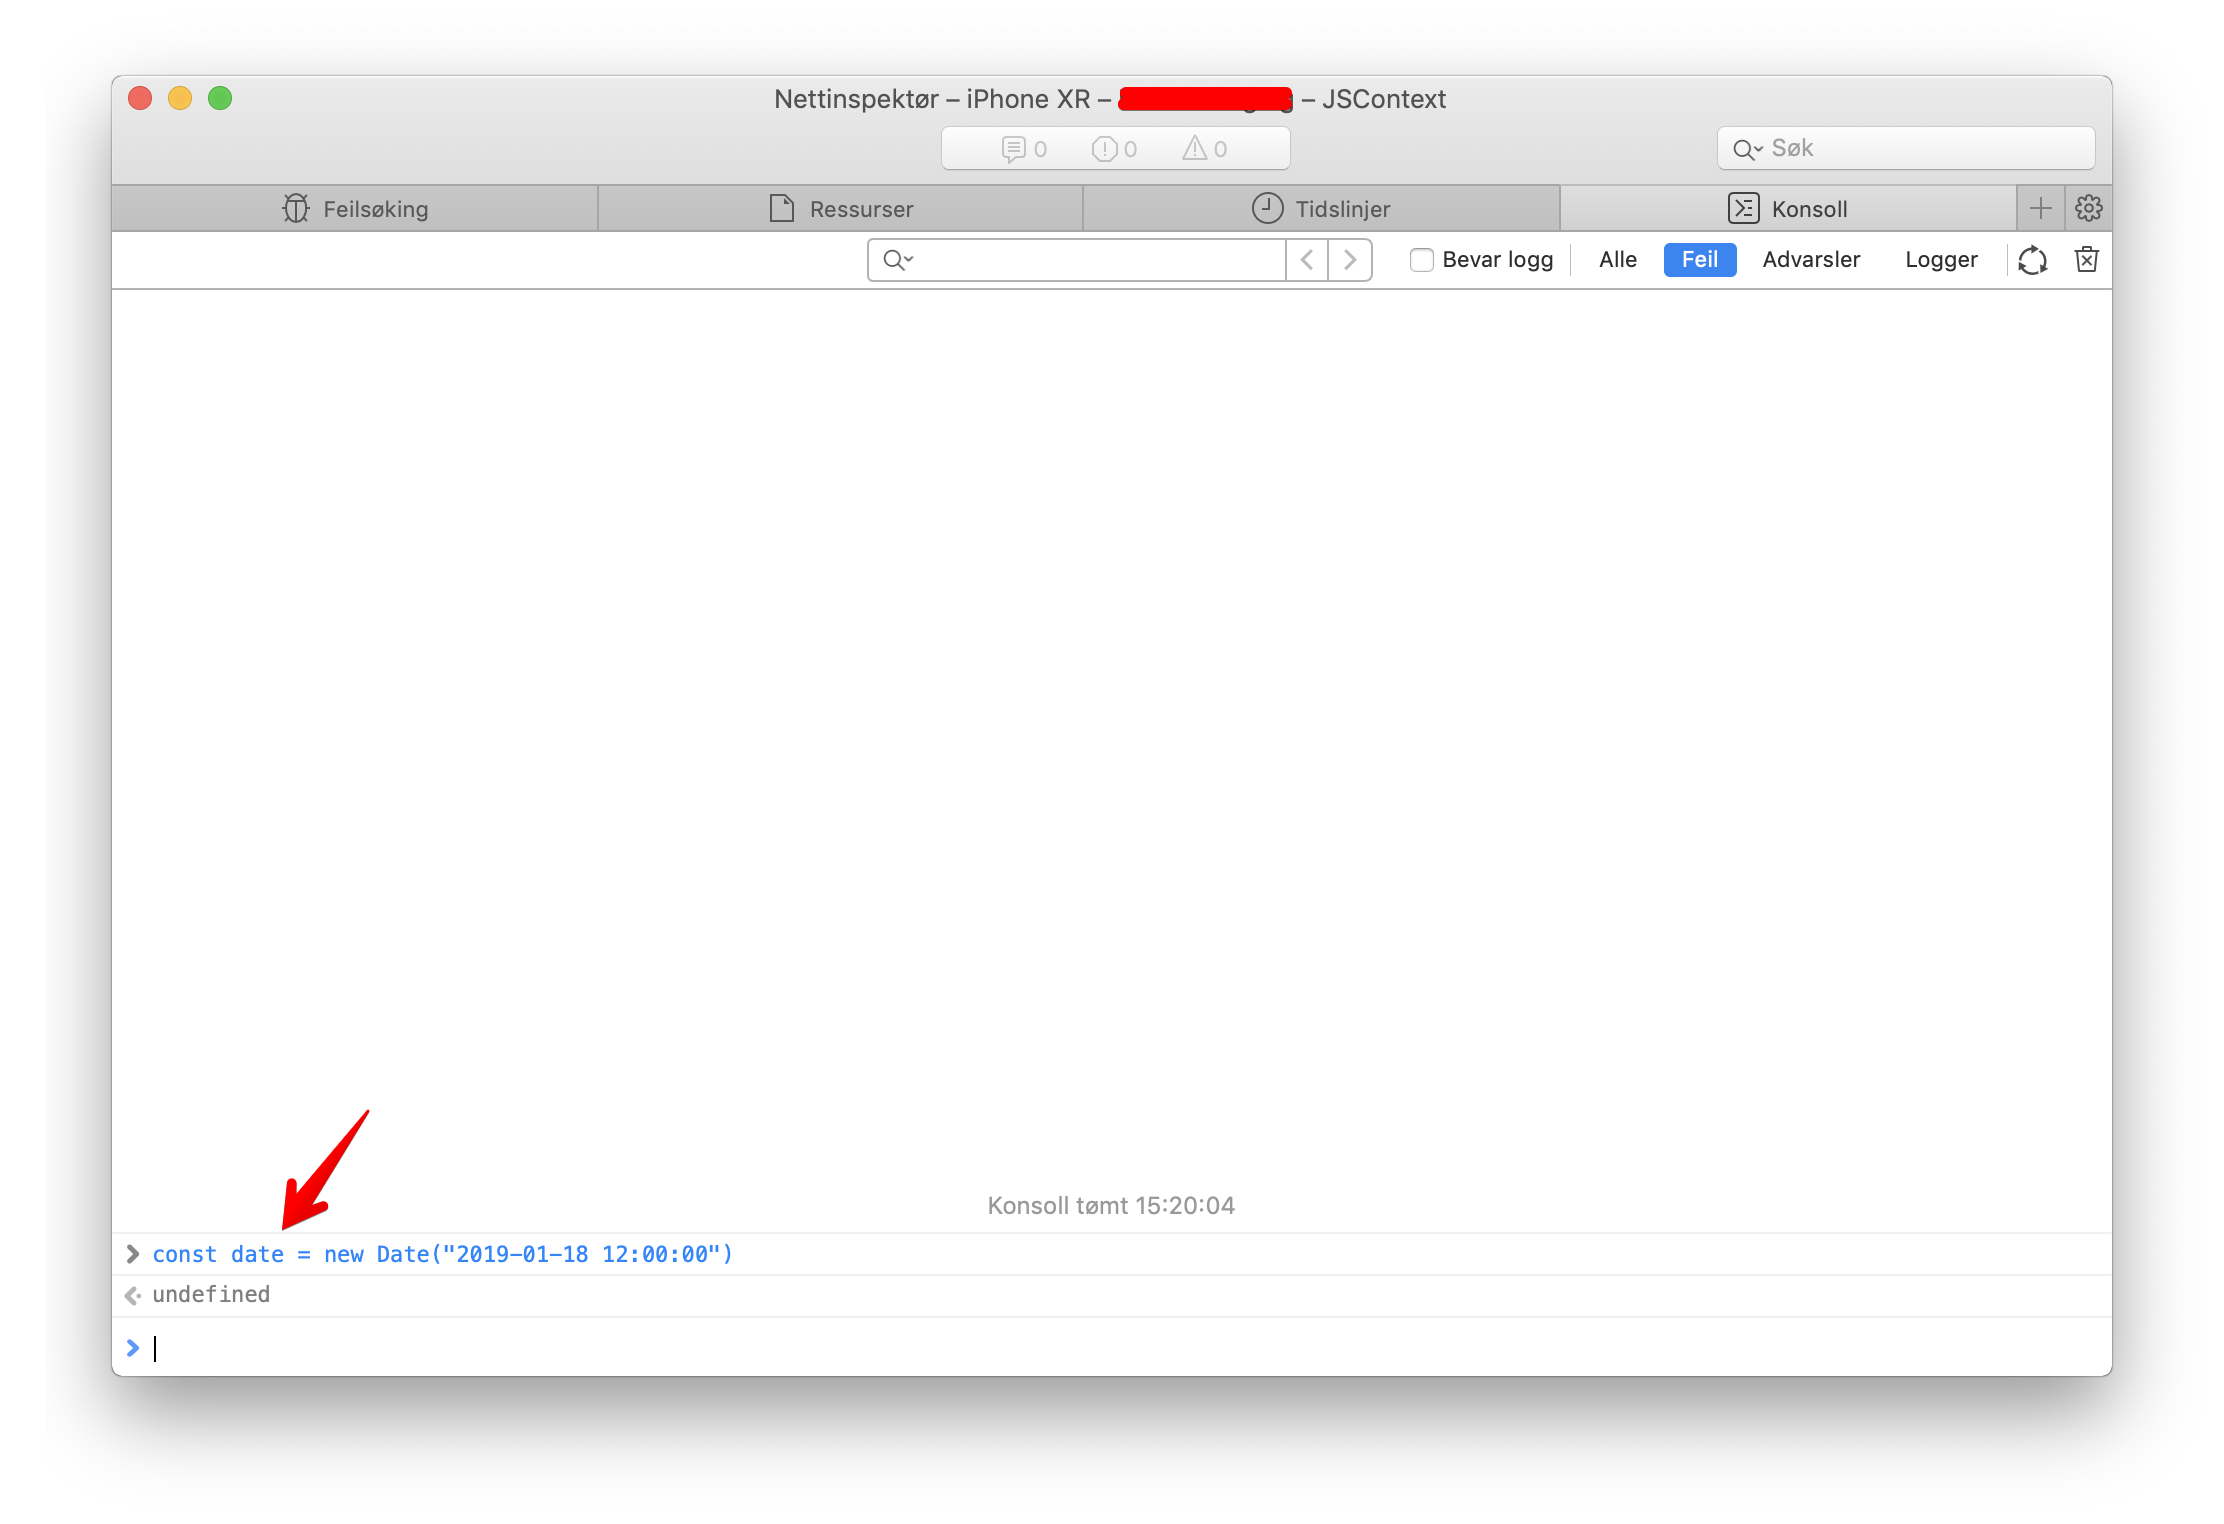
Now open the Console in Safari dev tools, and we should have access to JavascriptCore inside our app. Try running the above Date constructor to confirm that it fails:
Since 2016, JavascriptCore supports most ES6 features:
As of r202125, JavaScriptCore supports all of the new features in the ECMAScript 6 (ES6) language specification
And it was fully confirmed a year later in JSC 💕 ES6
ES2015 (also known as ES6), the version of the JavaScript specification ratified in 2015, is a huge improvement to the language’s expressive power thanks to features like classes, for-of, destructuring, spread, tail calls, and much more
WebKit’s JavaScript implementation, called JSC (JavaScriptCore), implements all of ES6
For more details about JavaScript features supported by different JavaScript engines, visit this ECMAScript comparison table.
Now for the date string format, from Date.parse, let’s visit ECMAScript 2015 specification to see what it says about date string format:
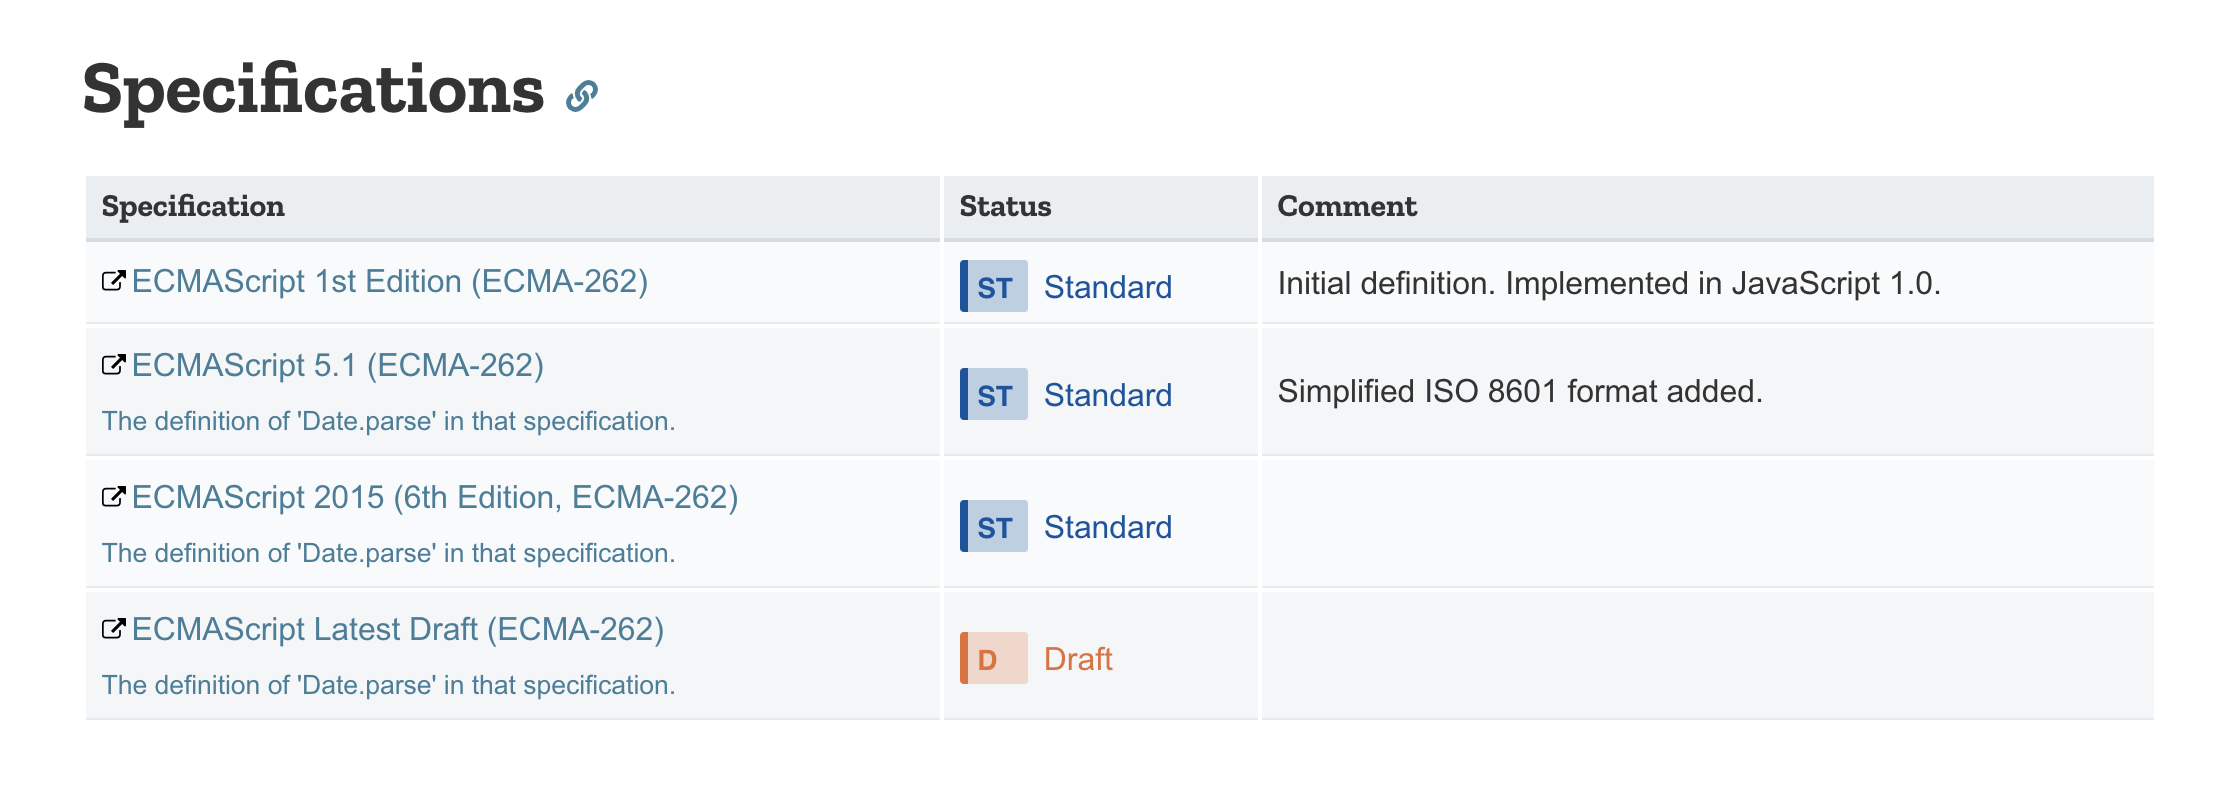
ECMAScript defines a string interchange format for date-times based upon a simplification of the ISO 8601 Extended Format. The format is as follows: YYYY-MM-DDTHH:mm:ss.sssZ
Where the fields are as follows:
“T” appears literally in the string, to indicate the beginning of the time element.
So JavascriptCore requires T specifier and V8 can work without it. The fix for now is to always include that T specifier. This way we always follow ECMAScript standards to make sure it works across different JavaScript environments.
const date = new Date("2019-01-18 12:00:00".replace(' ', 'T'))And now it returns correct Date object. There may be difference between JavascriptCore on iOS and macOS, and among different iOS versions. The lesson learned here is that we should always test our app thoroughly in production and on devices to make sure it works as expected.
Issue #264
Original post https://medium.com/react-native-training/react-native-bridging-how-to-make-linear-gradient-view-83c3805373b7
React Native lets us build mobile apps using only Javascript. It works by providing a common interface that talks to native iOS and Android components. There are enough essentials components to get started, but the cooler thing is that it is easy to build our own, hence we are not limited by React Native. In this post we will implement a linear gradient view, which is not supported by default in React Native, using native UI component, particularly CAGradientLayer in iOS and GradientDrawable in Android.
In Javascript there are hundreds of libraries for a single problem and you should check if you really need it or not. A search on Google for linear gradient shows a bunch of libraries, like react-native-linear-gradient. The less dependencies the better. Linear gradient is in fact very easy to build and we probably don’t need to add extra dependencies. Also integrating and following updates with 3rd libraries are painful, I would avoid that as much as possible.
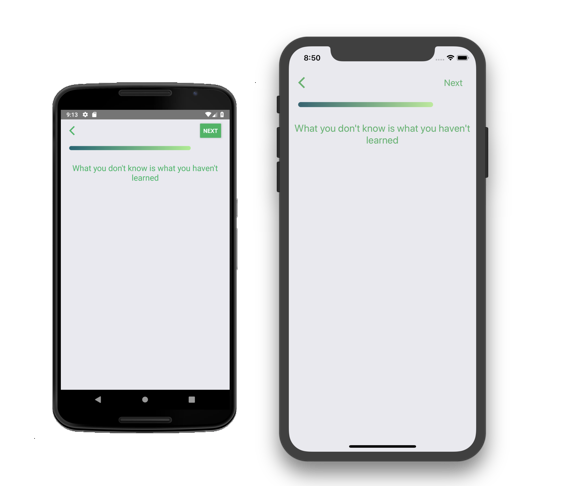
In React Native, there are native UI component and native module. React Native moves pretty fast so most of the articles will be outdated, it’s best to consult official documentation for the latest React Native version. This post will try to give you overview of the whole picture because for now the official guide seems not completed.
In simple explanation, native UI component is about making UIView in iOS or View in Android available as React.Component and used in render function in Javascript.
There are tons of native UI widgets out there ready to be used in the latest apps — some of them are part of the platform, others are available as third-party libraries, and still more might be in use in your very own portfolio. React Native has several of the most critical platform components already wrapped, like ScrollView and TextInput, but not all of them, and certainly not ones you might have written yourself for a previous app.
Native module is more general in that we make any native class available in Javascript.
Sometimes an app needs access to platform API, and React Native doesn’t have a corresponding module yet. Maybe you want to reuse some existing Objective-C, Swift or C++ code without having to reimplement it in JavaScript, or write some high performance, multi-threaded code such as for image processing, a database, or any number of advanced extensions.
To expose native UI views, we use the ViewManager as the bridge, it is RCTViewManager in iOS and SimpleViewManager in Android. Then inside this ViewManager we can just return our custom view. I see it’s good to use Objective C/Java for the ViewManager to match React Native classes, and the custom view we can use either Swift/Objective C in iOS and Kotlin/Java in Android.
I prefer to use Swift, but in this post to remove the overhead of introducing bridging header from Swift to Objective C, we use Objective C for simplicity. We also add the native source code directly into iOS and Android project, but in the future we can extract them easily to a React Native library.
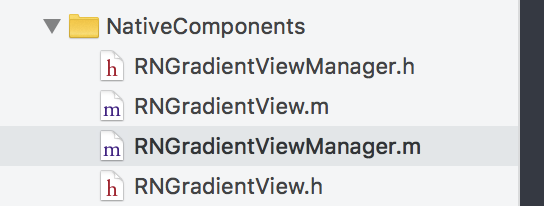
For now let ‘s use the name RNGradientViewManager and RNGradientView to stay consistent between iOS and Android. The RN prefix is arbitrary, you can use any prefix you want, but here I use it to indicate that these classes are meant to be used in Javascript side in React Native.
Add these Objective-C classes to the projects, I usually place them inside NativeComponents folder
Native views are created and manipulated by subclasses of RCTViewManager. These subclasses are similar in function to view controllers, but are essentially singletons - only one instance of each is created by the bridge. They expose native views to the RCTUIManager, which delegates back to them to set and update the properties of the views as necessary. The RCTViewManagers are also typically the delegates for the views, sending events back to JavaScript via the bridge.
Create a RNGradientViewManager that inherits from RCTViewManager
RNGradientViewManager.h
#import <React/RCTViewManager.h>
@interface RNGradientViewManager : RCTViewManager
@end
RNGradientViewManager.m
#import "RNGradientViewManager.h"
#import "RNGradientView.h"

[@implementation](http://twitter.com/implementation) RNGradientViewManager

RCT_EXPORT_MODULE()

- (UIView *)view {
  return [[RNGradientView alloc] init];
}

RCT_EXPORT_VIEW_PROPERTY(progress, NSNumber);
RCT_EXPORT_VIEW_PROPERTY(cornerRadius, NSNumber);
RCT_EXPORT_VIEW_PROPERTY(fromColor, UIColor);
RCT_EXPORT_VIEW_PROPERTY(toColor, UIColor);

[@end](http://twitter.com/end)
In iOS we use macro RCT_EXPORT_MODULE() to automatically register the module with the bridge when it loads. The optional js_name argument will be used as the JS module name. If omitted, the JS module name will match the Objective-C class name.
#define RCT_EXPORT_MODULE(js_name)The ViewManager, not the View, is the facade to the Javascript side, so we expose properties using RCT_EXPORT_VIEW_PROPERTY . Note that we do that inside @implementation RNGradientViewManager
Here we specify the types as NSNumber and UIColor , and later in Javascript we can just pass number and color hex string, and React Native can do the conversions for us. In older versions of React Native, we need processColor in Javascript or RCTConvert color in iOS side, but we don’t need to perform manual conversion now.
In the Native UI component example for iOS, they use WKWebView but here we make a RNGradientView which subclasses from RCTView to take advantage of many features of React Native views, and to avoid some problems we can get if using a normal UIView
RNGradientView.h
#import <UIKit/UIKit.h>
#import <React/RCTView.h>

[@interface](http://twitter.com/interface) RNGradientView : RCTView

[@end](http://twitter.com/end)
RNGradientView.m
#import "RNGradientView.h"
#import <UIKit/UIKit.h>

[@interface](http://twitter.com/interface) RNGradientView()
[@property](http://twitter.com/property) CAGradientLayer *gradientLayer;

[@property](http://twitter.com/property) UIColor *_fromColor;
[@property](http://twitter.com/property) UIColor *_toColor;
[@property](http://twitter.com/property) NSNumber *_progress;
[@property](http://twitter.com/property) NSNumber *_cornerRadius;
[@end](http://twitter.com/end)

[@implementation](http://twitter.com/implementation) RNGradientView

// MARK: - Init

- (instancetype)initWithFrame:(CGRect)frame
{
  self = [super initWithFrame:frame];
  if (self) {
    self.gradientLayer = [self makeGradientLayer];
    [self.layer addSublayer:self.gradientLayer];

self._fromColor = [UIColor blackColor];
    self._toColor = [UIColor whiteColor];
    self._progress = [@0](http://twitter.com/0).5;

[self update];
  }
  return self;
}

// MARK: - Life cycle

- (void)layoutSubviews {
  [super layoutSubviews];

self.gradientLayer.frame = CGRectMake(
    0, 0,
    self.bounds.size.width*self._progress.floatValue,
    self.bounds.size.height
  );
}

// MARK: - Properties

- (void)setFromColor:(UIColor *)color {
  self._fromColor = color;
  [self update];
}

- (void)setToColor:(UIColor *)color {
  self._toColor = color;
  [self update];
}

- (void)setProgress:(NSNumber *)progress {
  self._progress = progress;
  [self update];
}

- (void)setCornerRadius:(NSNumber *)cornerRadius {
  self._cornerRadius = cornerRadius;
  [self update];
}

// MARK: - Helper

- (void)update {
  self.gradientLayer.colors = @[
    (id)self._fromColor.CGColor,
    (id)self._toColor.CGColor
  ];

self.gradientLayer.cornerRadius = self._cornerRadius.floatValue;

[self setNeedsLayout];
}

- (CAGradientLayer *)makeGradientLayer {
  CAGradientLayer *gradientLayer = [CAGradientLayer layer];

gradientLayer.masksToBounds = true;

gradientLayer.startPoint = CGPointMake(0.0, 0.5);
  gradientLayer.endPoint = CGPointMake(1.0, 0.5);
  gradientLayer.anchorPoint = CGPointZero;

return gradientLayer;
}

[@end](http://twitter.com/end)
We can implement anything we want in this native view, in this case we use CAGradientLayer to get nicely displayed linear gradient. Since RNGradientViewManager exposes some properties like progress, cornerRadius, fromColor, toColor we need to implement some setters as they will be called by React Native when we update values in Javascript side. In the setter we call setNeedsLayout to tell the view to invalidate the layout, hence layoutSubviews will be called again.
Open project in Visual Studio Code, add GradientView.js to src/nativeComponents . The folder name is arbitrary, but it’s good to stay organised.
import { requireNativeComponent } from 'react-native'

module.exports = requireNativeComponent('RNGradientView', null)
Here we use requireNativeComponent to load our RNGradientView . We only need this one Javascript file for interacting with both iOS and Android. You can name the module as RNGradientView but I think the practice in Javascript is that we don’t use prefix, so we name just GradientView .
const requireNativeComponent = (uiViewClassName: string): string =>
  createReactNativeComponentClass(uiViewClassName, () =>
    getNativeComponentAttributes(uiViewClassName),
  );

module.exports = requireNativeComponent;
Before I tried to use export default for the native component, but this way the view is not rendered at all, even if I wrap it inside React.Component . It seems we must use module.exports for the native component to be properly loaded.
Now using it is as easy as declare the GradientView with JSX syntax
import GradientView from 'nativeComponents/GradientView'

export default class Profile extends React.Component {
  render() {
    return (
      <SafeAreaView style={styles.container}>
        <GradientView
          style={styles.progress}
          fromColor={R.colors.progress.from}
          toColor={R.colors.progress.to}
          cornerRadius={5.0}
          progress={0.8} />
    )
  }
}Add these Java classes to the projects, I usually place them inside nativeComponents folder

Create a RNGradientManager that extends SimpleViewManager
RNGradientManager.java
package com.onmyway133.myApp.nativeComponents;

import android.support.annotation.Nullable;
import com.facebook.react.uimanager.SimpleViewManager;
import com.facebook.react.uimanager.ThemedReactContext;
import com.facebook.react.uimanager.annotations.ReactProp;

public class RNGradientViewManager extends SimpleViewManager<RNGradientView> {
    [@Override](http://twitter.com/Override)
    public String getName() {
        return "RNGradientView";
    }

[@Override](http://twitter.com/Override)
    protected RNGradientView createViewInstance(ThemedReactContext reactContext) {
        return new RNGradientView(reactContext);
    }

// Properties

[@ReactProp](http://twitter.com/ReactProp)(name = "progress")
    public void setProgress(RNGradientView view, [@Nullable](http://twitter.com/Nullable) float progress) {
        view.setProgress(progress);
    }

[@ReactProp](http://twitter.com/ReactProp)(name = "cornerRadius")
    public void setCornerRadius(RNGradientView view, [@Nullable](http://twitter.com/Nullable) float cornerRadius) {
        view.setCornerRadius(cornerRadius);
    }

[@ReactProp](http://twitter.com/ReactProp)(name = "fromColor", customType = "Color")
    public void setFromColor(RNGradientView view, [@Nullable](http://twitter.com/Nullable) int color) {
        view.setFromColor(color);
    }

[@ReactProp](http://twitter.com/ReactProp)(name = "toColor", customType = "Color")
    public void setToColor(RNGradientView view, [@Nullable](http://twitter.com/Nullable) int color) {
        view.setToColor(color);
    }
}
We usually use Color as android.graphics.Color , but for the GradientDrawable that we are going to use, it use color as ARGB integer. So it’s nifty that React Native deals with Color as int type. We also need to specify customType = “Color” as Color is something kinda custom.
This is where we implement our view, we can do that in Kotlin if we like.
RNGradientView.java
package com.onmyway133.myApp.nativeComponents;

import android.content.Context;
import android.graphics.drawable.GradientDrawable;
import android.graphics.drawable.ScaleDrawable;
import android.support.annotation.Nullable;
import android.util.AttributeSet;
import android.view.Gravity;
import android.view.View;

public class RNGradientView extends View {

    float progress;
    float cornerRadius;
    int fromColor;
    int toColor;

    public RNGradientView(Context context) {
        super(context);
    }

    public RNGradientView(Context context, @Nullable AttributeSet attrs) {
        super(context, attrs);
    }

    public RNGradientView(Context context, @Nullable AttributeSet attrs, int defStyleAttr) {
        super(context, attrs, defStyleAttr);
    }

    public RNGradientView(Context context, @Nullable AttributeSet attrs, int defStyleAttr, int defStyleRes) {
        super(context, attrs, defStyleAttr, defStyleRes);
    }

    // update

    void update() {
        GradientDrawable gradient = new GradientDrawable();
        gradient.setColors(new int[] {
            this.fromColor,
            this.toColor
        });
         gradient.setOrientation(GradientDrawable.Orientation.*LEFT_RIGHT*);
        gradient.setGradientType(GradientDrawable.*LINEAR_GRADIENT*);
        gradient.setShape(GradientDrawable.*RECTANGLE*);
        gradient.setCornerRadius(this.cornerRadius * 4);

        ScaleDrawable scale = new ScaleDrawable(gradient, Gravity.*LEFT*, 1, -1);
        scale.setLevel((int)(this.progress * 10000));

        this.setBackground(scale);
    }

    // Getter & setter

    public void setProgress(float progress) {
        this.progress = progress;
        this.update();
    }

    public void setCornerRadius(float cornerRadius) {
        this.cornerRadius = cornerRadius;
        this.update();
    }

    public void setFromColor(int fromColor) {
        this.fromColor = fromColor;
        this.update();
    }

    public void setToColor(int toColor) {
        this.toColor = toColor;
        this.update();
    }
}
Pay attention to the setColors as it use an array of int
Sets the colors used to draw the gradient.
Each color is specified as an ARGB integer and the array must contain at least 2 colors.
If we call setBackground with the GradientDrawable it will be stretched to fill the view. In our case we want to support progress which determines how long the gradient should show. To fix that we use ScaleDrawable which is a Drawable that changes the size of another Drawable based on its current level value.
The same value for cornerRadius works in iOS, but for Android we need to use higher values, that’s why the multiplication in gradient.setCornerRadius(this.cornerRadius * 4)
Another way to implement gradient is to use Shape Drawable with xml , it’s the equivalent of using xib in iOS. We can create something like gradient.xml and put that inside /res/drawable
<?xml version="1.0" encoding="utf-8"?>
<shape xmlns:android="[http://schemas.android.com/apk/res/android](http://schemas.android.com/apk/res/android)"
    android:shape="rectangle">
    <gradient
        android:startColor="#3B5998"
        android:endColor="#00000000"
        android:angle="45"/>
</shape>
For more information, you can read
Android Shape Drawables Tutorial
Have you ever wanted to reduce your Android application’s size or make it look more interesting? If yes, then you…android.jlelse.eu
We can also use the class directly ShapeDrawable in code
A Drawable object that draws primitive shapes. A ShapeDrawable takes a Shape object and manages its presence on the screen. If no Shape is given, then the ShapeDrawable will default to a RectShape.
This object can be defined in an XML file with theelement.
In iOS we use RCT_EXPORT_MODULE to register the component, but in Android, things are done explicitly using Package . A package can register both native module and native UI component. In this case we deal with just UI component, so let’s return RNGradientManager in createViewManagers
GradientManagerPackage.java
package com.onmyway133.myApp.nativeComponents;

import com.facebook.react.ReactPackage;
import com.facebook.react.bridge.NativeModule;
import com.facebook.react.bridge.ReactApplicationContext;
import com.facebook.react.uimanager.ViewManager;
import java.util.Arrays;
import java.util.Collections;
import java.util.List;

public class RNGradientViewPackage implements ReactPackage {
    [@Override](http://twitter.com/Override)
    public List<NativeModule> createNativeModules(ReactApplicationContext reactContext) {
        return Collections.emptyList();
    }

[@Override](http://twitter.com/Override)
    public List<ViewManager> createViewManagers(ReactApplicationContext reactContext) {
        return Arrays.<ViewManager>asList(
            new RNGradientViewManager()
        );
    }
}
Then head over to MainApplication.java to declare our package
[@Override](http://twitter.com/Override)
protected List<ReactPackage> getPackages() {
  return Arrays.<ReactPackage>asList(
      new MainReactPackage(),
      new RNGradientViewPackage()
  );
}
That’s it for Android. We already have the GradientView.js written earlier, when running the app in Android, it will look up and load our RNGradientView
Hope you learn something about native UI component. In the post we only touch the surfaces on what native UI component can do, which is just passing configurations from Javascript to native. There are a lot more to discover, like event handling, thread, styles, custom types, please consult the official documentation for correct guidance.
Issue #263
Original post https://medium.com/react-native-training/how-to-dismiss-keyboard-with-react-navigation-in-react-native-apps-4b987bbfdc48
Showing and dismiss keyboard seems like a trivial thing to do in mobile apps, but it can be tricky in automatically dismissing it when it comes together with react-navigation and modal presentation. At least that’s according to my initial assumption. This article aims to detail what I have learned about keyboard handling and how to avoid extra tap when dealing with TextInput There will also be lots of code spelunking, thanks to the all the libraries being open source. The version of React Native I’m using at the time of writing is 0.57.5
React Native comes with a bunch of basic components, one of them is the TextInput for inputting text into the app via a keyboard.
import React, { Component } from 'react';
import { AppRegistry, TextInput } from 'react-native';

export default class UselessTextInput extends Component {
  constructor(props) {
    super(props);
    this.state = { text: 'Useless Placeholder' };
  }

render() {
    return (
      <TextInput
        style={{height: 40, borderColor: 'gray', borderWidth: 1}}
        onChangeText={(text) => this.setState({text})}
        value={this.state.text}
      />
    );
  }
}
That’s it, whenever we click on the text input, keyboard appears allowing us to enter values. To dismiss the keyboard by pressing anywhere on the screen, the easy solution is to TouchableWithoutFeedback together with Keyboard . This is similar to having UITapGestureRecognizer in iOS UIView and calling view.endEditing
import { Keyboard } from 'react-native'

Keyboard.dismiss()Normally we should have some text inputs inside a scrolling component, in React Native that is mostly ScrollView to be able to handle long list of content and avoid keyboard. If TextInput is inside ScrollView then the way keyboard gets dismissed behaves a bit differently, and depends on keyboardShouldPersistTaps
Determines when the keyboard should stay visible after a tap.
‘never’ (the default), tapping outside of the focused text input when the keyboard is up dismisses the keyboard. When this happens, children won’t receive the tap.
‘always’, the keyboard will not dismiss automatically, and the scroll view will not catch taps, but children of the scroll view can catch taps.
‘handled’, the keyboard will not dismiss automatically when the tap was handled by a children, (or captured by an ancestor).
The never mode should be the desired behaviour in most cases, clicking anywhere outside the focused text input should dismiss the keyboard.
In my app, there are some text inputs and an action button. The scenario is that users enter some infos and then press that button to register data. With the never mode, we have to press button twice, one for dismissing the keyboard, and two for the onPress of the Button . So the solution is to use always mode. This way the Button always gets the press event first.
<ScrollView keyboardShouldPersistTaps='always' />The native RCTScrollView class that power react native ScrollView has code to handle dismiss mode
RCT_SET_AND_PRESERVE_OFFSET(setKeyboardDismissMode, keyboardDismissMode, UIScrollViewKeyboardDismissMode)The option that it chooses is UIScrollViewKeyboardDismissMode for keyboardDismissMode property
The manner in which the keyboard is dismissed when a drag begins in the scroll view.
As you can see, the possible modes are onDrag and interactive . And react native exposes customization point for this via keyboardShouldPersistTaps
case none The keyboard does not get dismissed with a drag.
case onDrag The keyboard is dismissed when a drag begins.
case interactive The keyboard follows the dragging touch offscreen, and can be pulled upward again to cancel the dismiss.
But that does not work when ScrollView is inside Modal . By Modal I meant the Modal component in React Native. The only library that I use is react-navigation , and it supports Opening a full-screen modal too, but they way we declare modal in react-navigation looks like stack and it is confusing, so I would rather not use it. I use Modal in react-native and that works pretty well.
So if we have TextInput inside ScrollView inside Modal then keyboardShouldPersistTaps does not work. Modal seems to be aware of parent ScrollView so we have to declare keyboardShouldPersistTaps=’always’ on every parent ScrollView . In React Native FlatList and SectionList uses ScrollView under the hood, so we need to be aware of all those ScrollView components.
Since my app relies heavily on react-navigation , it’s good to have a deep understanding about its components so we make sure where the problem lies. I’ve written a bit about react-navigation structure below.
Using react-navigation 3.0 in React Native apps
react-navigation is probably the only dependency I use in React Native apps. I’m happy with it so far, then version 3.0…codeburst.io
Like every traditional mobile apps, my app consists of many stack navigators inside tab navigator. In iOS that means many UINavigationViewController inside UITabbarController . In react-navigation I use createMaterialTopTabNavigator inside createBottomTabNavigator
import { createMaterialTopTabNavigator } from 'react-navigation'
import { createBottomTabNavigator, BottomTabBar } from 'react-navigation-tabs'
The screen I have keyboard issue is a Modal presented from the 2nd screen in one of the stack navigators, so let’s examine every possible ScrollView up the hierarchy. This process involves lots of code reading and this’s how I love open source.
First let’s start with createBottomTabNavigator which uses createTabNavigator together with its own TabNavigationView
class TabNavigationView extends React.PureComponent<Props, State>

export default createTabNavigator(TabNavigationView);
Tab navigator has tab bar view below ScreenContainer , which is used to contain view. ScreenContainer is from react-native-screens “This project aims to expose native navigation container components to React Native”. Below is how tab navigator works.
render() {
  const { navigation, renderScene, lazy } = this.props;
  const { routes } = navigation.state;
  const { loaded } = this.state
  return (
    <View style={styles.container}>
      <ScreenContainer style={styles.pages}>
        {routes.map((route, index) => {
          if (lazy && !loaded.includes(index)) {
            // Don't render a screen if we've never navigated to it
            return null;

          const isFocused = navigation.state.index === index
          return (
            <ResourceSavingScene
              key={route.key}
              style={StyleSheet.absoluteFill}
              isVisible={isFocused}
            >
              {renderScene({ route })}
            </ResourceSavingScene>
          );
        })}
      </ScreenContainer>
      {this._renderTabBar()}
    </View>
  );
}
Tab bar is rendered using BottomTabBar in _renderTabBar function. Looking at the code, the whole tab navigator has nothing to do with ScrollView .
So there is only createMaterialTopTabNavigator left on the suspecting list. I use it in the app with swipeEnabled: true . And by looking at the imports, top tab navigator has
import MaterialTopTabBar, { type TabBarOptions,} from '../views/MaterialTopTabBar';MaterialTopTabBar has import from react-native-tab-view
import { TabBar } from 'react-native-tab-view';which has ScrollView
<View style={styles.scroll}>
  <Animated.ScrollView
    horizontal
    keyboardShouldPersistTaps="handled"
The property keyboardShouldPersistTaps was initial set to always , then set back to handled to avoid the bug that we can’t press any button in tab bar while keyboard is open https://github.com/react-native-community/react-native-tab-view/issues/375
But this TabBar has nothing with our problem, because it’s just for containing tab bar buttons.
Taking another look at createMaterialTopTabNavigator we see more imports from react-native-tab-view
import { TabView, PagerPan } from 'react-native-tab-view';TabView has swipeEnabled passed in
return (
  <TabView
    {...rest}
    navigationState={navigation.state}
    animationEnabled={animationEnabled}
    swipeEnabled={swipeEnabled}
    onAnimationEnd={this._handleAnimationEnd}
    onIndexChange={this._handleIndexChange}
    onSwipeStart={this._handleSwipeStart}
    renderPager={renderPager}
    renderTabBar={this._renderTabBar}
    renderScene={
      /* $FlowFixMe */
      this._renderScene
    }
  />
);
and it renders PagerDefault, which in turn uses PagerScroll for iOS
import { Platform } from 'react-native';

let Pager;

switch (Platform.OS) {
  case 'android':
    Pager = require('./PagerAndroid').default;
    break;
  case 'ios':
    Pager = require('./PagerScroll').default;
    break;
  default:
    Pager = require('./PagerPan').default;
    break;
}

export default Pager;
So PagerScroll uses ScrollView to handle scrolling to match material style that user can scroll between pages, and it has keyboardShouldPersistTaps=”always” which should be correct.
return (
  <ScrollView
    horizontal
    pagingEnabled
    directionalLockEnabled
    keyboardDismissMode="on-drag"
    keyboardShouldPersistTaps="always"
So nothing looks suspicious in react-navigation , which urges me to look at code from my project.
Like I stated in the beginning of this article, the root problem is that we need to declare keyboardShouldPersistTaps for all parent ScrollView in the hierarchy. That means to look out for any FlatList, SectionList and ScrollView
Luckily, there is react-devtools that shows tree of all rendered components in react app, and that is also guided in Debugging section of react native.
You can use the standalone version of React Developer Tools to debug the React component hierarchy. To use it, install the react-devtools package globally:
npm install -g react-devtoolsSo after searching I found out that there is a SectionList up the hierarchy that should have keyboardShouldPersistTaps=’always’ while it didn’t.
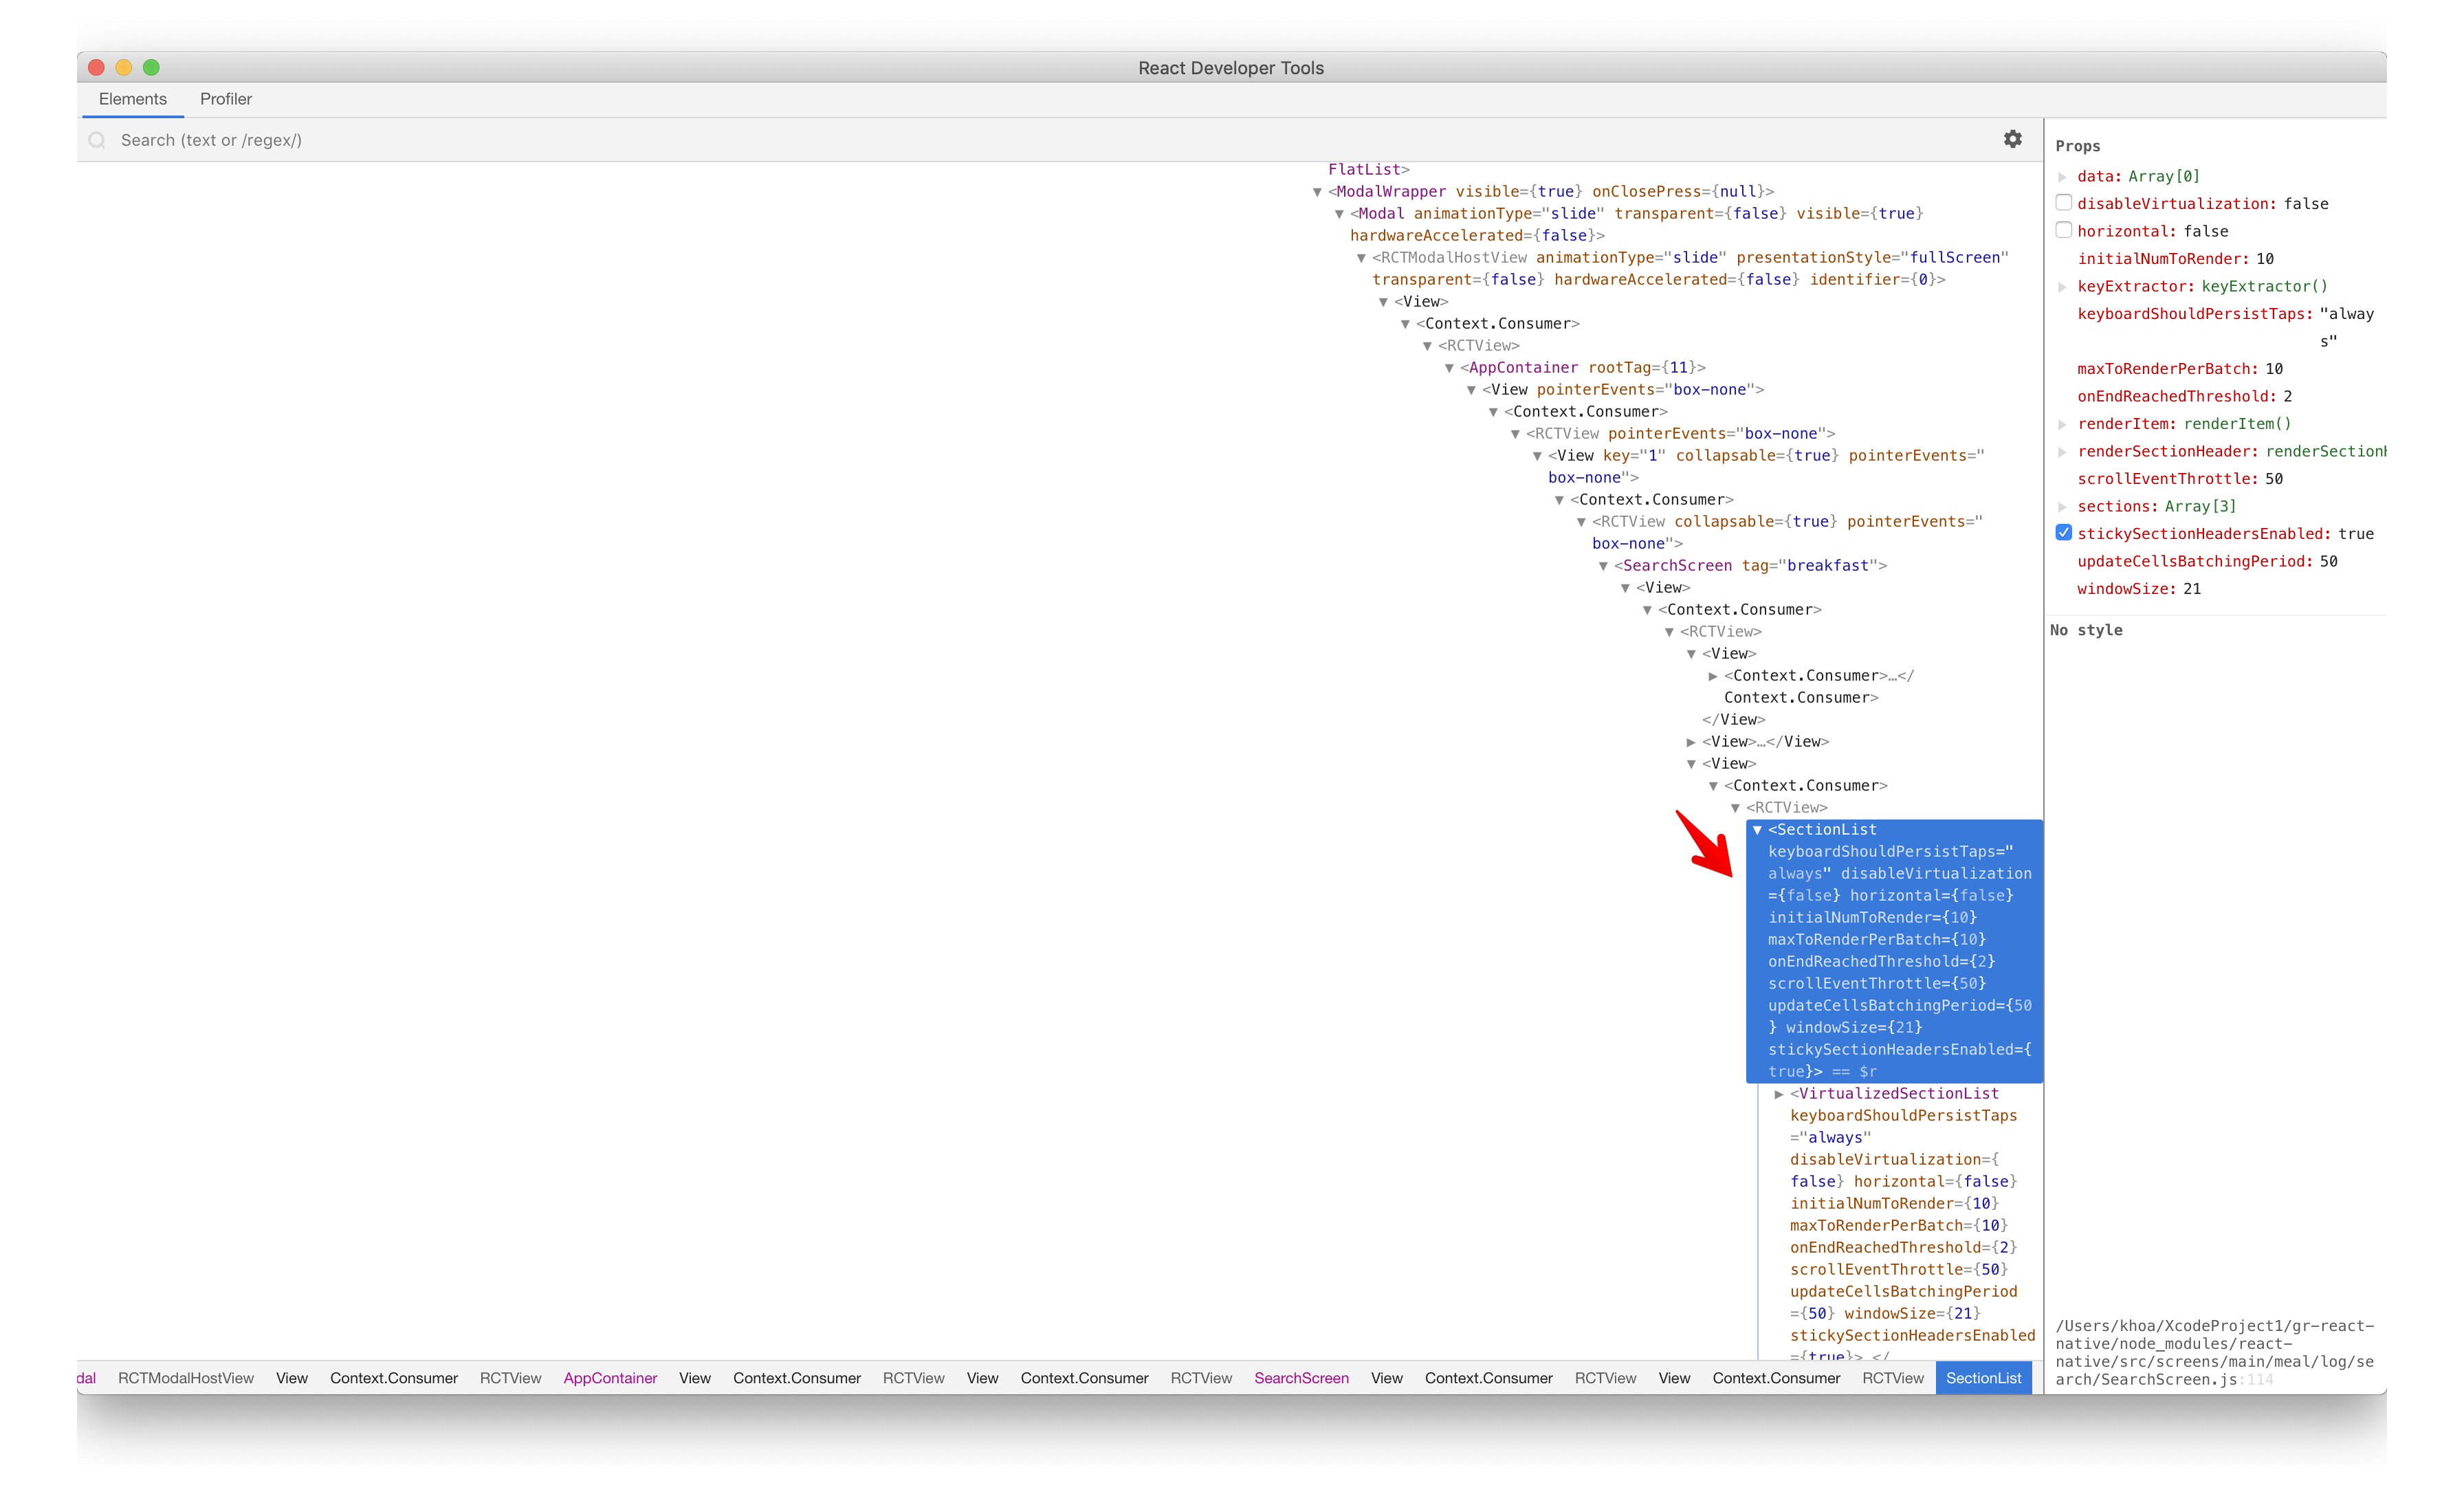
Taking a thorough look at the code, I found out that the Modal is trigged from a SectionList item. We already know that triggering Modal in react native means that to embed that Modal inside the view hierarchy and control its visibility via a state. So in terms of view and component, that Modal is inside a SectionList . And for your interest, if you dive deep into react native code, SectionList in my case is just VirtualizedSectionList , which is VirtualizedList, which uses ScrollView
So after I declare keyboardShouldPersistTaps=’always’ in that SectionList , the problem is solved. User can now just enters some values in the text inputs, then press once on the submit button to submit data. The button now captures touch events first instead of scrollview.
The solution for this is fortunately simple as it involves fixing our code without having to alter react-navigation code. But it’s good to look at the library code to know what it does, and to trace where the problem originates. Thanks for following such long exploring and hope you learn something.
Issue #260
Original post https://medium.com/react-native-training/firebase-sdk-with-firestore-for-react-native-apps-in-2018-aa89a67d6934
At Firebase Dev Summit 2017, Google introduced Firestore as fully-managed NoSQL document database for mobile and web app development. Compared to Firebase Realtime Database, it has better querying and more structured data, together with ease manual fetching of data.
The new structure of collection and document is probably the eye catching, this makes data more intuitive to users and query a breeze.
](https://cdn-images-1.medium.com/max/2000/0*mEjeh2eMqIvQYNTa.png) From https://firebase.googleblog.com/2017/10/cloud-firestore-for-rtdb-developers.html
From https://firebase.googleblog.com/2017/10/cloud-firestore-for-rtdb-developers.html
In this post, I will show how to setup Firebase Cloud Firestore in React Native apps for both iOS and Android through, of course, some pain points. Then we create and fetch document in Firestore database.
My first option is to go with Firebase Javascript SDK, as it worked well for me with Firebase Realtime Database. My use case is to just fetch and update Firestore collections, I think it does not involve much of native features. Furthermore, when possible I try to avoid native code as much as possible when dealing with React Native.
So let’s try Get started with Cloud Firestore
npm install firebaseThe version I install is 5.4.0. Next, import firebase and note that we need to import firestore as well
const firebase = require("firebase");
// Required for side-effects
require("firebase/firestore");This issue made me bang against my desk for a while. As people have pointed out, it is because of document being accessed.
var BrowserPlatform = /** @class */ (function () {
    function BrowserPlatform() {
        this.emptyByteString = '';
        this.document = document; // delete this line
        this.window = window; // delete this line
        this.base64Available = typeof atob !== 'undefined';
    }
The firestore component in the current Firebase Javascript SDK does not fully support React Native, so we need to work around or use beta version with npm install firebase@next . In the mean time, let’s try React Native Firebase.
Reading over at Cloud Firestore Library and framework integrations, React Native Firebase is recommended. Although some features from the Firebase Web SDK will generally work with React Native, it is mainly built for the web and as such has a limited compatible feature set.
](https://cdn-images-1.medium.com/max/2000/1*rae3_7gLeEQvPRDNesXgrw.png) Source: https://rnfirebase.io/docs/v4.3.x/getting-started
Source: https://rnfirebase.io/docs/v4.3.x/getting-started
The below article and their starter app is the guiding star. The integration with native code in iOS and Android can be painful, but I React Native Firebase is very powerful as it has up-to-date wrappers around native Firebase SDK.
Let ‘s npm install react-native-firebase , the current version is 4.3.8 , and follow manual setup guide for existing project, this helps you learn more about the process and the bootstrap script.
First you need to Firebase console and add a project. A project allows many apps to stay, for example I have 4 apps (2 iOS, 2 Android) that have access to Firestore database.
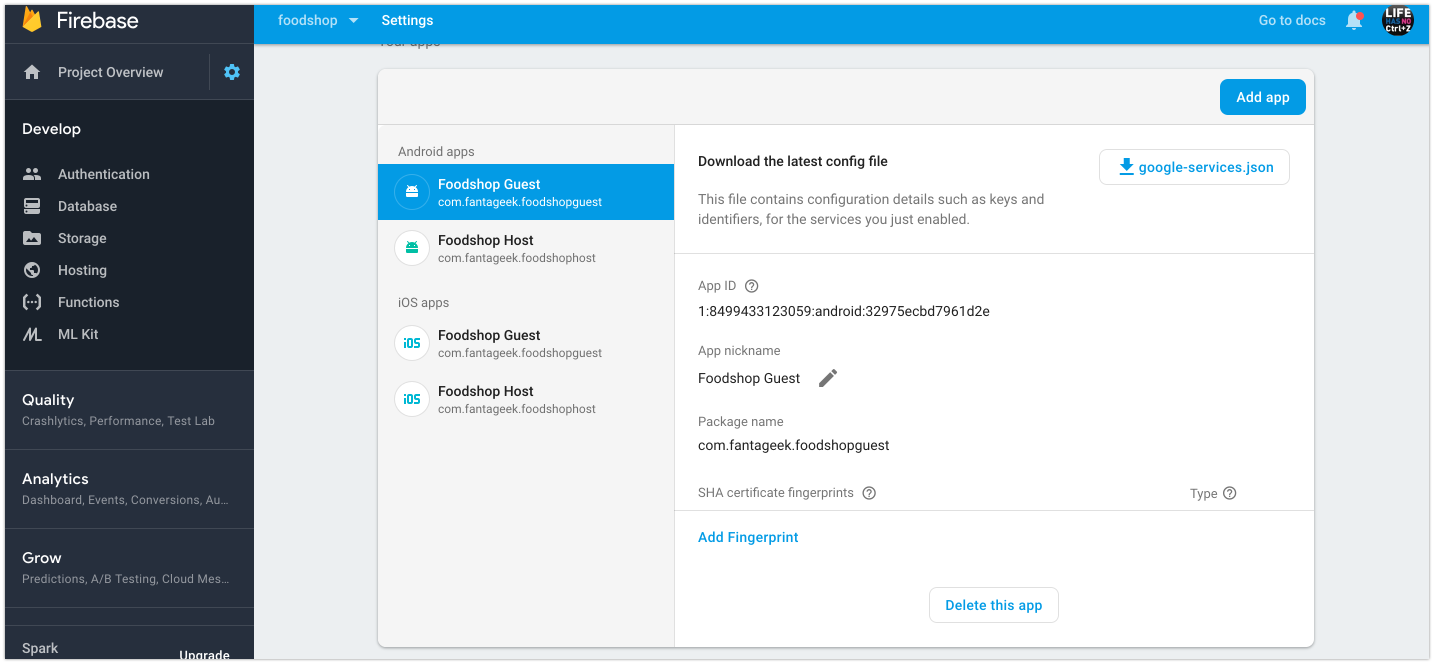
Head over to Database in the left menu, we can see a quick look into Firestore and its collection/document structure
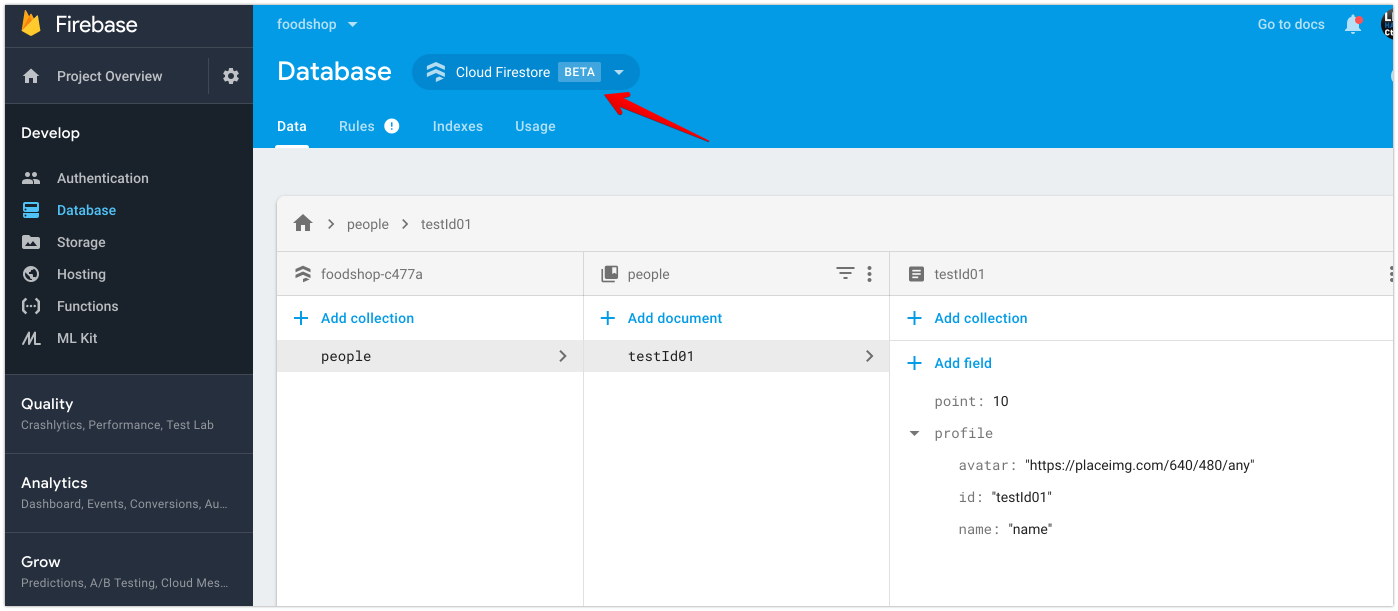
Follow iOS Installation Guide
Firstly, download GoogleService-Info.plist and place it in the correct folder, make sure it has been added to project via Xcode. Otherwise Firebase SDK causes app to crash right after start.
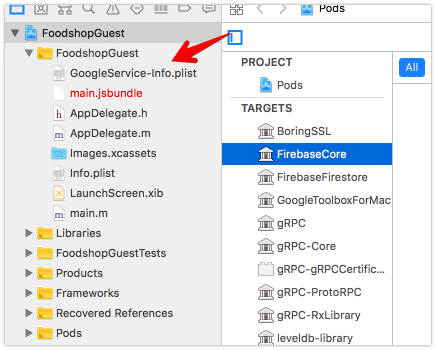
Then add #import <Firebase.h> to AppDelegate.m and [FIRApp configure]; to function didFinishLaunchingWithOptions . Next create Podfile with pod init inside ios folder. For Firestore, you need Firebase/Firestore to prevent the error below
You attempted to use a firebase module that’s not installed natively on your iOS project by calling firebase.firestore()
And you shouldn’t use use_frameworks! as it gives error ‘FirebaseCore/FIRAnalyticsConfiguration.h’ file not found
platform :ios, '9.0'

target 'FoodshopGuest' do
  pod 'Firebase/Core', '~> 5.3.0'
  pod 'Firebase/Firestore', '~> 5.3.0'
end
If you get framework not found FirebaseAnalytics , then make sure each target has $(inherited) at the top for Framework Search Paths
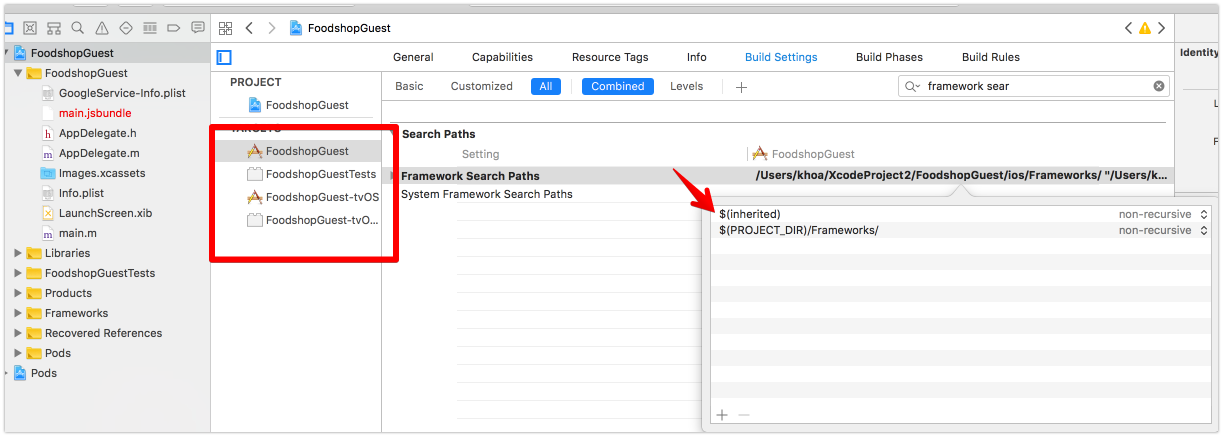
Then run react-native link react-native-firebase and you should be good for iOS.
Android is a bit less straightforward to setup than iOS. But it’s not impossible. Let’s follow Android Installation guide.
Firstly, place google-services.json in android/app/google-services.json . Let’s also use Gradle 4.4 and Google Play Services 15.0.1 . Change gradle/gradle-wrapper.properties to use
distributionUrl=https\://services.gradle.org/distributions/gradle-4.4-all.zipBelow is my project build.gradle with compileSdkVersion 27 and buildToolsVersion 27.0.3 . Make sure google() stays above jcenter()
// Top-level build file where you can add configuration options common to all sub-projects/modules.

buildscript {
    repositories {
        mavenLocal()
        google()
        jcenter()
        maven {
            url '[https://maven.google.com/'](https://maven.google.com/')
            name 'Google'
        }
    }
    dependencies {
        classpath 'com.android.tools.build:gradle:3.1.3'
        classpath 'com.google.gms:google-services:4.0.1'

// NOTE: Do not place your application dependencies here; they belong
        // in the individual module build.gradle files
    }
}

allprojects {
    repositories {
        mavenLocal()
        google()
        jcenter()
        maven {
            // All of React Native (JS, Obj-C sources, Android binaries) is installed from npm
            url "$rootDir/../node_modules/react-native/android"
        }
    }
}

ext {
    buildToolsVersion = "27.0.3"
    minSdkVersion = 16
    compileSdkVersion = 27
    targetSdkVersion = 26
    supportLibVersion = "26.1.0"
}
For my app module build.gradle , let’s have apply plugin: ‘com.google.gms.google-services’ at the very bottom of the file, this is important. In dependencies section, you must have com.google.firebase:firebase-firestore to include Firestore component.
dependencies {
    implementation project(':react-native-firebase')
    implementation fileTree(dir: "libs", include: ["*.jar"])
    implementation "com.android.support:appcompat-v7:${rootProject.ext.supportLibVersion}"

// Firebase dependencies
    implementation "com.google.android.gms:play-services-base:15.0.1"
    implementation "com.google.firebase:firebase-core:16.0.1"
    implementation "com.google.firebase:firebase-firestore:17.0.2"

}
Make sure there is no duplication of project(‘:react-native-firebase’) . And since we are using Gradle 4, let’s use implementation instead of compile
What’s the difference between implementation and compile in Gradle?
This site uses cookies to deliver our services and to show you relevant ads and job listings. By using our site, you…stackoverflow.com
Because of Firestore, let’s follow react-native-firebase-starter to fix heap problem
dexOptions {
    javaMaxHeapSize "4g"
}

multiDexEnabled true
If you get Native module RNFirebaseModule tried to override FNFirebaseModule
Native module RNFirebaseModule tried to override FNFirebaseModule for module name Firebase. If this was your intention, set `canOverrideExistingModule=true
Then make sure your MainApplication.java has no duplication for new RNFirebasePackage() . Here is my MainApplication.java , note that you need import io.invertase.firebase.firestore.RNFirebaseFirestorePackage; in order to use RNFirebaseFirestorePackage
package com.fantageek.foodshophost;

import android.app.Application;

import com.facebook.react.ReactApplication;
import io.invertase.firebase.RNFirebasePackage;
import io.invertase.firebase.firestore.RNFirebaseFirestorePackage;
import com.facebook.react.ReactNativeHost;
import com.facebook.react.ReactPackage;
import com.facebook.react.shell.MainReactPackage;
import com.facebook.soloader.SoLoader;

import java.util.Arrays;
import java.util.List;

public class MainApplication extends Application implements ReactApplication {

private final ReactNativeHost mReactNativeHost = new ReactNativeHost(this) {
    [@Override](http://twitter.com/Override)
    public boolean getUseDeveloperSupport() {
      return BuildConfig.DEBUG;
    }

[@Override](http://twitter.com/Override)
    protected List<ReactPackage> getPackages() {
      return Arrays.<ReactPackage>asList(
          new MainReactPackage(),
          new RNFirebasePackage(),
          new RNFirebaseFirestorePackage()
      );
    }

[@Override](http://twitter.com/Override)
    protected String getJSMainModuleName() {
      return "index";
    }
  };

[@Override](http://twitter.com/Override)
  public ReactNativeHost getReactNativeHost() {
    return mReactNativeHost;
  }

[@Override](http://twitter.com/Override)
  public void onCreate() {
    super.onCreate();
    SoLoader.init(this, /* native exopackage */ false);
  }
}
My rule of thumb is that you should always use Android Studio to perform Gradle sync or Build projectThere you should be able to see compile issues much easier. With all the steps above, compilation should succeed.
One problem with running React Native on Android, if after react-native run-android and Metro keeps showing Loading dependency graph, done , then you should start emulator via Android Studio -> AVD Manager or adb , the app should be already installed in the emulator, open the app and Metro will start loading again.
React Native Firebase should give you similar APIs to those in the web, so learn from Get data with Cloud Firestore for how to get or set documents.
I like to organise services in separate files, here is how to reference firestore and load document.
import firebase from 'react-native-firebase'

class FirebaseService {
  constructor() {
    this.ref = firebase.firestore().collection('people')
  }

async load(id) {
    const doc = await this.ref.doc(id).get()
    if (doc.exists) {
      return doc.data()
    } else {
      const defaultDoc = {
        name: "ABC",
        age: 2
      }

await this.ref.doc(id).set(defaultDoc)
      return doc
    }
  }
}

export const firebaseService = new FirebaseService()I hope this article helps in setting up Firebase SDK in React Native apps. Below are some resources that helps you explore further. The react-native-firebase-starter contains awesome reference code if you get into any troubles with react-native-firebase.
Getting started with Cloud Firestore on React Native
A week ago, Firebase announced Cloud Firestore, an awesome NoSQL document database that complements the existing…blog.invertase.io
invertase/react-native-firebase-starter
react-native-firebase-starter - 🎁 A bare-bones react native app with react-native-firebase pre-integrated so you can…github.com
Issue #259
React Native uses Yoga to achieve Flexbox style layout, which helps us set up layout in a declarative and easy way.
The Flexible Box Module, usually referred to as flexbox, was designed as a one-dimensional layout model, and as a method that could offer space distribution between items in an interface and powerful alignment capabilities
As someone who worked with Auto Layout in iOS and Constrain Layout in Android, I sometimes find it difficult to work with Flexbox in React Native. One of them is how to position certain element at the top or the bottom of the screen. This is the scenario when one element does not follow the rule i the container.
Consider this traditional welcome screen, where we have some texts and a login button.
Which is easily achieved with
import React from 'react'
import { View, StyleSheet, Image, Text, Button } from 'react-native'
import strings from 'res/strings'
import palette from 'res/palette'
import images from 'res/images'
import ImageButton from 'library/components/ImageButton'

export default class Welcome extends React.Component {
  render() {
    return (
      <View style={styles.container}>
        <Image
          style={styles.image}
          source={images.placeholder} />
        <Text style={styles.heading}>{strings.onboarding.welcome.heading.toUpperCase()}</Text>
        <Text style={styles.text}>{strings.onboarding.welcome.text1}</Text>
        <Text style={styles.text}>{strings.onboarding.welcome.text2}</Text>
        <ImageButton
          style={styles.button}
          title={strings.onboarding.welcome.button} />
      </View>
    )
  }
}

const styles = StyleSheet.create({
  container: {
    flex: 1,
    alignItems: 'center'
  },
  image: {
    marginTop: 50
  },
  heading: {
    ...palette.heading, ...{
      marginTop: 40
    }
  },
  text: {
    ...palette.text, ...{
      marginHorizontal: 8,
      marginVertical: 10
    }
  }
})
Pay attention to styles . Unlike in web, Flexbox in React Native defaults main axis to be vertical, so elements are laid out from top to bottom. alignItems makes sure all elements are centered in the horizontal axis, which is the cross axis according to Flexbox terminology.
According to design, the button should be positioned at the bottom of the screen. A dark though might suggest us to use position: ‘absolute’ , something like
button: {
  position: 'absolute',
  bottom:0
}
It workaround could work, but it’s like opting out of Flexbox. We like Flexbox and we like to embrace it. The solution is to use add a container for the button, and use flex-end inside so that the button moves to the bottom.
Let’s add a container
<View style={styles.bottom}>
  <ImageButton
    style={styles.button}
    title={strings.onboarding.welcome.button} />
</View>
and styles
bottom: {
  flex: 1,
  justifyContent: 'flex-end',
  marginBottom: 36
}
The flex tells the bottom view to take the remaining space. And inside this space, the bottom is laid out from the bottom, that’s what the flex-end means.
Here is how the result looks like
And there is the full code
import React from 'react'
import { View, StyleSheet, Image, Text, Button } from 'react-native'
import strings from 'res/strings'
import palette from 'res/palette'
import images from 'res/images'
import ImageButton from 'library/components/ImageButton'

export default class Welcome extends React.Component {
  render() {
    return (
      <View style={styles.container}>
        <Image
          style={styles.image}
          source={images.placeholder} />
        <Text style={styles.heading}>{strings.onboarding.welcome.heading.toUpperCase()}</Text>
        <Text style={styles.text}>{strings.onboarding.welcome.text1}</Text>
        <Text style={styles.text}>{strings.onboarding.welcome.text2}</Text>
        <View style={styles.bottom}>
          <ImageButton
            style={styles.button}
            title={strings.onboarding.welcome.button} />
        </View>
      </View>
    )
  }
}

const styles = StyleSheet.create({
  container: {
    flex: 1,
    alignItems: 'center'
  },
  image: {
    marginTop: 50
  },
  heading: {
    ...palette.heading, ...{
      marginTop: 40
    }
  },
  text: {
    ...palette.text, ...{
      marginHorizontal: 8,
      marginVertical: 10
    }
  },
  bottom: {
    flex: 1,
    justifyContent: 'flex-end',
    marginBottom: 36
  }
})According to Basic concepts of flexbox
The flex CSS property specifies how a flex item will grow or shrink so as to fit the space available in its flex container. This is a shorthand property that sets flex-grow, flex-shrink, and flex-basis.
and w3
flex:
Equivalent to flex: 1 0 . Makes the flex item flexible and sets the flex basis to zero, resulting in an item that receives the specified proportion of the free space in the flex container. If all items in the flex container use this pattern, their sizes will be proportional to the specified flex factor.
In most browsers, flex: 1 equals 1 1 0 , which means flex-grow: 1, flex-shrink:1, flex-basis: 0 . The flex-grow and flex-shrink specifies how much the item will grow or shrink relative to the rest of the flexible items inside the same container. And the flex-basis specifies the initial length of a flexible item. In this case the bottom View will take up the remaining space. And in that space, we can have whatever flow we want. To move the button to the bottom, we use justifyContent to lay out items in the main axis, with flex-end , which aligns the flex items at the end of the container.
While this works, code can be duplicated quickly as we need to do this in a lot of screens. All we need is to wrap this ImageButton inside a container . Let’s encapsulate this with a a utility function. Add this utils/moveToBottom.js
import React from 'react'
import { View, StyleSheet } from 'react-native'

function moveToBottom(component) {
  return (
    <View style={styles.container}>
      {component}
    </View>
  )
}

const styles = StyleSheet.create({
  container: {
    flex: 1,
    justifyContent: 'flex-end',
    marginBottom: 36
  }
})

export default moveToBottom
Now in our screen, we just need to import
import moveToBottom from 'library/utils/moveToBottom'and wrap our button
{
  moveToBottom(
    <ImageButton
      style={styles.button}
      title={strings.onboarding.welcome.button}
      onPress={() => {
        this.props.navigation.navigate('Term')
      }} />
  )
}
This time, we have the same screen as before, but with more reusable code. Since the styles are inside our moveToBottom module, we don’t need to specify styles in our screen any more. Here is the full code
import React from 'react'
import { View, StyleSheet, Image, Text, Button } from 'react-native'
import strings from 'res/strings'
import palette from 'res/palette'
import images from 'res/images'
import ImageButton from 'library/components/ImageButton'
import moveToBottom from 'library/utils/moveToBottom'

export default class Welcome extends React.Component {
  render() {
    return (
      <View style={styles.container}>
        <Image
          style={styles.logo}
          source={images.logo} />
        <Image
          style={styles.image}
          source={images.placeholder} />
        <Text style={styles.heading}>{strings.onboarding.welcome.heading.toUpperCase()}</Text>
        <Text style={styles.text}>{strings.onboarding.welcome.text1}</Text>
        <Text style={styles.text}>{strings.onboarding.welcome.text2}</Text>
        {
          moveToBottom(
            <ImageButton
              style={styles.button}
              title={strings.onboarding.welcome.button}
              onPress={() => {
                this.props.navigation.navigate('Term')
              }} />
          )
        }
      </View>
    )
  }
}

const styles = StyleSheet.create({
  container: {
    flex: 1,
    alignItems: 'center'
  },
  logo: {
    marginTop: 70,
    marginBottom: 42,
  },
  image: {

},
  heading: {
    ...palette.heading, ...{
      marginTop: 40
    }
  },
  text: {
    ...palette.text, ...{
      marginHorizontal: 8,
      marginVertical: 10
    }
  }
})I have to admit that I initially implement moveToBottom using Component (we need uppercase since React has a convention of using initial uppercase for components) to embed the Component inside View
function moveToBottom(Component) {
  return (
    <View style={styles.container}>
      <Component />
    </View>
  )
}
But this results in bundling error
ExceptionsManager.js:84 Warning: React.createElement: type is invalid -- expected a string (for built-in components) or a class/function (for composite components) but got: <ImageButton />. Did you accidentally export a JSX literal instead of a component?and
ExceptionsManager.js:76 Invariant Violation: Invariant Violation: Invariant Violation: Element type is invalid: expected a string (for built-in components) or a class/function (for composite components) but got: object.As this moment I release that the thing I pass in is actually an object, not a class , so I treat it as an object and it works
function moveToBottom(component) {
  return (
    <View style={styles.container}>
      {component}
    </View>
  )
}In the above moveToBottom function, I use marginBottom to have some margin from the bottom. This works on iOS but somehow does not have any effect in Android, and I use react-native 0.57.0 at the moment. This inconsistence can happen often in React Native development. A quick workaround is to perform platform check, we can make it into a nifty function in src/library/utils/check
import { Platform } from 'react-native'

const check = {
  isAndroid: () => {
    return Platform.OS === 'android'
  }
}

export default check
Then in moveToBottom , let ‘s use paddingBottom in case of app running in Android
const styles = StyleSheet.create({
  container: {
    flex: 1,
    justifyContent: 'flex-end',
    paddingBottom: check.isAndroid ? 14 : 0
  }
})In this post, we go from absolute position to another container, get to know flex , how to add reusable function and how to correctly pass component as parameter. Hope you find it useful. You can also check out this post React Native Login Using the Facebook SDK where I shows more tips for React Native developments and recommended links to learn about Flexbox.
Issue #256
Original post https://medium.freecodecamp.org/how-to-structure-your-project-and-manage-static-resources-in-react-native-6f4cfc947d92
React and React Native are just frameworks, and they do not dictate how we should structure our projects. It all depends on your personal taste and the project you’re working on.
In this post, we will go through how to structure a project and how to manage local assets. This of course is not written in stone, and you are free to apply only the pieces that suit you. Hope you learn something.
For a project bootstrapped with react-native init , we get only the basic structure.
There is the ios folder for Xcode projects, the android folder for Android projects, and an index.js and an App.js file for the React Native starting point.
ios/
android/
index.js
App.js
As someone who has worked with native on both Windows Phone, iOS and Android, I find that structuring a project all comes down to separating files by type or feature
Separating by type means that we organise files by their type. If it is a component, there are container and presentational files. If it is Redux, there are action, reducer, and store files. If it is view, there are JavaScript, HTML, and CSS files.
redux
  actions
  store
  reducers
components
  container
  presentational
view
  javascript
  html
  css
This way, we can see the type of each file, and easily run a script toward a certain file type. This is general for all projects, but it does not answer the question “what is this project about?” Is it news application? Is it a loyalty app? Is it about nutrition tracking?
Organising files by type is for a machine, not for a human. Many times we work on a feature, and finding files to fix in multiple directories is a hassle. It’s also a pain if we plan to make a framework out of our project, as files are spread across many places.
A more reasonable solution is to organise files by feature. Files related to a feature should be placed together. And test files should stay close to the source files. Check out this article to learn more.
A feature can be related to login, sign up, onboarding, or a user’s profile. A feature can contain sub-features as long as they belong to the same flow. If we wanted to move the sub feature around, it would be easy, as all related files are already grouped together.
My typical project structure based on features looks like this:
index.js
App.js
ios/
android/
src
  screens
    login
      LoginScreen.js
      LoginNavigator.js
    onboarding
      OnboardingNavigator
      welcome
        WelcomeScreen.js
      term
        TermScreen.js
      notification
        NotificationScreen.js
    main
      MainNavigator.js
      news
        NewsScreen.js
      profile
        ProfileScreen.js
      search
        SearchScreen.js
  library
    package.json
    components
      ImageButton.js
      RoundImage.js
    utils
      moveToBottom.js
      safeArea.js
    networking
      API.js
      Auth.js
  res
    package.json
    strings.js
    colors.js
    palette.js
    fonts.js
    images.js
    images
      logo@2x.png
      logo@3x.png
      button@2x.png
      button@3x.png
scripts
  images.js
  clear.js
Besides the traditional files App.js and index.js and the ios1 and android folders, I put all the source files inside the src folder. Inside src I have res for resources, library for common files used across features, and screens for a screen of content.
Since React Native is heavily dependent on tons of dependencies, I try to be pretty aware when adding more. In my project I use just react-navigation for navigation. And I’m not a fan of redux as it adds unneeded complexity. Only add a dependency when you really need it, otherwise you are just setting yourself up for more trouble than value.
The thing I like about React is the components. A component is where we define view, style and behavior. React has inline style — it’s like using JavaScript to define script, HTML and CSS. This fits the feature approach we are aiming for. That’s why I don’t use styled-components. Since styles are just JavaScript objects, we can just share comment styles in library .
I like Android a lot, so I name src and res to match its folder conventions.
react-native init sets up babel for us. But for a typical JavaScript project, it’s good to organise files in the src folder. In my electron.js application IconGenerator, I put the source files inside the src folder. This not only helps in terms of organising, but also helps babel transpile the entire folder at once. Just a command and I have the files in src transpiled to dist in a blink.
babel ./src --out-dir ./dist --copy-filesReact is based around components. Yup. There are container and presentational components, but we can compose components to build more complex components. They usually end in showing in the full screen. It is called Page in Windows Phone, ViewController in iOS and Activity in Android. The React Native guide mentions screen very often as something that covers the entire space:
Mobile apps are rarely made up of a single screen. Managing the presentation of, and transition between, multiple screens is typically handled by what is known as a navigator.
Each screen is considered the entry point for each feature. You can rename the LoginScreen.js to index.js by leveraging the Node module feature:
Modules don’t have to be files. We can also create a find-me folder under node_modules and place an index.js file in there. The same require(‘find-me’) line will use that folder’s index.js file
So instead of import LoginScreen from ‘./screens/LoginScreen’ , we can just do import LoginScreen from ‘./screens’.
Using index.js results in encapsulation and provides a public interface for the feature. This is all personal taste. I myself prefer explicit naming for a file, hence the name LoginScreen.js.
react-navigation seems to be the most popular choice for handling navigation in a React Native app. For a feature like onboarding, there are probably many screens managed by a stack navigation, so there is OnboardingNavigator .
You can think of Navigator as something that groups sub screens or features. Since we group by feature, it’s reasonable to place Navigator inside the feature folder. It basically looks like this:
import { createStackNavigator } from 'react-navigation'
import Welcome from './Welcome'
import Term from './Term'

const routeConfig = {
  Welcome: {
    screen: Welcome
  },
  Term: {
    screen: Term
  }
}

const navigatorConfig = {
  navigationOptions: {
    header: null
  }
}

export default OnboardingNavigator = createStackNavigator(routeConfig, navigatorConfig)This is the most controversial part of structuring a project. If you don’t like the name library, you can name it utilities, common, citadel , whatever…
This is not meant for homeless files, but it is where we place common utilities and components that are used by many features. Things like atomic components, wrappers, quick fixes function, networking stuff, and login info are used a lot, and it’s hard to move them to a specific feature folder. Sometimes we just need to be practical and get the work done.
In React Native, we often need to implement a button with an image background in many screens. Here is a simple one that stays inside library/components/ImageButton.js . The components folder is for reusable components, sometimes called atomic components. According to React naming conventions, the first letter should be uppercase.
1 | import React from 'react' |
And if we want to place the button at the bottom, we use a utility function to prevent code duplication. Here is library/utils/moveToBottom.js:
import React from 'react'
import { View, StyleSheet } from 'react-native'

function moveToBottom(component) {
  return (
    <View style={styles.container}>
      {component}
    </View>
  )
}

const styles = StyleSheet.create({
  container: {
    flex: 1,
    justifyContent: 'flex-end',
    marginBottom: 36
  }
})

export default moveToBottomThen somewhere in the src/screens/onboarding/term/Term.js , we can import by using relative paths:
import moveToBottom from '../../../../library/utils/move'
import ImageButton from '../../../../library/components/ImageButton'
This is a big red flag in my eyes. It’s error prone, as we need to calculate how many .. we need to perform. And if we move feature around, all of the paths need to be recalculated.
Since library is meant to be used many places, it’s good to reference it as an absolute path. In JavaScript there are usually 1000 libraries to a single problem. A quick search on Google reveals tons of libraries to tackle this issue. But we don’t need another dependency as this is extremely easy to fix.
The solution is to turn library into a module so node can find it. Adding package.json to any folder makes it into a Node module . Add package.json inside the library folder with this simple content:
{
  "name": "library",
  "version": "0.0.1"
}
Now in Term.js we can easily import things from library because it is now a module:
1 |
|
You may wonder what res/colors, res/strings , res/images and res/fonts are in the above examples. Well, for front end projects, we usually have components and style them using fonts, localised strings, colors, images and styles. JavaScript is a very dynamic language, and it’s easy to use stringly types everywhere. We could have a bunch of #00B75D color across many files, or Fira as a fontFamily in many Text components. This is error-prone and hard to refactor.
Let’s encapsulate resource usage inside the res folder with safer objects. They look like the examples below:
res/colors
const colors = {
  title: '#00B75D',
  text: '#0C222B',
  button: '#036675'
}

export default colors
res/strings
const strings = {
  onboarding: {
    welcome: {
      heading: 'Welcome',
      text1: "What you don't know is what you haven't learn",
      text2: 'Visit my GitHub at [https://github.com/onmyway133'](https://github.com/onmyway133'),
      button: 'Log in'
    },
    term: {
      heading: 'Terms and conditions',
      button: 'Read'
    }
  }
}

export default strings
res/fonts
const fonts = {
  title: 'Arial',
  text: 'SanFrancisco',
  code: 'Fira'
}

export default fonts
res/images
const images = {
  button: require('./images/button.png'),
  logo: require('./images/logo.png'),
  placeholder: require('./images/placeholder.png')
}

export default images
Like library , res files can be access from anywhere, so let’s make it a module . Add package.json to the res folder:
{
  "name": "res",
  "version": "0.0.1"
}
so we can access resource files like normal modules:
import strings from 'res/strings'
import palette from 'res/palette'
import images from 'res/images'The design of the app should be consistent. Certain elements should have the same look and feel so they don’t confuse the user. For example, the heading Text should use one color, font, and font size. The Image component should use the same placeholder image. In React Native, we already use the name styles with const styles = StyleSheet.create({}) so let’s use the name palette.
Below is my simple palette. It defines common styles for heading and Text:
import colors from './colors'

const palette = {
  heading: {
    color: colors.title,
    fontSize: 20,
    textAlign: 'center'
  },
  text: {
    color: colors.text,
    fontSize: 17,
    textAlign: 'center'
  }
}

export default palette
And then we can use them in our screen:
const styles = StyleSheet.create({
  container: {
    flex: 1,
    alignItems: 'center'
  },
  heading: {...palette.heading, ...{
    marginTop: 72
  }}
})
Here we use the object spread operator to merge palette.heading and our custom style object. This means that we use the styles from palette.heading but also specify more properties.
If we were to reskin the app for multiple brands, we could have multiple palettes. This is a really powerful pattern.
You can see that in /src/res/images.js we have properties for each image in the src/res/images folder:
const images = {
  button: require('./images/button.png'),
  logo: require('./images/logo.png'),
  placeholder: require('./images/placeholder.png')
}

export default images
This is tedious to do manually, and we have to update if there’s changes in image naming convention. Instead, we can add a script to generate the images.js based on the images we have. Add a file at the root of the project /scripts/images.js:
1 | const fs = require('fs') |
The cool thing about Node is that we have access to the fs module, which is really good at file processing. Here we simply traverse through images, and update /src/res/images.js accordingly.
Whenever we add or change images, we can run:
node scripts/images.jsAnd we can also declare the script inside our main package.json :
"scripts": {
  "start": "node node_modules/react-native/local-cli/cli.js start",
  "test": "jest",
  "lint": "eslint *.js **/*.js",
  "images": "node scripts/images.js"
}
Now we can just run npm run images and we get an up-to-date images.js resource file.
React Native has some custom fonts that may be good enough for your projects. You can also use custom fonts.
One thing to note is that Android uses the name of the font file, but iOS uses the full name. You can see the full name in Font Book app, or by inspecting in running app
for (NSString* family in [UIFont familyNames]) {
  NSLog(@"%@", family);

for (NSString* name in [UIFont fontNamesForFamilyName: family]) {
    NSLog(@"Family name:  %@", name);
  }
}
For custom fonts to be registered in iOS, we need to declare UIAppFonts in Info.plist using the file name of the fonts, and for Android, the fonts need to be placed at app/src/main/assets/fonts .
It is good practice to name the font file the same as full name. React Native is said to dynamically load custom fonts, but in case you get “Unrecognized font family”, then simply add those fonts to target within Xcode.
Doing this by hand takes time, luckily we have rnpm that can help. First add all the fonts inside res/fonts folder. Then simply declare rnpm in package.json and run react-native link . This should declare UIAppFonts in iOS and move all the fonts into app/src/main/assets/fonts for Android.
"rnpm": {
  "assets": [
    "./src/res/fonts/"
  ]
}
Accessing fonts by name is error prone, we can create a script similar to what we have done with images to generate a safer accession. Add fonts.js to our scripts folder
1 | const fs = require('fs') |
Now you can use custom font via R namespace.
1 | import R from 'res/R' |
This step depends on personal taste, but I find it more organised if we introduce the R namespace, just like how Android does for assets with the generated R class.
Once you externalize your app resources, you can access them using resource IDs that are generated in your project’s Rclass. This document shows you how to group your resources in your Android project and provide alternative resources for specific device configurations, and then access them from your app code or other XML files.
This way, let’s make a file called R.js in src/res:
import strings from './strings'
import images from './images'
import colors from './colors'
import palette from './palette'

const R = {
  strings,
  images,
  colors,
  palette
}

export default R
And access it in the screen:
1 | import R from 'res/R' |
Replace strings with R.strings, colors with R.colors, and images with R.images. With the R annotation, it is clear that we are accessing static assets from the app bundle.
This also matches the Airbnb convention for singleton, as our R is now like a global constant.
23.8 Use PascalCase when you export a constructor / class / singleton / function library / bare object.
const AirbnbStyleGuide = {
  es6: {
  },
}

export default AirbnbStyleGuideIn this post, I’ve shown you how I think you should structure folders and files in a React Native project. We’ve also learned how to manage resources and access them in a safer manner. I hope you’ve found it useful. Here are some more resources to explore further:
Issue #254
Original post https://stackoverflow.com/a/54108708/1418457
Make our own convenient OverlayContainer. The trick is to use absolute with 100% size
1 | // @flow |
Issue #100
For now, I still believe in native. Here are some interesting links
React Native