How to use Core Data

Issue #785

Core Data

  • Responding to changes in a managed object context

    Calling mergeChanges on a managed object context will automatically refresh any managed objects that have changed. This ensures that your context always contains all the latest information. Note that you don’t have to call mergeChanges on a viewContext when you set its automaticallyMergesChangesFromParent property to true. In that case, Core Data will handle the merge on your behalf.

  • Using Core Data in the Background

    Managed objects retrieved from a context are bound to the same queue that the context is bound to.

  • The Laws of Core Data

    The ability to have a child MOC is neat in some corner cases. Let’s review the core functionality of MOCs in order to understand those cases:

  • MOCs load objects from its source (a PSC or another MOC)
  • MOCs save objects to its source (a PSC or another MOC)
  • MOCs enforce graph integrity when they save

Use Core Data as a local cache

When you save changes in a context, the changes are only committed “one store up.” If you save a child context, changes are pushed to its parent. Changes are not saved to the persistent store until the root context is saved. (A root managed object context is one whose parent context is nil.)

  • NSManagedObjectContext fetch

    An object that meets the criteria specified by request (it is an instance of the entity specified by the request, and it matches the request’s predicate if there is one) and that has been inserted into a context but which is not yet saved to a persistent store, is retrieved if the fetch request is executed on that context.

  • NSBatchDeleteRequest mergeChanges

    Changes are not reflected in the context”. So what you’re seeing is normal. Batch updates work directly on the persistent store file instead of going through the managed object context, so the context doesn’t know about them. When you delete the objects by fetching and then deleting, you’re working through the context, so it knows about the changes you’re making (in fact it’s performing those changes for you).

  • Does modifying a managed object in a parent context propagate down to child contexts when performing a child fetch in Core Data?

mainContext would fetch all the way to the persistent store. Fetches and objectWithID: only go as many levels as they need to.
It’s important to remember that when a context is created it’s a “snapshot” of the state of it’s parent. Subsequent changes to the parent will not be visible in the child unless the child is somehow invalidated

CloudKit

NSFetchedResultsController

How to fetch with background context

TLDR: Use NSFetchedResultsController in backgroundContext

  • If use Core Data as cache: convert to struct
  • If use NSManagedObject: use FetchRequest on viewContext

Approach 1: Treat Core Data as cache

Pros

  • backgroundContext.automaticallyMergesChangesFromParent
  • Use 1 shared background context to load and updates changes
  • Convert NSManagedObject to struct
  • Our struct can have additional logic and properties
  • Does not need to care about faulting

Cons

  • Need to update objectId When context.save, NSManagedObject ‘s objecteId is updated
  • Need to reload when underlying NSManagedObject changes
  • Need to handle relationship

Instead of plain NSFetchRequest, can use NSFetchedResultsController on background context. In its controllerDidChangeContent convert to struct

Approach 2: viewContext to persistent coordinator

1
viewContext -> persistent coordinator <- backgroundContext

Pros

  • viewContext.automaticallyMergesChangesFromParent
  • viewContext and background Context stems from persistent container
  • background context changes object
  • viewContext read only

Cons

  • viewContext blocks main thread

Approach 3: viewContext to background context

1
viewContext -> backgroundContext -> persistent coordinator

Pros

  • viewContext.automaticallyMergesChangesFromParent
  • viewContext reads from backgroundContext, no main queue block
  • backgroundContext changes

Cons

  • ???

Read more

Approach 4: background context -> mainContext -> backgroundContext -> persistent coordinator

https://stackoverflow.com/questions/35961936/child-nsmanagedobjectcontext-update-from-parent

1
2
3
RootContext (private queue) - saves to persistent store
MainContext (main queue) child of RootContext - use for UI (FRC)
WorkerContext (private queue) - child of MainContext - use for updates & inserts

Updated at 2021-02-28 07:58:23
How to force resolve Swift Package in Xcode

Issue #784

Every time I switch git branches, SPM packages seem to be invalidated and Xcode does not fetch again, no matter how many times I reopen. Running xcodebuild -resolvePackageDependencies does fetch but Xcode does not recognize the resolved packages and still reports missing packages.

The good thing is under menu File -> Swift Packages there are options to reset and resolve packages

Screenshot 2021-02-26 at 10 08 38

How to listen to Published outside of SwiftUI view

Issue #782

Use $ to access Publisher

1
2
3
final class Store: ObservableObject {
@Published var showsSideWindow: Bool = false
}
1
2
3
4
5
6
7
8
9
10
var anyCancellables = Set<AnyCancellable>()

store.$showsSideWindow
.removeDuplicates()
.throttle(for: 0.2, scheduler: RunLoop.main, latest: true)
.receive(on: RunLoop.main)
.sink(receiveValue: { shows in
preferenceManager.reloadPosition(shows: shows)
})
.store(in: &anyCancellables)

Updated at 2021-02-25 21:56:42

How to build container view in SwiftUI

Issue #780

To make a container view that accepts child content, we use ViewBuilder

1
2
3
4
5
6
7
8
9
10
11
struct ContainerView<Content: View>: View {
let content: Content

init(@ViewBuilder content: () -> Content) {
self.content = content()
}

var body: some View {
content
}
}

From Swift 5.4, it can synthesize the init, so we can declare resultBuilder for stored property

struct AwesomeContainerView<Content: View>: View {
    @ViewBuilder
    let content: Content

    var body: some View {
        content
    }
}

Updated at 2021-02-24 21:22:49

How to tune performance with ButtonBehavior in SwiftUI

Issue #779

With Xcode 12.4, macOS 11.0 app. Every time we switch the system dark and light mode, the CPU goes up to 100%. Instruments show that there’s an increasing number of ButtonBehavior

Screenshot 2021-02-24 at 10 12 05

Suspect State in a row in LazyVStack

Every cell has its own toggle state

1
2
3
4
5
6
7
8
9
10
11
12
13
14
15
16
17
18
19
20
struct Cell: View {
enum ToggleState {
case general
case request
case response
}

let item: Item
@State
private var toggleState: ToggleState = .general

func toggleButton(text: String, state: ToggleState) -> some View {
Button(action: { self.toggleState = state }) {
Text(text)
.foregroundColor(state == toggleState ? Color.label : Color.secondary)
.fontWeight(state == toggleState ? .bold : .regular)
}
.buttonStyle(BorderlessButtonStyle())
}
}

Removing the buttons fix the problem. The workaround is to use Text with onTapGesture

1
2
3
4
5
6
Text(text)
.foregroundColor(state == toggleState ? Color.label : Color.secondary)
.fontWeight(state == toggleState ? .bold : .regular)
.onTapGesture {
self.toggleState = state
}

Updated at 2021-02-24 10:10:41

How to make simple search bar in SwiftUI

Issue #776

We need to use a custom Binding to trigger onChange as onEditingChanged is only called when the user selects the textField, and onCommit is only called when return or done button on keyboard is tapped.

1
2
3
4
5
6
7
8
9
10
11
12
13
14
15
16
17
18
19
20
21
22
23
24
25
26
27
28
29
30
31
32
33
34
35
36
37
38
39
40
41
42
43
44
45
46
47
48
49
50
51
52
53
54
55
56
57
58
59
60
61
62
63
64
65
66
67
68
69
70
71
72
73
74
75
76
77
78
79
80
import UIKit
import SwiftUI
import EasySwiftUI

struct SearchBar: View {
@Binding
var searchText: String
let onChange: () -> Void
@State
private var showsCancelButton: Bool = false

var body: some View {
return HStack {
textField
cancelButton
}
}

private var searchTextBinding: Binding<String> {
Binding<String>(get: {
searchText
}, set: { newValue in
DispatchQueue.main.async {
searchText = newValue
onChange()
}
})
}

private var textField: some View {
HStack {
Image(systemName: SFSymbol.magnifyingglass.rawValue)

TextField("Search", text: searchTextBinding, onEditingChanged: { isEditing in
withAnimation {
self.showsCancelButton = true
}
onChange()
}, onCommit: {
// No op
})
.foregroundColor(.primary)

Button(action: {
self.searchText = ""
}) {
Image(systemName: SFSymbol.xmarkCircleFill.rawValue)
.opacity(searchText == "" ? 0 : 1)
}
}
.padding(EdgeInsets(top: 8, leading: 6, bottom: 8, trailing: 6))
.foregroundColor(.secondary)
.background(Color(.systemBackground))
.cornerRadius(10.0)
}

@ViewBuilder
private var cancelButton: some View {
if showsCancelButton {
Button("Cancel") {
UIApplication.shared.endEditing(true)
withAnimation {
self.searchText = ""
self.showsCancelButton = false
}
onChange()
}
.foregroundColor(Color(.systemBlue))
}
}
}

extension UIApplication {
func endEditing(_ force: Bool) {
self.windows
.filter{$0.isKeyWindow}
.first?
.endEditing(force)
}
}

How to add home screen quick action in SwiftUI

Issue #774

Start by defining your quick actions. You can use UIApplicationShortcutIcon(type:) for predefined icons, or use UIApplicationShortcutIcon(systemImageName:) for SFSymbol

1
2
3
4
5
6
7
8
9
10
11
12
13
14
15
16
17
18
19
20
21
22
23
24
25
enum QuickAction: String {
case readPasteboard
case clear

var shortcutItem: UIApplicationShortcutItem {
switch self {
case .readPasteboard:
return UIApplicationShortcutItem(
type: rawValue,
localizedTitle: "Read Pasteboard",
localizedSubtitle: "",
icon: UIApplicationShortcutIcon(type: .add),
userInfo: nil
)
case .clear:
return UIApplicationShortcutItem(
type: rawValue,
localizedTitle: "Clear Pasteboard",
localizedSubtitle: "",
icon: UIApplicationShortcutIcon(systemImageName: SFSymbol.wind.rawValue),
userInfo: nil
)
}
}
}

Add a service to store selected quick action. I usually make this conform to ObservableObject to be able to bind to SwiftUI views later

1
2
final class QuickActionService: ObservableObject {
var shortcutItem: UIApplicationShortcutItem?

Expose AppDelegate and SceneDelegate to your SwiftUI App. Listen to scenePhase to add dynamic items

From Define Dynamic Quick Actions

Set dynamic screen quick actions at any point, but the sample sets them in the sceneWillResignActive(_:) function of the scene delegate. During the transition to a background state is a good time to update any dynamic quick actions, because the system executes this code before the user returns to the Home Screen.

1
2
3
4
5
6
7
8
9
10
11
12
13
14
15
16
17
18
19
20
21
22
23
24
25
26
27
28
29
30
@main
struct PastePaliOSApp: App {
@UIApplicationDelegateAdaptor(AppDelegate.self)
var appDelegate
@Environment(\.scenePhase)
var scenePhase

var body: some Scene {
WindowGroup {
main
}
.onChange(of: scenePhase) { scenePhase in
switch scenePhase {
case .background:
addDynamicQuickActions()
case .active:
QuickActionService.shared.perform()
default:
break
}
}
}

private func addDynamicQuickActions() {
UIApplication.shared.shortcutItems = [
QuickAction.readPasteboard.shortcutItem,
QuickAction.clear.shortcutItem
]
}
}

Quick actions are notified in 2 cases

  • If the app isn’t already loaded, it’s launched and passes details of the shortcut item in through the connectionOptions parameter of the scene(_:willConnectTo:options:) function in AppDelegate
  • If your app is already loaded, the system calls the windowScene(_:performActionFor:completionHandler:) function of your SceneDelegate

Therefore we need to handle both cases.

1
2
3
4
5
6
7
8
9
10
11
12
13
14
15
16
17
18
19
20
21
22
23
24
25
26
27
28
29
final class AppDelegate: NSObject, UIApplicationDelegate {
func application(
_ application: UIApplication,
configurationForConnecting connectingSceneSession: UISceneSession,
options: UIScene.ConnectionOptions
) -> UISceneConfiguration {
if let shortcutItem = options.shortcutItem {
QuickActionService.shared.shortcutItem = shortcutItem
}

let sceneConfiguration = UISceneConfiguration(
name: "Default",
sessionRole: connectingSceneSession.role
)
sceneConfiguration.delegateClass = SceneDelegate.self

return sceneConfiguration
}
}

private final class SceneDelegate: UIResponder, UIWindowSceneDelegate {
func windowScene(
_ windowScene: UIWindowScene,
performActionFor shortcutItem: UIApplicationShortcutItem,
completionHandler: @escaping (Bool) -> Void
) {
QuickActionService.shared.shortcutItem = shortcutItem
completionHandler(true)
}

Read more

For more please consult official Apple docs and design


Updated at 2021-02-10 06:43:19

How to use EquatableView in SwiftUI

Issue #773

From John Harper ‘s tweet

SwiftUI assumes any Equatable.== is a true equality check, so for POD views it compares each field directly instead (via reflection). For non-POD views it prefers the view’s == but falls back to its own field compare if no ==. EqView is a way to force the use of ==.

When it does the per-field comparison the same rules are applied recursively to each field (to choose direct comparison or == if defined). (POD = plain data, see Swift’s _isPOD() function.)

Read more

How to add new property in Codable struct in SwiftUI

Issue #772

I use Codable structs in my apps for preferences, and bind them to SwiftUI views. If we add new properties to existing Codable, it can’t decode with old saved json as we require new properties. We can either do cutom decoding with container, but this can result in lots more code and mistakes if we have many properties inside our struct.

The quick workaround is to declare new properties as optional, and use a computed property to wrap that. The good news is Binding works with computed properties too, from the outside all looks like struct properties to SwiftUI

1
2
3
4
5
6
struct Preference: Codable {
var _redacts: Bool? = false
var redacts: Bool {
get { _redacts ?? false }
set { _redacts = newValue }
}

How to handle escape in NSTextField in SwiftUI

Issue #770

Handle cancelOperation somewhere up in responder chain

1
2
3
4
5
6
7
8
class MyWindow: NSWindow {
let keyHandler = KeyHandler()

override func cancelOperation(_ sender: Any?) {
super.cancelOperation(sender)
keyHandler.onEvent(.esc)
}
}

How to fit ScrollView to content in SwiftUI

Issue #769

If we place ScrollView inside HStack or VStack, it takes all remaining space. To fit ScrollView to its content, we need to get its content size and constrain ScrollView size.

Use a GeometryReader as Scrollview content background, and get the local frame

1
2
3
4
5
6
7
8
9
10
11
12
13
14
15
16
17
18
19
20
21
22
23
24
25
26
27
28
29
30
import SwiftUI

struct HSearchBar: View {
@State
private var scrollViewContentSize: CGSize = .zero

var body: some View {
HStack {
searchButton
ScrollView(.horizontal, showsIndicators: false) {
HStack(spacing: 12) {
ForEach(store.collections) { collection in
collectionCell(collection)
}
}
.background(
GeometryReader { geo -> Color in
DispatchQueue.main.async {
scrollViewContentSize = geo.size
}
return Color.clear
}
)
}
.frame(
maxWidth: scrollViewContentSize.width
)
}
}
}

How to use ViewBuilder in SwiftUI

Issue #767

SwiftUI ‘s ViewBuilder is a custom parameter attribute that constructs views from closures.

It is available in body and most SwiftUI modifiers

1
2
3
4
5
6
public protocol View {
associatedtype Body : View
@ViewBuilder var body: Self.Body { get }
}

public func contextMenu<MenuItems>(@ViewBuilder menuItems: () -> MenuItems) -> some View where MenuItems : View

In these ViewBuilder enabled places we can perform conditional logic to construct views. For example here in our SampleView, we have switch statement in body

1
2
3
4
5
6
7
8
9
10
11
12
13
14
15
16
17
18
19
20
21
22
struct SampleView: View {
enum Position {
case top, bottom, left, right
}

let position: Position

var body: some View {
switch position {
case .top:
Image(systemName: SFSymbol.person.rawValue)
default:
EmptyView()
}
}

var profile: some View {
if true {
return Image(systemName: SFSymbol.person.rawValue)
}
}
}

ViewBuilder applies to both property and function. If we want to have the same logic style as in body in our custom property or methods, we can annotate with ViewBuilder. This works like magic, SwiftUI can determine the types of our expression.

1
2
3
4
5
6
7
8
9
10
11
extension SampleView {
@ViewBuilder
func profile2(position: Position) -> some View {
switch position {
case .top:
Image(systemName: SFSymbol.person.rawValue)
default:
EmptyView()
}
}
}

Use ViewBuilder to construct View

We can use ViewBuiler as our parameter that constructs View. For example we can build an IfLet that construct View with optional check.

1
2
3
4
5
6
7
8
9
10
11
12
13
14
15
public struct IfLet<T, Content: View>: View {
let value: T?
let content: (T) -> Content

public init(_ value: T?, @ViewBuilder content: @escaping (T) -> Content) {
self.value = value
self.content = content
}

public var body: some View {
if let value = value {
content(value)
}
}
}

With ViewBuilder we can apply logic inside our closure

1
2
3
4
5
6
7
8
9
10
11
12
13
struct EmailView: View {
let email: String?

var body: some View {
IfLet(email) { email in
if email.isEmpty {
Circle()
} else {
Text(email)
}
}
}
}

Use ViewBuilder where we can’t use closure

In some modifers like overlay, SwiftUI expects a View, not a closure that returns a View. There we cannot use additional logic

1
2
extension View {
@inlinable public func overlay<Overlay>(_ overlay: Overlay, alignment: Alignment = .center) -> some View where Overlay : View

The below won’t work as we can’t do conditional statement in overlay modifier

1
2
3
4
5
6
7
8
9
10
11
12
struct MessageView: View {
let showsHUD: Bool

var body: some View {
Text("Message")
.overlay(
if showsHUD {
Text("HUD")
}
)
}
}

But we can make something like MakeView that provides a ViewBuilder closure

1
2
3
4
5
6
7
8
9
10
11
public struct MakeView<Content: View>: View {
let content: Content

public init(@ViewBuilder make: () -> Content) {
self.content = make()
}

public var body: some View {
content
}
}

So we can use a conditional statement in any modifier that does not accept ViewModifier

1
2
3
4
5
6
7
8
9
10
11
12
13
14
struct MessageView: View {
let showsHUD: Bool

var body: some View {
Text("Message")
.overlay(
MakeView {
if showsHUD {
Text("HUD")
}
}
)
}
}

How to show multiple popover in SwiftUI

Issue #765

In SwiftUI currently, it’s not possible to attach multiple .popover to the same View. But we can use condition to show different content

1
2
3
4
5
6
7
8
9
10
11
12
13
14
15
16
17
18
19
20
21
22
23
24
25
26
27
struct ClipboardCell: View {
enum PopoverStyle {
case raw
case preview
}

@Binding
var showsPopover: Bool
@Binding
var popoverStyle: PopoverStyle

var body: some View {
VStack {
header
content
.popover(isPresented: $showsPopover) {
switch popoverStyle {
case .raw:
ViewRawView(item: item)
case .preview:
PreviewView(item: item)
}
}
footer
}
}
}

How to handle keyDown in SwiftUI for macOS

Issue #764

Use a custom KeyAwareView that uses an NSView that checks for keyDown method. In case we can’t handle certain keys, call super.keyDown(with: event)

1
2
3
4
5
6
7
8
9
10
11
12
13
14
15
16
17
18
19
20
21
22
23
24
25
26
27
28
29
30
31
32
33
34
35
36
37
38
39
40
41
42
43
44
45
46
47
48
49
50
51
52
53
54
55
import SwiftUI
import KeyboardShortcuts

struct KeyAwareView: NSViewRepresentable {
let onEvent: (Event) -> Void

func makeNSView(context: Context) -> NSView {
let view = KeyView()
view.onEvent = onEvent
DispatchQueue.main.async {
view.window?.makeFirstResponder(view)
}
return view
}

func updateNSView(_ nsView: NSView, context: Context) {}
}

extension KeyAwareView {
enum Event {
case upArrow
case downArrow
case leftArrow
case rightArrow
case space
case delete
case cmdC
}
}

private class KeyView: NSView {
var onEvent: (KeyAwareView.Event) -> Void = { _ in }

override var acceptsFirstResponder: Bool { true }
override func keyDown(with event: NSEvent) {
switch Int(event.keyCode) {
case KeyboardShortcuts.Key.delete.rawValue:
onEvent(.delete)
case KeyboardShortcuts.Key.upArrow.rawValue:
onEvent(.upArrow)
case KeyboardShortcuts.Key.downArrow.rawValue:
onEvent(.downArrow)
case KeyboardShortcuts.Key.leftArrow.rawValue:
onEvent(.leftArrow)
case KeyboardShortcuts.Key.rightArrow.rawValue:
onEvent(.rightArrow)
case KeyboardShortcuts.Key.space.rawValue:
onEvent(.space)
case KeyboardShortcuts.Key.c.rawValue where event.modifierFlags.contains(.command):
onEvent(.cmdC)
default:
super.keyDown(with: event)
}
}
}

Then we can place this as a background

1
2
3
4
LazyVStack {

}
.background(KeyAwareView(onEvent: {}))

Updated at 2021-01-29 20:55:39

How to extend custom View in SwiftUI

Issue #763

I usually break down a big struct into smaller views and extensions. For example I have a ClipboardCell that has a lot of onReceive so I want to move these to another component.

One way to do that is to extend ClipboardCell

1
2
3
4
5
6
7
8
9
10
11
12
13
14
15
16
17
18
19
20
struct ClipboardCell: View {
let isSelected: Bool
@State var showsPreview: Bool
@State var showsViewRaw: Bool
let onCopy: () -> Void
let onDelete: () -> Void
}

extension ClipboardCell {
func onReceiveKeyboard() -> some View {
self.onReceive(
NotificationCenter.default
.publisher(for: .didKeyboardCopyItem)
.receive(on: RunLoop.main),
perform: { note in
onCopy()
}
)
}
}

but then when we want to use this, we get some View has no member onReceiveKeyboard as self after some Swift modifier becomes some View, unless we call onReceiveKeyboard first

1
2
3
4
5
6
7
struct ClipboardCell: View {
var body: some View {
self
.padding()
.onReceiveKeyboard()
}
}

Use ViewModifier

The SwiftUI is to use ViewModifier where we can inject Binding and functions

1
2
3
4
5
6
7
8
9
10
11
12
13
14
15
16
17
18
19
20
struct ClipboardCellOnKeyboardModifier: ViewModifier {
let isSelected: Bool
@Binding var showsPreview: Bool
@Binding var showsViewRaw: Bool
let onCopy: () -> Void
let onDelete: () -> Void

func body(content: Content) -> some View {
content.onReceive(
NotificationCenter.default
.publisher(for: .didKeyboardCopyItem)
.receive(on: RunLoop.main),
perform: { _ in
guard isSelected else { return }
onCopy()
}
)
}
}
`

Then we can consume it and pass parameters

1
2
3
4
5
6
7
8
9
10
11
12
struct ClipboardCell: View {
var body: some View {
self
.padding()
.modifier(
ClipboardCellOnKeyboardModifier(
showsPreview: Binding<Bool>(get: {}, set: {}) ,
showsViewRaw: Binding<Bool>(get: {}, set: {})
)
)
}
}

Pass State and Binding

For now SwiftUI seems to have a bug that ViewModifier does not listen to onReceive, we can extend generic View and pass parameters instead

1
2
3
4
5
6
7
8
9
10
11
12
13
14
15
16
17
extension View {
func onClipboardCellReceiveKeyboard(
isSelected: Bool,
showsPreview: Binding<Bool>,
showsViewRaw: Binding<Bool>,
onCopy: () -> Void,
onDelete: () -> Void
) -> some View {
self.onReceive(
NotificationCenter.default
.publisher(for: .didKeyboardCopyItem)
.receive(on: RunLoop.main),
perform: { _ in
guard isSelected else { return }
onCopy()
}
)

Use ObservableObject

Another way is to use an ObservableObject and encapsulate logic and state in there, and share this across views that want to consume this set of data, just like a ViewModel

1
2
3
4
5
6
7
8
9
10
11
12
13
14
15
16
17
18
19
20
21
22
23
24
25
26
27
28
29
30
31
32
33
34
35
import SwiftUI

final class ItemsHolder: ObservableObject {
@Published var items: [ClipboardItem] = []
@Published var selectedItems = Set<ClipboardItem>()
@Published var agos: [UUID: String] = [:]

func updateAgos() {
agos.removeAll()
for item in items {
agos[item.id] = Formattes.ago(date: item.createdAt)
}
}

func update(items: [ClipboardItem]) {
self.items = items
.sorted(by: { $0.createdAt > $1.createdAt })
updateAgos()
}
}

struct ClipboardCell: View {
@StateObject var itemsHolder = ItemsHolder()

var body: some View {
list.onReceive(
NotificationCenter.default
.publisher(for: .didKeyboardCopyItem)
.receive(on: RunLoop.main),
perform: { note in
itemsHolder.onCopy()
}
)
}
}

Updated at 2021-01-29 12:51:52

How to use ScrollViewReader in SwiftUI

Issue #761

Explicitly specify id

1
2
3
4
5
6
7
8
9
10
11
12
13
14
15
16
17
18
19
20
21
22
ScrollView {
ScrollViewReader { proxy in
LazyVStack(spacing: 10) {
ForEach(items) { item in
Cell(item: item)
.id(item.id)
}
}
.padding()
.onReceiveKeyboard(onNext: {
onNext()
if let item = selectedItem {
proxy.scrollTo(item.id, anchor: .center)
}
}, onPrevious: {
onPrevious()
if let item = selectedItem {
proxy.scrollTo(item.id, anchor: .center)
}
})
}
}

I usually extract ScrollViewReader into a helper function that use onChange to react to state changes

1
2
3
4
5
6
7
8
9
10
11
 func scrollViewReader<Content: View>(@ViewBuilder content: @escaping () -> Content) -> some View {
ScrollViewReader { proxy in
content()
.onChange(of: itemsHolder.focusItem) { item in
guard let item = item else { return }
withAnimation {
proxy.scrollTo(item.id, anchor: .center)
}
}
}
}

Updated at 2021-02-21 19:14:01

How to fix overlapped navigation titles in SwiftUI

Issue #756

1
2
3
4
5
6
7
8
9
extension NavigationLink {
func fixOverlap() -> AnyView {
if UIDevice.current.userInterfaceIdiom == .phone {
return self.isDetailLink(false).erase()
} else {
return self.erase()
}
}
}

Read more


Updated at 2021-01-20 21:59:41

How to make popup button in SwiftUI for macOS

Issue #748

There is said to be PopUpButtonPickerStyle and MenuPickerStyle but these don’t seem to work.

There’s Menu button it shows a dropdown style. We fake it by fading this and overlay with a button. allowsHitTesting does not work, but disabled seems to do the trick

1
2
3
4
5
6
7
8
9
10
11
12
13
Menu {
Button("About", action: ActionService.onAbout)
Button("Quit", action: ActionService.onQuit)
} label: {
Text("")
}
.frame(width: 24)
.opacity(0.01)
.overlay(
makeButton(action: {}, "gearshape.fill")
.disabled(true)
.foregroundColor(Color.secondaryLabel)
)

Follow pika

1
2
3
4
5
6
7
8
9
10
11
12
13
14
15
16
17
18
19
20
21
22
23
24
25
26
27
28
29
30
31
32
33
34
35
36
37
38
39
40
41
42
43
struct ColorMenu: View {
var eyedropper: Eyedropper

var body: some View {
if #available(OSX 11.0, *) {
Menu {
ColorMenuItems(eyedropper: eyedropper)
} label: {
Image(systemName: "ellipsis.circle")
}
.menuStyle(BorderlessButtonMenuStyle(showsMenuIndicator: false))
} else {
MenuButton(label: IconImage(name: "ellipsis.circle"), content: {
ColorMenuItems(eyedropper: eyedropper)
})
.menuButtonStyle(BorderlessButtonMenuButtonStyle())
}
}
}

struct ColorMenuItems: View {
var eyedropper: Eyedropper
let pasteboard = NSPasteboard.general

var body: some View {
VStack(alignment: .leading, spacing: 0.0) {
Text(eyedropper.title)
Divider()
}
Button(action: {
pasteboard.clearContents()
pasteboard.setString(eyedropper.color.toHex, forType: .string)
}, label: { Text("Copy color hex") })
Button(action: {
pasteboard.clearContents()
pasteboard.setString(eyedropper.color.toRGB, forType: .string)
}, label: { Text("Copy RGB values") })
Button(action: {
pasteboard.clearContents()
pasteboard.setString(eyedropper.color.toHSB, forType: .string)
}, label: { Text("Copy HSB values") })
}
}

Need to specify .fixedSize() for menu rows to hug content. Can also use opacity to reduce Menu button color

1
2
3
Menu
.fixedSize()
.opacity(0.8)

Updated at 2021-01-21 09:12:48

How to use UITextView in SwiftUI

Issue #747

Need to use Coordinator conforming to UITextViewDelegate to apply changes back to Binding

1
2
3
4
5
6
7
8
9
10
11
12
13
14
15
16
17
18
19
20
21
22
23
24
25
26
27
28
29
30
31
32
33
34
35
36
37
38
39
import SwiftUI
import UIKit

struct MyTextView: UIViewRepresentable {
@Binding
var text: String

final class Coordinator: NSObject, UITextViewDelegate {
let parent: MyTextView

init(parent: MyTextView) {
self.parent = parent
}

func textViewDidChange(_ textView: UITextView) {
if textView.text != parent.text {
parent.text = textView.text
}
}
}

func makeCoordinator() -> Coordinator {
Coordinator(parent: self)
}

func makeUIView(context: Context) -> UITextView {
let view = UITextView()
view.isScrollEnabled = true
view.isEditable = true
view.isUserInteractionEnabled = true
view.font = UIFont.preferredFont(forTextStyle: .body)
view.delegate = context.coordinator
return view
}

func updateUIView(_ uiView: UITextView, context: Context) {
uiView.text = text
}
}

How to check app going to background in SwiftUI

Issue #746

From iOS 13, the default is to support multiple scene, so the the old UIApplicationDelegate lifecycle does not work. Double check your Info.plist for UIApplicationSceneManifest key

1
2
3
4
5
<key>UIApplicationSceneManifest</key>
<dict>
<key>UIApplicationSupportsMultipleScenes</key>
<true/>
</dict>

One way to be notified about application life cycle is to use UIApplicationDelegateAdaptor and via NotificationCenter

1
2
3
4
5
6
7
8
9
10
11
12
13
14
15
16
17
18
19
20
21
22
23
24
25
26
27
28
import SwiftUI
import UIKit
import FontAwesomeSwiftUI

final class AppDelegate: NSObject, UIApplicationDelegate {
func application(_ application: UIApplication, didFinishLaunchingWithOptions launchOptions: [UIApplication.LaunchOptionsKey : Any]? = nil) -> Bool {
FontAwesome.register()
PreferenceManager.shared.load()
return true
}
}

@main
struct MyAwesomeApp: App {
@UIApplicationDelegateAdaptor(AppDelegate.self)
var appDelegate

var body: some Scene {
WindowGroup {
MainView(store: Store.shared)
.onReceive(
NotificationCenter.default.publisher(
for: UIApplication.didEnterBackgroundNotification)) { _ in
PreferenceManager.shared.save()
}
}
}
}

How to use selection in List in SwiftUI

Issue #745

I used to use selection with Binding where wrappedValue is optional, together with tag in SwiftUI for macOS, and it shows current selection

1
2
3
4
5
6
7
@Binding
var selection: Tag? = .all

List(section: $selection) {
Text("All")
.tag(Tag.all)
}

From the API, looks like Binding<Set> is for multiple selection, and Binding<Optional> is for single selection
Looking at List signature, I see that selection uses wrappedValue as Set for Binding<Set<SelectionValue>>?

1
init<Data, ID, RowContent>(Data, id: KeyPath<Data.Element, ID>, selection: Binding<Set<SelectionValue>>?, rowContent: (Data.Element) -> RowContent)

So let’s use Set. It shows current selection and I don’t need to use .tag also

let selection: Binding<Set<SidebarTag>> = Binding<Set<SidebarTag>>(
    get: { Set(arrayLiteral: store.sidebarTag) },
    set: { newValue in
        DispatchQueue.main.async {
            if let first = newValue.first {
                store.sidebarTag = first
            }
        }
    }
)

List(selection: selection) {
    Text("All")
}

Updated at 2021-01-06 21:13:43

How to make tiled image in SwiftUI

Issue #737

Use resizingMode of .tile with a tile image from https://www.transparenttextures.com/

1
2
3
4
5
6
Image("transparentTile")
.resizable(capInsets: .init(), resizingMode: .tile)
.scaleEffect(2)
.aspectRatio(contentMode: .fit)
.frame(maxWidth: .infinity, maxHeight: .infinity)
.clipped()

Updated at 2021-01-02 22:47:57

How to use WebView in SwiftUI

Issue #736

1
2
3
4
5
6
7
8
9
10
11
12
13
14
15
16
17
18
19
20
21
22
23
24
25
26
27
28
29
30
31
32
33
34
35
36
struct MyWebView: NSViewRepresentable {
let url: URL
@Binding
var isLoading: Bool

func makeCoordinator() -> Coordinator {
Coordinator(parent: self)
}

func makeNSView(context: Context) -> WKWebView {
let view = WKWebView()
view.navigationDelegate = context.coordinator
view.load(URLRequest(url: url))
return view
}

func updateNSView(_ nsView: WKWebView, context: Context) {

}

class Coordinator: NSObject, WKNavigationDelegate {
let parent: MyWebView

init(parent: MyWebView) {
self.parent = parent
}

func webView(_ webView: WKWebView, didCommit navigation: WKNavigation!) {
parent.isLoading = true
}

func webView(_ webView: WKWebView, didFinish navigation: WKNavigation!) {
parent.isLoading = false
}
}
}

How to use GeometryReader in SwiftUI

Issue #735

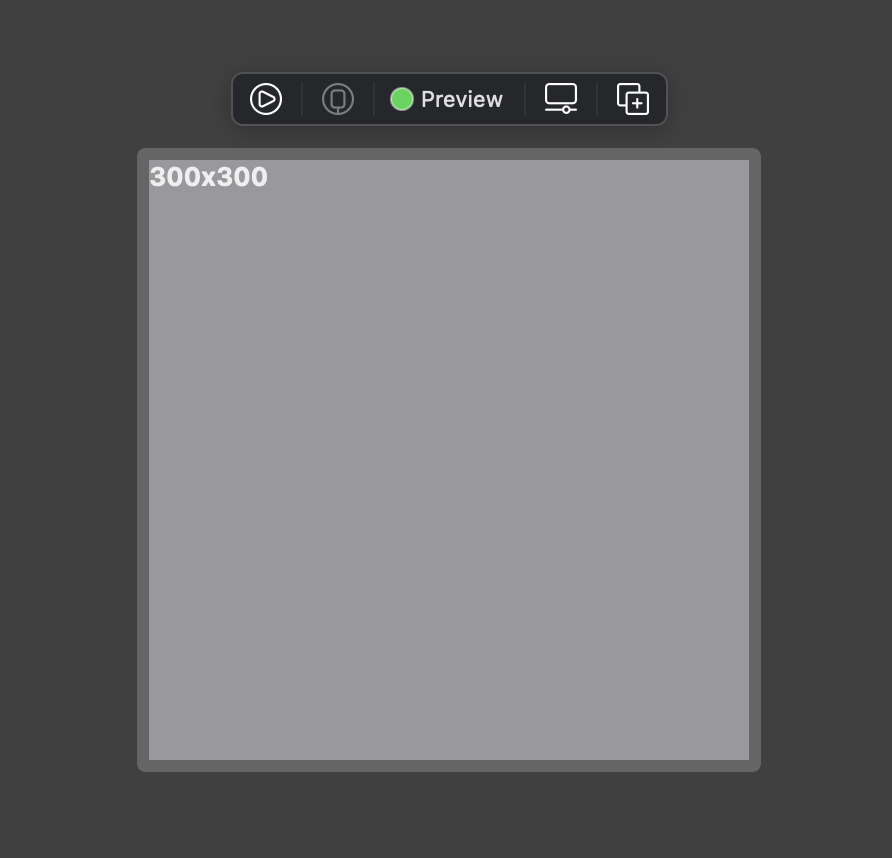
From my previous post How to use flexible frame in SwiftUI we know that certain views have different frame behaviors. 2 of them are .overlay and GeometryReader that takes up whole size proposed by parent.

By default GeometryReader takes up whole width and height of parent, and align its content as .topLeading

1
2
3
4
5
6
7
8
9
10
11
12
13
14
15
struct ContentView_Previews: PreviewProvider {
static var previews: some View {
VStack {
Rectangle()
.fill(Color.gray)
.overlay(
GeometryReader { geo in
Text("\(Int(geo.size.width))x\(Int(geo.size.height))")
.bold()
}
)
}
.frame(width: 300, height: 300)
}
}
Screenshot 2021-01-02 at 00 37 17

To align content center, we can specify frame with geo information

1
2
3
4
5
6
7
8
9
10
11
12
13
14
15
16
struct ContentView_Previews: PreviewProvider {
static var previews: some View {
VStack {
Rectangle()
.fill(Color.gray)
.overlay(
GeometryReader { geo in
Text("\(Int(geo.size.width))x\(Int(geo.size.height))")
.bold()
.frame(width: geo.size.width, height: geo.size.height, alignment: .center)
}
)
}
.frame(width: 300, height: 300)
}
}

The result is that Text is center aligned

Screenshot 2021-01-02 at 00 39 13

If we were to implement GeometryReader, it would look like this

1
2
3
4
5
6
7
8
9
10
11
12
13
struct GeometryReader<Content: View>: View {
let content: (CGSize) -> Content

func size(proposedSize: CGSize) -> CGSize {
// Take up whole size proposed by parent
proposedSize
}

func buildBody(calculatedSize: CGSize) -> some View {
// Pass in the calculated size
content(calculatedSize)
}
}

Updated at 2021-01-01 23:42:34

How to use flexible frame in SwiftUI

Issue #734

In SwiftUI there are fixed frame and flexible frame modifiers.

Fixed frame Positions this view within an invisible frame with the specified size.

Use this method to specify a fixed size for a view’s width, height, or both. If you only specify one of the dimensions, the resulting view assumes this view’s sizing behavior in the other dimension.

1
2
3
4
5
6
7
8
VStack {
Ellipse()
.fill(Color.purple)
.frame(width: 200, height: 100)
Ellipse()
.fill(Color.blue)
.frame(height: 100)
}

Flexible frame frame(minWidth:idealWidth:maxWidth:minHeight:idealHeight:maxHeight:alignment:)

Read the documentation carefully

Always specify at least one size characteristic when calling this method. Pass nil or leave out a characteristic to indicate that the frame should adopt this view’s sizing behavior, constrained by the other non-nil arguments.

The size proposed to this view is the size proposed to the frame, limited by any constraints specified, and with any ideal dimensions specified replacing any corresponding unspecified dimensions in the proposal.

If no minimum or maximum constraint is specified in a given dimension, the frame adopts the sizing behavior of its child in that dimension. If both constraints are specified in a dimension, the frame unconditionally adopts the size proposed for it, clamped to the constraints. Otherwise, the size of the frame in either dimension is:

If a minimum constraint is specified and the size proposed for the frame by the parent is less than the size of this view, the proposed size, clamped to that minimum.

If a maximum constraint is specified and the size proposed for the frame by the parent is greater than the size of this view, the proposed size, clamped to that maximum.

Otherwise, the size of this view.

Experiment with different proposed frame

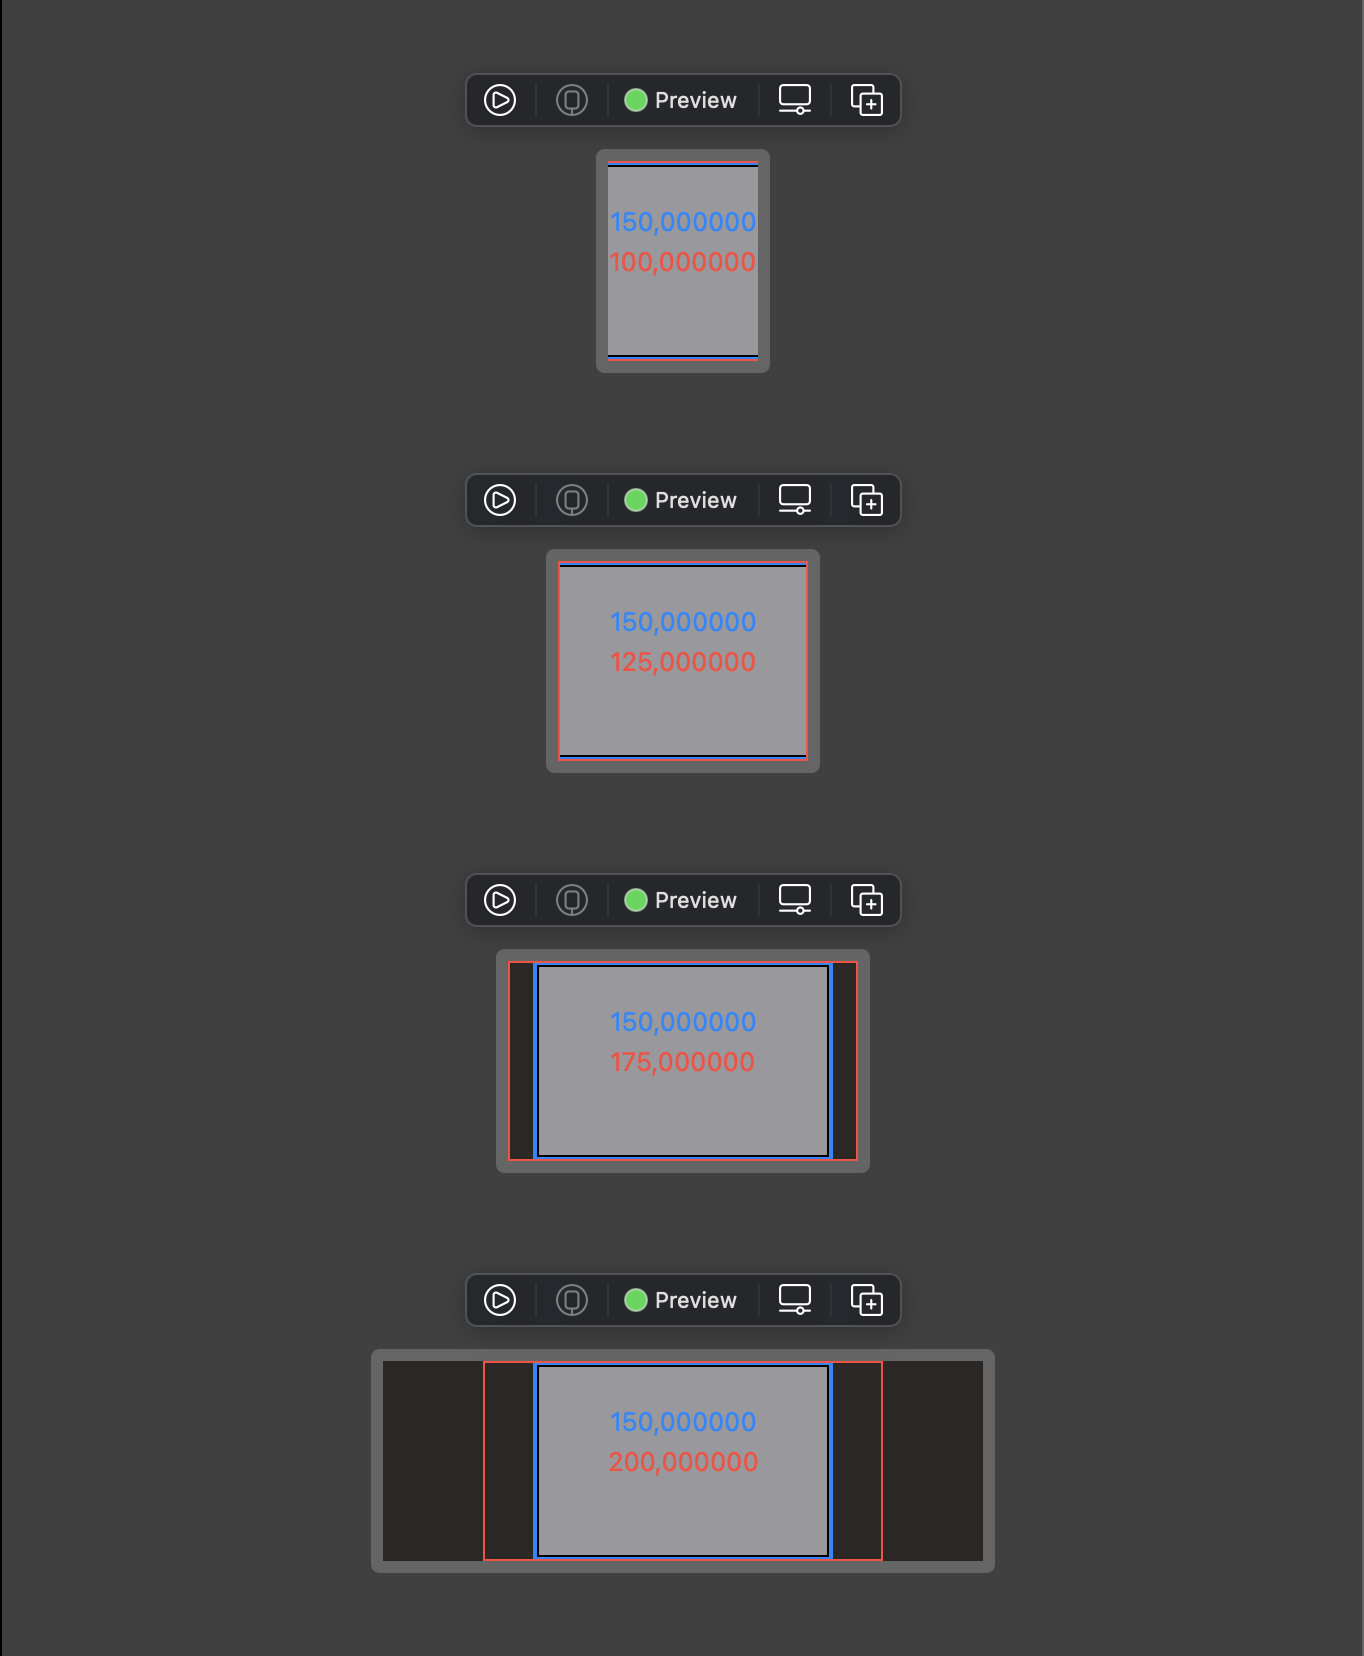
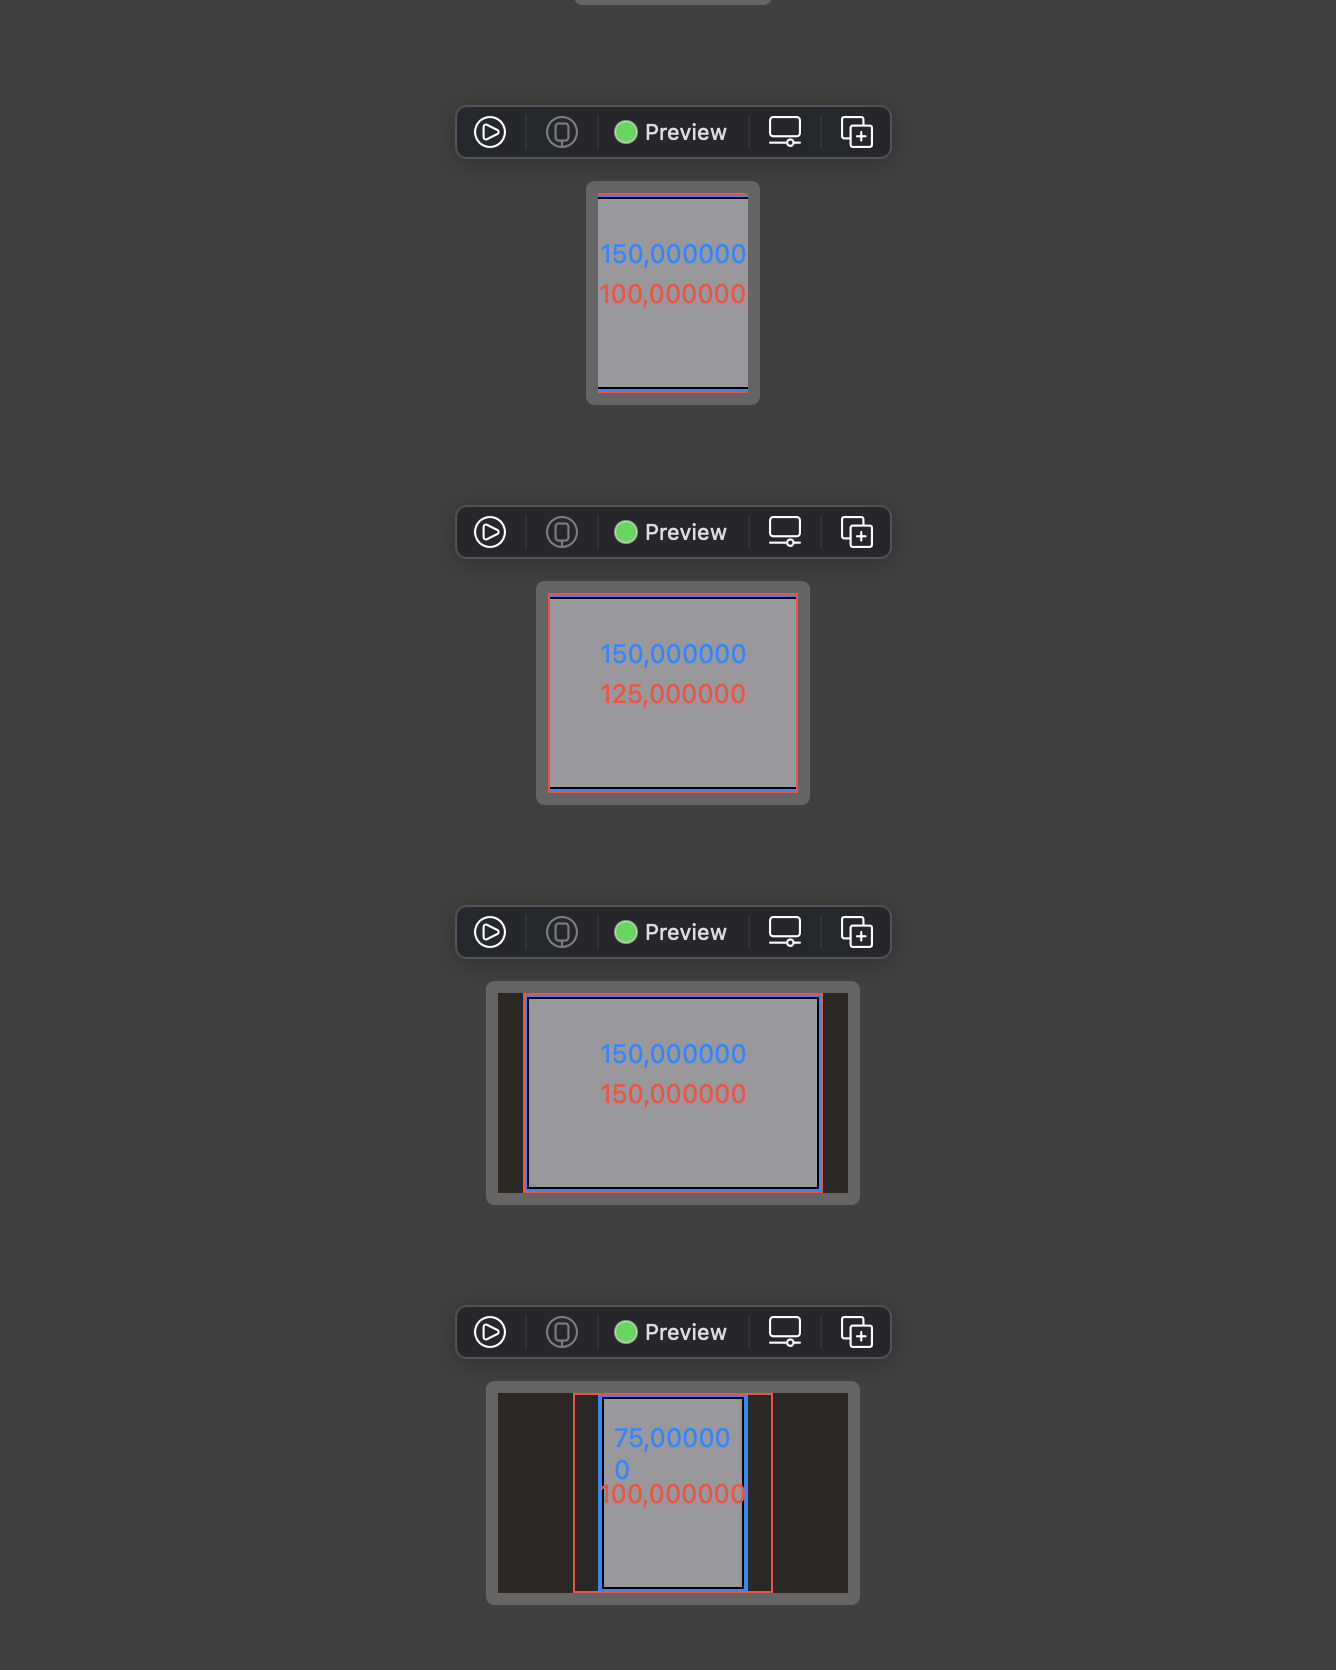
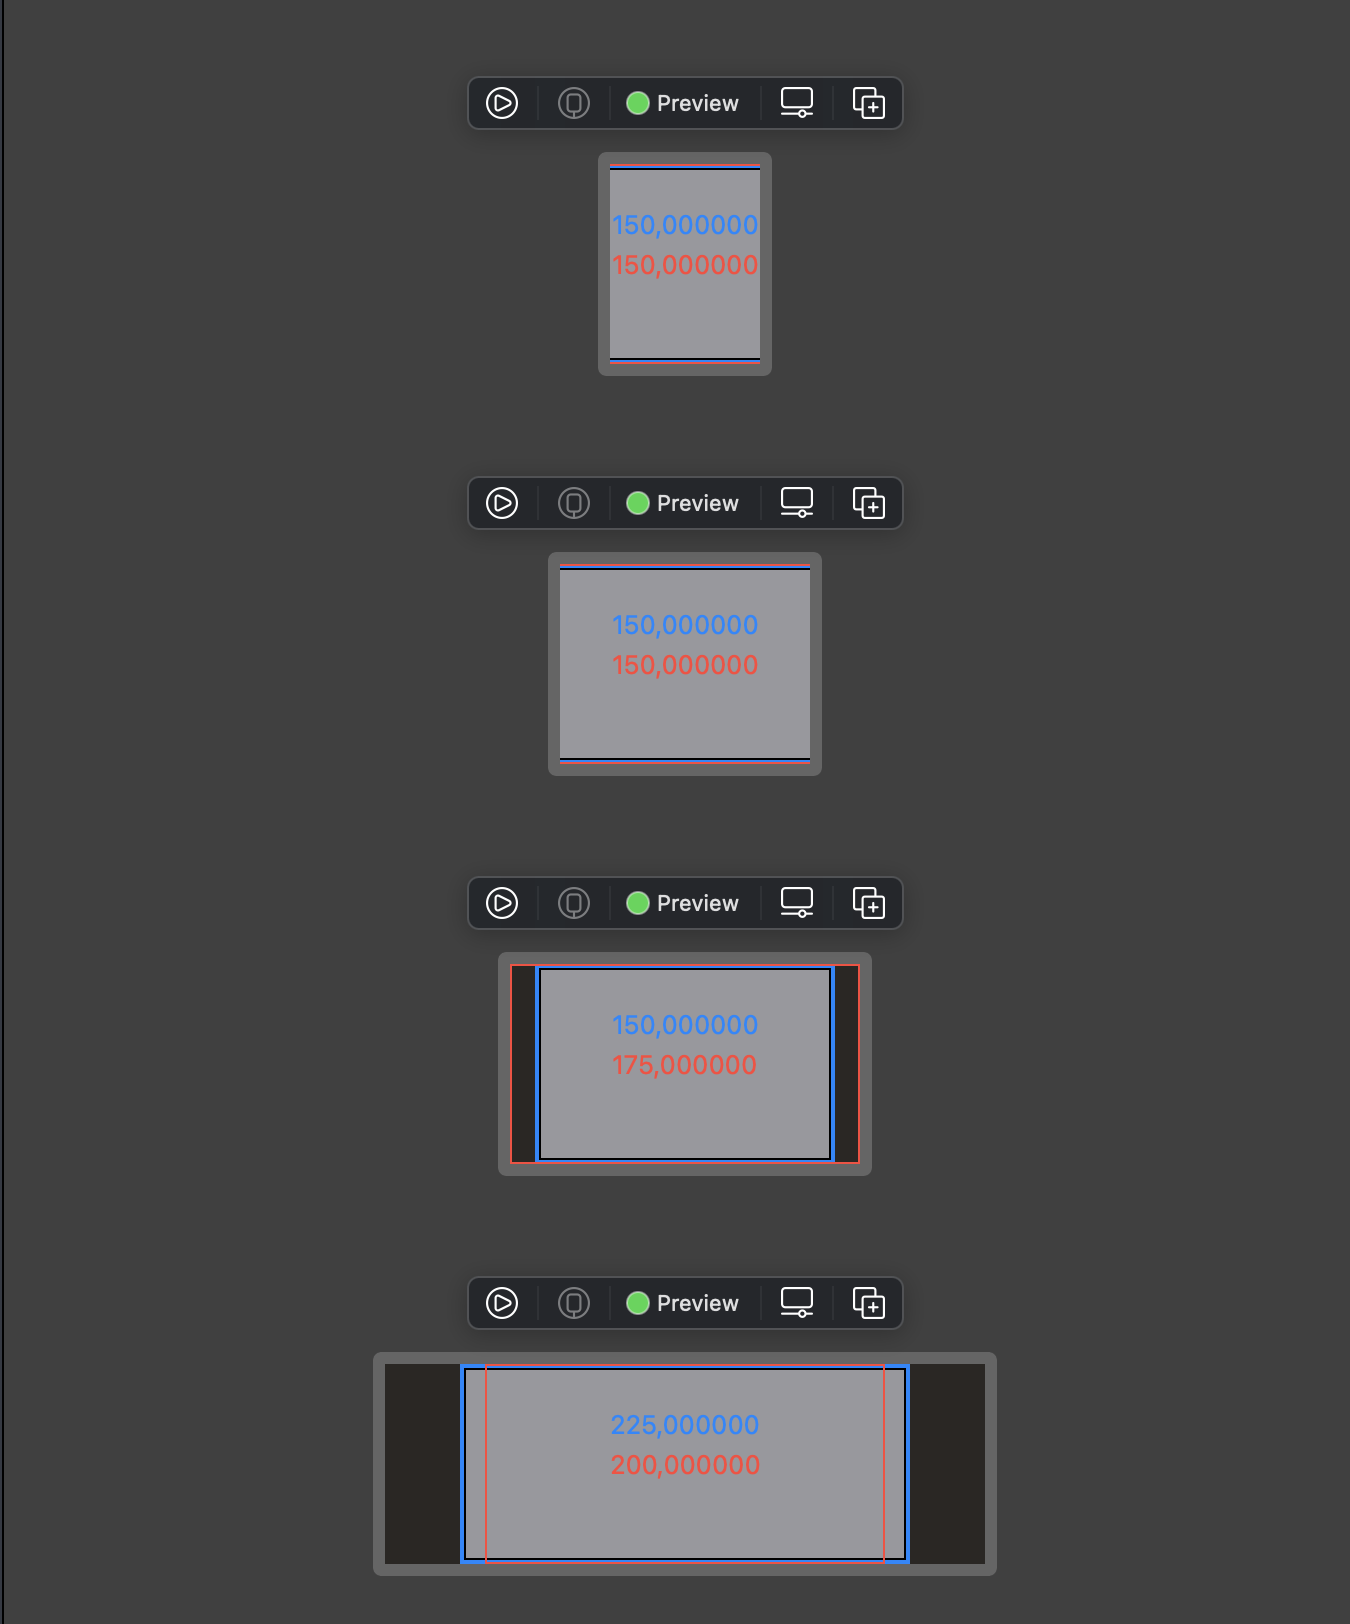
To understand the explanation above, I prepare a Swift playground to examine with 3 scenarios: when both minWidth and maxWidth are provided, when either minWidth or maxWidth is provided. I use width for horizontal dimension but the same applies in vertical direction with height.

I have a View called Examine to demonstrate flexible frame. Here we have a flexible frame with red border and red text showing its size where you can specify minWidth and maxWidth.

Inside it is the content with a fixed frame with blue border and blue text showing content size where you can specify contentWidth. Finally there’s parentWidth where we specify proposed width to our red flexible frame.

The variations for our scenarios are that proposed width falls outside and inside minWidth, contentWidth, and maxWidth range.

1
2
3
4
5
6
7
8
9
10
11
12
13
14
15
16
17
18
19
20
21
22
23
24
25
26
27
28
29
30
31
32
33
34
35
36
37
38
39
40
41
42
43
44
45
46
47
48
49
50
51
52
53
54
55
56
57
58
59
60
61
62
63
64
65
66
67
68
69
70
71
72
73
74
75
76
77
78
79
80
81
82
83
84
import SwiftUI

struct Examine: View {
let parentWidth: CGFloat
let contentWidth: CGFloat
var minWidth: CGFloat?
var maxWidth: CGFloat?

var body: some View {
Rectangle()
.fill(Color.gray)
.border(Color.black, width: 3)
.frame(width: contentWidth)
.overlay(
GeometryReader { geo in
Text("\(geo.size.width)")
.foregroundColor(Color.blue)
.offset(x: 0, y: -20)
.center()
}
)
.border(Color.blue, width: 2)
.frame(minWidth: minWidth, maxWidth: maxWidth)
.overlay(
GeometryReader { geo in
Text("\(geo.size.width)")
.foregroundColor(Color.red)
.center()
}
)
.border(Color.red, width: 1)
.frame(width: parentWidth, height: 100)
}
}

extension View {
func center() -> some View {
VStack {
Spacer()
HStack {
Spacer()
self
Spacer()
}
Spacer()
}
}
}

struct Examine_Previews: PreviewProvider {
static var previews: some View {
Group {
Group {
Text("Both minWidth and maxWidth")
Examine(parentWidth: 75, contentWidth: 150, minWidth: 100, maxWidth: 200)
.help("proposed size < min width")
Examine(parentWidth: 125, contentWidth: 150, minWidth: 100, maxWidth: 200)
.help("min width < proposed size < content")
Examine(parentWidth: 175, contentWidth: 150, minWidth: 100, maxWidth: 200)
.help("min width < content < proposed size")
Examine(parentWidth: 300, contentWidth: 150, minWidth: 100, maxWidth: 200)
.help("min width < content < max width < proposed size")
}

Group {
Text("Just minWidth")
Examine(parentWidth: 75, contentWidth: 150, minWidth: 100)
Examine(parentWidth: 125, contentWidth: 150, minWidth: 100)
Examine(parentWidth: 175, contentWidth: 150, minWidth: 100)
Examine(parentWidth: 175, contentWidth: 75, minWidth: 100)
.help("content < minWidth")
}

Group {
Text("Just maxWidth")
Examine(parentWidth: 75, contentWidth: 150, maxWidth: 200)
Examine(parentWidth: 125, contentWidth: 150, maxWidth: 200)
Examine(parentWidth: 175, contentWidth: 150, maxWidth: 200)
Examine(parentWidth: 300, contentWidth: 225, maxWidth: 200)
.help("content > maxWidth")
}
}
}
}

Observation

Here are the results with different variations of specifying parentWidth aka proposed width.

🍑 Scenario 1: both minWidth and maxWidth are specified

Our red flexible frame clamps proposed width between its minWidth and maxWidth, ignoring contentWidth

1
let redWidth = clamp(minWidth, parentWidth, maxWidth)
Screenshot 2021-01-01 at 23 30 19

🍅 Scenario 2: only minWidth is specified

Our red flexible frame clamps proposed width between its minWidth and contentWidth. In case content is less than minWidth, then final width is minWidth

1
let redWidth = clamp(minWidth, parentWidth, contentWidth)
Screenshot 2021-01-01 at 23 51 46

🍏 Scenario 3: only maxWidth is specified

Our red flexible frame clamps proposed width between its contentWidth and maxWidth. In case content is more than maxWidth, then final width is maxWidth

1
let redWidth = clamp(contentWidth, parentWidth, maxWidth)
Screenshot 2021-01-01 at 23 52 27

What are idealWidth and idealHeight

In SwiftUI, view takes proposed frame from its parent, then proposes its to its child, and reports the size it wants from it’s child and its proposed frame from parent. The reported frame is the final frame used by that view.

When we use .frame modifier, SwiftUI does not changes the frame of that view directly. Instead it creates a container around that view.

There are 4 kinds of frame behavior depending on which View we are using. Some have mixed behavior.

  • Sum up frames from its children then report the final frame. For example HStack, VStack
  • Merely use the proposed frame. For example GeometryReader, .overlay, Rectangle
  • Use more space than proposed. For example texts with fixedSize
  • Use only space needed for its content and respect proposed frame as max

Fix the size to its ideal size

Some View like Text or Image has intrinsic content size, means it has implicit idealWidth and idealHeight. Some like Rectangle we need to explicit set .frame(idealWidth: idealHeight). And these ideal width and height are only applied if we specify fixedSize

To understand this, let’s read fixedSize

Fixes this view at its ideal size.
During the layout of the view hierarchy, each view proposes a size to each child view it contains. If the child view doesn’t need a fixed size it can accept and conform to the size offered by the parent.
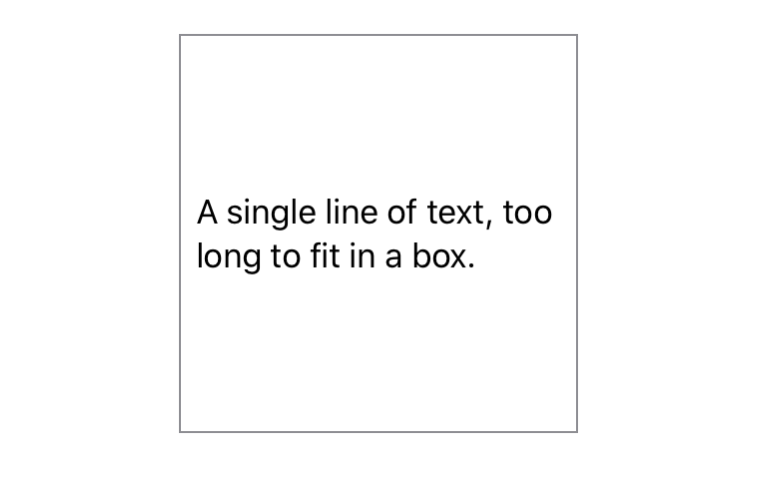
For example, a Text view placed in an explicitly sized frame wraps and truncates its string to remain within its parent’s bounds:

1
2
3
Text("A single line of text, too long to fit in a box.")
.frame(width: 200, height: 200)
.border(Color.gray)
Screenshot 2021-01-02 at 00 15 14

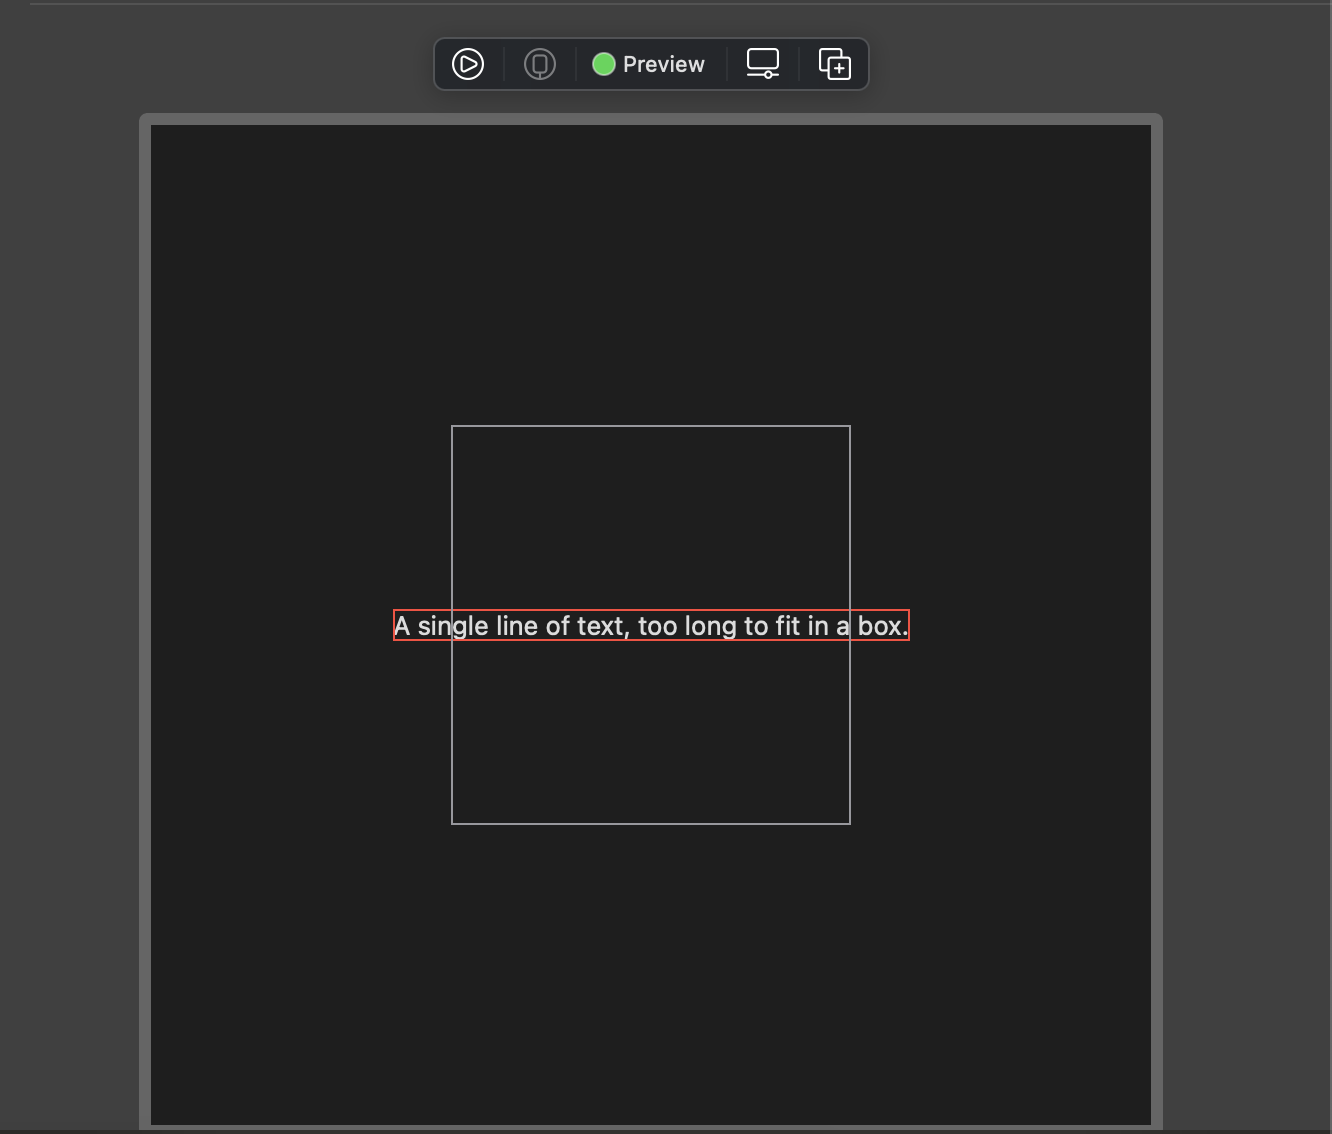
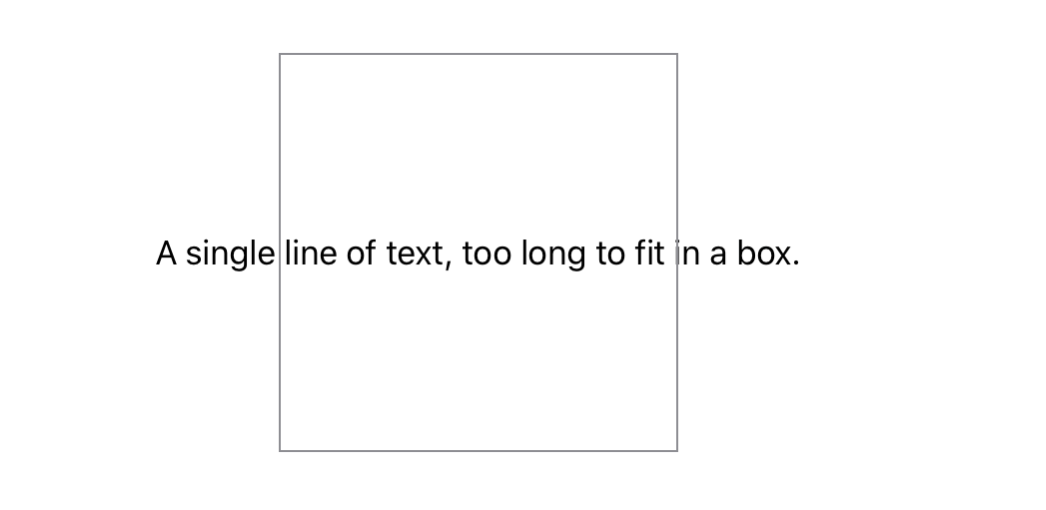
The fixedSize() modifier can be used to create a view that maintains the ideal size of its children both dimensions:

1
2
3
4
Text("A single line of text, too long to fit in a box.")
.fixedSize()
.frame(width: 200, height: 200)
.border(Color.gray)
Screenshot 2021-01-02 at 00 16 11

You can think of fixedSize() as the creation of a counter proposal to the view size proposed to a view by its parent. The ideal size of a view, and the specific effects of fixedSize() depends on the particular view and how you have configured it.

To view this in playground, I have prepared this snippet

1
2
3
4
5
6
7
8
9
10
11
12
13
14
struct Text_Previews: PreviewProvider {
static var previews: some View {
VStack(spacing: 16) {
Text("A single line of text, too long to fit in a box.")
.fixedSize()
.border(Color.red)
.frame(width: 200, height: 200)
.border(Color.gray)
}
.padding()
.frame(width: 500, height: 500)

}
}

Here we can see that our canvas is 500x500, and the Text grows outside its parent frame 200x200

Screenshot 2021-01-02 at 00 17 29

Play with Rectangle

Remember that shapes like Rectangle takes up all the proposed size. When we explicitly specify fixedSize, theidealWidth and idealHeight are used.

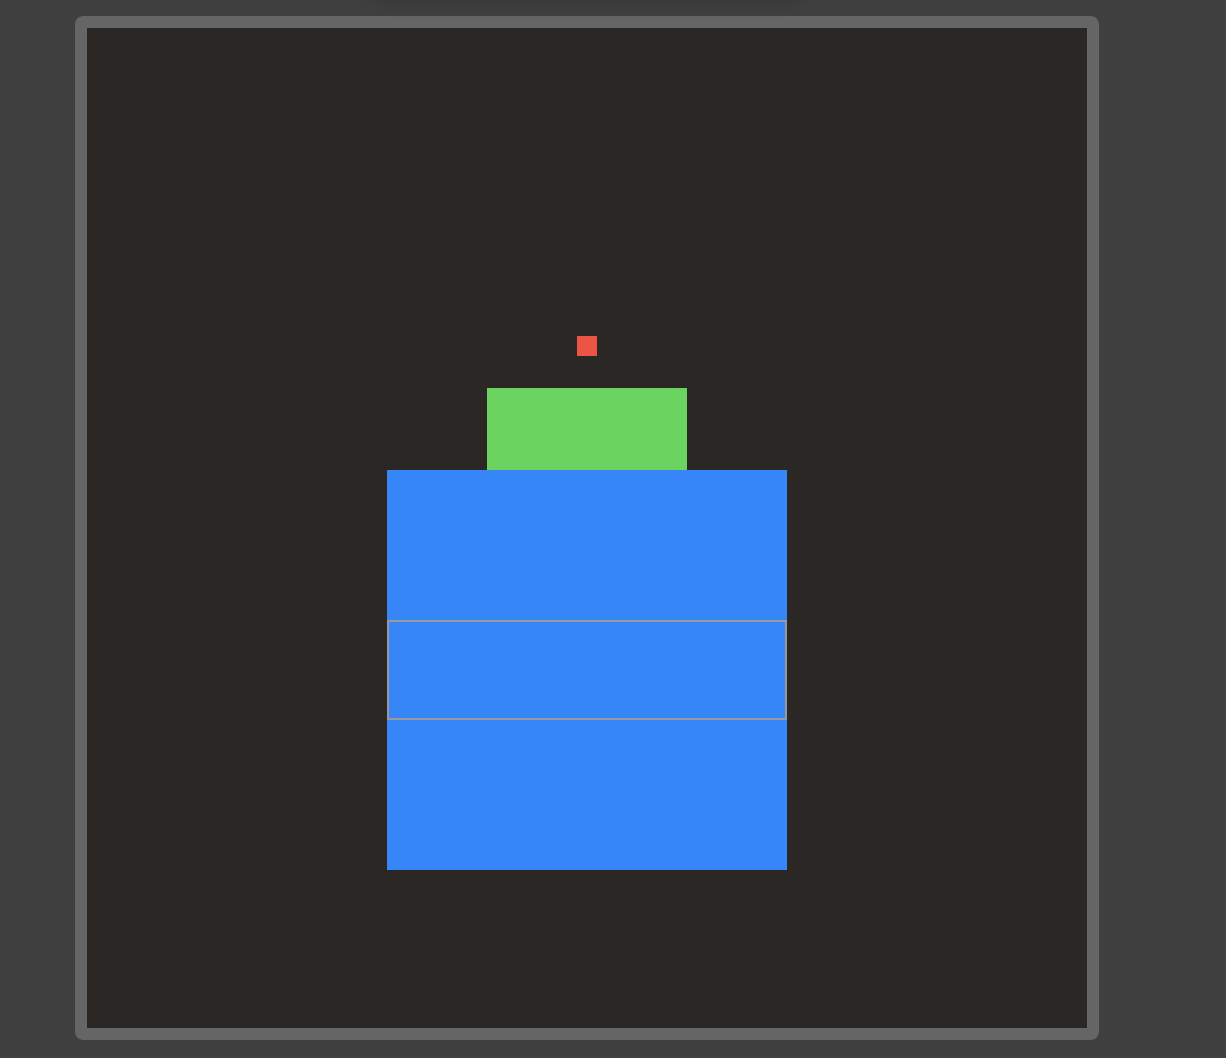
Here I have 3 rectangle

🍎 Red: There are no ideal size explicitly specified, so SwiftUI uses a magic number 10 as the size
🍏 Green: We specify frame directly and no idealWidth, idealHeight and no fixedSize, so this rectangle takes up full frame
🧊 Blue: The outer gray box has height 50, but this rectangle uses idealWidth and idealHeight of 200 because we specify fixedSize

1
2
3
4
5
6
7
8
9
10
11
12
13
14
15
16
17
18
19
20
21
22
23
struct ContentView_Previews: PreviewProvider {
static var previews: some View {
VStack(spacing: 16) {
Rectangle()
.fill(Color.red)
.fixedSize()

Rectangle()
.fill(Color.green)
.frame(width: 100, height: 100)

Rectangle()
.fill(Color.blue)
.frame(idealWidth: 200, idealHeight: 200)
.fixedSize(horizontal: true, vertical: true)
.frame(height: 50)
.border(Color.gray)
}
.padding()
.frame(width: 500, height: 500)

}
}
Screenshot 2021-01-02 at 00 23 29

Updated at 2021-01-01 23:25:08

How to make view appear with delay in SwiftUI

Issue #731

Sometimes we don’t want to show progress view right away

1
2
3
4
5
6
HUDProgressView()
.transition(
AnyTransition.asymmetric(
insertion: AnyTransition.opacity.animation(Animation.default.delay(1)),
removal: AnyTransition.opacity)
)

Updated at 2020-12-31 05:33:00

How to make attributed string Text in SwiftUI for macOS

Issue #730

Use NSTextField with maximumNumberOfLines

1
2
3
4
5
6
7
8
9
10
11
12
13
14
15
16
17
18
19
20
21
22
23
24
25
import AppKit
import SwiftUI

struct AttributedText: NSViewRepresentable {

let attributedString: NSAttributedString

init(_ attributedString: NSAttributedString) {
self.attributedString = attributedString
}

func makeNSView(context: Context) -> NSTextField {
let textField = NSTextField()

textField.lineBreakMode = .byClipping
textField.maximumNumberOfLines = 0
textField.isBordered = false

return textField
}

func updateNSView(_ nsView: NSTextField, context: Context) {
nsView.attributedStringValue = attributedString
}
}

TextField has problem with wrapping, we can use TextView

1
2
3
4
5
6
7
8
9
10
11
12
13
14
15
16
17
18
19
20
21
22
23
24
25
26
27
28
29
30
31
32
struct AttributedTextView: NSViewRepresentable {
typealias NSViewType = NSScrollView

let attributedText: NSAttributedString?
let isSelectable: Bool
var insetSize: CGSize = .zero

func makeNSView(context: Context) -> NSViewType {
let scrollView = NSTextView.scrollableTextView()

let textView = scrollView.documentView as! NSTextView
textView.drawsBackground = false
textView.textColor = .controlTextColor
textView.textContainerInset = insetSize

return scrollView
}

func updateNSView(_ nsView: NSViewType, context: Context) {
let textView = (nsView.documentView as! NSTextView)
textView.isSelectable = isSelectable

if let attributedText = attributedText,
attributedText != textView.attributedString() {
textView.textStorage?.setAttributedString(attributedText)
}

if let lineLimit = context.environment.lineLimit {
textView.textContainer?.maximumNumberOfLines = lineLimit
}
}
}

Updated at 2020-12-31 05:51:42

How to make visual effect blur in SwiftUI for macOS

Issue #724

We can use .blur modifier, but with VisualEffectView gives us more options for material and blending mode.

1
2
3
4
5
6
7
8
9
10
11
12
13
14
15
16
17
18
19
20
21
22
23
24
25
public struct VisualEffectView: NSViewRepresentable {
let material: NSVisualEffectView.Material
let blendingMode: NSVisualEffectView.BlendingMode

public init(
material: NSVisualEffectView.Material = .contentBackground,
blendingMode: NSVisualEffectView.BlendingMode = .withinWindow
) {
self.material = material
self.blendingMode = blendingMode
}

public func makeNSView(context: Context) -> NSVisualEffectView {
let visualEffectView = NSVisualEffectView()
visualEffectView.material = material
visualEffectView.blendingMode = blendingMode
visualEffectView.state = NSVisualEffectView.State.active
return visualEffectView
}

public func updateNSView(_ visualEffectView: NSVisualEffectView, context: Context) {
visualEffectView.material = material
visualEffectView.blendingMode = blendingMode
}
}

How to make simple HUD in SwiftUI

Issue #723

Use @ViewBuilder to build dynamic content for our HUD. For blur effect, here I use NSVisualEffectView, but we can use .blur modifier also

1
2
3
4
5
6
7
8
9
10
11
12
13
14
15
16
17
struct HUD<Content>: View where Content: View {
let content: () -> Content

init(@ViewBuilder content: @escaping () -> Content) {
self.content = content
}

var body: some View {
content()
.frame(width: 80, height: 80)
.background(
VisualEffectView(material: .hudWindow)
.clipShape(RoundedRectangle(cornerRadius: 12))
.shadow(color: Color.black.opacity(0.22), radius: 12, x: 0, y: 5)
)
}
}

Then we can make some wrappers for information and progress HUD

1
2
3
4
5
6
7
8
9
10
11
12
13
14
15
16
17
struct HUD<Content>: View where Content: View {
let content: () -> Content

init(@ViewBuilder content: @escaping () -> Content) {
self.content = content
}

var body: some View {
content()
.frame(width: 80, height: 80)
.background(
VisualEffectView()
)
.cornerRadius(10)
.shadow(color: Color.gray.opacity(0.3), radius: 1, x: 0, y: 1)
}
}

Updated at 2020-12-26 20:59:10

How to instrument SwiftUI app

Issue #722

With Xcode 12, we can fire up Instrument to profile our app. Select SwiftUI template

Screenshot 2020-12-26 at 00 02 03

There are many profiles in that template, I find SwiftUI and Time Profile very useful. Here’s the profile I run for my app PastePal

SwiftUI View Body

This shows how many instance of View with body invocation are there, both for SwiftUI views and our app views

Taking a look at SwiftUI profile, it shows that ClipboardCell is taking most of the time, here over 7 seconds

Screenshot 2020-12-25 at 23 59 12

Time Profiler

This shows how much time was spent in each functions and call stack.

Then we drill down to Time Profiler, it shows that NSSharingService.submenu accounts for 75% of performance issue

Screenshot 2020-12-25 at 23 59 57

With these instruments, I found out that the NSSharingService context menu I added has poor performance.

This below method is used every time Menu is asked, which causes a significant overload on main thread, resulting in noticeable laggy scrolling

1
2
3
4
5
6
7
8
9
10
11
12
13
14
15
16
17
18
extension NSSharingService {
static func submenu(text: String) -> some View {
return Menu(
content: {
ForEach(NSSharingService.sharingServices(forItems: [""])), id: \.title) { item in
Button(action: { item.perform(withItems: [string]) }) {
Image(nsImage: item.image)
Text(item.title)
}
}
},
label: {
Text("Share")
Image(systemName: SFSymbol.squareAndArrowUp.rawValue)
}
)
}
}

The reason is that NSSharingService.sharingServices requires quite some time to get sharing services. A quick fix is to cache the items using static variable. In Swift, static variable is like lazy attribute, it is computed only once on first asked

1
private static let items = NSSharingService.sharingServices(forItems: [""])

There are more to optimize in my case, for example calculation of image and dominant colors. But we should only optimize when seeing real performance issue and after proper instruments

Fix and instrument again

After the fix, the time reduces from over 7 seconds to just less than 200ms

Screenshot 2020-12-26 at 00 09 51 Screenshot 2020-12-26 at 00 09 01

Updated at 2020-12-30 06:37:53