How to show image and text in menu item in SwiftUI for macOS

Issue #719

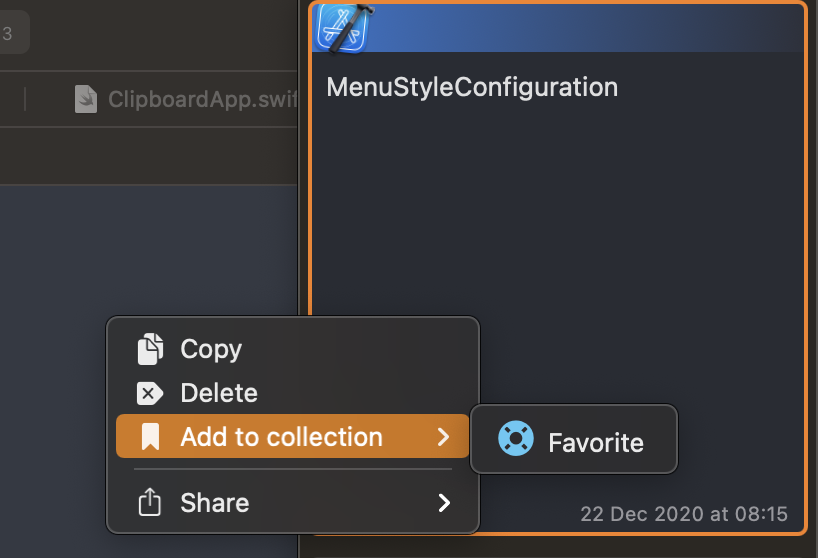
From SwiftUI 2 for macOS 11.0, we have access to Menu for creating menu and submenu. Usually we use Button for interactive menu items and Text for disabled menu items.

The easy way to customize menu with image is to call Menu with content and label. Pay attention to how we use Button and Label inside Content to create interactive menu items

1
2
3
4
5
6
7
8
9
10
11
12
13
Menu(
content: {
ForEach(collections) { collection in
Button(action: {) {
Label(collection.name, systemImage: SFSymbol.star.rawValue)
}
}
},
label: {
Image(systemName: SFSymbol.bookmarkFill.rawValue)
Text("Add to collection")
}
)

We can also use Image and Text separately. By default SwiftUI wraps these inside HStack automatically for us. For now, color has no effect in Menu, but it works on Text

1
2
3
4
Image(systemName: SFSymbol.bookmarkFill.rawValue)
.foregroundColor(Color.red)
Text(collection.name)
.foregroundColor(Color.green)

One way to mitigate this is to use Text with icon font. Here I use my FontAwesomeSwiftUI

There’s a problem that only the first Text is shown

1
2
3
4
Text(collection.icon)
.font(.awesome(style: .solid, size: 18))
.foregroundColor(Color.red)
Text(collection.name)

The solution is to concatenate Text. In SwiftUI, Text has + operator that allows us to make cool attributed texts
Screenshot 2020-12-23 at 07 34 40
1
2
3
4
Text(collection.icon)
.font(.awesome(style: .solid, size: 18))
.foregroundColor(Color.red)
+ Text(collection.name)

Updated at 2020-12-23 06:35:31

How to make sharing menu in SwiftUI for macOS

Issue #718

Use NSSharingService.sharingServices(forItems:) with an array of one empty string gives a list of sharing items. There we show image and title of each menu item.

We should cache sharing items as that can cause performance issue

1
2
3
4
5
6
7
8
9
10
11
12
13
14
15
16
17
18
19
20
21
22
23
import SwiftUI
import AppKit
import EasySwiftUI

extension NSSharingService {
private static let items = NSSharingService.sharingServices(forItems: [""])
static func submenu(text: String) -> some View {
return Menu(
content: {
ForEach(items, id: \.title) { item in
Button(action: { item.perform(withItems: [string]) }) {
Image(nsImage: item.image)
Text(item.title)
}
}
},
label: {
Text("Share")
Image(systemName: SFSymbol.squareAndArrowUp.rawValue)
}
)
}
}

Alternative, you can trigger NSSharingServicePicker from a button, it shows a context menu with sharing options

Read more


Updated at 2020-12-25 22:57:57

How to make stepper with plus and minus buttons in SwiftUI for macOS

Issue #717

Try to use predefined system colors in Human Interface Guidelines for macOS

Here we use this color unemphasizedSelectedTextBackgroundColor for button background

Screenshot 2020-12-21 at 06 24 16
1
2
3
4
5
6
7
8
9
10
11
12
13
14
HStack(spacing: 1) {
makeUnderListButton(action: {}, icon: .plus)
makeUnderListButton(action: {}, icon: .minus)
}
.background(Color(NSColor.unemphasizedSelectedTextBackgroundColor))
.cornerRadius(4)

func makeUnderListButton(action: @escaping () -> Void, icon: AwesomeIcon) -> some View {
Button(action: action) {
Text(icon.rawValue)
.font(.awesome(style: .solid, size: 14))
}
.buttonStyle(HighlightButtonStyle(h: 8, v: 6, cornerRadius: 4))
}

Another thing is List, where we have selected and alternative background colors. We should also use dynamic system colors selectedContentBackgroundColor and alternatingContentBackgroundColors

1
2
3
4
5
6
7
8
9
10
11
12
13
VStack {
ForEach(apps.enumerated().map({ $0 }), id: \.element) { index, app in
makeRow(app: app)
.onTapGesture {
self.selected = app
}
.background(
self.selected == app
? Color(NSColor.selectedContentBackgroundColor)
: Color(NSColor.alternatingContentBackgroundColors[index % 2])
)
}
}

Read more


Updated at 2020-12-21 05:56:28

How to fix Picker not showing selection in SwiftUI

Issue #716

I have an enum that conforms to CaseIterable that I want to show in Picker

1
2
3
4
5
6
7
8
9
10
11
12
13
enum Position: String, Codable, CaseIterable, Identifiable {
var id: String { rawValue }
case left
case right
case bottom
case top
}

Picker(selection: $preference.position, label: Text("Position")) {
ForEach(Preference.Position.allCases) { position in
Text(position.rawValue)
}
}

It compiles and runs just fine, but Picker does not show current selection regardless of any Picker style I choose. It does not update Binding at all.

The fix is to specify id, it looks redundant because of enum conforms to Identifiable, but it fixes the problem

1
2
3
4
5
Picker(selection: $preference.position, label: Text("Position")) {
ForEach(Preference.Position.allCases, id: \.self) { position in
Text(position.rawValue)
}
}

Mismatch between rawValue and enum case itself

Reading ForEach once again

1
init(_ data: Data, content: @escaping (Data.Element) -> Content)

Available when Data conforms to RandomAccessCollection, ID is Data.Element.ID, Content conforms to View, and Data.Element conforms to Identifiable.

So in our case, we use rawValue as id for Identifiable, so there’s mismatch between our selection being enum case and items in ForEach, which uses rawValue to uniquely identifies items. So our fix is to explicitly state that we want to use the enum case itself \.self as idfor ForEach

What we can also do is to declare enum case itself as id

1
2
3
4
5
6
7
enum Position: String, Codable, CaseIterable, Identifiable {
var id: Position { self }
case left
case right
case bottom
case top
}

The lesson learned here is we need to ensure the underlying type of selection in List and id used in ForEach are the same

Updated at 2020-12-23 06:05:08

How to do didSet for State and Binding in SwiftUI

Issue #714

Below is an example of a parent ContentView with State and a child Sidebar with a Binding.

The didSet is only called for the property that is changed.

When we click Button in ContentView, that changes State property, so only the didSet in ContentView is called
When we click Button in Sidebar, that changes Binding property, so only the didSet in Sidebar is called

1
2
3
4
5
6
7
8
9
10
11
12
13
14
15
16
17
18
19
20
21
22
23
24
25
26
27
28
29
30
31
32
33
34
35
36
enum Tag: String {
case all
case settings
}

struct ContentView: View {
@State
private var tag: Tag = .all {
didSet {
print("ContentView \(tag)")
}
}

var body: some View {
Sidebar(tag: $tag)
Button(action: { tag = .settings }) {
Text("Button in ContentView")
}
}
}

struct Sidebar: View {
@Binding
var tag: Tag {
didSet {
print("Sidebar \(tag)")
}
}

var body: some View {
Text(tag.rawValue)
Button(action: { tag = .settings }) {
Text("Button in Sidebar")
}
}
}

Custom Binding with get set

Another way to observe Binding changes is to use custom Binding with get, set. Here even if we click Button in ContentView, the set block is triggered and here we can change State

1
2
3
4
5
6
7
8
9
10
11
12
var body: some View {
Sidebar(tag: Binding<Tag>(
get: { tag },
set: { newTag in
self.tag = newTag
print("ContentView newTag \(newTag)")
}
))
Button(action: { tag = .settings }) {
Text("Button in ContentView")
}
}

Convenient new Binding

We can also make convenient extension on Binding to return new Binding, with a hook allowing us to inspect newValue. So we can call like Sidebar(tag: $tag.didSet

1
2
3
4
5
6
7
8
9
10
11
12
13
14
15
16
17
18
19
20
21
22
23
24
25
26
27
28
29
extension Binding {
func didSet(_ didSet: @escaping (Value) -> Void) -> Binding<Value> {
Binding(
get: { wrappedValue },
set: { newValue in
self.wrappedValue = newValue
didSet(newValue)
}
)
}
}

struct ContentView: View {
@State
private var tag: Tag = .all {
didSet {
print("ContentView \(tag)")
}
}

var body: some View {
Sidebar(tag: $tag.didSet { newValue in
print("ContentView newTag \(newValue)")
})
Button(action: { tag = .settings }) {
Text("Button in ContentView")
}
}
}

Updated at 2021-02-06 21:57:28

How to programatically select row in List in SwiftUI

Issue #711

List has a selection parameter where we can pass selection binding. As we can see here selection is of type optional Binding<Set<SelectionValue>>? where SelectionValue is any thing conforming to Hasable

1
2
3
4
@available(iOS 13.0, macOS 10.15, tvOS 13.0, watchOS 6.0, *)
public struct List<SelectionValue, Content> : View where SelectionValue : Hashable, Content : View {
@available(watchOS, unavailable)
public init(selection: Binding<Set<SelectionValue>>?, @ViewBuilder content: () -> Content)

So we can programatically control selection by tagging row with our own Tag

1
2
3
4
5
6
7
8
9
10
11
12
13
14
15
16
17
18
19
struct SideView: View {
enum Tag: String, Hashable {
case all
case settings
}

@State
var selection: Tag? = .all

var body: some View {
List {
all
.tag(Tag.all)
categories
settings
.tag(Tag.settings)
}
}
}

How to show sidebar in SwiftUI for macOS

Issue #710

Starting from macOS 11, we can use List with SidebarListStyle inside NavigationView to declare master detail view. The SidebarListStyle makes list translucent. It automatically handles selection and marks selected row in list with accent color.

1
2
3
4
5
6
7
8
9
10
11
12
13
14
15
16
17
18
19
20
21
22
23
24
25
26
27
28
struct MainView: some View {
var body: some View {
NavigationView {
sidebar
ContentView()
}
}

private var sidebar: some View {
List {
Group {
Text("Categories")
.foregroundColor(.gray)
ForEach(categories) { category in
NavigationLink(destination: ContentView(category: category)) {
Label(category.name, systemImage: "message")
}
}
}

Divider()
NavigationLink(destination: SettingsView()) {
Label("Settings", systemImage: "gear")
}
}
.listStyle(SidebarListStyle())
}
}

If we use Section instead of just Group we get a nice dropdown arrow button to expand and collapse section

1
2
3
4
5
List {
Section(header: Text("Categories")) {
ForEach
}
}

Show and hide side bar

To toggle side bar, we can use toggleSidebar selector since for now, sidebar is backed by NSSplitViewController

1
mainWindow.firstResponder?.tryToPerform(#selector(NSSplitViewController.toggleSidebar(_:)), with: nil)

We can specify tool bar items on either sidebar or content.

1
2
3
4
5
6
7
8
.toolbar{
//Toggle Sidebar Button
ToolbarItem(placement: .navigation){
Button(action: toggleSidebar) {
Image(systemName: "sidebar.left")
})
}
}

For tool bar to work, we must use App and embed views inside WindowGroup

1
2
3
4
5
6
7
8
@main
struct AppWithSidebarAndToolbar: App {
var body: some Scene {
WindowGroup {
MainView()
}
}
}

Updated at 2021-01-06 20:43:40

How to disable NSTextView in SwiftUI

Issue #702

The trick is to use an overlay

1
2
3
4
5
6
7
8
9
10
MessageTextView(text: $input.message)
.overlay(obscure)

var obscure: AnyView {
if store.pricingPlan.isPro {
return EmptyView().erase()
} else {
return Color.black.opacity(0.01).erase()
}
}

How to use nested ObservableObject in SwiftUI

Issue #694

I usually structure my app to have 1 main ObservableObject called Store with multiple properties in it.

1
2
3
4
5
6
7
8
9
10
11
12
final class Store: ObservableObject {
@Published var pricingPlan: PricingPlan()
@Published var preferences: Preferences()
}

struct Preferences {
var opensAtLogin: Bool = true
}

final class PricingPlan: ObservableObject {
@Published var isPro: Bool = true
}

SwiftUI for now does not work with nested ObservableObject, so if I pass Store to PricingView, changes in PricingPlan does not trigger view update in PricingView.

1
2
3
4
5
6
7
8
9
10
11
12
13
14
15
16
17
struct MainView: View {
@ObservedObject
var store: Store


var body: some View {
VStack { geo in

}
.sheet(isPresented: $showsPricing) {
PricingView(
isPresented: $showsPricing,
store: store
)
}
}
}

There are some workarounds

Pass nested ObservableObject

So that View observes both parent and nested objects.

1
2
3
4
PricingView(
store: store,
pricingPlan: store.pricingPlan
)

Use struct

This forces us to deal with immutability also, as with reference type PricingPlan, someone could just save a reference to it and alter it at some point.

1
struct PricingPlan {}

Listen to nested objects changes

Every ObservableObject has a synthesized property objectWillChange that triggers when any @Publisshed property changes

1
2
3
4
5
6
7
8
9
10
final class Store: ObservableObject {
@Published var pricingPlan = PricingPlan()

private var anyCancellable: AnyCancellable? = nil

init() {
anyCancellable = pricingPlan.objectWillChange.sink { [weak self] _ in
self?.objectWillChange.send()
}
}

How to make full size content view in SwiftUI for macOS

Issue #689

1
2
3
4
5
6
7
8
9
10
11
12
13
14
15
16
17
18
19
20
21
22
23
24
25
func applicationDidFinishLaunching(_ aNotification: Notification) {
// extend to title bar
let contentView = ContentView()
// .padding(.top, 24) // can padding to give some space
.edgesIgnoringSafeArea(.top)

// specify fullSizeContentView
window = NSWindow(
contentRect: NSRect(x: 0, y: 0, width: 800, height: 600),
styleMask: [.titled, .closable, .miniaturizable, .texturedBackground, .resizable, .fullSizeContentView],
backing: .buffered,
defer: false
)
window.center()
window.setFrameAutosaveName("My App")

// window.title = ... // no title
// window.toolbar = NSToolbar() // use toolbar if wanted. This triggers .unifiedTitleAndToolbar styleMask
window.titlebarAppearsTransparent = true
window.titleVisibility = .hidden // hide title
window.backgroundColor = R.color.myBackgroundColor // set our preferred background color

window.contentView = NSHostingView(rootView: contentView)
window.makeKeyAndOrderFront(nil)
}

I have an issue where if I use HSplitView, some Button are not clickable until I drag the split view handle. The workaround is to use HStack with a Divider

Updated at 2020-11-03 05:21:50

How to override styles in SwiftUI

Issue #688

In the app I’m working on Elegant Converter, I usually like preset theme with a custom background color and a matching foreground color.

Thanks to SwiftUI style cascading, I can just declare in root MainView and it will be inherited down the view hierachy.

1
2
3
4
5
6
7
8
9
10
struct MainView: View {
var body: some View {
HSplitView {
ListView()
RightView()
}
.foregroundColor(R.color.text)
.background(R.color.background)
}
}

This works great regardless of system light or dark mode, but in light mode it does not look good, as my designed theme is similar to dark mode. Here the color is pale for default Picker and Button.

Screenshot 2020-10-31 at 06 49 55

The way to fix that is to reset the foregroundColor, take a look at the documentation for foregroundColor

The foreground color to use when displaying this view. Pass nil to remove any custom foreground color and to allow the system or the container to provide its own foreground color. If a container-specific override doesn’t exist, the system uses the primary color.

So we can pass nil and the controls will pick the correct color based on system preferences.

1
2
3
4
5
6
7
8
9
10
11
Picker(selection: intent.fileType, label: EmptyView()) {
ForEach(filtered, id: \.self) {
Text($0.dropdownName)
}
}
.foregroundColor(nil)

Button(action: convert) {
Text("Convert")
}
.foregroundColor(nil)

Now Picker and Button look nice in both dark and light mode

Screenshot 2020-10-31 at 06 52 53 Screenshot 2020-10-31 at 06 53 10

Updated at 2020-11-01 04:57:11

How to use CoreData safely

Issue #686

I now use Core Data more often now. Here is how I usually use it, for example in Push Hero

From iOS 10 and macOS 10.12, NSPersistentContainer that simplifies Core Data setup quite a lot. I usually use 1 NSPersistentContainer and its viewContext together with newBackgroundContext attached to that NSPersistentContainer

In Core Data, each context has a queue, except for viewContext using the DispatchQueue.main, and each NSManagedObject retrieved from 1 context is supposed to use within that context queue only, except for objectId property.

Although NSManagedObject subclasses from NSObject, it has a lot of other constraints that we need to be aware of. So it’s safe to treat Core Data as a cache layer, and use our own model on top of it. I usually perform operations on background context to avoid main thread blocking, and automaticallyMergesChangesFromParent handles merge changes automatically for us.

1
2
3
4
5
6
7
8
9
10
11
12
13
14
15
16
17
18
19
20
21
22
23
24
25
26
27
28
29
30
31
32
33
34
35
36
37
38
39
40
41
42
43
44
45
46
47
48
49
50
51
52
53
54
55
56
57
58
59
60
61
extension SendHistoryItem {
func toCoreData(context: NSManagedObjectContext) {
context.perform {
let cd = CDSendHistoryItem(context: context)
}
}
}

extension CDSendHistoryItem {
func toModel() throws -> SendHistoryItem {

}
}

final class CoreDataManager {
private var backgroundContext: NSManagedObjectContext?

init() {
self.backgroundContext = self.persistentContainer.newBackgroundContext()
}

lazy var persistentContainer: NSPersistentContainer = {
let container = NSPersistentContainer(name: "PushHero")
container.loadPersistentStores(completionHandler: { (storeDescription, error) in
if let error = error {
print(error)
}
})
return container
}()

func load(request: NSFetchRequest<CDSendHistoryItem>, completion: @escaping ([SendHistoryItem]) -> Void) {
guard let context = CoreDataManager.shared.backgroundContext else { return }
context.perform {
do {
let cdItems = try request.execute()
let items = cdItems.compactMap({ try? $0.toModel() })
completion(items)
} catch {
completion([])
}
}
}

func save(items: [SendHistoryItem]) {
guard let context = backgroundContext else {
return
}

context.perform {
items.forEach {
let _ = $0.toCoreData(context: context)
}
do {
try context.save()
} catch {
print(error)
}
}
}
}

Read more


Updated at 2020-10-25 20:58:07

How to pass ObservedObject as parameter in SwiftUI

Issue #685

Since we have custom init in ChildView to manually set a State, we need to pass ObservedObject. In the ParentView, use underscore _ to access property wrapper type.

1
2
3
4
5
6
7
8
9
10
11
12
13
14
15
16
17
18
19
20
struct ChildView: View {
@ObservedObject
var store: Store

@State
private var selectedTask: AnyTask

init(store: ObservedObject<Store>) {
_selectedTask = State(initialValue: tasks.first!)
_store = store
}
}

struct ParentView: View {
@ObservedObject
var store: Store

var body: some View {
ChildView(store: _store)
}

How to do equal width in SwiftUI

Issue #684

In SwiftUI, specifying maxWidth as .infinity means taking the whole available width of the container.
If many children ask for max width, then they will be divided equally.
This is similar to weight in LinearLayout in Android or css flex-grow property.

The same applies in vertical direct also.

width


Updated at 2020-10-23 08:17:08

How to style multiline Text in SwiftUI for macOS

Issue #681

Only need to specify fixedSize on text to preserve ideal height.

The maximum number of lines is 1 if the value is less than 1. If the value is nil, the text uses as many lines as required. The default is nil.

1
2
3
Text(longText)
.lineLimit(nil) // No need
.fixedSize(horizontal: false, vertical: true)

If the Text is inside a row in a List, fixedSize causes the row to be in middle of the List, workaround is to use ScrollView and vertical StackView.

Sometimes for Text to properly size itself, specify an explicit frame width

Updated at 2020-10-07 05:02:01

How to clear List background color in SwiftUI for macOS

Issue #680

For List in SwiftUI for macOS, it has default background color because of the enclosing NSScrollView via NSTableView that List uses under the hood. Using listRowBackground also gives no effect

The solution is to use a library like SwiftUI-Introspect

1
2
3
4
5
6
7
8
9
10
import Introspect

extension List {
func removeBackground() -> some View {
return introspectTableView { tableView in
tableView.backgroundColor = .clear
tableView.enclosingScrollView!.drawsBackground = false
}
}
}

then

1
2
3
4
5
6
List {
ForEach(items) { item in
// view here
}
}
.removeBackground()

Or we can add extension on NSTableView to alter its content when it moves to superview

1
2
3
4
5
6
7
8
extension NSTableView {
open override func viewDidMoveToWindow() {
super.viewDidMoveToWindow()

backgroundColor = NSColor.clear
enclosingScrollView!.drawsBackground = false
}
}

This works OK for me on macOS 10.15.5, 10.15.7 and macOS 10.11 beta. But it was reported crash during review on macOS 10.15.6

The app launches briefly and then quits without error message.

After inspecting crash log, it is because of viewDidMoveToWindow. So it’s wise not to mess with NSTableView for now

1
2
3
4
5
Thread 0 Crashed:: Dispatch queue: com.apple.main-thread
0 com.onmyway133.PushHero 0x0000000104770b0a @objc NSTableView.viewDidMoveToWindow() (in Push Hero) (<compiler-generated>:296)
1 com.apple.AppKit 0x00007fff2d8638ea -[NSView _setWindow:] + 2416
2 com.apple.AppKit 0x00007fff2d8844ea -[NSControl _setWindow:] + 158
3 com.apple.AppKit 0x00007fff2d946ace -[NSTableView _setWindow:] + 306

Updated at 2020-10-09 03:49:39

How to avoid reduced opacity when hiding view with animation in SwiftUI

Issue #679

While redesigning UI for my app Push Hero, I ended up with an accordion style to toggle section.

Screenshot 2020-10-01 at 06 58 33

It worked great so far, but after 1 collapsing, all image and text views have reduced opacity. This does not happen for other elements like dropdown button or text.

1
2
3
4
5
6
7
8
9
10
11
12
13
14
15
16
17
18
19
20
21
22
23
24
25
26
extension View {
func sectionBackground(_ title: String, _ shows: Binding<Bool>) -> some View {
VStack(alignment: .leading) {
HStack {
Text(title.uppercased())
Spacer()
if shows != nil {
SmallButton(
imageName: "downArrow",
tooltip: shows!.wrappedValue ? "Collapse" : "Expand",
action: {
withAnimation(.easeInOut) {
shows!.wrappedValue.toggle()
}
}
)
.rotationEffect(.radians(shows!.wrappedValue ? .pi : 0))
}
}

if shows.wrappedValue {
self
}
}
}
}

The culprit is that withAnimation, it seems to apply opacity effect. So the workaround is to disable animation wrappedValue, or to tweak transition so that there’s no opacity adjustment.

1
2
3
if shows.wrappedValue {
self.transition(AnyTransition.identity)
}

How to dynamically add items to VStack from list in SwiftUI

Issue #678

Use enumerated to get index so we can assign to item in list. Here is how I show list of device tokens in my app Push Hero

1
2
3
4
5
6
7
8
9
10
11
12
13
14
15
private var textViews: some View {
let withIndex = input.deviceTokens.enumerated().map({ $0 })
let binding: (Int, Input.DeviceToken) -> Binding<String> = { index, token in
Binding<String>(
get: { token.token },
set: { self.input.deviceTokens[index].token = $0 }
)
}

return VStack {
ForEach(withIndex, id: \.element.id) { index, token in
return DeviceTokenTextView(text: binding(index, token))
}
}
}

How to unwrap Binding with Optional in SwiftUI

Issue #677

The quick way to add new properties without breaking current saved Codable is to declare them as optional. For example if you use EasyStash library to save and load Codable models.

1
2
3
4
5
6
7
import SwiftUI

struct Input: Codable {
var bundleId: String = ""

// New props
var notificationId: String?

This new property when using dollar syntax $input.notificationId turn into Binding with optional Binding<Strting?> which is incompatible in SwiftUI when we use Binding.

1
2
3
4
struct MaterialTextField: View {
let placeholder: String
@Binding var text: String
}

The solution here is write an extension that converts Binding<String?> to Binding<String>

1
2
3
4
5
6
7
8
9
10
11
12
extension Binding where Value == String? {
func toNonOptional() -> Binding<String> {
return Binding<String>(
get: {
return self.wrappedValue ?? ""
},
set: {
self.wrappedValue = $0
}
)
}
}

so we can use them as normal

1
MaterialTextField(text: $input.notificationId.toNonOptional())

How to make custom toggle in SwiftUI

Issue #676

I’ve used the default SwiftUI to achieve the 2 tab views in SwiftUI. It adds a default box around the content and also opinionated paddings. For now on light mode on macOS, the unselected tab has wrong colors.

The way to solve this is to come up with a custom toggle, that we can style and align the way we want. Here is how I did for my app Push Hero

Using a Text instead of Button here gives me default static text look.

Screenshot 2020-09-29 at 06 52 33
1
2
3
4
5
6
7
8
9
10
11
12
13
14
15
16
17
18
19
20
21
22
23
24
25
26
27
28
29
30
31
32
33
34
35
36
37
38
39
40
41
42
43
44
45
46
47
48
49
50
51
52
53
54
struct AuthenticationView: View {
@Binding var input: Input

var body: some View {
toggle
}

var toggle: some View {
VStack(alignment: .leading) {
HStack {
HStack(spacing: 0) {
Text("🔑 Key")
.style(selected: input.authentication == .key)
.onTapGesture {
self.input.authentication = .key
}

Text("📰 Certificate")
.style(selected: input.authentication == .certificate)
.onTapGesture {
self.input.authentication = .certificate
}
}
.padding(3)
.background(Color.white.opacity(0.2))
.cornerRadius(6)

Spacer()
}

choose
Spacer()
}
}

var choose: AnyView {
switch input.authentication {
case .key:
return KeyAuthenticationView().erase()
case .certificate:
return CertificateAuthenticationView().erase()
}
}
}

private extension Text {
func style(selected: Bool) -> some View {
return self
.padding(.vertical, 3)
.padding(.horizontal, 4)
.background(selected ? Color.white.opacity(0.5) : Color.clear)
.cornerRadius(6)
}
}

Updated at 2020-09-29 04:55:14

How to use Binding in function in Swift

Issue #675

Use wrappedValue to get the underlying value that Binding contains

1
2
3
4
5
6
7
8
9
10
11
12
13
14
15
16
17
18
19
20
21
extension View {
func addOverlay(shows: Binding<Bool>) -> some View {
HStack {
self
Spacer()
}
.overlay(
HStack {
Spacer()
SmallButton(
imageName: "downArrow",
tooltip: shows.wrappedValue ? "Collapse" : "Expand",
action: {
shows.wrappedValue.toggle()
}
)
.rotationEffect(.radians(shows.wrappedValue ? .pi : 0))
}
)
}
}

How to use HSplitView to define 3 panes view in SwiftUI for macOS

Issue #674

Specify minWidth to ensure miminum width, and use .layoutPriority(1) for the most important pane.

1
2
3
4
5
6
7
8
9
10
11
12
13
14
15
16
17
18
19
20
21
import SwiftUI

struct MainView: View {
@EnvironmentObject var store: Store

var body: some View {
HSplitView {
LeftPane()
.padding()
.frame(minWidth: 200, maxWidth: 500)
MiddlePane(store: store)
.padding()
.frame(minWidth: 500)
.layoutPriority(1)
RightPane()
.padding()
.frame(minWidth: 300)
}
.background(R.color.background)
}
}

Updated at 2020-09-23 08:42:29

How to make switch statement in SwiftUI

Issue #656

Lately I’ve been challenging myself to declare switch statement in SwiftUI, or in a more generalized way, execute any anonymous function that can return a View

Use Switch and Case views

Note that this approach does not work yet, as TupeView should support variadic number of contents, and also T.RawValue needs to conform to Equatable in order to check the cases.

Also in Switch statement, Content can’t be inferred

1
2
3
4
5
6
7
8
9
10
11
12
13
14
15
16
17
18
19
20
21
22
23
24
25
26
27
28
29
30
31
32
33
34
35
36
37
38
39
40
41
42
43
44
45
46
47
48
49
50
51
52
struct Case<T: RawRepresentable, Content: View>: View {
let value: T
let content: Content

init(_ value: T, @ViewBuilder content: () -> Content) {
self.value = value
self.content = content()
}

var body: some View {
content
}
}

struct Switch<T: RawRepresentable, Content: View>: View {
let value: T
let cases: TupleView<Case<T, Content>>

init(_ value: T, @ViewBuilder cases: () -> TupleView<Case<T, Content>>) {
self.value = value
self.cases = cases()
}

var body: some View {
makeBody()
}

private func makeBody() -> some View {
// TODO: Logic here
cases
}
}

struct UseSwitchStatement {
let animal: Animal = .cat

var body: some View {
VStack {
Switch(animal) {
Case(Animal.cat) {
Text("cat")
}
Case(Animal.dog) {
Text("dog")
}
Case(Animal.mouse) {
Text("mouse")
}
}
}
}
}

Use MakeView

Another solution is to use a MakeView view, this is more generic as it can execute any functions

1
2
3
4
5
6
7
8
9
10
11
12
13
14
15
16
17
18
19
20
21
22
23
24
25
26
27
28
29
30
enum Animal: String {
case cat
case dog
case mouse
}

struct MakeView: View {
let make: () -> AnyView

var body: some View {
make()
}
}

struct UseMakeView: View {
let animal: Animal = .cat

var body: some View {
MakeView {
switch self.animal {
case .cat:
return Text("cat").erase()
case .dog:
return Text("dog").erase()
case .mouse:
return Text("mouse").erase()
}
}
}
}

Updated at 2020-05-22 20:42:14

How to conditionally apply modifier in SwiftUI

Issue #633

Use autoclosure and AnyView

1
2
3
4
5
6
7
8
9
10
@available(iOS 13.0, OSX 10.15, tvOS 13.0, watchOS 6.0, *)
public extension View {
func applyIf<T: View>(_ condition: @autoclosure () -> Bool, apply: (Self) -> T) -> AnyView {
if condition() {
return apply(self).erase()
} else {
return self.erase()
}
}
}
1
2
3
4
5
6
7
8
9
10
Button(action: onSearch) {
Image("search")
.resizable()
.styleButton()
.overlay(ToolTip("Search"))
}
.buttonStyle(BorderlessButtonStyle())
.applyIf(showsSearch, apply: {
$0.foregroundColor(Color.orange)
})

How to toggle with animation in SwiftUI

Issue #632

Use Group

1
2
3
4
5
6
7
8
9
10
11
12
13
14
15
16
17
18
19
private func makeHeader() -> some View {
Group {
if showsSearch {
SearchView(
onSearch: onSearch
)
.transition(.move(edge: .leading))
} else {
InputView(
onAdd: onAdd
)
.transition(.move(edge: .leading))
}
}
}

withAnimation {
self.showsSearch.toggle()
}

How to show context popover from SwiftUI for macOS

Issue #630

For SwiftUI app using NSPopover, to show context popover menu, we can ask for windows array, get the _NSPopoverWindow and calculate the position. Note that origin of macOS screen is bottom left

1
2
3
4
(lldb) po NSApp.windows
▿ 2 elements
- 0 : <NSStatusBarWindow: 0x101a02700>
- 1 : <_NSPopoverWindow: 0x101c01060>
1
2
3
4
5
6
7
8
9
10
let handler = MenuHandler()
handler.add(title: "About", action: onAbout)
handler.add(title: "Quit", action: onQuit)

guard let window = NSApp.windows.last else { return }
let position = CGPoint(
x: window.frame.maxX - 100,
y: window.frame.minY + 80
)
handler.menu.popUp(positioning: nil, at: position, in: nil)

How to make segmented control in SwiftUI for macOS

Issue #629

Use Picker with SegmentedPickerStyle.

1
2
3
4
5
6
7
8
9
10
11
12
Picker(selection: $preferenceManager.preference.display, label: EmptyView()) {
Image("grid")
.resizable()
.padding()
.tag(0)
Image("list")
.resizable()
.tag(1)
}.pickerStyle(SegmentedPickerStyle())
.frame(width: 50)
.padding(.leading, 16)
.padding(.trailing, 24)

Alternatively, we can make custom NSSegmentedControl

1
2
3
4
5
6
7
8
9
10
11
12
13
14
15
16
17
18
19
20
21
22
23
24
25
26
27
28
29
30
31
32
33
34
35
36
37
import AppKit
import SwiftUI

struct MySegmentControl: NSViewRepresentable {
func makeCoordinator() -> MySegmentControl.Coordinator {
Coordinator(parent: self)
}

func makeNSView(context: NSViewRepresentableContext<MySegmentControl>) -> NSSegmentedControl {
let control = NSSegmentedControl(
images: [
NSImage(named: NSImage.Name("grid"))!,
NSImage(named: NSImage.Name("list"))!
],
trackingMode: .selectOne,
target: context.coordinator,
action: #selector(Coordinator.onChange(_:))
)
return control
}

func updateNSView(_ nsView: NSSegmentedControl, context: NSViewRepresentableContext<MySegmentControl>) {

}

class Coordinator {
let parent: MySegmentControl
init(parent: MySegmentControl) {
self.parent = parent
}

@objc
func onChange(_ control: NSSegmentedControl) {

}
}
}

How to trigger onAppear in SwiftUI for macOS

Issue #626

SwiftUI does not trigger onAppear and onDisappear like we expect. We can use NSView to trigger

1
2
3
4
5
6
7
8
9
10
11
12
13
14
15
16
17
18
19
20
21
22
23
24
25
26
27
28
import SwiftUI

struct AppearAware: NSViewRepresentable {
var onAppear: () -> Void

func makeNSView(context: NSViewRepresentableContext<AppearAware>) -> AwareView {
let view = AwareView()
view.onAppear = onAppear
return view
}

func updateNSView(_ nsView: AwareView, context: NSViewRepresentableContext<AppearAware>) {

}
}

final class AwareView: NSView {
private var trigged: Bool = false
var onAppear: () -> Void = {}

override func viewDidMoveToSuperview() {
super.viewDidMoveToSuperview()

guard !trigged else { return }
trigged = true
onAppear()
}
}

Then we can use it as an hidden view, like in a ZStack

1
2
3
4
5
6
7
8
ZStack {
AppearAware(onAppear: {
LocalImageCache.shared.load(url: url) { image in
self.image = image
}
})
Image(image)
}

How to force refresh in ForEach in SwiftUI for macOS

Issue #625

For some strange reasons, content inside ForEach does not update with changes in Core Data NSManagedObject. The workaround is to introduce salt, like UUID just to make state change

1
2
3
4
5
6
7
8
9
10
struct NoteRow: View {
let note: Note
let id: UUID
}

List {
ForEach(notes) { note in
NoteRow(note: note, id: UUID())
}
}

Updated at 2020-11-20 03:29:39